


dikman
-
Posts
4,828 -
Joined
-
Last visited
Content Type
Profiles
Forums
Events
Blogs
Gallery
Store
Everything posted by dikman
-
No worries mate, its just an idea at the moment.
-
About 1/8", the top loop has to be at right angles to the bottom loop, the bonus of making a replacement is that I could make it fractionally shorter which would give a little more lift. Something to ponder.
-
My Pfaff 335 has a manual tension disc release and that's exactly what I get if I forget to release the lever and run it with no upper thread tension.
-
Only good thing about the heat is my tomatoes and cucumbers are finally starting to grow!! I've been thinking about that wire link and I'm wondering if it will be possible to make a replacement out of steel stock. I'll have to see how much room there is.
-
In that case I think you've just answered your own question. The 26 will fit up to 5/8" under the feet and will need minimal adjusting between thick and thin stuff. At least, that's how I see it. Doubtless you will get more thoughts in a few hours, as due to time differences many of your compatriots will be on later.
-
Probably could have hammered the stitches down on the back - but I'm just being picky. That looks real nice, simple clean lines, neat stitching and the colour and finish is very pleasing (to my eyes, anyway).
-
Yeah, not looking good temp. wise. I hate summer!!! If it wasn't for having family here we would have moved to Tassie years ago. Anti-histamines, got them but not doing much good today, so I'm just sitting around with a laptop. I've got some cartridges to reload but it's too hot in the shed for that or sewing.
-
What size thread do you want to use? The 26 sounds like the best fit for your needs but will probably be limited to #138 thread. If you want thicker thread then the class 4 is the obvious choice but may (probably will be) a problem if you want to make lighter items. As Wiz has mentioned these big machines can be "dumbed down" for lighter items/thread but it isn't an ideal solution (or probably practical for most people).
-
Mine has about 3/4" (20mm) of lift with the foot pedal, but there is still another 1/4" (5mm) left before the presser foot bar is at it's max. lift. Looking at the design it wouldn't be hard to get that full lift , by making a replacement crank. I just checked the Juki parts list and interestingly the Juki crank is flat, it doesn't have the offset that the Cowboy machine has. Maybe when I'm looking for something to do one day.......... In the meantime I explained the issue to Jess (Hi Jess ) and suggested she check it on any machines she unpacks, just in case. She said will order a replacement part for me, so all is good. Now if I can just get rid of this bloody hay fever!!!!!!
-
Will, thanks for taking the time to post this info. After my efforts at trying to do the same thing here (Australia), and discovering there was nothing to be gained I was curious whether it would be the same situation in the US. It appears that it is.
-
I've wondered the same thing, JLS. If it's something that is going to be bent/folded/handled a lot how long will it keep its looks?
-
Excellent service. Without having the actual unit to play with I would never have guessed the bearing, going by the fault description.Most peculiar.
-
Interesting idea about the opening wedge Brian, something to keep in mind. RS, I didn't have an issue with binding when using the hand lifter because the travel is less than with the chain lifter. It only became a problem past the range of the hand lifter. I should mention that historically whenever I buy something if there's a faulty unit in a batch I always seem to get it!! It's called Murphy's Law, and I sometimes wonder if my middle name should have been Murphy. If someone assembled mine wrong then there's every chance that they've done the same thing to other machines, I would think.
-
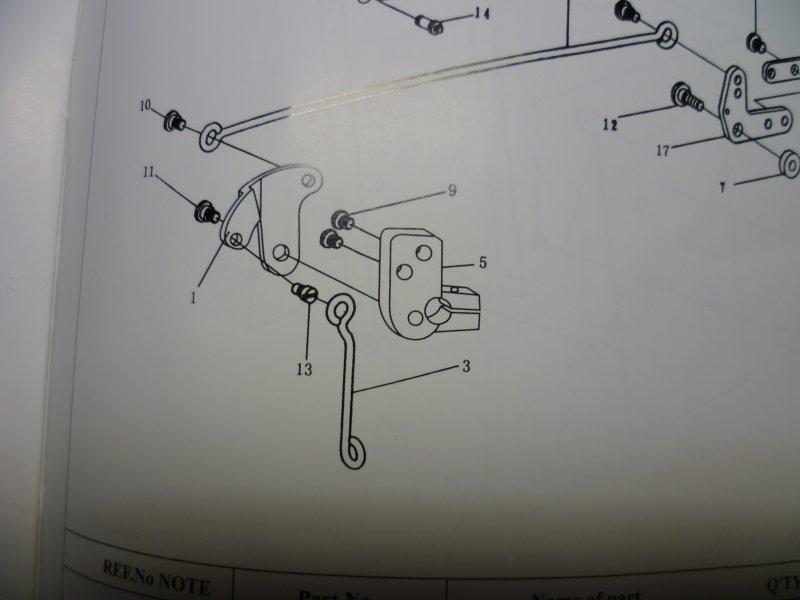
Thanks Brian, the first photo shows the correct assembly. In the middle the plate with the stud sticking out to the left and on the inside is the wire loop over the screw head. The loop on mine was on the left of the plate, over the stud, which is used to push up the lever to open the tension discs. How mine still worked to open the discs is a miracle, given how short that stud is! I haven't been able to find any information regarding how this part of the mechanism works (and possible problems), there just seems to be an automatic assumption that it will never cause a problem! RS, I figure they used an impact driver to do up the screws on mine!!!!!
-
I was thinking the same thing. The RB1 would be a "1st generation" model and while it would be nice at only $200 cheaper than new it's over-priced, imo. I'd go for new at that price - unless you can knock down the price on the RB1. To use a well known Aussie phrase, at $1300 "tell him he's dreaming"!
-
-
Best walking foot sewing machine for thread size 138
dikman replied to siddiqui2008's topic in Leather Sewing Machines
There's much ingenuity on this site. -
The part in question is #3. It's obvious (now) that the top loop fits over the head of screw #13, but this screw actually protrudes through part #1 and the protruding part isn't threaded, so it looks like something fits over it. On my machine the loop on part #3 was over this stud, on the other side of #1, which looked right.
-
jack Jack 513A engine problem...
dikman replied to FREDERIKDIAMOND's topic in Leather Sewing Machines
E5 indicates an error with the Hall sensor, how did you clear the error? Have you tried resetting to factory defaults? -
As long as it's sewing ok then I reckon you got a good deal at that price.
-
Yep, I probably would have been on my own and had to make a new shaped piece of wire! I'll definitely be fine-tuning it once I get things sorted out.
-
OK, I've found the problem, the lifting bar was fitted incorrectly (I'll post a photo from the manual later so this thread might make a bit more sense). When I had a closer look at it there also appears to be a crack in it, so while it's working I don't know how long it will last. I'll give Jess a call on Monday and let her know what happened and see if they can get me a replacement (it's only a bit of bent wire!). As this is the first time I've had anything to do with one of these machines it wasn't obvious at first and the manual only helped once I realised what was probably wrong. Anyhow, now I can get about 20mm using the foot pedal and if I force the foot up further by hand it will reach 25mm (1"). So it's working as it should. Yes, it would have been nice if it had been checked first but as I said Jess gave me a very good deal so I'm not pushing the issue. Plus, Cowboy machines have a very good reputation for quality and they probably didn't expect anything to be wrong. As Brian said they are new to this and doubtless it's a steep learning curve for them, so I'm prepared to cut them some slack. It's a great machine and this little exercise has let me learn quite a bit about how it works.
-
I understand what you're saying, and under different conditions I would do that (I've done it before!). She gave me what I consider a very good price and overall I'm happy enough with the machine. To send it back would be a major undertaking anyway. When I set it up it sewed fine straight out of the box and it was only when I decided to start pushing it that I discovered the problem. After studying its operation I consider it less complex than my Seiko and fairly easy to work on. If I can't fix it easily then I'll simply tell them it's faulty and take it from there (fixing it is far preferable than the stuffing around that will occur otherwise).
-
Thanks Wiz. Because I bought a head only I doubt it was checked by the dealer, just re-shipped still in its carton. If I had bought a complete setup, including table and motor, I've no doubt it would have been assembled and tested. No big deal as I like to find out how things work so that I can maintain them. There's just not a lot of information out there (as in none) on this particular aspect of adjustment. I'm quite confidant that once I put a slight bend in the lifting wire it will work as it should. I did manage to jam 3/4" of leather under the feet and it went through like it wasn't there. I reckon they must have used an impact driver to do up the screws as every one I've had to remove has been bloody TIGHT!
-
I can push down on the linkage at the back of the machine, so not using the chain/pedal, with the same results. I've been looking at the parts manual (for what it's worth) and I'll go down and have another look. It's a bit hard to see without removing some of the parts, fortunately this appears to be a fairly simple machine mechanically. 40 mins later: I may have found it, if not it's still something that's not right. I removed all the linkages to the pedal lifter which left a bell crank at the back, next to where the top tension assembly sits. This has a thick wire connecting link that goes down inside to a sliding block on the presser shaft (my manual calls it a "presser bar lifting bar"). When the pedal is pressed it operates the bell crank which lifts this wire lifting bar, which in turn lifts the presser bar. Only problem is it only comes up so far and then it jams against the housing, stopping the sliding block from lifting the presser bar any higher. Tomorrow afternoon (I'm going shooting tomorrow) I'll bend an off-set into the wire, which should stop it jamming. Hopefully that's all the problem is.