dikman
-
Posts
4,829 -
Joined
-
Last visited
Content Type
Profiles
Forums
Events
Blogs
Gallery
Store
Everything posted by dikman
-
Wiz, the motor's not a problem. This will be replacing the Pfaff 335 on its table, already fitted with a servo and I have several speed reducers that I can fit (I've had a little experience at slowing down machines ). As for the edge guide, I'll probably make one to suit, I've already made one or two different types for my other machines. I'll ask them what it comes fitted with (I'm guessing the blanket foot).
-
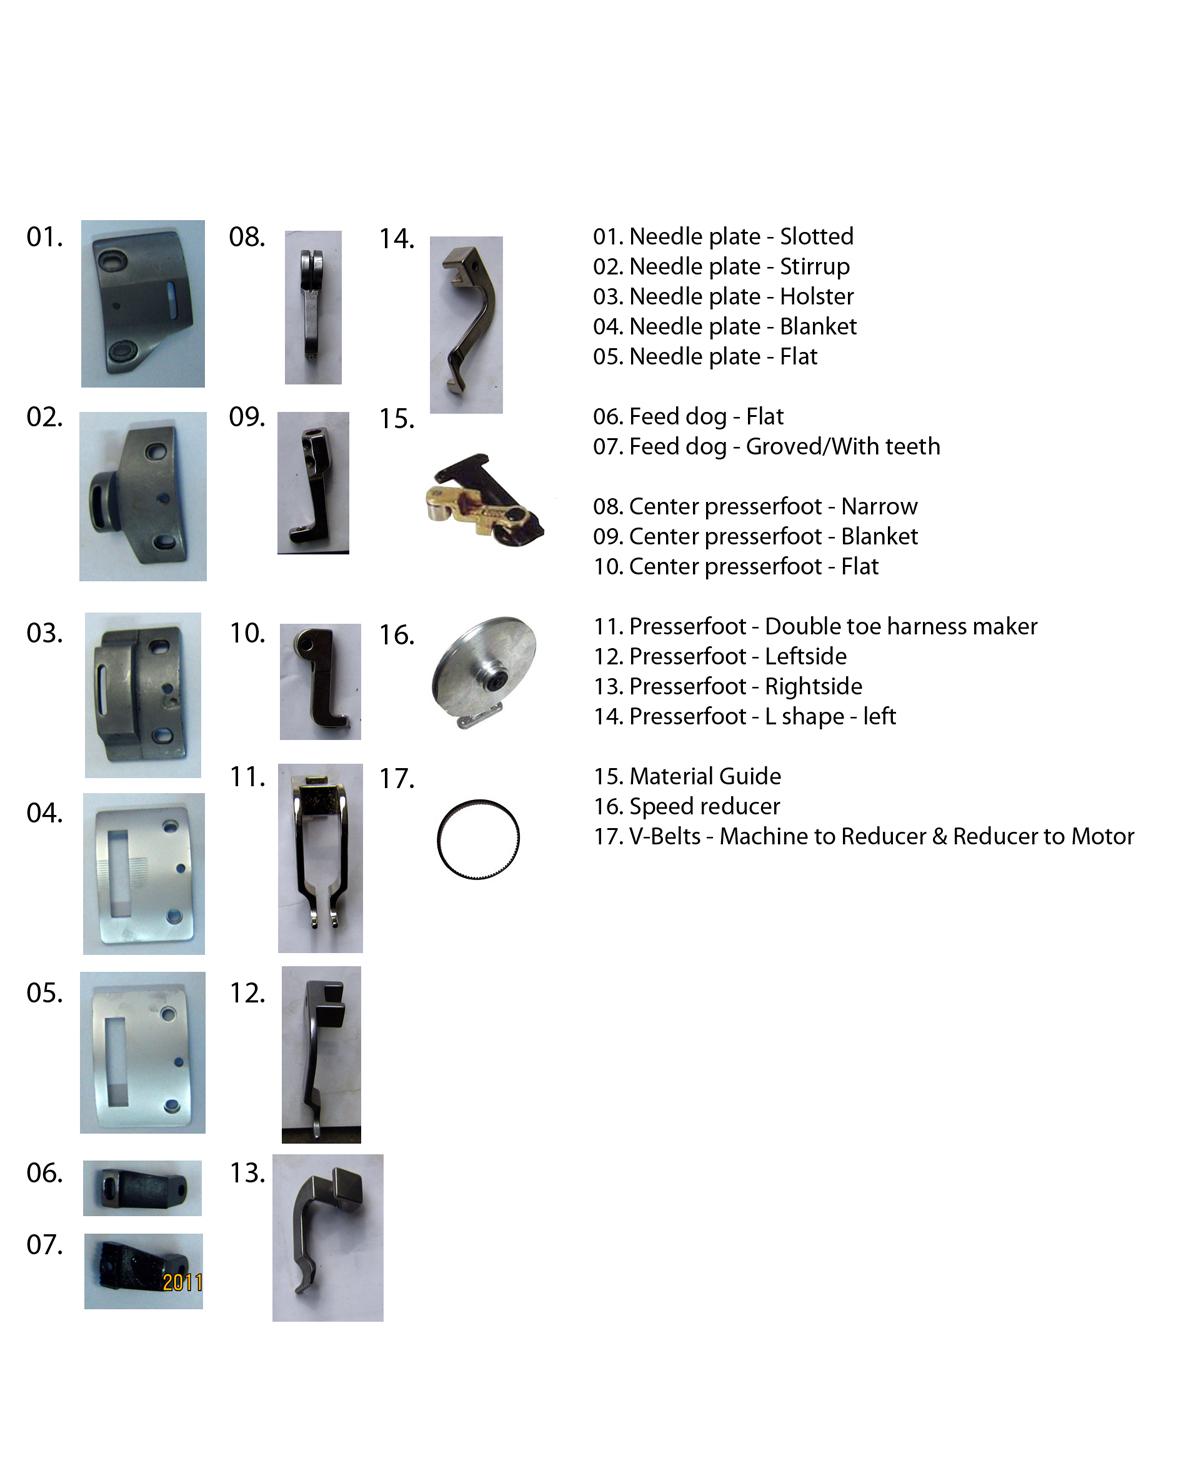
Assuming I get my 441, what type of feet, plates and feed dogs will I need to sew leather (holsters and belts)? Keestar have a selection available so buying from them makes sense as at least I know they will fit the machine. I sort of have some idea but figured it's better to rely on other's experience.
-
Yes, I just found out that they have assorted bits. I'll start another thread about it.
-
Thanks for your input, Glenn. I would love to buy the cheapest, just to see what it's like, but like most of us I have to try and get it right the first time. The little voice inside is saying Keestar, and I've ignored this voice in the past and got things wrong! I've always intended to go through whatever I get, to both check it out and to get familiar with it. I've managed to resurrect/adjust a few machines now so I don't consider it as a big deal. Now I'll need to find a source for extra feet, needles and thread (thread heavier than #138 is not that common here). More expense.
-
Good idea about the saw blades. I have a couple of cheap handsaws, I'll have to test the steel and see what it's like. Failing that I'll try and find a saw sharpening place.
-
My guess would be that the most they would do is turn over the machine by hand to make sure it at least moves before leaving the factory. If it's bought from the factory that assembles them then I guess there's a better chance that it will have at least been examined as the final stage. If it comes from a reseller, and apparently there are quite a few on alibaba, then the reseller wouldn't check it they would basically on-ship it as it came from the factory. Keestar, while a bit more expensive than some, sounds promising. They apparently manufacture a wide range of sewing machines and the woman I've swapped emails with said that if there is any problem with damaged parts they simply send them out. At least it's a name I've heard of. I've just emailed the customs broker to ask for a quote based on this machine, although the size/weight won't vary regardless of where I buy it from.
-
Finally got a price from Keestar, $1310. She suggested an Adler clone that they sell would be better - but at double the price I think not!! So far the cheapest price is $938.
-
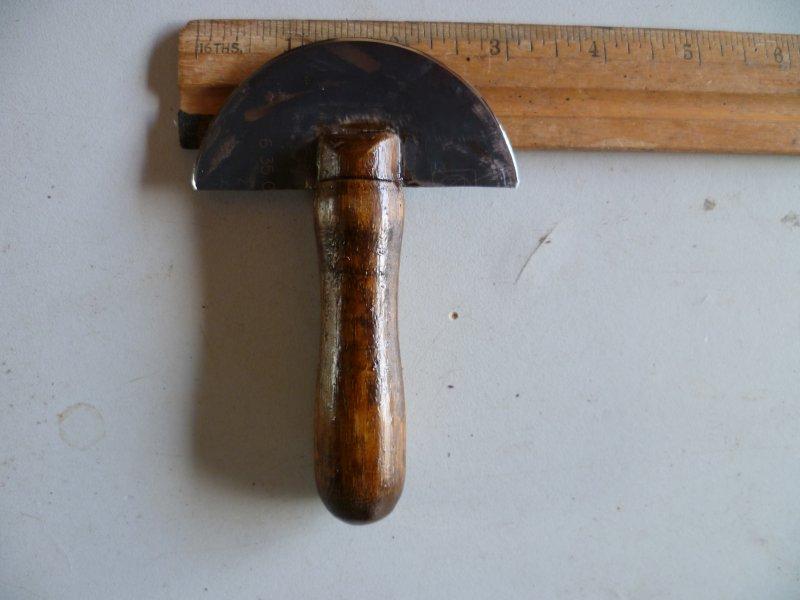
I made a mini head knife! I have a Fein multitool (great piece of gear) and the half-round bi-metal cutting blade broke where it fits on to the tool. I was looking at it and thought it was a nice piece of steel, very thin and hard. So I ground off the teeth and shaped it , then turned a small wooden handle, slit it and epoxied the blade in. Bit of varnish on the handle and then I sharpened it on my motorised paper wheel. It is SHARP! Great for skiving. Now I need to make a bigger one once I find a suitable piece of steel.
-
I've been trying to get a price out of Keestar, should be simple, just ask for FOB price like all the others. Nope, they want to know what I'm making, what type of leather I'm using and want my email address to send me literature. I told them I want a 441-type machine, what is so hard about giving me their FOB price?
-
tt, while I agree with your sentiments Bert is right. If the difference was $2-300 I'd buy local, but I'm looking at a minimum saving of $1000, and depending which one I buy could be up to $1400 by buying from China. I don't know about you but that's a significant amount of money to me.
-
Two more prices, $938 and $1269. The hard part is trying to make sure they are actual factories or simply resellers. This is becoming quite an experience . I definitely intend to buy a 441 as I've convinced myself I need it and I've just sold my 111W117 (to make room - well not really but it sounds good).
-
Interesting, Bob, never knew that. Could explain why some of the crates are made from the cheapest plywood they can find! Chris, it's a dilemma. The cheapest one has positive reviews and reading their company profile sound pretty good. The dearer ones have been on alibaba longer, but does that make them any better.
-
So far I have prices of $1600, $1579, $1400, $1392, and $1111 (Australian $). The last one is branded SKSEW. There are many more sellers on alibaba, with prices all over the place. These prices are for a 441 head unit only, FOB. I'm estimating shipping/customs at $500-$600 air freight.
-
Speed Reducer And Servo Motor?
dikman replied to buffalobill plus Ed D's topic in Leather Sewing Machines
Sorry mate, every handwheel I've seen has been permanently attached to the pulley! The shaft won't be long enough to attach another pulley as well as the handwheel. -
Speed Reducer And Servo Motor?
dikman replied to buffalobill plus Ed D's topic in Leather Sewing Machines
As toxo mentioned if you replace the handwheel with a larger pulley that, coupled with a smaller motor pulley, will give you the equivalent of fitting a speed reducer. And it's simpler. I've done it on several machines. -
Speed Reducer And Servo Motor?
dikman replied to buffalobill plus Ed D's topic in Leather Sewing Machines
Wellington, in round figures 550w is 3/4hp. -
What Bert said. I was told the fumigation is an expensive thing to have done, and I have no reason to doubt it. I've just heard back from a chap who sells the Typical brand machines and he can do a 441 head unit for $3,000. This would include a 12 month Australian warranty and he has someone here in Adelaide who does any warranty work so it doesn't have to be shipped anywhere by me. Something else to consider.
-
I've received a couple of quotes via alibaba but I'm still hoping more will come in. So far it looks to be under $2,000 for a complete unit and $1600 for the head only. I was advised to talk to a customs broker and get them to handle it at this end and one thing I was told is if there's any wood inside the crate, like a table, then it will be quarantined and will have a significant extra cost added on! If I bring in just the head it's not a problem, and as a bonus there's no customs duty on sewing machines, only GST.
-
tt, that would be the Australian retail price. Granted, our $ isn't as good as it could be for buying overseas but we have a history of being ripped off in this country. China is in our backyard geographically so shipping costs should be cheaper than sending to the US or UK. Unfortunately, for items like this it's a relatively small market so not much competition so they can charge what they like. There is an industrial sewing machine dealer here in Adelaide and his 441 equivalent is about $5,000!
-
Different leather becomes wrong tension?
dikman replied to unionattic's topic in Leather Sewing Machines
At 5 you've got it coming off the check spring, through the guide and up to the arm - try going from the check spring directly up to the arm then back down through the guide. -
Nice clean lines, simple and elegant.
-
I've used KungPeng and found them very good to deal with.
-
Went to the Adelaide Custom Knife Show today, and while talking to a couple of knifemakers there (I know many of them from previous shows) one mentioned that a vendor there imports leather sewing machines, among their many other products. So off I trot to have a word with him and yes, they sell Cowboy machines. He said to call their head office tomorrow and talk to Bob, who handles the leather side of things. I left feeling optimistic. When I got home I thought I'd check their website and the only machine they list is the CB3200, which is fine, unfortunately the price of $3700 is not so fine! Nor is $2900 for a hand crank head-only. Looks like I'm back to figuring out the practicalities of importing a 441 clone (probably head only).
-
New patterning techniques + advantages
dikman replied to RockyAussie's topic in Patterns and Templates
PLA is surprisingly tough. It's when you have file/cut pieces that you realise just how tough. Pretty simple - and cheap - when you need to make replacement pattern pieces. -
Well, the figures I got, in $AU, came out at close to new price for a Cowboy 441 bought here - and that doesn't include the 10% GST and who knows what other little charges the government could find to apply! I think you may be right about the 3200 as it doesn't show up much when I started searching various factories' websites. Unlike the 441, which is pretty common. It was just a thought that I had, which I will now consign to the wastebasket. If I do anything at all it will be a 441 clone.