


dikman
-
Posts
4,859 -
Joined
-
Last visited
Content Type
Profiles
Forums
Events
Blogs
Gallery
Store
Everything posted by dikman
-
As long as it's sewing ok then I reckon you got a good deal at that price.
-
Yep, I probably would have been on my own and had to make a new shaped piece of wire! I'll definitely be fine-tuning it once I get things sorted out.
-
OK, I've found the problem, the lifting bar was fitted incorrectly (I'll post a photo from the manual later so this thread might make a bit more sense). When I had a closer look at it there also appears to be a crack in it, so while it's working I don't know how long it will last. I'll give Jess a call on Monday and let her know what happened and see if they can get me a replacement (it's only a bit of bent wire!). As this is the first time I've had anything to do with one of these machines it wasn't obvious at first and the manual only helped once I realised what was probably wrong. Anyhow, now I can get about 20mm using the foot pedal and if I force the foot up further by hand it will reach 25mm (1"). So it's working as it should. Yes, it would have been nice if it had been checked first but as I said Jess gave me a very good deal so I'm not pushing the issue. Plus, Cowboy machines have a very good reputation for quality and they probably didn't expect anything to be wrong. As Brian said they are new to this and doubtless it's a steep learning curve for them, so I'm prepared to cut them some slack. It's a great machine and this little exercise has let me learn quite a bit about how it works.
-
I understand what you're saying, and under different conditions I would do that (I've done it before!). She gave me what I consider a very good price and overall I'm happy enough with the machine. To send it back would be a major undertaking anyway. When I set it up it sewed fine straight out of the box and it was only when I decided to start pushing it that I discovered the problem. After studying its operation I consider it less complex than my Seiko and fairly easy to work on. If I can't fix it easily then I'll simply tell them it's faulty and take it from there (fixing it is far preferable than the stuffing around that will occur otherwise).
-
Thanks Wiz. Because I bought a head only I doubt it was checked by the dealer, just re-shipped still in its carton. If I had bought a complete setup, including table and motor, I've no doubt it would have been assembled and tested. No big deal as I like to find out how things work so that I can maintain them. There's just not a lot of information out there (as in none) on this particular aspect of adjustment. I'm quite confidant that once I put a slight bend in the lifting wire it will work as it should. I did manage to jam 3/4" of leather under the feet and it went through like it wasn't there. I reckon they must have used an impact driver to do up the screws as every one I've had to remove has been bloody TIGHT!
-
I can push down on the linkage at the back of the machine, so not using the chain/pedal, with the same results. I've been looking at the parts manual (for what it's worth) and I'll go down and have another look. It's a bit hard to see without removing some of the parts, fortunately this appears to be a fairly simple machine mechanically. 40 mins later: I may have found it, if not it's still something that's not right. I removed all the linkages to the pedal lifter which left a bell crank at the back, next to where the top tension assembly sits. This has a thick wire connecting link that goes down inside to a sliding block on the presser shaft (my manual calls it a "presser bar lifting bar"). When the pedal is pressed it operates the bell crank which lifts this wire lifting bar, which in turn lifts the presser bar. Only problem is it only comes up so far and then it jams against the housing, stopping the sliding block from lifting the presser bar any higher. Tomorrow afternoon (I'm going shooting tomorrow) I'll bend an off-set into the wire, which should stop it jamming. Hopefully that's all the problem is.
-
I've just realised that the clearance under the feet isn't to specs and I'm a bit perplexed. When the foot pedal is pushed down hard the maximum lift I'm getting is 5/8". I've studied the mechanics involved and can't see where the linkages have any adjustments. I removed the pressure adjustment screw to release pressure on the outer foot and when the pedal lifts to its max I can still push the feet up so the travel is there but it's not lifting. I'm still searching for info. Before I start pulling things apart does anyone have any ideas?
-
2 - 3.5 metres?
-
What Weight Leather Will This Sew?
dikman replied to Sheilajeanne's topic in Leather Sewing Machines
He/she who hesitates is lost........done the same thing myself. -
They moved about a year or so ago, as for a mechanic I've no idea as I've only ever bought needles and bobbins from them.
-
What Weight Leather Will This Sew?
dikman replied to Sheilajeanne's topic in Leather Sewing Machines
As long as it's in working condition then grab it! If you don't want it I'm sure someone here will give you $110 for it. Instant profit. -
I always wondered what the Dillon numbers referred to, now I know. Thanks. As for the 4500, I have no use for it yet. Once I understood about leather sewing machines I just knew that one day I had to get a big sucker (I had already pushed my other machines to their limits) and had discovered the problems of working with thick leather. I'm going through the experimenting/learning stage with it, and as I suspected I had threaded it differently (around the lower tension assembly) to the two methods shown on youtube - but it still worked fine, which just shows there is some latitude in how they're threaded. Did I mention it sews real nice? I am still undecided on the style of (western) holster that I need to make, which is what I had in mind when I bought it, but no hurry there.
-
I'd say belt.The chain has nothing to do with the motor, you can see the motor/pedal linkage down on the left. Re-adjust the motor mount to give a bit of slack between the motor and the reducer. Bearings don't usually squeak when they're starting to fail, they tend to make more horrible grunching/grating/rumbling noises. Make sure everything is aligned and running true - and not drum-tight.
-
Does it have reverse? I can't see a reverse lever, and I would think that you could disable/remove the thread cutter anyway.
-
I don't see how a laser printer/cutter could accept/use .stl files. These files contain data for a 3-dimensional object, whereas printer/cutters work in 2 dimensions (ok, I know you can set depth but it's only a fraction of the Z height in most 3-dimensional .stl files).
-
I bought bobbins for some of my machines from Elizabeth Sewing Machines on Richmond Rd, Adelaide. They specialise in industrial machines and generally have a good range of needles and bobbins. If you take in what you've got if they haven't got it/can't get it they might be able to match it up with what they do have. I've found them to be very helpful.
-
The funny thing is the blanket feet had been removed and were in a plastic bag, along with a spring (looks like a tension spring for the outer foot pressure adjustment), the plate and a little nut. It came with a narrow foot and double toe presser foot fitted. I'm beginning to think it has nothing to do with the machine. No matter, I ran a few stitches down an old belt doubled over and it sewed beautifully, and reverse went back into the same holes. And I don't think I've even got it threaded right! Now I need to get some decent thread (the stuff I used is Barbour's but is an indeterminate age and, I think, all cotton). I have 23 needles, size 25 LP but want to get some round point too, only problem is the shop I rang only has them in size 24 and 26 (no 25). I figure 24 should be ok? This is exciting, maybe I'll try sewing some plywood!!
-
Sort of funny. It's definitely not in the parts listing in the "manual" so I'll check the Juki parts listing, but it's no big deal as it works fine without it. Checked it all over, it's oiled and clean so I lubed every moving part that I could find anyway. Runs great, now to wind a bobbin and sew......something. kgg, I bought a 650, I heard that they were being replaced with a 750 and managed to find one set up for .38. I was lucky as Australia doesn't carry big stocks. Did a few mods (adapted Lee 4-tube case and boolit feeders to work with it, made a primer loader for the primer tubes etc). It works great, much more consistent than the Lee Loadmaster it replaced.
-
Pfaff 335, Adler 69 type Cylinder arm caps.
dikman replied to RockyAussie's topic in 3D Printers and Lasers
I agree constabulary. Every time I start trying to learn how to use a design programme I get distracted onto something else. -
Chris, no sew-off. Thinking about the "binding" it could just be that I've never had a machine that can exert such pressure on the material so I may be over-thinking things. NylonRigging, based on your description I'll have a closer look at the manual (and machine). Sort of makes sense? On the other hand Brian could be right but because I only bought a head I have no way of confirming it. As for Christmas - I already have my (early) Christmas present as I bought a Dillon reloading press a little while ago , but yes, I guess Santa has been pretty good to me. And my wife reminded me that with all the machines I've bought (and sold) this is my first NEW machine.
-
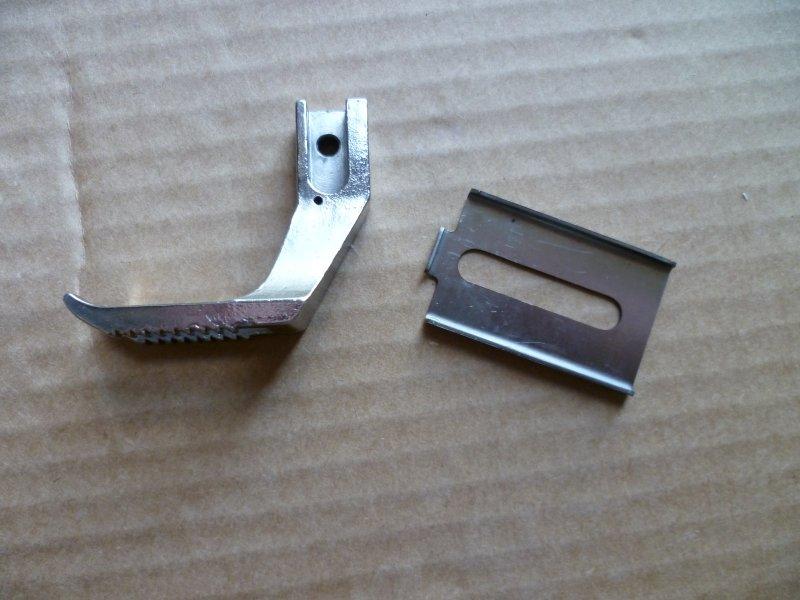
The good news, got a call this morning from the transport company that my 4500 was ready for pickup. The bad news, because it was on a (small) pallet they have to use a forklift and will only load it on a ute (pickup to you Yanks), truck, trailer or van, none of which I had. After some head scratching I remembered a mate had a ute, which I borrowed. Now, I would call this a "farm ute" because it looks like it's spent all its life bush bashing on a farm! It's also been a long time since I've driven a manual gearbox, no power brakes and no power steering. To say the steering was heavy is an understatement and it had the turning circle of a big truck!!! It did the job and I managed to get it unloaded and down into my shed. I was wondering how I would get it onto the table but once I unpacked it and discovered some of the weight was the (heavy) flywheel I found I could just lift it onto the table! It's a beast!! Tomorrow I will fix it to the table and connect the motor but in the meantime I turned it by hand and found it had a tight spot, which I'm pretty sure is the inner foot pressing too hard on the feed dog. Also, being a Cowboy it came with additional feet and in the bag with the blanket feet was a slotted bracket and I have no idea what it's for. It doesn't show up in the manual. Speaking of which, it's a pretty poor manual. If someone bought one of these, didn't have much experience and had to rely on the manual they would be in trouble. Threading has been discussed here recently and the manual is badly lacking in detail compared to what's been said here. Fortunately, because of this site the poor manual doesn't matter. Photo of the bracket, just curious what it's for.
-
Pfaff 335, Adler 69 type Cylinder arm caps.
dikman replied to RockyAussie's topic in 3D Printers and Lasers
Err Jimi, that appears to be a link to your C drive? -
Sounds like a good "buy". It shouldn't be too hard to work on one of these (unless you're a complete mechanical numpty) and I would think any manuals covering models from the 31 series in general should help. As for the needles, if you can't (easily) find the correct size then just find the closest common modern needles and adjust the needle bar to use them.
-
Well done guys, waste not want not, as they say.
-
This is quite bizarre. Consew don't list a CSM3000 on their website when I searched for manuals. I found references, via google, to the 3000 being an upgrade to the 1000 but only showing it as a 2-button unit. I found one post from someone who bought one but didn't get a manual with it and had to contact Consew for it. All very strange. Did you get a manual with yours?