rickybobby
-
Posts
722 -
Joined
-
Last visited
Content Type
Profiles
Forums
Events
Blogs
Gallery
Store
Everything posted by rickybobby
-

Another Business Card Wallet
rickybobby replied to RobDude30's topic in Purses, Wallets, Belts and Miscellaneous Pocket Items
Nice job. Your stitching is excellent. I like the "G" and the stitch for it. Nice piece of work, you should be proud! Rick -
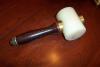
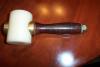
Hi Ferg, You got me!! Maul, Mallet. Big heavy thing to bust your knuckles on!! I was not sure what to call it!! I used it for larger hole punches and leather Rosette punches. I found I do not care for the plastic head on this heavy of a maul/mallet I really prefer a rawhide surface. I seem to get a better "dead blow" and it does not slip off during the strike. Rick
-
Hi J. Nice job! Floral pattern, leaves & stems all looks good. This is not the critique section but you asked, you should work on backgrounding a little smoother, it looks choppy, not sure why, maybe it was to wet? Also you might try rebeveling around the border after all tooling is done, it seems to clean up things for me and reestablishes the edge border/tooling. These are a couple things I would try. If they work for you great, it looks good and most people would be happy. I always try to improve every project I do and sometimes it can make me crazy! Thats why we pound on leather!!! Great job!! Rick
-
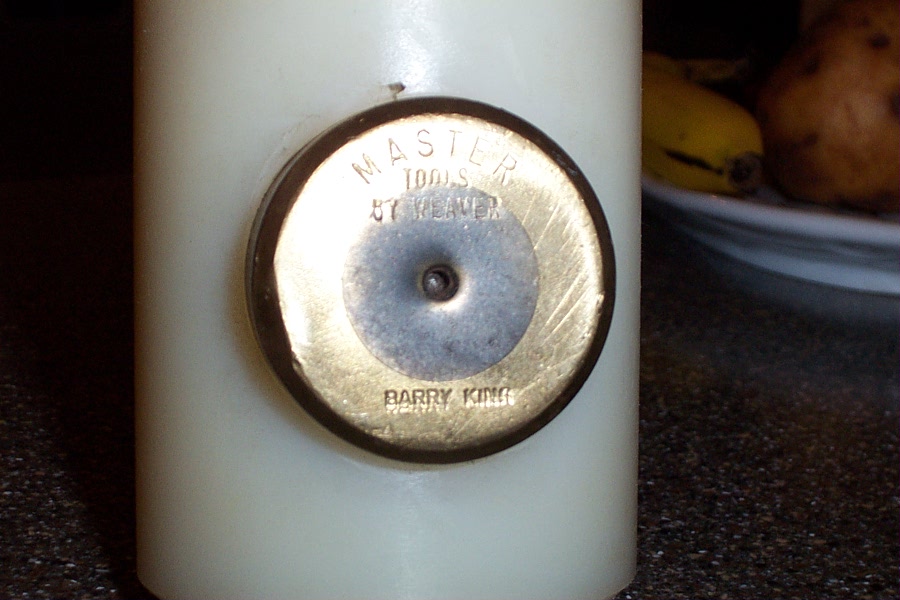
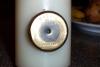
Hi All!! I have a 4 lb. Barry King maul for sale on Ebay. It is over sunday 1-16-11 Item # 250755094559 Thanks for looking, Rick
-
Tandy Cell Phone Case
rickybobby replied to treadhead1952's topic in Purses, Wallets, Belts and Miscellaneous Pocket Items
Hey Jay! It looks like you are on the road to being hooked on leather work. Just leave all your extra money at Tandy's and stock up on tools and stuff!!! Good start on the cell phone case, to be careful about copying Tandys stuff is a good idea. We have all done it to trade or get an old pattern not available any longer but don't put it in a post, for a small item like a cell phone case ($9.00) the other party should buy it and make as many cases that they want to build their skills. Good job on the case and keep posting your stuff. For additional critique, post it in the "Critique my work" section. You will get a lot more information then you may want:excuseme: . We will be looking for more projects from you !!! Rick J. -
S. Machine Allbook & Hashfield Success
rickybobby replied to Razz's topic in Leather Sewing Machines
Buy it!!! Buy it!!!! Buy it !!!!! Or tell me how I can!!! This is a special type "long arm" type machine also known as a "patcher". Used by shoe/boot makers and repair it can reach into places that other sewing machines cannot because of the thin long arm and 360 degree sewing ability (can sew in a circle) that other machines cannot do. It is also good for sewing patches on jackets, zippers in jackets, purses ect. there are 100's of uses. We use our everyday in our shop. It does not sew real heavy leather and is difficult to sew a straight line with out a lot of practice. You will also need other machines for projects but if you are doing alot of other repairs/projects this machine will be handy. Good luck, don't let it get away but do check with some of the sewing machine pro's here (LW.net) and make sure the needles are available! Rick -
Ray, You absolutely did the right thing. The anger carried after dealing with someone like that can affect other business decisions made in other areas of your shop. The couple times I have done this type of “discount” work always sets me behind mentally and you never see any work (money making kind) from them. I have sent a couple people on their way if they were not 100% on board with the price of the work. I no longer even give them a chance to reconsider or make an offer. This type of customer will never be 100% happy (they will always think they could have it cheaper) and will not send other, profitable work to you no matter how good of a job you do. Then their friends will show up and know you give “good deals”. You never get a chance to make any money with this type of customer. When I was in the automotive body shop business years ago, an older bodyman once told me, “I can starve to death sitting on my butt, why should I starve to death working for that guy” A craftsman earns a living working with their hands, if this work they want done so bad is so easy… LET THEM DO IT!!! We slit our own throat when we work cheap; I stopped doing it and have never looked back. Best of luck Ray, you always bring great ideas and knowledge to us here on LW and we all appreciate it, Rick
-
Joel, The couple I have done are like horn caps with a little larger and longer screw in them (I think about 1 1/4'' long). I planned the layout in advance and tooled a "frame" border around it. Sorry, no pic.s There may be other ways of attachment but I have not seen them. Rick
-
Boothill Bob, It sounds like you may not of been using a heavy solid surface to stamp on, it is a very important step to do all your stamping/tooling on a solid surface like a marble or granite slab. Also consider a Maul or Mallet of the proper weight for the stamp/tool you are using. A lead hammer will damage most stamps. A heavy 3 lb. maul with you maker stamp on a slab of 4 inch marble on a solid surface should not rattle your walls. Those stamp you bought will need a 16 to 24 oz. maul or mallet with the proper tooling surface (like marble or granite). Also make sure you have the proper moisture content of the leather for good tooling impressions. If you are already doing all of this great. I just wanted to point out a couple of options for you before you cut up those stamps you bought from Mr. Ghormley.
-
Personal Organizer
rickybobby replied to hidepounder's topic in Purses, Wallets, Belts and Miscellaneous Pocket Items
Bobby, Beautiful job, as always! Your work is incredible, it is the best. Thanks for posting. Rick -
How Do I Shrink A Pair Of Leather Gloves?
rickybobby replied to MedusaOblongata's topic in How Do I Do That?
Getting the leather wet and letting them dry should do it. There will be no way to control the shrinkage. A second attempt may be what we do with shrinking/stretching boots, mix 50% rubbing alcohol and 50% water in a spray bottle, add 2 drops of liquid dish soap. Spray the gloves inside and out and wear them until they are dry. You could also try this after letting them shrink on their own by wetting and letting them dry without wearing. Hope this may help. Rick -
Try Bowden Saddle trees co. They sell a kit. http://saddletree.com/catalog.html Rick
-
Tom, Home Depot sells a rotary cutter that Kowboyboots here on LW used and she said it worked great for her. I think it is made by Ryobi. Rick
-
I looked up the smartflix site and the Bianchi vids are there, check again, it looks like $22.95 mo. not bad for all of the leather vids they have. Search "Leather" on smartflix. Also check Tandy Leather, they have a Buscadero Belt / Holster book written by Al Stohlman Rick
-
Hi, Check out John Bianchi's "cowboy western gun holster making" Use google to find it. It is a very good tool to get started building those types of holster/belt rigs. There are a lot of tips for making just holsters that can be applied to any style gun. Rick J.
-
Fredo, I ran this up the leather flag pole a couple years ago. http://leatherworker.net/entry112806 At that point I was doing leatherwork as "part hobby, part make some money" and thought this would make the pain of blue gun expense less. Some of the "holster pro's" had some very good feedback and pointed out flaws that could occur in the system. I now am doing leather work for a living and see the flaws much clearer. #1. Someone else has the one I need right now, they are not available to send it back because (insert excuse here) #2. Cost of shipping. At 8 to 10 dollars each way ($16.00 / $20.00 total cost) you are well on your way to buying it. #3. Would you loan your major tool for earning a living to someone else (and mail it to them? and expect it back the day you need it?). As stated many times here by Ray (Lobo Gunleather) the blue guns pay for themselves. When I buy a Blue Gun I make several holsters right away. I have those for sale and when you post those for sale or tell people you have them RIGHT NOW for them they sell really fast, paying for your blue gun and the materials, now you have the funds for another blue gun, start the process all over again. I have done this ( I buy a couple at a time ) and start making holsters to pay for them. I know this is hard to do as a hobbyist but I remember how hard it was to buy a "whole side of leather" for the first time, now I cannot buy the amount of sides I need all at once! The leather items you make should at least pay for the materials and tools you need to grow. Any time you involve a community of folks to share something (like the blue guns) you have to expect slow delivery times, damage to the guns, and stress for no return in $$$$. I think a couple of people that live in the same town/area may be able to share a tool like this but for me, after a lot of studying of this as a business or even a nonprofit service (just pay for itself) for a group it does not make sense. Building your tools for this hobby/business is an expensive onetime outlay of money, but when done systematically it eases the costs and your collection will build quickly. Every tool you buy should make you money as your talents expand. I hope this helps, Rick J.
-
Hi All, Boot and Saddle Repair shop in Phoenix AZ. We are known for quality work and need someone capable of this level. Other skills we are looking for are, fabrication and fine sewing. Contact Butch Perez at, Arizona Boot and Saddle Repair 623 580-7272 or 602 882-8705 www.AZBootandSaddleRepair.com
-
Floral Belt
rickybobby replied to Tkleather1's topic in Purses, Wallets, Belts and Miscellaneous Pocket Items
Nice job Tim, I like the pattern, nice simple floral and leaf, it is always a very good "look". I also like the back "natural" with no color. I have done a couple belts like that and customers always like it. I am going to try my hand at "finger carving" the inside. It ads a professional touch and is quite different then a "off the shelf" belt. Thanks for posting it, Rick J. -
Dave, The new website looks great! The items you have posted are a good base for inventory and production. Nice job and would love to know if the website captures any new customers. Rick
-
My Fisrt Ranger Belt
rickybobby replied to boma's topic in Purses, Wallets, Belts and Miscellaneous Pocket Items
Beautiful job! I like the 2 tone effect on the inside edge. The tooling is excellent!! The process of laying out the ranger belt has been difficult. for me. I have to lay all of the hardware out, cut the belt out then layout the billets to make sure I have room for buckle, keeper, and the tip. Great job, Rick -
50/50 mix of water and rubbing alcohol with a couple drops of dish soap (just 2 or three for a mixed quart of liquid) Put this in a spray bottle. Spray inside of boots/shoes and the out side. Wet the area most needed of stretch the most and then give the whole outer leather a light spray, this keeps the leather from staining. Put your stretcher in and crank it hard. Watch the leather arounf the welt area to make sure you are not tearing anything up. Set it aside for 12 to 14 hours then take the stretcher out and try them on. Repeat if needed. You can also repeat the whole spray the inside and out side and put the boots/shoes on and wear them until they are dry. Some people swear this give the best custom fit of an "off the rack" footwear. some stretchers that are available online... http://www.amazon.com/FootSmart-FitRight-Two-Way-Shoe-Stretcher/dp/B000KPMBWU http://www.shoebuy.com/shoekeeper-5742-professional-shoe-stretch-kit/173823/394418?cm_mmc=googleproductads-_-none-_-none-_-none http://www.shopwiki.com/Shoe+Stretcher
-
Shoe Repair Question: Sanding Down Heels
rickybobby replied to beachape's topic in Leatherwork Conversation
You have some additional sanding to go. Paul and Randy are right on the money. You are on the right track with cutting the excess rubber off (do not over cut) try to find a table top belt sander so you can clean up the edges. In our shop after trimming with a knife we go with 100 grit and/or 120 grit. You also need the speed of the power sander to smooth it down. Your dremel will tear that heel side up, with that small of grinding edge you will not get it very smooth, you need a larger sanding surface. Hope this helps, Rick -
Pairs #4 For These Folks
rickybobby replied to Leatherimages's topic in Shoes, Boots, Sandals and Moccassins
Paul, Nice job on the boots. The finish and proportions are beautiful. Your enjoyment shows in your work. Thanks for posting them, they are really nice! Rick p.s. Thanks for the tips on wood pegs! A little water base glue on the end works great! R.J. -
What To Treat Sole Wood Pegs With?
rickybobby replied to rickybobby's topic in Shoes, Boots, Sandals and Moccassins
Thanks Paul, That is how we have started doing it, I thought there may be a "secret formula" or something. We spoke to another bootmaker and he said to use a little contact cement on the pegs before setting them. We tried that and it works well. I down loaded the bootmaking book from the LW.net site and they did not say anything about coating the pegs either. We just want to do the best job we can on our customers boots so I thought I would explore the peg coating, thanks to all that gave an opinion. We will run some tests on our own boots to make sure all is well. Rick -
What To Treat Sole Wood Pegs With?
rickybobby posted a topic in Shoes, Boots, Sandals and Moccassins
Hi All ! We have been using Brass clench nails in the sole/shank area of our Cowboy Boot full soles and they have been fine for "off the shelf" boots. We have seen a big increase of custom boots coming into the shop and they all have Wood Pegs and customers are starting to ask for them so... We have bought a bag of wood pegs and are ready to have at it!! What should the wood pegs be soaked in prior to putting them in?? I have done a quick search of forums and could not find anything and do not have the connection fast enough to down load the boot book on line here right now, any help would be appreciated. Thank you in advance, Rick Jorgenson 623 580-7272