rickybobby
-
Posts
722 -
Joined
-
Last visited
Content Type
Profiles
Forums
Events
Blogs
Gallery
Store
Everything posted by rickybobby
-
I have a Tippman Boss (Alum Frame) and have not had any trouble with it. When you first get it they are dry (no lube from factory) get some grease and hit the moving parts in back and on the handle. Oil (lightly) all the points near the needle and foot mech. They work well after that and spend some time learning how to adjust them. Run a bunch of test panels, over adjusting and over adjusting, learn what to look for in the stitch. They work like a champ. They are a good beginner machine if you are patient but that is the same with any sewing machine. I have several sewing machines now and still there are some jobs I will use the Boss for. Just my .02 cents Rick J.
-

For Sale: Used JUKI LU-563 walking foot industrial sewing machine
rickybobby replied to nanera's topic in Old/Sold
p.m. sent Rick -
There ia an article in an older LC&SJ written by Dusty Johnson. I have about 12 years of them I have gone through some but have not found it. Maybe someone else would know the year & month. I hope this gives you a heads up. If I find it I will get back to this thread. Rick J.
-
Paul, You are on the right track. Try Tandy's "Deglazer" liquid, it will take off the sealer, oils on the surface from the previous finish, or acetone. Just let all dry well (well ventalated area) Note also that these will soften the glue between stitches so don't be sloppy with these products, apply to a rag and apply to surface with a wiping motion. Don't soak the welt or sole. Use a liquid dye, I prefer Lincoln brand. (Use a dauber for large area and q-tips for hard to reach edges.) It is an alcohol base but let it dry completely then decide if a second coat is needed. At this point I use Meltonian cream polish. It will restore some oils/waxes to the leather and will even out the color and brings up a shine. You can decide if you want to use a sealer or not at this point. I don't seal after this point because the polish performs that. If they are going to get heavy damp use you can apply Tan Kote, Resolene, or something like that. Good luck, Rick J.
-
Blue Guns For Holster Guys
rickybobby replied to lazj's topic in Gun Holsters, Rifle Slings and Knife Sheathes
I am interested, p.m. sent Rick J. -
Tom, I love your work and your Steampunk creations! I hope the posters sell well for you. Rick J.
-
Hi, I have all sizes in stock (and rubber heel nails). I need to measurements to get you the right size, Front to back & Side to side With these measurements I can get a very close match for Cowboy Heels (rubber) I know you did'nt ask but I will give quick tutorial... Use a pair of dulled end cutter style wire cutters to remove the old heel. While pulling them off use a flat blade to push down any leather that may want to come up with the rubber heel. Sand the heel bases with a sanding block to remove old glue and flatten the base (glue down any layer of base that may have lifted) use 80 or 100 grit, hold the block flat and don't round out the edges. Apply glue to tooth picks and fill holes from nails. Nip them off flat. Rough up new heels and apply glue to heel bases and the new heels, let it tack up (15 or 20 min.) Apply new heel to heel base. Center the heel on the heel base, do not use the heel breast (the flat part) to line up heel, you may need that forward overlap. Remember, there are 1/4in washers around the nail holes in the rubber heel, when trimming you do not want to hit those or it will show when finished. Use a fence post or some kind of post to hold the boot steady while putting the nails in the heels (there are always old bench top boot jacks on ebay for $10.00 to $20.00) if you do much of your own boot work, it makes it much easier. Make sure your post will not damage the inside of the boot. Install nails, use a nail set to recess them a little, (not to much you will damage the washer in the heel). Trim excess rubber from edge with a "box cutter" type blade. I use a "fixed" blade type, the adjustables will wobble and mess up your cut. If you do this with the same conture of the heel base you will have very little sanding to do to even up the rubber to the heel base Sand off and smooth the trimmed rubber to the heel base (80 to 100 grit) finish with 150 grit to smooth finish. Apply heel and sole finish to sanded edges to finish and check inside boot to make sure nail points are not comming up thru your heel. It is best to remove any insole in your boot if it is thick and rubbery, remove it while installing heel then glue it back in when done. They interfear with putting in the nails by making the boot jump around while hammering the nails in. Rick J.
-
Holster Progress after many moons
rickybobby replied to Jordan's topic in Gun Holsters, Rifle Slings and Knife Sheathes
Nice job on that Jordan !! I hope you post it complete, I have done a few western holsters and a few western gun belts but never done both for the same customer. Everyone has ordered one or the other. Good luck on poss. sales. Please post the results of that on the "Marketing" forum. Rick J. -
Cowboy Holster Tutorial
rickybobby replied to Jim's topic in Gun Holsters, Rifle Slings and Knife Sheathes
Jim, Thanks for posting that! Great tutorial! A "must read" for anyone thinking of building this type of holster. Rick J. -
Hi and welcome to the forum, I started 10 years ago with the Stohlman books and Bill Gomers Tapes (which you can now get on DVD) and started building saddles. I had been doing leather work (belts, tack repair, wallets) for 20 years before doing saddles. I bought a complete saddle (very cheap) from a lady that had sold her horse and took it apart! The tree was sound and I used that to build my first saddle. Don't get real hung up on needing "patterns" for parts, The Bill Gomer DVD's show you how to make your own. The Stohlmans books have patterns in them, I used those to but modified them to suit me using Bill Gomers DVD's. The Stohlmans are very "wordy" and take pages to explain steps (sometimes needed) so if you get stuck it helps. Getting other references also gives you other views and methods of building. I did saddles on my own with only those books & tapes, they gave me the expierence to start working at a saddle shop doing repairs and building tack. I was able to watch their building techniques which really helped me at home. When I started there were no forums like this to ask questions so add this to your learning abilities too. Rick J.
-
Welcome to The Thread Exchange - We are internet-based thread sellers who offer easy shopping, helpful product information pages, no minimum order, and great prices. We accept VISA, Master Card, American Express, and Discover Card -- Sorry, No CODs. Orders for stock items received by 3PM Eastern Time normally ship the same day. Shipping charges cover actual Postal and UPS costs. We are totally focused on thread and do not sell needles, fabric, webbing, or sewing machines. Our web site is our catalog. Please click to learn more about doing business with us. I got this from their website, I guess they do not sell needles! I will try somewhere else !! Southern Leather in Denver used to carry them but no longer do. It has left me "High and dry" on this machine. I am down to my last needle! Thanks Bobby, I will try someone else. I have not done a Google search yet. Rick J.
-
Hi, Can someone steer me to a supplier for these needles? We have a Tuffy 88 long arm patcher. The people we used to buy from no longer can/will get them. It is a great machine and I don't want to run out while doing a job. Thanks in advance, Rick J.
-
Orthopedic Build Ups
rickybobby replied to rickybobby's topic in Shoes, Boots, Sandals and Moccassins
Nice work you do! It appears you used a cork base for the lift and covered it? I have never used cork or done that high of lift. I have done 1/4" to 1 1/4" lifts and used "cloud "material. We only do a couple a week, but it is a nice change from doing 1/2 soles and heels on dozens of pairs of cowboy boots! A little challenge can brighten your day! Rick J. -
Using a Tippmann Boss Stitcher
rickybobby replied to thecapgunkid's topic in Leather Sewing Machines
It sounds like you need to deal with the upper and lower tension. The book they supply does a great job of telling how to adjust. I tightened one loosened the other, then did the opposite, mostly to see what happened and what the "MISTAKES" looked like. Then concentrated on doing nice stitches, ran through a bunch of scrap leather but really got it to do a nice tight stitch on top and on the bottom. I found that they were very under lubricated from the factory. I used "Marine" grease available at the auto parts store and spent some time putting small amounts of grease on the major moving parts and used a light oil on the other parts (lower bobbin schuttle) , BINGO!! The thing started running like a dream! Do the grease/lube thing first then make all the mistakes on scrap, this enables you to recognize what needs adjustment while working with it. I always run a test piece with this machine or any other machine I have to make sure I know what the adjustments are. Rick J. -
Here is the website I ordered it off of... http://www.thingswestern.com/8.html Very interesting guy, he has lots of talents and is a cheerleader for the self employed artisan. He has made the mistakes and is passing the info to us before we do! Best 25 bucks I have spent in a long time! Rick J.
-
I am glad you brought this up! I am reading Joe Rollings Book "Artisans & Money" It is a MUST have for those of us that make things to sell. The reasons given have all been stated by others in this thread already but the two that are missing that is in his book is... The Product is better off in the trunk of your car and under your control than on somebodys shelf who has not paid for it. People who want to do business using someone else's money give me a rash. Sooner or later we will always fall out over something anyway, so why not make it sooner? The truth is that a lot of "consignment only" stores will buy outright when they see products they know they can sell. They will not admit it to most of their suppliers, but the best of the merchandise in the shop is often bought and paid for. The consignment stuff just fills the place up. Reference, Artisans & Money, Joe Rollings (p.41, 42) Fakahwee Publications, Rodeo NM. 800 840-2434 I am in no way affiliated with this author, I have just got the book and it has helped me in some aspects of my business. I'm a better businessman because of what is in it. Bottom line regarding consignment, don't do it. The product will sell anyway even if you have to sell it else where. Don't let them use your money, artisans are not big banks. We need to think of ourselves and our products not the other guy and his financial situation. Rick J.
-
I don't know anything about the value of this saddle. It may be a nice "find" if the history given is accurate. The other saddle (foster) was a vintage find just because of the style. This saddle looks like a production type saddle that many of the "Dude" ranches here in AZ. use. It may just be the design but it may be worth some $$. Take a look around the web and see. The other saddle sold for $300.00+ Did you get it? These older saddles are really cool and even better if they have some history to them. The second saddle (foster) that you posted does not look like it is in as good of condition but it is hard to tell in photos. The discription that is given does not seem very accurate I believe cutter and reiners (stock horse class in the 60's & 70's) liked a flatter seat like they do today. That seat is for Equitation to help roll your seat (butt) under you to help sit up straight. This would appear to be a 60's show saddle as well. Rick J.
-
I don't have any info on your saddles maker, sorry. After seeing the photo, I think the saddle was made in the 1960's. Those big equitation seats, dark antique tooling and Elephant ear cantles were popular then. The swell shape baffles me, that was not popular for that time (in So. Cal. horse shows). Now, after seeing the photo it looks like a quality saddle, the leather appears to not be "breaking down" the tooling appears "crisp" over all it does not look beat up. If this saddle is in fact 30 to 40 years old and looks like that it is more than likely a "good" saddle. Esp. for bid @ $205.00 If you are going to ride in it, have a saddle maker look it over, verify it is safe, Riggings are in good condition, tree is sound, ect. As an investment I don't think it would sell because it is so "dated" for the show ring, but for display and to ride around it could be fine. Buying a saddle without being able to inspect it is a challenge, and you might be buying something that is not safe or comfortable for your horse or you! It would be a great display or addition to a collection because of how unique it is. I was showing horses in the early 70's in So. Cal. and remember seeing those style saddles, they were on their way out of favor by then, that is how I estimated its age. Good luck if bidding on this, it could be a fun addition to your collection for not a huge price, but beware and have it checked out before using! Rick J.
-
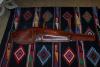
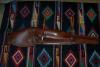
Saddle Rifle Scabbard
rickybobby replied to rickybobby's topic in Gun Holsters, Rifle Slings and Knife Sheathes
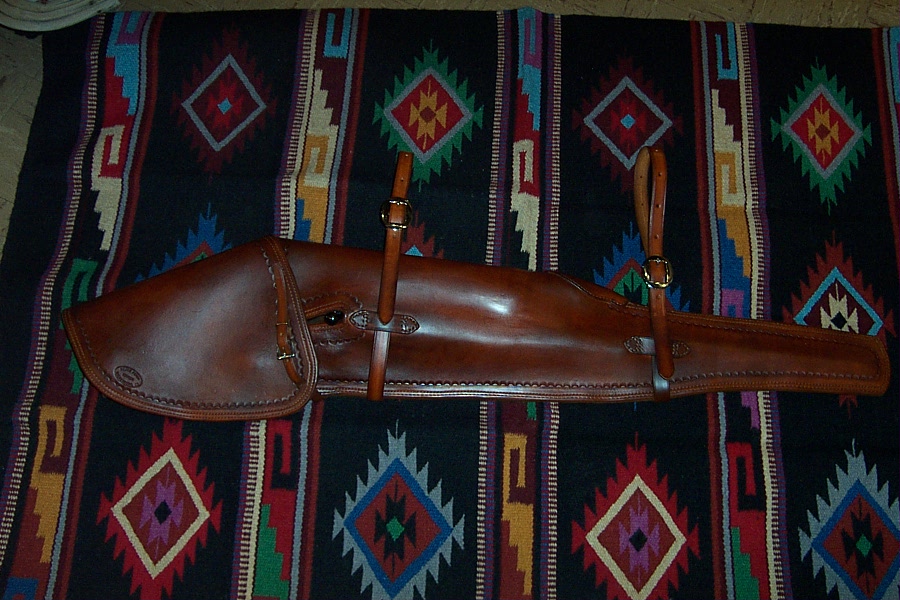
Thanks Bobby, I did this at Ben's for Bruce, he did not want to tackle the job, he stayed as far away as possible while I was laying it out and sewing it! It is nice to get a call from him to go in to his shop and do something special. I still want to stop in to your shop and meet you! Thanks for looking, Rick Dan, That is 2 passes on the machine, I stitch groove both so I have a good line to follow. This one was a challenge because of its size, I needed someone on the other end to hold it up while stitching. Thanks for looking, Rick I have to say this was a really nice gun/scope. You can see the fleas on a deer at 200 yards! I did another scabbard like this for the same gun, only it was "camo" I normally do not like a rifle with a synthetic stock but this was nice. Weatherby makes a fine rifle! Rick -
Saddle Rifle Scabbard
rickybobby replied to rickybobby's topic in Gun Holsters, Rifle Slings and Knife Sheathes
Luke, Thanks for the input on that, I need to come up with a better "closure" system. If you look close the rivets are protected on the upper flap above the bolt. But I agree, something needs to be different, I am not sure how yet. Thanks, Rick -
I use acetone. It is in the paint dept. at Lowes or Home Depot It looks "funky" at first, just keep stirring and then let it sit for 10 min. stir some more and you should be good to go! Rick J.
-
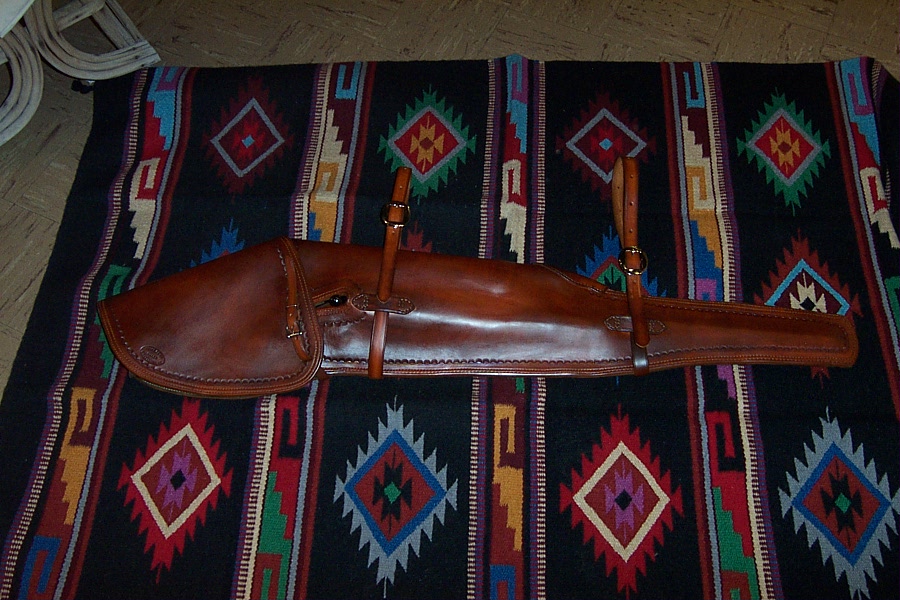
Just finished this saddle scabbard this week, veg tan 12/13oz Wet formed to the rifle/scope The customer wanted full protection from brush and trees. This was a fun project and used a huge piece of leather. I made a full paper patern (several of them) before transfering it to leather and cutting it out! Critiques always welcome, I try to improve by taking your advice. Thanks for looking! Rick J. The dye marks under the flap came off with some solvent! R.J.
-
Bobocat, As always your work is incredible! Very nice job. The customer will be very pleased with the bag. Rick
-
Finally got my website ta goin'
rickybobby replied to UncleGeorge's topic in Marketing and Advertising
Great site George! I like the content, (nice holsters) good information, love the uTube vid.s, nice touch! Rick Jorgenson -
Online signposts mean more web customers
rickybobby replied to UKRay's topic in Marketing and Advertising
Ray, Thanks for the marketing lesson! When you set up these posts is there a fee (like a website) every month? You did not mention that there is. Is there a way to do this for little or no cost? Rick J.