


fredk
-
Posts
5,976 -
Joined
Content Type
Profiles
Forums
Events
Blogs
Gallery
Store
Everything posted by fredk
-
Have you got access to a computer and printer? Write the letters in a Word document. Enlarge the letters to your size. Print out on paper. Rub some olive oil onto paper. Place onto cased leather then go over the outline of the letters with a dead biro pen, pressing the outline into the leather. Then work on those outlines
-
@WraithTDK I would do it for you just for the cost of postage. But I'm in Northern Ireland, about 3000 (at least) miles from you Bert's suggestion is about the best. HobbyLobby might have the snaps in stock
-
-
@Handstitched like it!
-
@a6r8n This is one sort of kit https://www.ebay.co.uk/itm/155079251934?_trkparms=amclksrc%3DITM%26aid%3D1110018%26algo%3DHOMESPLICE.COMPLISTINGS%26ao%3D1%26asc%3D243356%26meid%3De6297ceeb03c4df2bf34983c0f3e7f0d%26pid%3D101111%26rk%3D4%26rkt%3D12%26sd%3D265587416914%26itm%3D155079251934%26pmt%3D1%26noa%3D0%26pg%3D2563228%26algv%3DItemStripV101HighAdFeeWithCompV3RankerWithKnnRecallV1&_trksid=p2563228.c101111.m2109&amdata=cksum%3A155079251934e6297ceeb03c4df2bf34983c0f3e7f0d|enc%3AAQAHAAABEA%2FJiT7ssNXrEsx1zZncFUUkLU8ikMh%2FiWOsxkTqeqIbE5K4lpcDSKjAfQ%2F1if83xbfN%2BWJZePKyin7mK4z34%2FWoGVsKwzAVQvloX%2BEyRjWLg0P91JBxZS3jZ%2Fc%2BaWQ%2BYRky6S72%2BXmJVpEZx%2FBMkwJkDGGNSaYXLhsb7NezXHSUQ3OgzXPqIOQ8DmWLc22IC5sWtmXdYc2RdN97gFN1jBjPbFFuMj9lshfbRdue3PUYDpv12B2cRFNs8PtkbiDhnQsxTUx3c%2BK%2Bi0lY7EfCYPyYKqhGEEkIrRwyAUHOYT6KzwEjlwCai6Y4hOVCPqndQ0tyI8FRJ5ZNXfmTS26ZiRk4MS5EVt9pbKkVtc55Hpzy|ampid%3APL_CLK|clp%3A2563228 I used a similar kit to repair cracks on a Cadillac dash top
-
I would use a fine V beveller lightly along each line A B997 or a F121
-
1. btw, that ain't much of a scrap box, , I have 3 x 80L plastic boxes, a couple of 32L plastic boxes and about 6 card boxes of various sizes with 'scrap' leather 2. send your wifey over my way to sort MY scrap leather! 3. you could do what I did when #1 dottir was a toddler and wanted to do what daddy was doing; I made up her own leather supplies box for her to use, instead of her taking my leather scissors to one of my new hides. Let wifey have this box and you start a new box for you
-
And we will be visiting DwightT in his local hospital Never, ever, go up against SWMBO when she thinks she's done somat nice & helpful for you
-

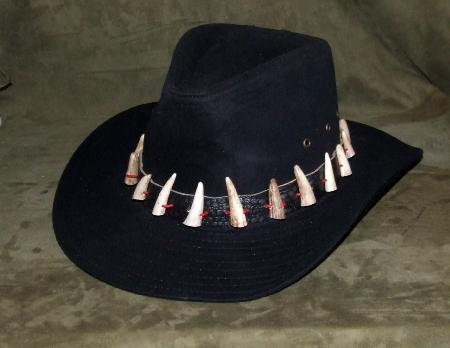
'Crocodile Dundee' inspired hat band
fredk replied to fredk's topic in Clothing, Jackets, Vests and Chaps
An excellent question. I just weighed the hat band. It weighs in at 2 & 5/8 ounces, or 75 grams. Each antler tip is only a couple of grams weight -
Jeepers-o, that takes all the fun out of searching for that perfect wee piece ya need. 'I know its in this box . . . .or is it in this box? . . . ' Plenty of time searching for that scrap piece with a beer and/or a ceegar on hand as sustenance during the search
-
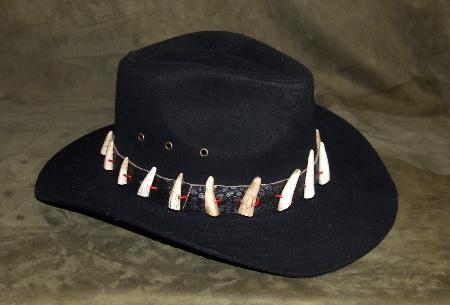
I got my 'Crocodile Dundee' inspired hat band made. Using antler tips because obtaining croc teeth or using them is illegal in N.I. The antler tips, 18 in total, were sorted in to almost-matching pairs in size & shape and put on with the smallest towards the rear with the longest at the front. Leather was a piece of scrap blackish-silvery 'snake-skin' imprinted laminated with some other scrap leather to thicken it up, The antler tips were drilled through and 2mm red lace threaded through them then through holes on the band either side of the antler tip to hold them tightly in place. It worked out that each hole was spaced at about 15 to 17mm I need to work on and do better on my joint at the rear; its just the lace through some holes in the band. it's ok but not real good

-
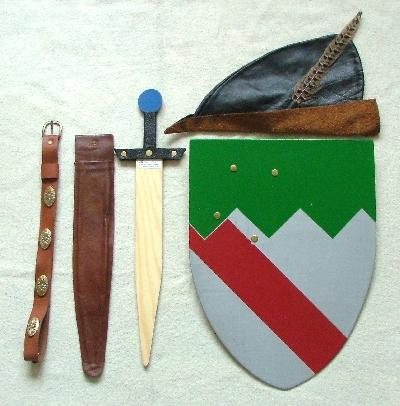
With Halloween over it was time to change my hat band. Well, not really a 'had to' but I decided to change it. Many years ago when I was involved in a history presentation group I used to make and sell a children's 'medieval' play set; a leather 'Robin Hood' hat, a wood sword and leather scabbard, a wood shield and a decorated leather belt. The other day whilst sorting through old stock I found 8 of these belts. Not all decorated. These belts are about 18 years old now (Happy Birthday to you . . . ) mmm, I thunked a think and tried a tryer, and guess what? all of them will fit my size of hat as a band so I used one of the concho decorated ones But this was only a place-saver whist I got my 'Crocodile Dundee' inspired hat band made. Using antler tips because obtaining croc teeth or using them is illegal in N.I. I need to work on and do better on my joint at the rear; its just the lace through some holes in the band. it's ok but not real good

-
Through ebay you can buy coloured acrylic pastes in a kit for doing this sort of repair
-
Wash it down with a rag soaked in cellulose thinners
-
Just use a craft knife to carefully remove the wood in that slot. Go little by little, test fitting until you get a neat fit. Do not use the Dremel, it will easily take out too much too quickly That is just the normal result of the handle being turned on a lathe. That is where one of the chucks held the piece of wood
-
That looks like a home-made awl ground down from some other larger tool. And it looks like the maker cut and gouged out the haft to take that big lump I would gouge out that hole a bit more to make the awl blade end fit better, then use an epoxy glue to hold it in place. Then when that is set, use more epoxy smothered over the wood and push the ferrule on
-
Seeking general advice about Tippmann Boss needles
fredk replied to fredk's topic in Leather Sewing Machines
Thanks chaps. @Dwight that list is very informative and most useful. Mucho thanks and a thank you to @Wizcrafts for your info as well -
I join in with the others with hearty congrats to you May it bring you more business As an aside; Over here your business name would have a different meaning ie 'Camp' is/was used to describe an effeminate male, so Camp Leather Goods would be taken to mean particular 'life-style' type leather items. Just sayin like
-
I reckon YUP
-
Seeking general advice about Tippmann Boss needles
fredk replied to fredk's topic in Leather Sewing Machines
Ta -
I have decided that very soon I shall buy a Tippmann Boss I'm going to get the package which includes a selection of needles, viz: Two 7x3 160, two 7x3 180, two 7x3 200, two 794200, two 794250 I would like to buy extra needles at the time I buy the package Now, being a total numpty those needle sizes mean nowt to me. Therefore I seek guidance Firstly, I do not make knife sheaths anymore. I'll be upping my production of shoulder bags, usually seams are no more than 4mm thick. Other items, maybe 5 to 6mm thick. I would like to try to make 'cowboy' or 'slim Jim' type holsters. I would also like to use the Boss just for making holes for hand-sewing. For this I prefer 0.5/0.6mm and 0.8/1.0mm thick thread What needles do youse suggest I should get extras of? And what size thread goes with some of those needles that Tippmann supply
-
These are all very loverly indeedy, and inspirational too How are you doing the lids? are you wet moulding over a buck then tooling it?
-
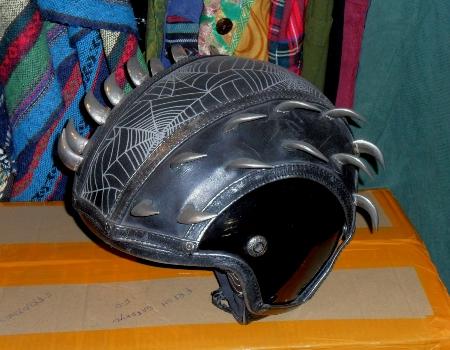
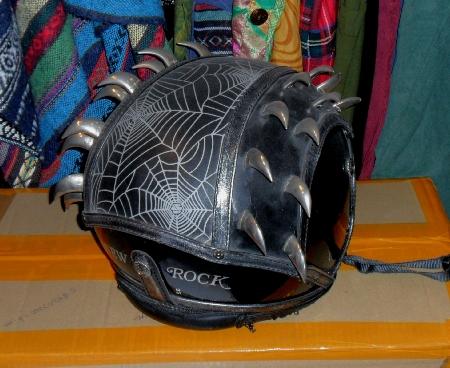
Thanks for responses chaps Out round Belfast yesterday. Very similar to Monday's outings. Just a few comments, from a child 'Thats a funny hat mummy' said to parent. From a lady 'Cool hat!' and the best to top it off was from an elderly man on the bus (yes, there seems to be men older than me!) (Note; that it was raining heavy at the time) 'Thats a handy hat to have today' Hardly anyone else noticed, but one young teenage girl did. She was with about 5 or 6 friends, she stopped in her tracks and stared wide-eyed at my hat and kept staring as I went on past her. Some of her friends bumped into her having not noticed she'd stopped walking A couple of ideas for some of youse to take up maybe 1. I spotted this motercikle crash helmet in an alternative clothing shop in Belfast. I asked and was given permission to take these photos. Cost of helmet is £350. I think the false leather is just glued to the helmet although there appear to be some basic type poppers along the front and rear edges. The spider's web design is just drawn on the 'leather' Those spikes can be bought for about 10 to 50p each (15c to 50c say) Something to do for / on bicycle helmets maybe? 2. I can't show a picture of this item because I cannot find one at all! I traipsed around Belfast and other places recently and my search returned a big fat 0, nil, nada, Round stiff hat boxes. To store your good going to church/going to a wedding hat in. All I could find are fold-up felt ones, which will keep the dust off but do not protect the hat from crushing It used to be, and I'm not talking of so very long ago, that when you bought an expensive hat you got a stiff round card box to keep it in. But I cannot find these available anywhere. Enquiries at hat shops; hats are given to the customer in a plastic or paper bag. It might be different in the USA / Canada / France A woman will spend £200 plus on a special hat for an occasion. I actually met a woman who spent £1500 on a hand-made hat for wearing at a Royal event. And what do they get to keep the hat in? a paper bag! This is something we as leather workers/crafters can make quite easily. Its just a dice cup with a lid but really, really big. And easier to make Two pieces of 3oz / 1.2mm veg or chrome tan, flesh side of each stuck to a piece of cardboard for the wall. Using Gezzer's method of dropping in a round base (very clever that), again a disc of relatively thinnish leather, two pieces laminated with thicker cardboard and repeat for the lid, slightly larger diameter and shallow. Add leather strap handles, job done. The fold up felt hat container sells for about £16. We could get much more for a nice quality leather one, and it could be tooled to make it even more unique The reason I got into this is I was looking for hat boxes to keep some of my hats safe. Its now a 'winter' project to make a few hat boxes Discuss in 10,000 words or less and have in to me for marking by end of Black Friday

-
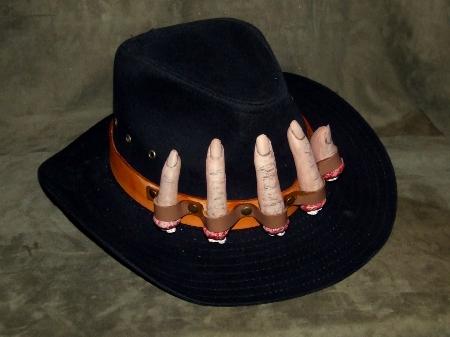
On Sunday I finally got round to making my 'severed fingers' hat band On Monday, today, I wore it. I was quite surprised that only two people spoke to me about it and just a few children, maybe 3, stared wide eyed at it. It was like, seeing 'severed fingers' on a cowboy hat is just an everyday sight! I'll be wearing it out around Belfast tomorrow, Tuesday
-
Air pods case
fredk replied to Chux's topic in Purses, Wallets, Belts and Miscellaneous Pocket Items
It looks grand to me The thread is not necessarily too large, but I would use a smooth hammer/mallet to tap down the stitches