fredk
-
Posts
6,000 -
Joined
Content Type
Profiles
Forums
Events
Blogs
Gallery
Store
Everything posted by fredk
-
Merry & Happy CHRISTmas every one If you are in area which is experiencing extreme weather, please do not take any risks, stay safe, drink responsibly and if you have the opportunity please look after other people either less fortunate than us or just those who need some attention A very mild 13* here, raining occasionally
-
I'm going to put a real damper on your plans In my experience almost all 'defects' in leather can only be detected by actual handling of the leather. The defects can not be seen. Some 'defects' only appear after the leather is dyed or worked, they have not been seen until then I do not count scars and blemishes as 'defects' but as character of the leather and as these are unique to each hide which might have them no AI will be able to classify or recognise them
-
The way I see it; only those who know your name will see 'Joel' as your personalisation. Others will see it as the 'makers brand' Think of all the big names in the fashion trade, eg Gucci, Nike, Zara, Prada, they only put their name on their items and people accept that As for me; I preferred a 'Western' styled makers mark, But that's my choice I've just had another one made; Both are 3cm across I'll be getting a different version made soon I got my latest one made in Hong Kong. Its made in brass. Including s&h and taxes it cost me £17.99. Quite affordable imo


-
The thickness of your leather has no bearing on the size of the awl cut/hole. You should be looking at a hole size to suit your thread
-
Le Prevo might have it in stock http://www.leprevo.co.uk/photos/stamp1.htm D444 or D445
-
I could list quite a few. But I don't think this thread is the right place for it
-
Here is one guide
-
1. the mangle was in use certainly by the iron age Romans 2. these carvings were done in, afair, the Victorian period, who certainly used mangles 3. the Victorians often made-up things to do with earlier history. Its been the bane of my life separating Victorian myths from real historic fact for history teaching 4. rather than pressing down on the leather, could it have been used for applying some sort of drying agent, such as salt or chalk ? Think of one of those pots with a roller for applying edging finish to a strap or belt and sort of turn that up-side-down - pot on top with a slot for chalk to fall onto the roller which applies it to the leather
-
Use a scalpel to cut open a slot where the stitches will be, They will cover the slot. Then use a curved sewing needle to sew the loops. Leave the end on the outside. Lay it parallel to the sides of the strap. Sew some loops over that end to hide it and hold it. Sew more loops. On the final loop bring the needle up between the leathers and out through the slot, in between some of the loop threads. Trim close and maybe apply a small spot of glue to the end
-
Nice, I like it. Very much proper looking too
-
Clever idea A few of these in different sizes could be handy
-

Advice on a Reichsrevolver holster
fredk replied to JayB's topic in Gun Holsters, Rifle Slings and Knife Sheathes
As you want the holster for display; the way museum conservators would do it here would be 1. sew the flap back on and fix up any other stitching with a thread which matches the original 2. use a non-chemical bonding adhesive to stick something like acid free board / card or lightweight leather to the flap 3. cut that card / leather to the shape the original flap would have been Note; the card or leather is not dyed or coloured to match it in but is actually of a contrasting colour to show it 4. have a new copy of the holster made to put along side the original. The new holster can have the firearm partially inserted Your biggest problem is getting one of those special flap closures to put on a copy holster -
I would need to see a picture of the bellows to consider what approach to take in replacing the bellows leather And we would need to know whereabouts you are in the world to advise you on where to get the leather
-
Vacuum molding while it's raining outside
fredk replied to Theonlyone325's topic in How Do I Do That?
I dunno how youse lot use a vac bag or how it works for you When I use one the leather never dries inside the bag. I have to periodically change the air in the bag; open the bag, allow room air in and then re-seal the bag and suck that air out. If I replace the air in the bag with dry air eventually the leather starts to dry, but if I replace with humid air, ie air when its raining, the leather is slower in drying -
Once bellows leather starts to dry out and crack you'll be 'repairing' them forever. You'd be be best to totally replace the leather
-
Vacuum molding while it's raining outside
fredk replied to Theonlyone325's topic in How Do I Do That?
I was just doing some wet moulding, but not using a vac bag Up to a few days, a week, ago or so the pieces were drying out quite fast, about 2 hours, but once the rain started and the humidity level went up I was looking at 8 hours to dry. No change to the heat levels in my place. But I've had to put the last 3 items in front of a blow heater to speed up some drying Therefore, I would think that it would be the same using a vac bag. Slower drying time -
My #2 son is like that. Watches stop working when they are on him, but will work away from him. Also, he can fry a computer chip by just putting a finger close to a computer. He has to switch it on using a pencil with an eraser on the end
-
I too used to use a pocket watch. Started using one in RAF. Working around engines et cetera a wristwatch was a no-no. My last pocket watch was wrecked by a customs official who took it apart looking for drugs. Fortunately it was only a $15 watch and not one of my better ones. I'm using a self-winding wrist watch these days as I can't find a decent daily-user pocket watch
-
My I throw something into the plot ? A long time ago, a very long time ago, I helped my father restore some very old business desks which had leather tops. Long before I got into leather work. We could not replace those leather tops. The leather was quite thick, about 4 to 6 mm , and as stiff & hard as a wood board. Definitely leather as the tops had cuts in them which showed the fibres I agree with the others; use a smaller writing pad on top of the good leather
-
Just in case anyone doesn't know that Le Prevo is still going strong I just received this in an email quote; Hello All We keep getting asked if we are still trading so this is a one-off message to confirm that Le Prevo Leather is definitely still open for business following Stu's retirement. It's the same wide range of leather & fittings and the same staff - but new owners (who are old customers...). The trade counter is now back open Monday to Friday for shop visits and click & collect orders. We're in the process of updating the website, restocking and cataloguing the warehouse archive. You can keep up to date with developments on our latest news page: http://www.leprevo.co.uk/news.htm and at #leprevoleather over on Instagram. Hope this finds you all well. Regards David end quote
-
Thanks for the explanation,
-
Thanks from me too
-
I have a few paint pens which I use to colour in small spots that don't take dye. Used carefully they can match the rest of the colour and are undetectable
-
Most loverly work & finish Why the title 'Trench Gun' ?
-
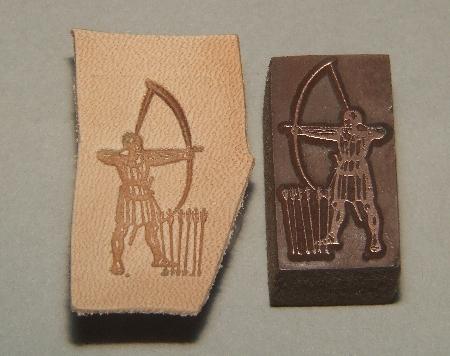
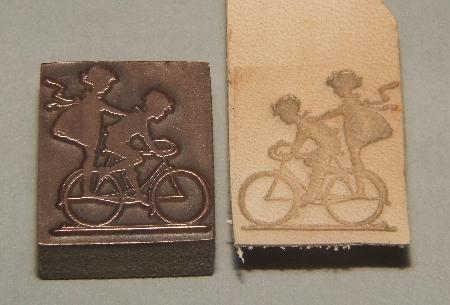
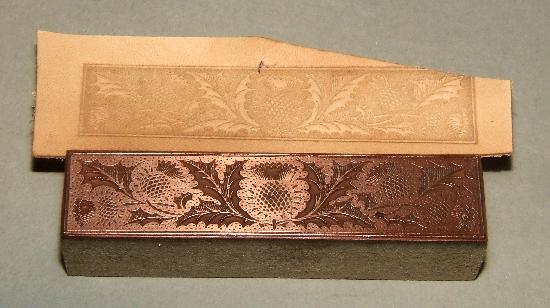
I doubt that I'm the first to discover this A cheap and ready source for picture or letter stamps are ones made for Letterpress printing There are is a wide range of letter types and sizes. For not too much you can buy complete alphabet sets, actually multiple letters in the sets Also there are available various pictures and fancy designs. With these you are limited to size. But they are cheap 3 quick samples 1. Archer, size of stamp is 31mm high by 17 mm across 2. Two children on a bicycle, stamp size is 30mm high by 27 mm across 3. Scottish themed border, 20 mm high by 86 mm across. In the hand even the small details can be seen impressed into the leather All of these, and others I've bought, are metal bonded to a wood block. I used my Tandy press, (1.25 ton), to press these into cased 1mm leather. Just a quick & rough test On average I got them for about £4 each