Dwight
-
Posts
5,236 -
Joined
-
Last visited
Content Type
Profiles
Forums
Events
Blogs
Gallery
Everything posted by Dwight
-
Dirtclod's answer (cork backed s/s rulers) is about 60% of the answer to your problem. These rulers (I have an 18 and a 48) are worth their weight in gold for the leather worker. The other 40% is the knife. Personally, . . . the carpenter's utility knife is my favorite for anything above 4 oz leather, . . . a 50mm rotary cutter does the 4 and below stuff very nicely, . . . especially any fringe I want to cut. Every brand new blade right out of the package first goes to my strop before it ever touches leather. Then strop it every time before you use it. Leather demands either sharp tools or blood sacrifice on your part, . . . and it is your choice. Dull blades will get you the blood sacrifice. For absolutely square pieces, . . . you need a table with a flat & square edge, . . . and a triangular "rafter" square, . . . it looks like a 6 inch by 6 inch aluminum triangle with a lip on one side, . . . lay the leather along the edge of the desk, . . . put the square on it, . . . cut the perpindicular edge, . . . voila, . . . exact squares. Final tip, . . . you cannot cut leather well when you are sitting on your duff. Stand up, . . . look straight down on what you are cutting, . . . and give it your total concentration. And again, . . . I cannot emphatically urge you too much to make sure your blades are SHARP !!! May God bless, Dwight
-
Some folks doing Western holsters (especially buscadero rigs) will attach a thick piece of leather on the back side of the holster just on the other side of the gun itself. It can't be seen normally, . . . but that piece of leather bumps into the buscadero loop and doesn't allow the holster to be pulled up through that loop. You can also put a similar piece on a Mexican loop or even a slim Jim, . . . but you have to place it correctly so it lays just under the bottom edge of the belt. Personally, . . . I make very few buscadero rigs, . . . most use a fold over holster with at loop holding it onto the belt, . . . and I mold them tight enough that the waist pressure keeps the holster from moving. May God bless, Dwight
-
If you are basically "hard labor challenged" (a euphemism for lazy), . . . you can wrap it around, . . . mark it, . . . cut it, . . . then try it to be sure it fits. Use a marking wheel to set you stitch placement, . . . punch and lace the two pieces together like a high top tennis shoe, . . . but leave the laces loose. Slip the dowel rod in, . . . tighten up the laces, . . . tie it off, . . . you're done. May God bless, Dwight
-

Couple Of Recent Holsters
Dwight replied to jackd942's topic in Gun Holsters, Rifle Slings and Knife Sheathes
Just a curious question, Jack, . . . what weight leather are you using for those two holsters? They both are really nice, . . . and a thumbs up on the JB weld. Thanks, may God bless, Dwight -
Message sent
-
1841 Pistol Box Instructions
Dwight replied to Brazos Jack's topic in Gun Holsters, Rifle Slings and Knife Sheathes
Once again, . . . many thanks, . . . May God bless, Dwight -
Civil War 1863 Pattern Holster
Dwight replied to Brazos Jack's topic in Gun Holsters, Rifle Slings and Knife Sheathes
Thanks, Brazos, . . . I got a sneaking hunch one of these will be popping up in the near future at my shop. I made one similar a number of years ago, . . . but not as nice as these. Now, . . . do you have the cartridge box pattern to go with it, . . . lol, . . .??? May God bless, Dwight -
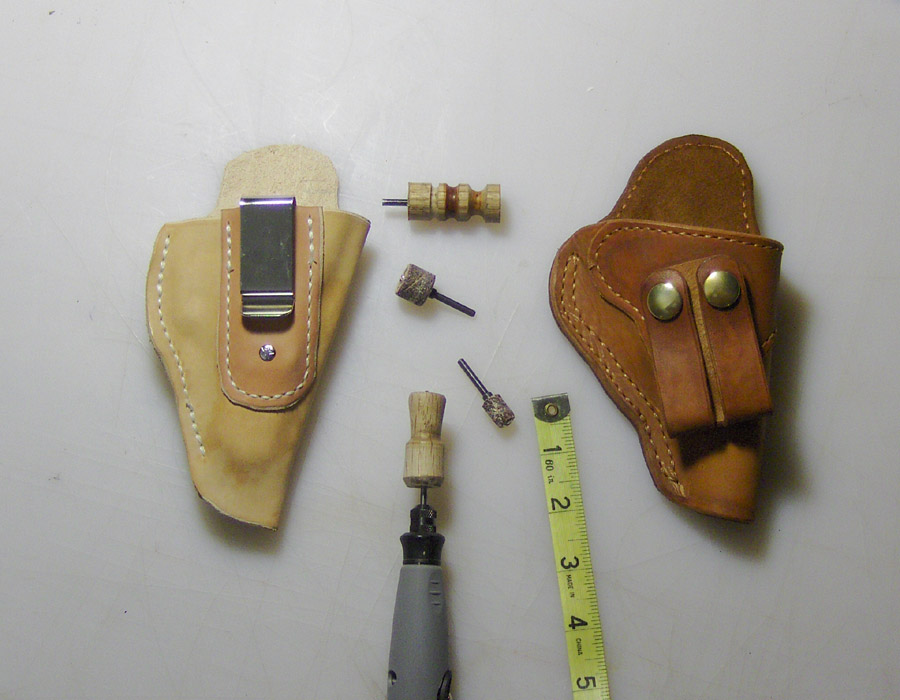
Bob's method is no doubt top quality, . . . but sometimes for a less expensive rig, . . . pocket holster, . . . something that doesn't have to pass admiral's inspection, . . . there is a quicker and easier way. FIRST, . . . use a sander of some sort (I use both a Dremel and a 1 inch wide belt sander) to even up all the layers so they lay perfectly flat together. SECOND, . . . bevel the edges with a SHARP beveler. I cannot overstate this point. Third, . . . a little water and a couple of home made tools in the end of a Dremel, at about 1500 rpm's, . . . light pressure, . . . side to side, . . . apply until you get the finish you want. Look in the picture, . . . both are nothing more than hardwood dowel rod, . . . a 1/8th inch drill bit run up through the center and glued in place, . . . and grooves cut with a file and sandpaper, . . . all while rotating the tool in the Dremel. The grooved one works for straps and single layers, . . . the one with only one shelf looking groove is the one I use the most. I can edge up a holster in all of about 10 minutes with it, . . . which I do twice, . . . before dyeing and just before final finishing. Sometimes I'll come back and "polish" it after final finish just to make it look a tad better. May God bless, Dwight (another Ky product, . . . Olive Hill area)

-
How Do I Print A Logo Like Hermes And Other High End Leather Products
Dwight replied to span65's topic in How Do I Do That?
If you want to see one in action, try a local Bible book store. They usually have one. May God bless, Dwight -
1St Duty Style Holster
Dwight replied to George B's topic in Gun Holsters, Rifle Slings and Knife Sheathes
I had to laugh when I saw the picture, . . . I couldn't figure out how he would wear it. Then I looked again, . . . southpaw. I've also got a nephew who is a policeman, . . . he's also left handed, . . . made his holster and ranger belt a few years back. Good job, George, . . . hope he likes it as well as we do. May God bless, Dwight -
IF, . . . IF, . . . you have access to an arbor press, . . . that might be the ticket. I've had good fortune using mine on my projects, . . . used to do it with a mallet, . . . and there were some that just DID NOT turn out like I wanted them to do. The arbor press allows you to try, . . . look, . . . and try again, . . . until you get the impression you want. Personally, . . . I'd pass on the stamp, . . . that is what I do if a piece gets away from me in the process. May God bless, Dwight
-
Shoulder Holster Angle?
Dwight replied to George B's topic in Gun Holsters, Rifle Slings and Knife Sheathes
My personal commitment to not producing them is simple, . . . I do not want to put something out there that I believe is inherently dangerous. Given today's penchant for Glocks and similar weaponry having no safety and a 6 oz trigger, . . . those who do make them will one day be appraised that a product they made was worn by a person who while "re-holstering", . . . inadvertently flung a round out the rear facing holster. They may also be invited to sit at the defendant's table during a long and bloody civil suit. I'd just as soon not get involved. I also do not make SOB holsters, . . . people who wear them are one slip and fall accident away from a permanent wheelchair, . . . and again, . . . I don't plan on contributing to the program. But, . . . that's just old geezer me, . . . doin my own thing, . . . have been for the last 69 years. May God bless, Dwight PS: George, . . . sorry, . . . looks like I failed to put in the drawings in the other post, . . . here they are this time.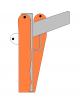
-
Pounding is un-necessary, . . . period. A light rolling with a rolling pin just to flatten it together is all that is needed. And all you are doing is making sure there are no air voids where the glue comes together on the two pieces. Now I know there are folks who disagree, . . . Take 4 pieces of leather, . . . cut em 2 inches wide, . . . 4 inches long, . . . lather em all 4 up on the flesh side with Weldwood. Let it dry, . . . fully dry to the touch, . . . dry enough that you can lay it on newspaper and it not stick. Stick two of them together, . . . lay a piece of 2 x 4 on it, . . . and whack it to your little hearts content. Stick the other two of them together, . . . and with one hand, . . . put a good portion of your body weight on it for 3 to 5 seconds with just the palm of your hand. Give it an hour, . . . try pulling them apart. There really shouldn't be much difference in the two test pieces when you get em apart. . . . IF you get them apart. But in answer to the original question, . . . realize you have to put some pressure on the pieces to get them together. If the design is really delicate, . . . intricate, . . . you may want to do the artist work last. On the other hand, . . . if you are stamping acorns, . . . skulls, . . . or other images (names and/or initials), . . . do it up front, . . . then put it together. May God bless, Dwight
-
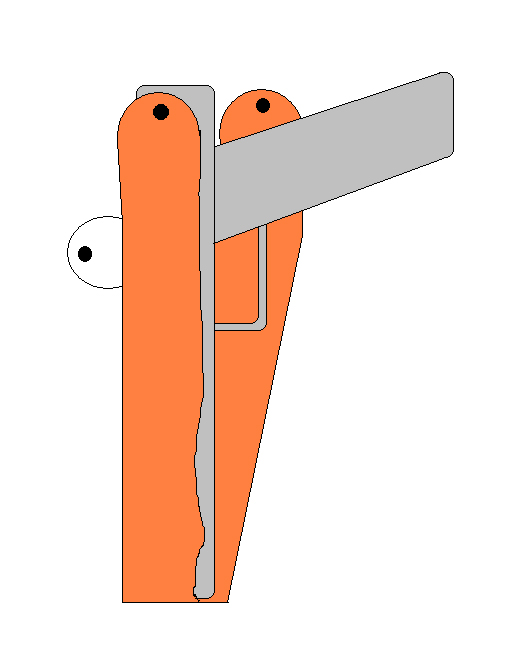
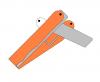
Shoulder Holster Angle?
Dwight replied to George B's topic in Gun Holsters, Rifle Slings and Knife Sheathes
Personally, I have just about quit making shoulder holsters, . . . But when I do, . . . it is muzzle pointed straight down, . . . folks don't like it, . . . buy one somewhere else, . . . that's my policy. But for your problem, . . . look at the straight drawing, . . . two tabs at the top are my attachment points. For a 45, . . . just drop it down the barrel a bit, . . . probably have to play with it, . . . sew the tab onto the side of the holster under the arm, . . . make the attachment. May God bless, Dwight -
Bonding Double Layer Belts ?
Dwight replied to Shooter McGavin's topic in Gun Holsters, Rifle Slings and Knife Sheathes
It may have been someone else there Red, . . . but I use a heat gun almost constantly any more. To heck with wasting time (or trying to find something else to do) when all I need done is some weldwood solvent burned off. So far, I've burned up 2 of them 12 dollar Harbor Freight heat guns, . . . and have even done a stint with my own personal hair dryer (though with what little I have left now, . . . probably ought to sell the dryer,.......), . . . and you are so right, . . . if the glue is dry and warm, . . . where you put it, . . . it sticks. Part of my reasoning is the way my mind works, . . . if I lay something aside, . . . I have to spend time getting back up to speed on that project, . . . whereas if I can just keep plodding along, . . . I usually will not forget some critical piece like the backing for a concho, . . . a rivet here or a puched hole there. Laying it down while it dries is an invitation for disaster in my poor old codger mind. May God bless, Dwight -
Bonding Double Layer Belts ?
Dwight replied to Shooter McGavin's topic in Gun Holsters, Rifle Slings and Knife Sheathes
Hey, Shooter, . . . you're spending far too much time thinking about this my friend. Use a pie dough roller, . . . just don't let your wife catch you using hers. Seriously, . . . whoever told you that you have to whack it and beat it after you put it together just seriously does not know the product. I've been using Weldwood since the late 60's on furniture, cabinets, leather, cloth, and probably stuff I don't even remember. I just . . . NEVER, . . . EVER did anything more than push the two together with a rolling pin or something similar and have again NEVER had a customer complain. The word contact means touching, . . . not beating, . . . May God bless, Dwight -
You can also soften most veggie tan leather also by taking a 1/2 to 3/4 inch rod and rolling it on the floor. Roll it around the rod, . . . making it do a 180 as you go from end to end. Do both sides a couple of times, . . . it softens up nicely. I do all my belts that way, . . . kinda breaks them in quickly. May God bless, Dwight
-
That would be one of the few places where I would break my # 1 rule: hands are for hamburgers, . . . machines are for stitching. Groove it, . . . mark it, . . . awl the holes, . . . and saddle stitch it. It will take a couple of curved & short needles at the start and the end, . . . but it is not out of the realm of possibility, . . . and the only other choice is to take a razor knife and cut the stitches under the barrel and trigger guard, . . . re=cement it, . . . and stitch it again. Get on your good glasses, . . . sharpen that razor knife until you can split the hairs on a spider's head with it, . . . and very carefully cut down between two of the layers. Assuming you put in a gusset piece in the bottom of the holster, . . . it should work out fairly easily. I have done the second option, . . . if you do it, . . . as you are putting it back together, . . . use two needles, one at each end, . . . to line up your holes, . . . otherwise you will be punching new holes in the back and will weaken that side of the holster with all the extra holes. More than one holster has left a shop here and there after having been done, . . . dissected, . . . and re-done. May God bless, Dwight Don't pitch it, . . . it's too easy to fix THAT mistake.
-
Contact cement on leather is kinda like your first kiss, . . . once it is done, . . . it is done. You just pretty much have to cut it off, . . . thereby probably ruining the project. Just learn to be a bit more careful with it. I have developed an "eye" for applying it that will not let me get all the way out to the very edge if there is a possibility of it showing. That of course prevents any problem with dyeing. Sorry I didn't have a better answer, . . . but it's just one of those things. May God bless, Dwight
-
I hate to "assume" but since there was no description, . . . it looks like you want to know how to achieve a black to fading into light tan color effect. Air brush, . . . dye, . . . and a lot of practice. The emphasis is on practice. May God bless, Dwight
-
Jack showed one of the best ways to do this, . . . it is one way I make my magazine pouches for hand guns. One thing to keep in mind though, . . . the corners cannot be abrupt, hard angles. Soften the end of that multitool blank you used, . . . round it on the corners both horizontally and vertically, . . . then use Jack's method, . . . you will probably really like the result. May God bless, Dwight
-
It's quicker if I just tell you how I make a belt. I don't do very many single layer belts, . . . but when I do, . . . this is the process. Cut the belt blank, . . . every supplier I've purchased blanks from were sorry, shoddy, and/or bum leather, . . . cut my own from a larger piece of leather. I use a strap cutter, . . . but a razor knive (think drywall knife) works well if you strop the blade first. Exacto knives are for making model airplanes. Cut the ends, . . . one is pointed (tongue end) the other is rounded (buckle end) Punch the holes for buckle on both ends. Sand all the edges with a belt sander. This gets rid of imperfections that originate in the cutting, . . . especially on the ends. You can sand down a real nice half circle, . . . but only about 1 person in 100 can cut a really nice half circle time and time again. Bevel the edges. Make the belt keeper. Dye the leather, . . . I personally only dip dye, . . . dunking it gets a really good penetration that cannot be matched with a dauber and an air brush just barely coats the outside surface. It is also more uniform. If you make a belt today, . . . and the guy wants one a month later for his lady to match his, . . . dunking is the one way that will come close to guaranteeing the color will match. All other ways I've tried are a gamble. Allow to dry for 24 hours. Burnish the edges with water and a slicker, . . . most edge paints will eventually flake off, . . . so use dye on the edge if you want to do a 2 tone. Finish the belt, . . . I use 50/50 resolene. Allow it to dry for 24 hours before messing with it any more. Put it together, . . . I use Chicago screws, . . . no snaps. Now, . . . for your list: Beveling tool OK, . . . get a # 4 wood or plastic edge bevel slicker OK rotary punch Nahh, . . . get a mallet and the two "Punch Sets", with the little replaceable tips. Fielbings professional dye OK, . . . just pick a oil dye color 2 belt blanks and two belt buckles I'd probably buy a double shoulder, . . . unless you need a really big belt, . . . a large double shoulder will give you enough length for most, . . . and some really good leather for other projects. If you buy their blanks, . . . make sure you turn them over and look at the backs. No dangly thingys hanging down, . . . even thickness from one end to the other, . . . even hardness from one end to the other, . . . if it is really soft, . . . it was cut from the sides and almost belly leather, . . . which makes lousy, stretchy belts. belt loops OK, . . . I prefer to make my own some sort of finish? Resolene edge kote? Nahh, . . . save your money May God bless, Dwight
-
A pair I had was not particularly expensive, . . . and the heels were simply nailed on down through the heel. I assume they were also glued, . . . but they got to the point that it was hard to tell much at all about em before they went bye bye. I'd probably use veggie tan, . . . contact cemented together as a stack, . . . put in a carpenter vice for 24 hours, . . . and sanded down to the shape you want. Just be sure to bevel out a place in the heel for your heel on your foot, . . . I do know that the old heel was coutoured down in and not flat. May God bless, Dwight
-
Help Making A Laptop Sleeve With A More Rigid Shape
Dwight replied to Ed81's topic in How Do I Do That?
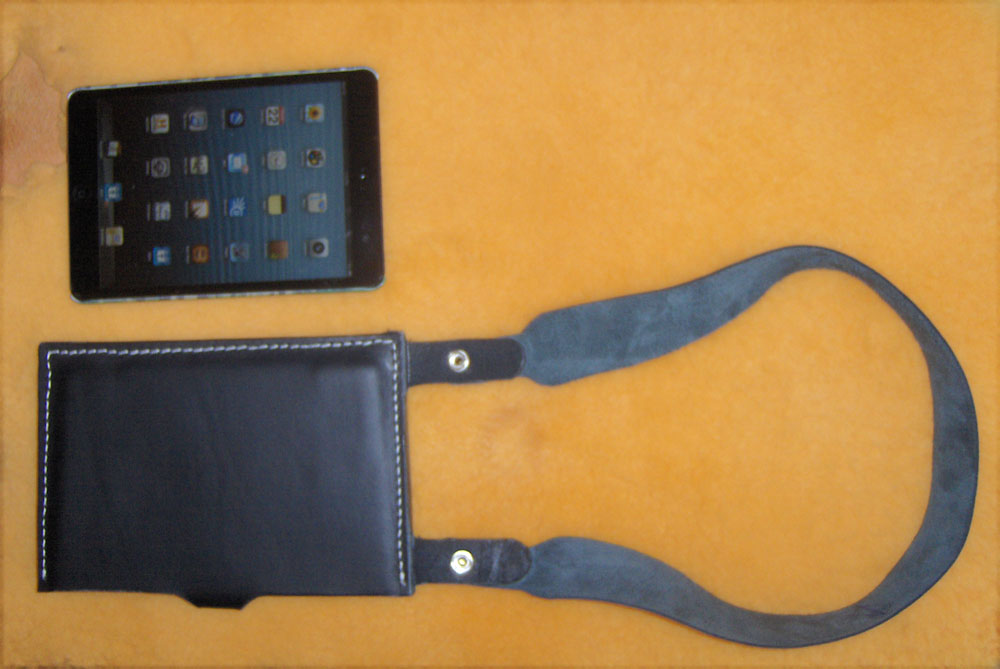
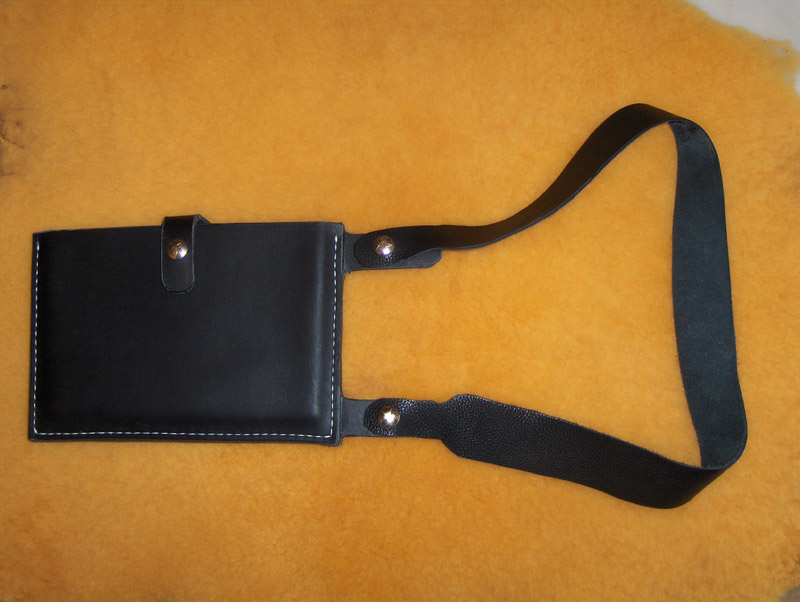
I have a case I made for my I-pad mini, . . . I call it my "shoulder holster" for it, . . . as I detest carrying things in my hands. BUT I digress, . . . It is made of black, drum dyed, 8/9 oz leather, . . . and it more than adequately protects it, . . . and of course it slides in and out real easy. Being veggie tan leather, . . . I made it the "right" size, . . . got it wet, . . . and forced a wooden mockup of my I-pad into it to shape it. The mockup was very slightly over sized so the case would be slightly over sized. Really easy construction, . . . top / bottom / stacked leather pieces around 3 sides to add rigidity as did the video. Contact cement the pieces together, . . . sew, . . . burnish the edges, . . . done. May God bless, Dwight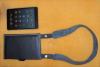

-
I have some closed cell polyethylene foam that would be just wonderful for that project. I have used it for so many different things in the past 20 years that it beggars description for all of its uses. On "leatherworking" use for it, . . . it holds all my leather working tools. It does not flake off like styrene foam, . . . floats, . . . is readily cut with a razor knife, . . . and is virtually silent in about all it's uses. May God bless, Dwight