Dwight
-
Posts
5,250 -
Joined
-
Last visited
Content Type
Profiles
Forums
Events
Blogs
Gallery
Store
Everything posted by Dwight
-
You can do it either way, . . . but if you remove it, . . . lay the plate steel across the legs, . . . you get a little wider base, . . . less chance of tipping the thing, . . . and you can drill the back of the plate, . . . screw it to the legs. That will let you build a moveable fence that you can use to align your stamps and make your stamping look a lot more professional. May God bless, Dwight
-

Wet Forming Holster
Dwight replied to SpursNM's topic in Gun Holsters, Rifle Slings and Knife Sheathes
Mine go in the holster, . . . into the vac forming bag, . . . get formed, . . . removed from the bag, . . . checked for correctness, . . . and removed. Total time in the wet leather is no more than 4 or 5 minutes. I use the weapon itself if it is available, . . . blue guns when that won't work, . . . and wooden replicas when the back is up against the wall. They are all treated the same, . . . And thanks for the detailed post, Rednichols. May God bless, Dwight -
The very best thing for you to do, . . . go to a leather shop that sells the type satchel you want to reproduce. Find the one that has the right feel, . . . size, . . . weight, . . . in YOUR opinion. Take a dial caliper with you and measure the thickness. Then remember we are talking inches here not millymeteres. Convert the decimal fraction of the thickness into a fraction of 64ths, . . . 3/64ths, . . . 7/64ths, . . . etc. The number of 64ths is the oz weight of the leather. Then just go to the leather store near by, . . . tell em what you want to make, . . . let em show you what they have in that thickness. May God bless, Dwight
-
I have an arbor press that I also use for stamping letters, numbers, and designs. I took a piece of 1/2 inch plate steel, . . . placed it across the feet of my press, . . . and it is my bed for stamps, rivets, and when I get the right tool, . . . snaps. The only change I made, . . . I covered it with 2 inch wide masking tape to prevent any discoloration of the leather from the metal. Admittedly, . . . I don't do a lot with 3/4 leather, . . . but mine has come through for me in every case. As far as a "nice crisp stamp" goes, . . . the harder the plate under it, . . . the crisper the stamp, . . . but with 3/4 leather, . . . there is not enough thickness to get a really super looking stamp. AND, . . . forget the clamp idea, . . . bolt that thing down to your bench or whatever you want to use it on. Guaranteed, . . . if you don't, . . . it will move, . . . it will ruin a project, . . . and you WILL be unhappy. Temporary bolts with wing nuts will work if you only want to use it for a while, . . . but you are creating a huge force when you get your hand out on the end of that handle, . . . pulled all the way out, . . . Another thing you will want to do: adjust the handle so it is most comfortable for you to use. Are you left handed? If so, . . . take the collar off the left side of the gear shaft, . . . slide the shaft out the right side, . . . put it back in on the other side, . . . it makes a left handed press. Also, . . . put on your plate, . . . then block up the ram with a piece of wood simulating the length of your stamps, . . . and adjust the arm to be where it is most comfortable for you. I have mine just below horizontal, . . . it allows me to slip the handle onto my shoulder, . . . so I can reposition with both hands if I need to, . . . my shoulder holding the ram just up off the stamp. You adjust it by lowering it onto the block, . . . slide the gear arm out, . . . then slip it back in wherever it most comfortable for you. May God bless, Dwight
-
Pounder, . . . don't ever allow yourself the luxury of thinking that we are now 2014, . . . so much smarter,. . . better tools, . . . better equipment, . . . and roll that over into thinking that the craftsmen of 100+ years ago were any less craftsmen than we are. If any thing, . . . it has gone down hill. If you wound up in Quack Quack City, Colorado, . . . needing a gun rig, . . . your options were a catalog order that may take several weeks if not months, . . . ride over to another city, . . . or let the local guy do his thing for you. He didn't need to be in a hurry, . . . and he generally had "his own" style to a certain extent, . . . and if you hit the museums, . . . all of us can only hope that some day a piece of our craft my lay near some of those. Use the general idea of the period, . . . but make it "your" way, . . . that is exactly what the old timers did, . . . you will be following in their footsteps boot tracks. Make em proud, . . . by being like them, . . . not copying them. Copy their character, . . . dedication, . . . resourcefulness. As an aside, . . . one of the greatest compliments I ever received, . . . the person didn't know that I'm basically cheap, . . . make my own tools as often as not, . . . especially for a special need. That person related, laughingly, a little factoid about my grandfather, Will Webb, . . . stating that he was never very long waiting for a tool or a wrench. If a wagon came into his blackmith shop with a bolt or nut for which he didn't have a wrench, . . . 1/2 hour to 45 minutes later, . . . after a little forging, cutting, and anvil work, . . . he had the wrench. I think I grew about 3 inches that day, . . . knowing that I had "unknowingly" stepped into a pair of boots that have long been special to me. Good luck, . . . happy pounding. May God bless, Dwight
-
How Would You Sew This And What Machine
Dwight replied to Barlaam1's topic in Leather Sewing Machines
I think what is says is simple: it is THE bottom end of the price structure for a sewing machine that will sew through 3/4 of an inch of leather. Many folks by them as a starting machine, . . . then choose to graduate to a different machine, . . . especially if what they are doing requires a lot of stitching. When I began my search for a machine, . . . I already had a slight familiarization with the Boss as a local leather store sold them. Therefore, . . . when I saw one of the full time craftsmen of a major holster mfg. here in the US, . . . standing beside his in an advertisement promotion, . . . I immediately recognized the machine. Later as I began to finalize the decision, . . . I guess I figured if my business got so good using a Boss, . . . some day I would be like them, . . . and have a 1 year waiting list for my product. Sometimes volume is better used to describe the output of a radio than a craftsman's shop. And, . . . if volume goes up in a production facility, . . . about 99.95% of the time, . . . quality goes down. May God bless, Dwight -
Actually, . . . I never oil before dying, . . . and I only oil after, if I'm convinced that the leather is dry. It will take a looooooooong time for the oil in the leather to dry out, . . . BUT, . . . it is real easy to get too much oil on the project to start with. Most of my products rely on the inherent stiffness of the veggie tan created by wet molding, . . . even the slightest too much oil can ruin that effect. My lifetime rule is we will all err, . . . but it pays to know which side on which to err, . . . in this case, . . . too little oil will come about far less times by not oiling, . . . than too much oil will come about by oiling. Just my thoughts, . . . May God bless, Dwight
-
Are you using the leather to practice tattooing like for people? May God bless, Dwight
-
How Would You Sew This And What Machine
Dwight replied to Barlaam1's topic in Leather Sewing Machines
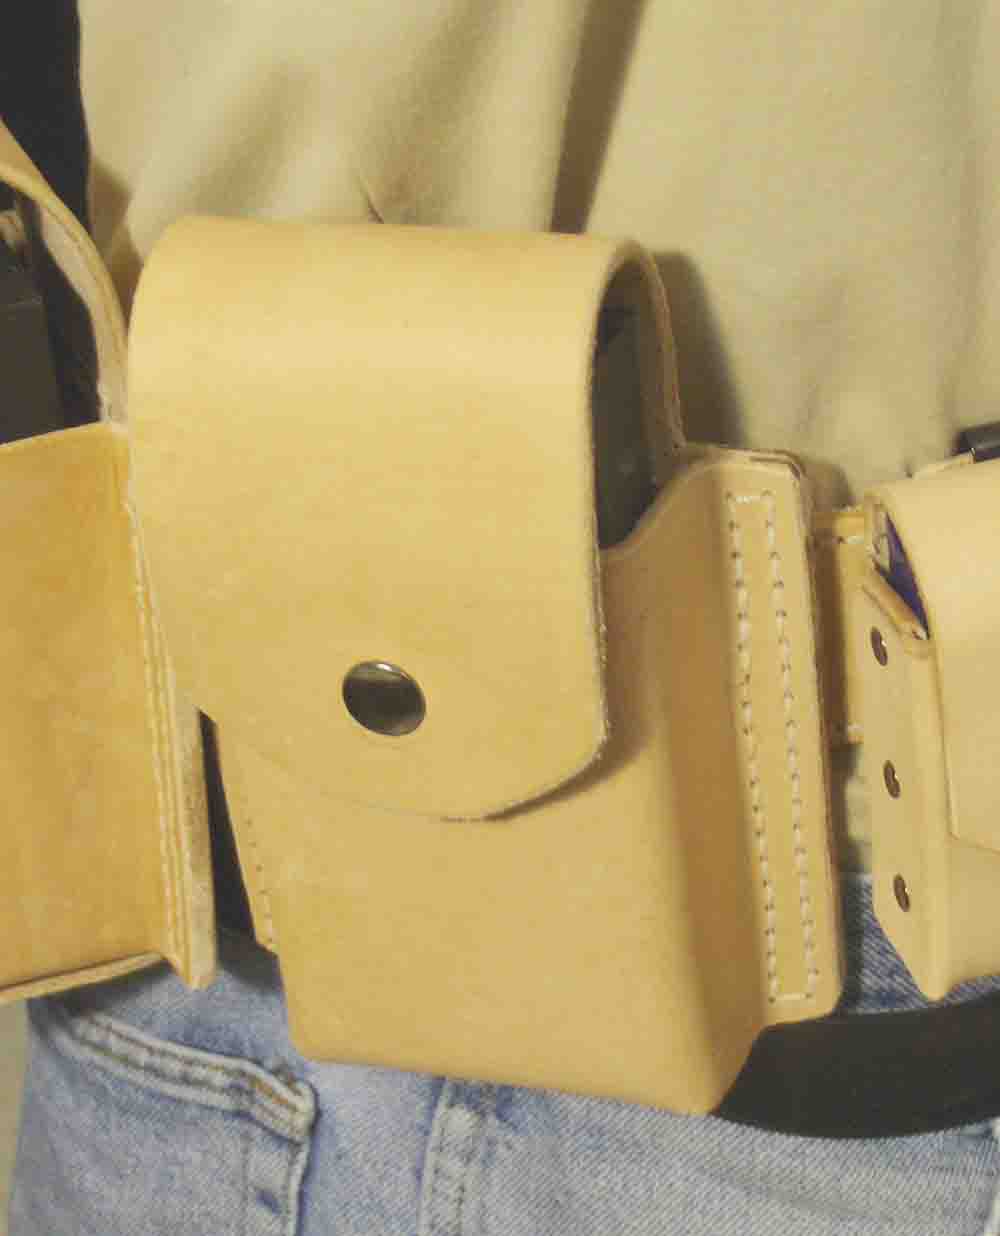
Barlaam, . . . I make pouches to carry M14 magazines in, . . . from 8 oz leather. I do two different models, . . . riveted and sewn. They both are each cut from one piece of leather, . . . wet formed, . . . contact cemented together, . . . and riveted or sewn. Picture shows both procedures, . . . and my machine is a Tippmann Boss. May God bless, Dwight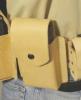
-
Anything you can put in an air brush that doesn't have a compressor, . . . . ^ ^ ^ AND, . . . you knew someone was going to say that, . . . I just got there first. Seriously, . . . the nearest thing that will work is Resolene. It has a UV blocker, . . . that keeps sunlight from darkening the leather really bad, really quick. Unfortunately, . . . if it is veggie tan, . . . one of the properties of the product, . . . leave it out in light, . . . it will turn darker. Resolene will slow down the process, . . . but it won't stop it. And it does, itself, turn the leather just a tad darker, . . . but it is kind of a "pink" darker. I've done a few things with it like that, . . . but nothing of a great sort. Honestly, . . . I like it a bit darker. What are you trying to achieve? May God bless, Dwight
-
My biological father was an enigma of a man, . . . so great in many ways, . . . but not in others. I was given his billfold, that he made, by my half-sister, . . . she thought since I do leatherwork, . . . I should have it. Tempted to use it, . . . I resisted, . . . it's in a drawer right beside me right now, . . . it is my "link" to him. Just glad to hear that there are a number of us who share similar stories, . . . and I certainly hope you get yours "fixed". But remember, if you don't it can always go into a drawer, . . . be retrieved from time to time, . . . May God bless, Dwight
-
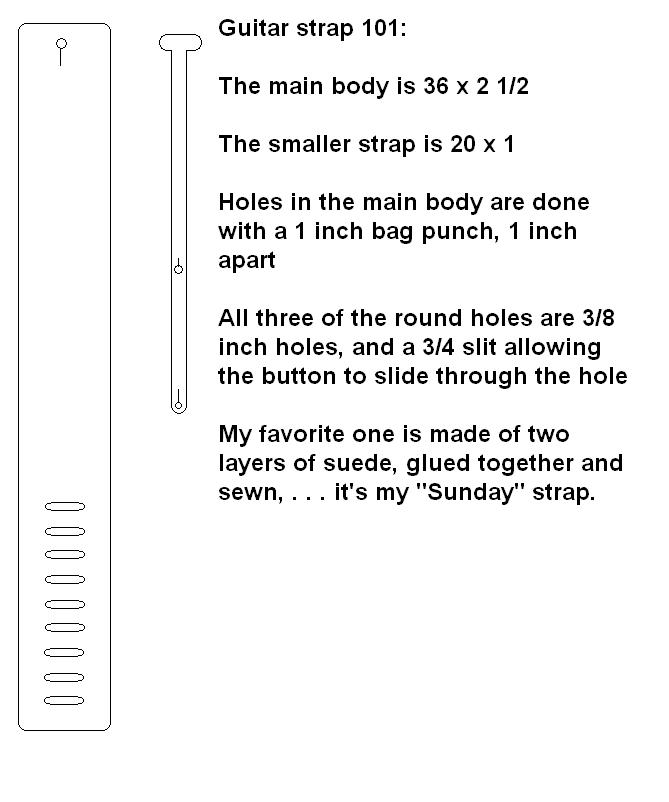
This one is about as easy as they come, . . . I've had it for so long, . . . don't rightly recollect when I did get it, . . . Have fun, may God bless, Dwight
-
Like Canadian Girl said, . . . mix 50/50 with water. I use a cheap bristle brush, . . . put a good wet coat on the belt (always start with the back), . . . and keep adding and brushing until I build up almost a bubbly lather. I then turn it over and do the same thing for the front. Come back to the back, . . . add a little more, . . . brush the bubbles left, right, up, down, crossways, . . . until they have been brushed out. Turn it over and do the same for the front, . . . Hang it up on a hook and very carefully make sure wherever I have touched it that it gets a good brushing of Resolene, . . . especially the edges. You really do want a plastic, or latex glove on the "handling" hand. That stuff won't hurt you, I don't think, . . . but it's sticky nasty, . . . kinda like a 1 year old handing you her sucker,.......... You also want to be sure to do all the bending necessary (buckle end especially) because when this hardens and dries, it can crack. Do the bending while it is still wet, . . . then touch up where you touched it bending it. May God bless, Dwight
-
Well, for starters, . . . you picked the one Feibings oil dye that I will probably never use again myself when my bottle is done. But, . . . you might just allow it to dry thoroughly and it will be OK, . . . it has done things like that to me. What are you using for the finish coat? Resolene has a habit of helping to smooth out what would otherwise look kinda blotchy for me. I use it almost exclusively on belts. Best wishes, may God bless, Dwight
-
There are some models of sewing machines, . . . that have enough neck to get down in the barrel of a boot, . . . and can sew on a patch, . . . or if the sewer is relatively inventive, . . . they may be able to add a floral or initial design for you. OR, . . . you can get an awl, . . . some needles, . . . and go at it if stitching will suffice for what you want to do. Best wishes, . . . may God bless, Dwight
-
Now, . . . I am going to be good, . . . I am not going to be a smart alec and say "Sew with WHITE thread". Though as the class clown years ago, . . . I would have. Actually, . . . every thing I make is contact cemented together, . . . in such a manner that the stitches are in some cases nothing more than decoration. But when I do white stitches, . . . EVERY THING ELSE is done first. The object is finished except for sewing and applying the top-coat final finish. THEN, I sew. All dying, edging, sanding, burnishing, polishing, . . . every bit of it is done, . . . including the stitch gouging, . . . which since I know is going to be done in white, . . . I do it even before I dye the leather, . . . as it makes a much better presentation. After I sew, . . . final top coat, . . . a little wax or polish sometimes, . . . look in the mirror and smile, . . . ya did good ! At least that is my process. May God bless, Dwight
-
Floral Holster & Doubled Suede Gunbelt
Dwight replied to Josh Ashman's topic in Gun Holsters, Rifle Slings and Knife Sheathes
Yee, Haw, . . . (couldn't pass up the old Hee Haw line), . . . looks real good, Josh. The light/dark mottling of the holster is an especially nice touch, I think. I did something similar to my personal Western rig, . . . but with black. Did you make that for youself or for a lefty customer? May God bless, Dwight -
Actually, from what I understand, . . . the "Oz" stands for "ounces per square foot". So if you take a dial caliper and the leather measures between .094 and .109 and it weighs between 7 1/2 pounds and 8 3/4 pounds, . . . you got what you paid for. The lower weight would correspond to the thinner thickness, . . . the higher weight, . . . the thicker measurement. Some folks will tell you that it's all done by a laser and computer anymore, . . . and whether it is or not, . . . this is (I am told) supposed to be THE way to check out the sale, . . . period. At least try it, . . . see how close you came out. May God bless, Dwight
-
Need Help With Sheath Idea
Dwight replied to Shooter McGavin's topic in Gun Holsters, Rifle Slings and Knife Sheathes
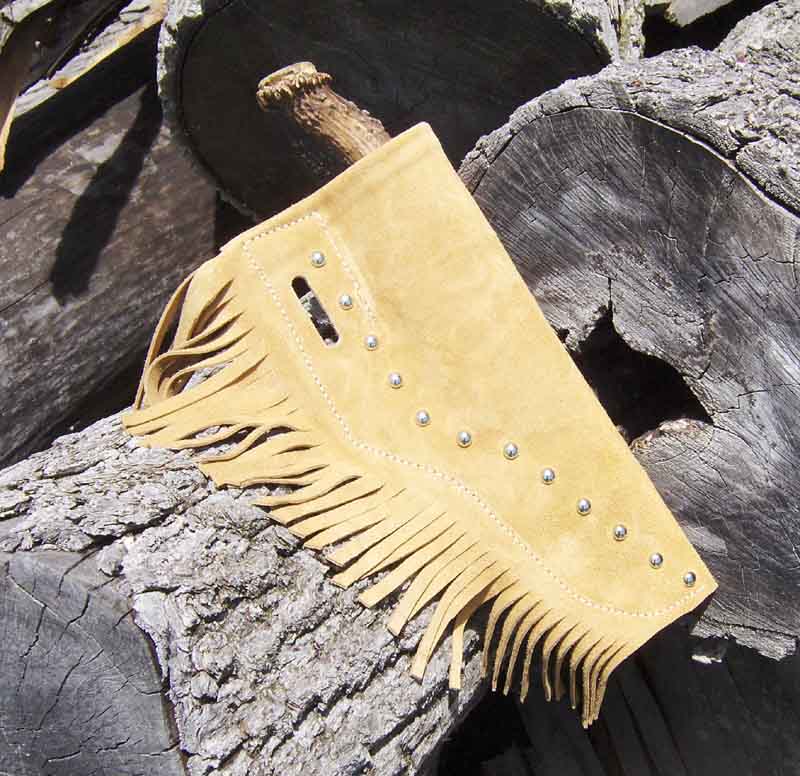
Different customer, . . . but same idea. Here's what I did for him, . . . it's suede outside, . . . rawhide inside, . . . the hilt has a bump area to be pulled through, . . . will not fall out if held upside down. He loves it. May God bless, Dwight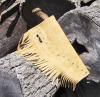
-
Hey, Compound, . . . woo-hoo, . . . and thank you. I've been using a dial caliper for any number of years, . . . and sometimes it is just a pain. Can't get over "there" where it looks like it is a bit thicker, . . . and won't find out until you cut it. I've got a sneaking hunch that sometime this year, . . . me, . . . my welder, . . . some technical tools, . . . will all come together to make one of those. I have 3 or 4 dial indicators out in the shop, . . . one of them will take care of this job for sure. And when I do it, . . . I'll make a new face that reads out in oz's. Thanks again, . . . and as has already been said, . . . thank you for giving new life to an old tool. I totally detest people who just toss stuff cause they don't know how to use it or it isn't "new" and fandangled enough for em. May God bless, Dwight
-
Actually, . . . No, . . . whatever is not absorbed by the leather (you don't allow it to take a nap in the dye, . . . just a few seconds to get a good, deep penetration) is then poured back into the bottle. I mix my dyes up by the quart, . . . when it gets about half empty, . . . mix up another and finish filling the jug, . . . so most of the time I have at least one full quart on hand. I use one brown pan, . . . one black pan, . . . and I have a spare that I would use for "others". I average using something in the neighborhood of 3 oz per holster, . . . or belt. But remember, . . . that's kind of a rough figure. The most important part, . . . my dying is uniform, . . . and anyone who is in the business of satisfying the public will tell you your product has to approach uniformity. May God bless, Dwight
-
I am not certain about the UK, . . . but here in the states, . . . it is way cheaper to just go buy the single phase motor. The added benefit, . . . it doesn't take an engineer or even a highly trained tech to troubleshoot the single phase setup. But the 3 phase setup will require someone nearby who understands the thing when you get into technical difficulties. May God bless, Dwight
-
You are off to a good start. Dying is one of those "to each his own" things, . . . but I've found that making the holster, belt, bag, purse, . . . whatever, . . . first works best for me. Once it is dyed, . . . and you start stretching, molding, cutting, fitting, etc, . . . you wind up with a bunch of areas that either fade out or need touched up, . . . and touching up can be one livid pain. Adding oils before dying also acts as a blocker to a certain extent, . . . not allowing the dye to penetrate fully. And you may want to consider dip dyeing. It will get rid of the un-dyed portion of the black holster under the belt loop. I do mine in a 9 x 14 by 2 inch deep aluminum cake pan, . . . pouring the dye over the holster as I pour it into the pan. That way the color is fully uniform, . . . something I never was satisfied with using daubers, brushes, etc. Then after you have dyed it, . . . hang it up somewhere to fully and completely dry. Leave it alone, . . . 100% until it is dry, . . . then add the oil, . . . just remember to be sparing with it. Too much oil and you have a floppy, greasy, dog's chew toy. May God bless, Dwight
-
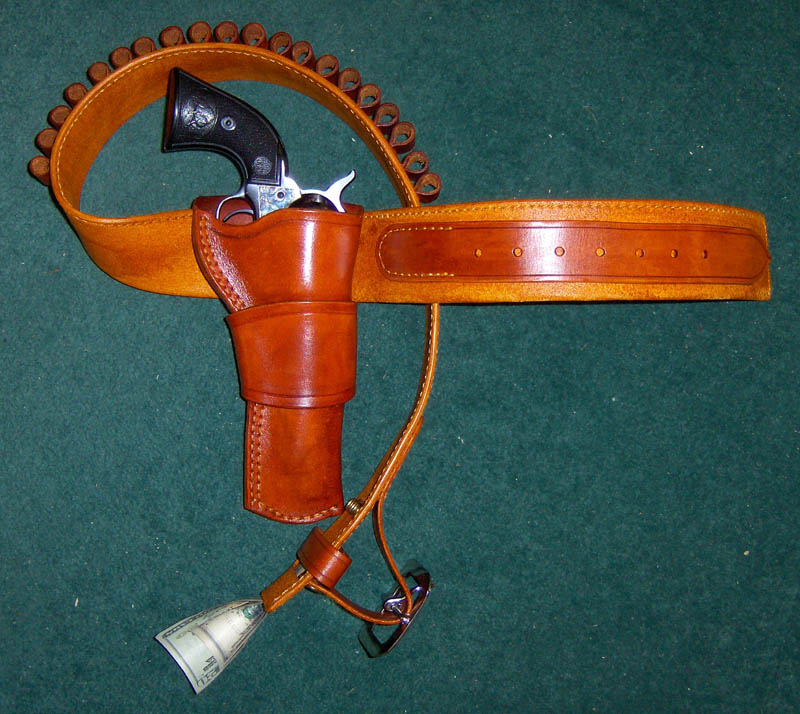
I don't have the article, . . . but I read once where the rig the Duke carried in several of his last westerns, . . . was a folded over, rough out, money belt. I made one once, . . . had a lot of fun with it, . . . just might make another. Good job, Cogs, . . . your customer will be proud of that for years to come. I didn't get an exact copy of JW's rig myself, . . . but I was happy with how it turned out. May God bless, Dwight

-
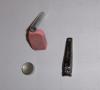
For manually setting rivets, . . . quite honestly there is a little tool that comes in one of the bags of rivets sold at Tandy's. It is about 3/8 of an inch in diameter and has a domed face for doing rivets. I find that it is more than adequate, . . . does a good job, . . . and doesn't deform the rivets. I put a nail clipper in the picture, . . . gives you an idea of the size of the pieces. You use it in conjunction with the anvil that came in the same package, . . . it is about 3/4 inch in diameter. It also has a domed face. Top of the rivet lays in the anvil, . . . through the leather, . . . put on the bottom, . . . and I tend to "tap, tap, tap" instead of "WHACK", . . . when I'm setting rivets. Just looking at your belt, . . . I'd say you laid the rivet heads on something flat and hard, . . . and in setting the other side, . . . this side is deformed. The little anvil in the bag of rivets prevents that. And I don't think the mallet makes much difference, . . . using a metal one will deform most leather tools over time, . . . that is why most leatherworkers tend to use a plastic or rawhide mallet. May God bless, Dwight