


Dwight
-
Posts
5,248 -
Joined
-
Last visited
Content Type
Profiles
Forums
Events
Blogs
Gallery
Store
Everything posted by Dwight
-
I don't know where to look on mine for a year, . . . heck, I was tickled to find out what kind it was. Pretty much have decided to leave well enough alone. Gonna clean it and oil it, . . . plan on riding the July 4th parade with it, . . . it's an office ornament right now in my leather shop, . . . lots cheaper than paintings, . . . and a whole bunch more practical. Someone added a lot of stampings to it, . . . I look at those and just have to wonder, . . . sure wish it could talk. May God bless, Dwight
-

How Do I Stop My Leather Stretching When Embossing?
Dwight replied to Pinky's topic in How Do I Do That?
I don't have a lot of experience embossing, . . . but the last belts we did, . . . we lightened the pressure a bit, . . . made everything so much better. We wanted really deep impressions, . . . but it gave us other problems, . . . like you mentioned. May God bless, Dwight -
Personally, I don't do it, . . . never had one come apart yet. SOMETIMES, . . . it adds to the look, . . . but especially if you are hand sewing, . . . lots of extra work for a minimal return. May God bless, Dwight
-
Well, I suppose one could follow that line of thinking, . . . but the overall effect would I think be minimal. The down side is that it also makes the overall holster longer, . . . which can be a pain, trying to fit it exactly where you want it on a belt, considering the belt loop placement. Diagonal slots take up more belt room, . . . leaving less for adjustment. Plus, . . . I think if you look at most of the production makers, . . . they're really close to parallel, . . . if they aren't. May God bless, Dwight
-
Good holster for your first one, . . . the initials on the back is a nice touch, . . . as well as the model, . . . some folks need that. On your sweat shield, . . . you beveled the hair side, but not the flesh side, . . . so when you burnished it, . . . a hard lip formed on the gun side of the sweat shield. Take a spoon, . . . put your thumb in it, . . . and work out those hard lips. Believe it or not, . . . after finishing them really good, . . . they can be sharp enough to cut you. The only other thing I saw is a common one for new pancake makers. Your slots are not parallel. Both are angled in so that they sort of point toward the muzzle of the gun. It usually is not a problem, . . . but if the length of your slots is "just enough" for the belt, . . . it will put the belt on a bind behind it. It also makes it very hard to put on if the slots are only "big enough" for the belt, . . . May God bless, Dwight
-
Sorry, Cheryl, . . . wrong answer. Resolene goes on the front, back, edges, keeper, . . . only things it misses on my belts is the holes and the buckles. Not putting it on the back of the belt is telling your customer that you want the belt to soak up his / her sweat, . . . get all grungy, grimy, gooky, wear out, and be useless sooner so they can buy another one. it is a sealing product, . . . meant to seal the dye in, . . . keep the belt looking greater, longer. It also seals most liquids out, including sweat. I cannot think of a project I would not do, . . . inside and out with it, . . . unless I lined the inside with suede or veggie tan to protect the weapon on a holster, or the blade on a sheath. Those are the only exceptions in my line up. YMMV May God bless, Dwight
-
If you only have a few, . . . or have some extra time on your hands, . . . and / or are VERY picky about your spots: take one, . . . slide it into your spot setter handle, . . . then pull up on the sleeve so that just the points end sticks out, . . . take a piece of masking tape, . . . tape the sleeve in place. Then use the spot setter as the tool to mark where you need the holes, by pressing down with it on your leather. Take a narrow awl, . . . make your holes. Push your spots through with your thumb, . . . turn the piece over, . . . put the spot in the proper dome in the tool that fits it, . . . push the spot legs over to the center of each spot with a flat blade screwdriver, . . . after all spots are set, . . . turn the piece back over, . . . lay it on a hard surface, . . . use the spot setting tool to then complete the job by tapping them until they are set down in the leather a bit. I set all of mine this way for a long time, . . . then went to the poundo board method, . . . do most of them that way now, . . . but for very special projects, . . . still come back to this. May God bless, Dwight
-
Handmade Holsters
Dwight replied to JBLeatherworks's topic in Gun Holsters, Rifle Slings and Knife Sheathes
I really like your work, JB, . . . and as a pastor, . . . I share your enthusiasm. I am more into the "watering and keep alive" rather than planting, . . . but we all work for the same cause, . . . so that's great. Just one caution though, . . . the first post, . . . center holster, . . . looks like a Glock. I would never get the trigger guard so deeply boned. Glocks have no external safety, . . . just that little dipsy doodle thingy in the center of the trigger, . . . the owner shoving his piece in the holster in a hurry might get an unintended discharge, . . . which would not be a happy affair. I'm extremely careful of boning the trigger guard for Glocks and similar plastic fantastics that have no real safety on the weapon. Again, . . . not a criticism, . . . just a caution. May God bless, Dwight -
1913 Double Magazine Pouch For A M1911-A1
Dwight replied to sinpac's topic in Gun Holsters, Rifle Slings and Knife Sheathes
Well, . . . it ain't a gold mine, . . . but it sure is a blessing. I needed a piece for my work table several years ago, . . . it was only 36 x 48 and about 5/16 thick, . . . the guy gave me a "break" at $40. Good find, . . . May God bless, Dwight -
1913 Double Magazine Pouch For A M1911-A1
Dwight replied to sinpac's topic in Gun Holsters, Rifle Slings and Knife Sheathes
I am certainly no expert in what is or is not period authentic and all that, . . . But your rendition of a double mag pouch is really good lookin. I like the mold you used too, . . . am I correct that it may have been a cutting board at one time? May God bless, Dwight -
-
How Would I Make This Bag?
Dwight replied to Aubrey Kloppers's topic in Purses, Wallets, Belts and Miscellaneous Pocket Items
Thanks, Ash, . . . I have a young lady in Hungary (missionary's daughter) who just may be getting one of those. Been looking for "THE" gift for her, . . . that, I like. Her brother gets a billfold,......... May God bless, Dwight -
Google is your friend, . . .
-
One source for stitch markings might be a hacksaw blade. Many of them have 12 teeth per inch, . . . and other derivitives. A short piece, . . . maybe 1 inch long, . . . could be affixed to a wooden dowel, . . . and used to mark the stitch placement. Sometimes you gotta be creative, . . . May God bless, Dwight
-
On the streets: "What goes around, . . . comes around" Buddhism calls this idea Karma. Christianity says, "As ye sow, . . . so shall ye reap". Funny how the same concept is seriously universal, . . . excepting maybe muhammedism, . . . Good post, Handstitched, . . . look forward to pictures, . . . it's always fun to see what other people are doing. If you get over to the gold coast, . . . tell it Dwight said "Hello", . . . been over 40 years, . . . but was some of the best days of my youthful life. May God bless, Dwight
-
If I'm not using my standard 346 thread, . . . the only other one I use at all goes on my other sewing machine, . . . I buy it at JoAnn fabrics, . . . it is called upholstery thread in their store. It is one strong thread, . . . would do wonderfully for smaller stitches (I do 5 spi with the big machine, . . . about 8 spi with the upholstery thread) if you are sewing by hand. May God bless, Dwight
-
How Do You Finish The Flesh Side Of Your Straps?
Dwight replied to FoamerAce's topic in How Do I Do That?
I assume that you have leather that has appendages hanging off the flesh side of your leather. First rule, . . . never buy that cheap of leather. Second, . . . take a sander to it, . . . yeah, . . . the wood sander sitting on your woodworking shelf. No sense in trying to explain how, . . . you play with it a while, . . . it'll come to you. Then you just finish the flesh side the same way you do the hair side. Now some folks don't dye the flesh side, . . . I'm not one of them. Dye jobs at my place are a baptismal effect, . . . dunked till they bubble. Add the appropriate finish, . . . I'm partial to Resolene, . . . mop & glo works, . . . as well as others. Hope this helps, . . . may God bless, Dwight -
I'll be deadpan honest with you, . . . never saw or heard of such a rig. Been doing this for several years, . . . but I guess it's never too late to learn a new trick. My "commercial" gun belts run almost 1/4 inch thick, . . . but the holsters either thread on through slots, . . . hang on with clips, . . . or something of that nature. If it were mine, . . . I'd get a good solid 9/10 oz blank belt, . . . and another 5/6 blank, . . . both 1 1/2 wide. The thin piece will be your "liner" which goes from the tounge end to where the buckle end is folded over and Chicago Screwed together to hold the buckle. On that liner, . . . sew your velcro wherever you want it. Then use Weldwood contact cement to cement the two pieces together (flesh side to flesh side). From my velcro experience with other projects, . . . I'd probably bevel down the edges of my liner, . . . buy a piece of velcro that was 2 1/2 inches wide, . . . wrap it around the liner and sew it in place. It will make that portion of the belt a bit thicker and bulkier, . . . but not enough to cause a problem. Sand the edges smooth, . . . bevel and burnish them, . . . stitch groove them, . . . sew them, . . . stain and finish, . . . VOILA, . . . done ! I'd like to see the finished product as well as a picture of the holster you intend to use with it. Look at my website, . . . you'll see one of my finished ranger belts, . . . www.dwightsgunleather.com May God bless, Dwight
-
A shearling skin from Springfield leather will cost you $99 + P&H. One pint of Weldwood contact cement will be about $8. Simply dissassemble the saddle until you get the skirts off, . . . remove the old, . . . glue on the new, . . . sew the edges, . . . trim, . . . re-assemble, . . . ride on, cowboy, . . . ride on. Like Tom said, . . . it can be done in an afternoon, . . . but if you don't start until Noon, . . .and you've never done anything like this before, . . . I wouldn't plan on watching much of anything on TV before the late night news. May God bless, Dwight
-
Sewing in toe plugs is sorta like changing a flat tire on the freeway, Friday night, in the middle of a rain storm. There ain't no real easy way to do either one, . . . you just do it. Will's way will definitely work, . . . and yours looks reallygood to me. And, . . . when you stand back 36 inches or so, . . . who is going to know how you did it? May God bless, Dwight
-
i did it one time, . . . but then again, . . . I only tried once. Needed a black pair of boots, . . . had two brown pairs. Took good old USMC black, . . . the rest is history. Course then again, . . . I was doing the whole boot, . . . you'll need to be careful. May God bless, Dwight
-
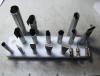
Now I don't know, . . . don't look like my spot setters. Have you tried using one of them to set a spot? That might settle the question real good and quick. May God bless, Dwight
-
Can't tell for dead certain, . . . but the center one and the one on the right do look like round spot setters like the ones I have. Maybe side view pics???? May God bless, Dwight
-
Get or make a punch, . . . or get a belt sander ($50 at Harbor Freight). Either will give you a fairly uniform and good looking end. They will also give you the ability to quickly finish the "end" problem. I make those kinds of punches, . . . conduit, . . . sharpened on a disc sander around the outside circumference, . . . then cut the edges to achieve the punch I desire. May God bless, Dwight
-
Yessir, . . . been there, . . . done that, . . . what Renee said is on the money. No, . . . you don't want to know how I know for sure what she said is right May God bless, Dwight

