Dwight
-
Posts
5,240 -
Joined
-
Last visited
Content Type
Profiles
Forums
Events
Blogs
Gallery
Everything posted by Dwight
-
-
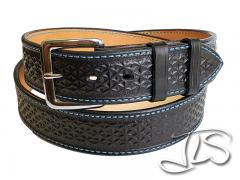
In a one word answer: no. I have not done this, . . . but leather is very similar to soft wood, . . . your bit MUST BE very sharp, . . . recommend BRAND NEW. But then again, I've never done a belt like that If I did, . . . I'm a lazy rascal, . . . and I just will not take the long, rough, hard, intensive road for anything, . . . just my nature. I'm constantly trying ways to make things easier for this 74 yr old coot, . . . and after giving it some thought, . . . looking at my available tools, . . . that was the idea I came up with. It will not, I am sure, work on anything thinner than 7/8, . . . and that belt looks more like 11/12 leather. I would also cut the blank as high up on the side of leather as I could get. Leather nearer the spine tends to be denser and harder than belly leather. If it is a 1 1/2 inch belt, I would cut my blank probably 2 1/2 inches wide, . . . soak it good and when it gets back to a good "in case" do the stamping in the middle 1 1/2 for the belt, . . . then lay it out to dry. It will harden as all veggie tan does, . . . and then you glue it to the plywood and go for it. Knowing me, . . . I'd take a 12 inch piece of leather and try this first, . . . get the knack of doing it by practice, . . . and then hop on it. I think it would make a fantastic looking weight lifting belt or something like that. May God bless, Dwight
-
Tandy often has some sheep skins with very short fibers, . . . like maybe 3/8 inch, . . . I've gotten them for projects, . . . and they were not that expensive as I recall. Been a while, . . . though, . . . There is also a synthetic sheepskin, . . . I''ve seen a few of them, . . . they would work. May God bless, Dwight
-
Being an old wood worker, . . . I would stamp the letters in the belt blank, . . . then rubber cement the leather to a piece of 1/4 inch mahogany plywood. Then I would clean the bottom of my router off real clean, . . . put in a 1/4 inch bit, . . . and hog out the biggest parts of the areas, . . . then switch to a 1/8 inch cutting blade, . . . finish up the cutting out of the letters. Up at the top and down at the bottom where the straight cuts are, . . . I'd use a wood chisel, . . . it makes really nice straight cuts that are super clean. Pull the leather off the plywood, . . . and like Hildebrand said, . . . glue it to a contrasting backer, . . . sew the edges, . . . and you are in business. May God bless, Dwight
-
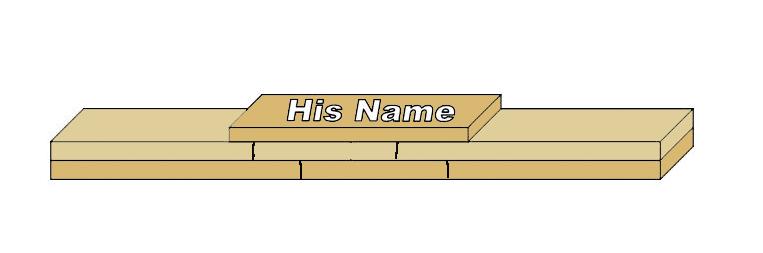
This is a rough drawing of what I did. The bottom layer is the inside layer of the belt, . . . the middle layer as you can see is butt joined in the center, . . . and the patch with the name is what covered up the obvious butt joints. I did this only because I did not have a long enough piece of leather for his belt on the finish side. I would use this same process to extend a belt, . . . cutting the top layer, . . . then the bottom layer maybe an inch apart, . . . and staggering pieces between them to lengthen the belt, . . . and cover it all with a top patch. The belt was of course sewn from end to end as I do all my double layer belts, . . . the patch was sewn around the inside of the patch, . . . He loved it. I see him occasionally, . . . and he still wears it. May God bless, Dwight
-
Some time back, I had to make a double layer belt but for the outside layer, . . . I had to splice it (he was a BIG guy). Over the splice . . . I put a thin piece (3 oz??) and stamped his name in it. He was totally thrilled, . . . never guessed the reason for the "patch". You could do something similar, . . . a 6 inch long "patch" on the outside of a 3 inch extension piece. I did my splice dead in the middle of the back so his name is visible as he walks away. May God bless, Dwight
-
I make cheek risers for friends this way. They are sandwiched layers of leather, . . . contact cemented together. I put one on the stock, . . . hold it down with rubber bands, . . . then contact cement the next layer on and keep going until I get it as high as I want it. I take the finished "height" piece, . . . sand the sides smooth on a belt sander, . . . I then put the outside covering on it, . . . after any tooling or stamping, . . . dye, . . . and send it out. May God bless, Dwight
-
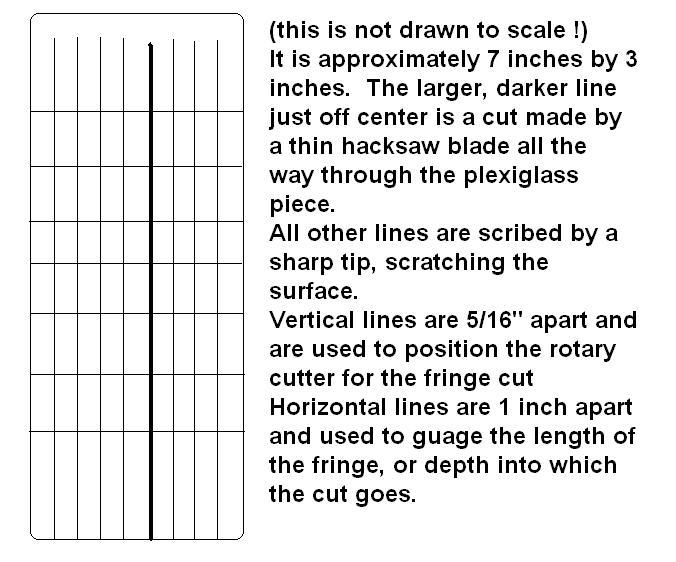
When I make a pair of chaps or anything else using fringe, . . . my fringe is cut all in one piece, . . . gave up long ago trying to make smaller pieces of fringe all line up right and hang correctly. I found the template for this a number of years ago, . . . this is what I use with a 2 1/4 inch rotary knife, . . . and a lot of care. I can cut about 8 inches a minute with this, . . . and you will have to spend some big $$$$ to get a lot faster than that. The one picture gives you the idea how to make it, . . . the one I use mostly is in the other picture, . . . the center one. May God bless, Dwight

-
Dye is not severely expensive, . . . but it DOES ADD to the total price of the project. For that reason, . . . all cutting, fitting, sewing, sanding, buffing, etc. is done before I dye a project. When I dye, . . . project has passed the construction and assembly parts, . . . needs only finish, polish, and send. May God bless, Dwight
-
 Looks great, . . . also way above my pay grade, . . . I can't even keep basket weave straight for a key fob. May God bless, Dwight
 -

Cowboy Single Action loading strips
Dwight replied to noobleather's topic in Gun Holsters, Rifle Slings and Knife Sheathes
If you are going to poke the Oz bear, . . . poke him with the idea that you "heard of" a pastor that not only carries concealed, . . . but has been known to don a set of body armor as well. Make up your popcorn and milkshake ahead of time, . . . the show should be fun to watch if you have enough snacks. May God bless, Dwight -
Cowboy Single Action loading strips
Dwight replied to noobleather's topic in Gun Holsters, Rifle Slings and Knife Sheathes
Actually my church gun is also a .45, . . . but it is the more modern style, . . . more easily concealed, . . . more quickly reloaded, . . . and holds 9 to start with, . . . a 50% improvement over the old West favorite. I can also hit something with it, . . . the cowboy gun will hit a gallon milk bottle in my hands if it ain't over about 10 feet away, . . . lol. May God bless, Dwight -
Cowboy Single Action loading strips
Dwight replied to noobleather's topic in Gun Holsters, Rifle Slings and Knife Sheathes
Actually, . . . the story behind that buckle set is I saw the belt buckle hanging in the Tandy store, . . . bought it for my own personal dress buckle. Got it home, . . . took a better look, . . . decided to break down and make my own cowboy rig, . . . kinda sorta like the Duke's rig he wore in the last 5 or 6 westerns he did. Then I had to go get the little buckle and the conchos to finish it. Opening up the little buckles bag, . . . finally saw the design name on it "Diablo", . . . had to laugh that here is a church pastor with a cowboy rig, . . . buckle set is the "Devil" in spanish. Still chuckle about it. May God bless, Dwight -
TonyRV2 hit the nail on the head, . . . "Up to now I have found that a light coat of oil prior to dying did improve the process." My first couple of uses of Feibings Saddle Tan worked OK then I hit the "blotchy" wall, . . . saw several pieces basically ruined by uneven dye jobs. Tried the "oil it first", . . . and have been doing that ever since, . . . works like a champ. I use a bristle brush and lay an even coat of neatsfoot oil (NOT compound) on the flesh side of the projects, . . . 24 hrs later the leather has returned pretty near to the original color, . . . then I do the dip dye trick, . . . love the results. May God bless, Dwight
-
Cowboy Single Action loading strips
Dwight replied to noobleather's topic in Gun Holsters, Rifle Slings and Knife Sheathes
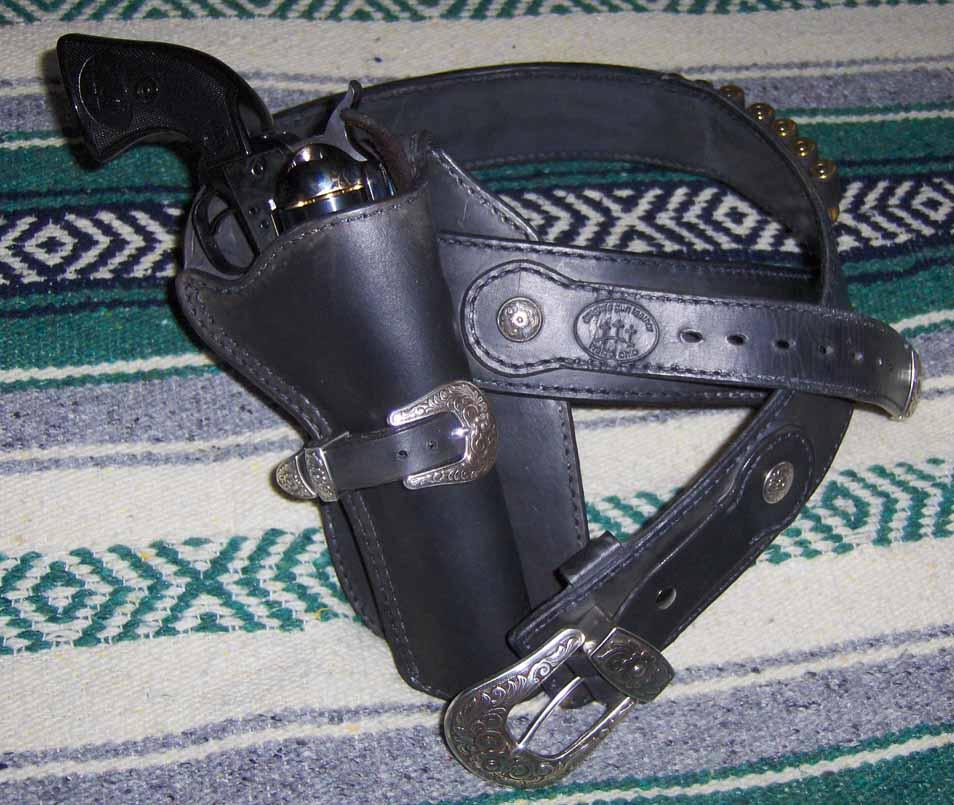
This is not any kind of fancy, . . . it is my personal holster and gun belt, . . . as of now it is about 15 yrs old, . . . feels better each time I put it on. AND of course it is made the way I described to you. May God bless, Dwight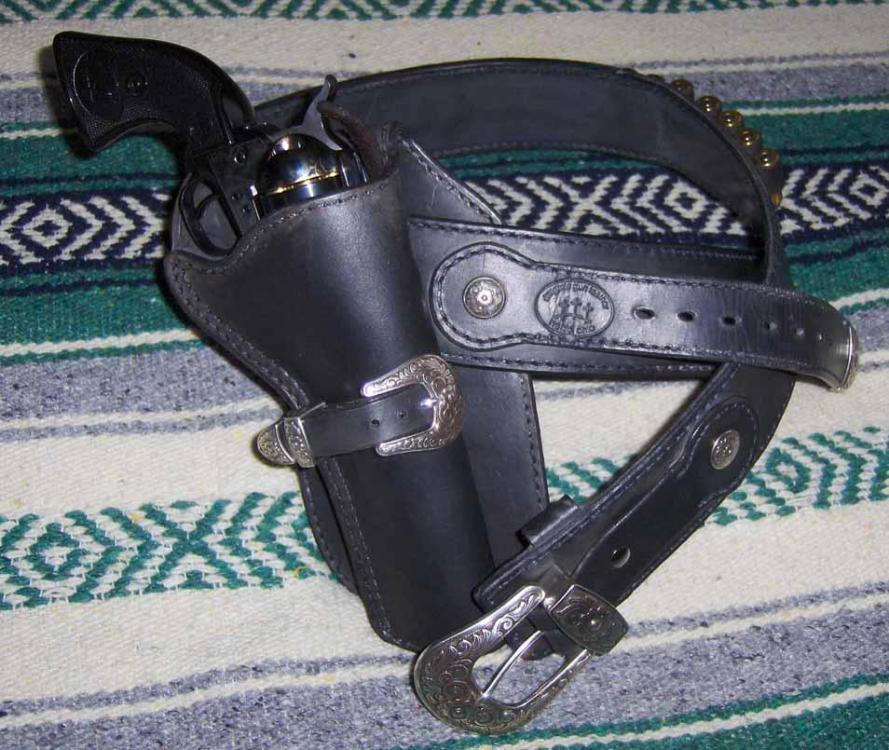
-
Cowboy Single Action loading strips
Dwight replied to noobleather's topic in Gun Holsters, Rifle Slings and Knife Sheathes
Thanks noobleather and Dikman, . . . I am not into Cowboy action shooting, . . . so that was WAyyyyyyyy over my head. But they still are darned nice. AND . . . noobleather, . . . I make those loops in every gun belt I make, . . . never had to stitch even one of em. I use 3/4 calf leather, . . . cut it about 3/32 wider than the slot, . . . pull it thru and around the bullet, . . . back out the same hole, . . . once it dries, it'll never move. Of course, . . . I help that along with a couple light coats of Resolene, . . . mixed 50/50 with water, . . . makes em solid as a Republican judge. May God bless, Dwight -
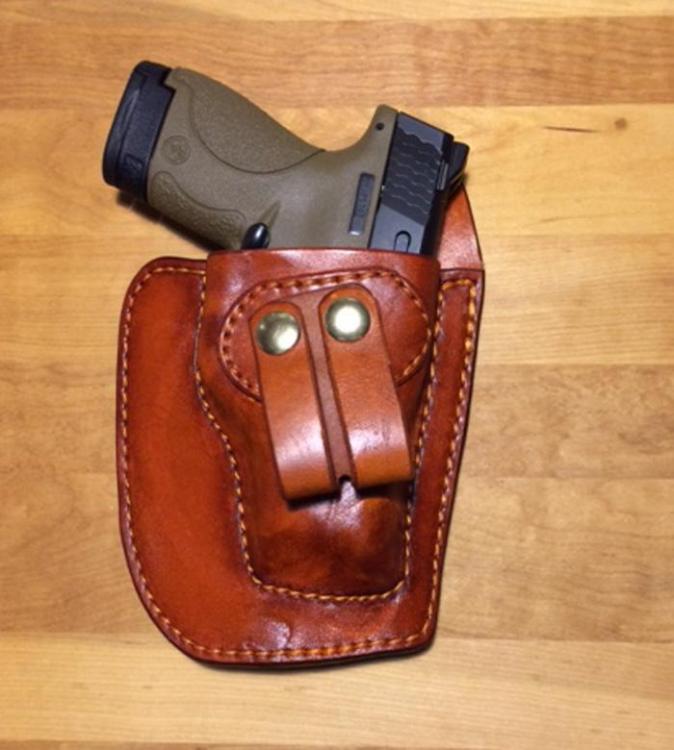
Some of the stuff I've gotten from Tandy has a wax coating on it, . . . the latest stuff does not, . . . and I don't know if it's polyester or what, . . . it is what they sold me. It has a coating that sometimes acts like wax, . . . I just assumed that is what it is, . . . but I'm not a chemist. The holster in the picture was sewn with Tandy 346 white thread, . . . then dyed when I dipped the holster in the British tan dye. May God bless, Dwight
-
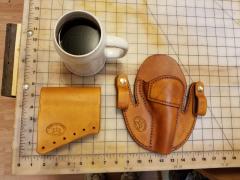
Here is one of my favorite holsters, . . . 346 thread. May God bless, Dwight
-
Rough out IWB step by step
Dwight replied to Josh Ashman's topic in Gun Holsters, Rifle Slings and Knife Sheathes
I got stuck on 346 about 15 years ago . . . if I do something in 277, . . . looks like I used my wife's sewing thread, . . . I'm so used to the heavier look. Got a spool of 4 something, . . . REALLY BIG, . . . gonna do a white stitch black belt with that one of these days, . . . just for kicks and giggles. I'ma lika dat holster there Josh, . . . always have been kinda partial to roughout, . . . although I don't do very many of em. May God bless, Dwight -
Here are the thread sizes I use: Again, . . . the 346 is my favorite. May God bless, Dwight Size 277 / Tex 277 / Govt. 4-Cord Heavyweight thread used for hand and machine sewing. Typical uses include horse saddles and tack, knife sheaths, holsters, tarpaulins, banners, boat and pool covers. Its stitches are a focal point. Size 346 / Tex 350 / Govt. 5-Cord Heavyweight thread used for hand and machine sewing. Typical uses include canvas tarpaulins, saddles, horse tack, shoe repair, conveyer belts, holsters, and sheaths. Its stitches are a focal point. Size 415 / Tex 410 / Govt. 6-Cord Heavyweight thread used for hand and machine sewing. It is also a survival pack staple. Typical uses include canvas tarpaulins, saddles, horse tack, shoe repair, conveyor belts, holsters, and sheaths. Its stitches are a focal point.
-
Nahh, . . . that's an old wives tale, . . . Somewhere after I've done a half dozen holsters, . . . or maybe 3 belts, . . . there will be a stack of the wax on the upper left of the machine where it goes thru that little port, . . . paper towel wipes it off. Same for the lanyard above the needle, . . . and sometimes on the top of the needle. Worst part is your fingers are around that super sharp needle, . . . and it can lace you good if you are not careful. I tried non waxed, . . . think I threw the spool away, . . . don't know what happened to it, . . . I DID NOT LIKE IT. May God bless, Dwight
-
Cowboy Single Action loading strips
Dwight replied to noobleather's topic in Gun Holsters, Rifle Slings and Knife Sheathes
OK, . . . I'm confused, . . . how do you use them? Looks like something you would load up, . . . toss in a shooting bag, . . . Are they worn in any way on the body? Thanks, may God bless, Dwight -
My Tippmann Boss likes 346 waxed thread, . . . for belts, holsters, and knife sheaths. I have others on the shelf, . . . they mostly gather dust. May God bless, Dwight
-
I bought an arbor press from Harbor Freight https://www.harborfreight.com/1-ton-arbor-press-3552.html I use it for other things as well, . . . but it does my maker's stamp perfectly every time on my belts and my holsters and knife sheaths I make. May God bless, Dwight
-
It looked (in the photo clips from the "promo") like s simple Colt dragoon holster style made for a SAA size instead of the larger Colt. It also looked like, from what I could see, . . . that the holster was attached by wings from the top of the holster flap rather than by the usual belt loop. It should not be hard to make, . . . if you have had some experience in making holster patterns from scratch. Let me know if you have not done this, . . . I'll see if I can pop out a pattern for you, . . . but it would be home grown, . . . not necessarily perfect according to the movie. May God bless, Dwight