Dwight
-
Posts
5,258 -
Joined
-
Last visited
Content Type
Profiles
Forums
Events
Blogs
Gallery
Store
Everything posted by Dwight
-
 Franklyleather, . . . pm me your mailing address. I'm not sure if I have all of the pattern, . . . lots of stuff I do is not from a pattern, . . . I just kinda "do it" and they become "one of a kind", . . . Let me see what I've got, . . . I know I have some of it and I'll get that part to you. May God bless, Dwight
 -
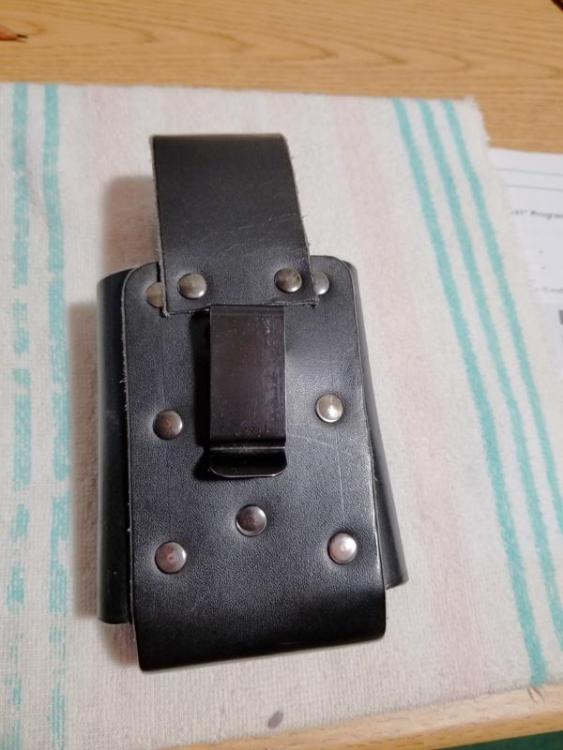
How about something on this order, franklyleather??? The first picture is of the ammo, . . . it's a dump pouch sort of, . . . holds a stripper clip with 5 rounds in it. Other picture is the hand gun itself, . . . SP101 (I think that is the proper nomenclature), . . . has a combination thumb break / finger break, . . . depending on which way it snaps on. All of the plastic attachments were hand made from kydex sheets . . . the attachment points are chicago screws. I made it a few years back for an elderly neighbor down the road. May God bless, Dwight
-
When you say "contaminates" I assume that you mean the dye is rubbing off on your papers. My 1st thought would be to seal it, . . . the inside portion that is, . . . and the product I would recommend would be Resolene. NOW, . . . I do not work much with oil tanned leather, . . . so what I would suggest is you get some scraps from when you made the briefcase, . . . rub them against your papers to make sure they are doing the same thing, . . . and if they are, . . . coat the inside of them with a light coat of 50/50 Resolene and water. Use a small piece of a sponge, . . . and you will have to dampen it pretty good, . . . put a light coat of the Resolene/water mixture on it, . . . allow it to dry for about 4 hours, . . . then try to see if the dye will then come off on your paper. If I were a gambler, . . . I would bet this will cure your problem 100%, . . . by one or two light coats of Resolene on the inside of your briefcase. May God bless, Dwight
-
Be careful with it, . . . a lady who was trying to just be a nice lady, . . . did not know what she was doing, . . . ruined my 85 dollar Bible, . . . back when I was making maybe 6 bucks an hour, . . . or 7. I forgave her, . . . but my Bible has never been the same. Just be careful, . . . you can always cut leather away, . . . you cannot add it on (generally speaking), May God bless, Dwight
-
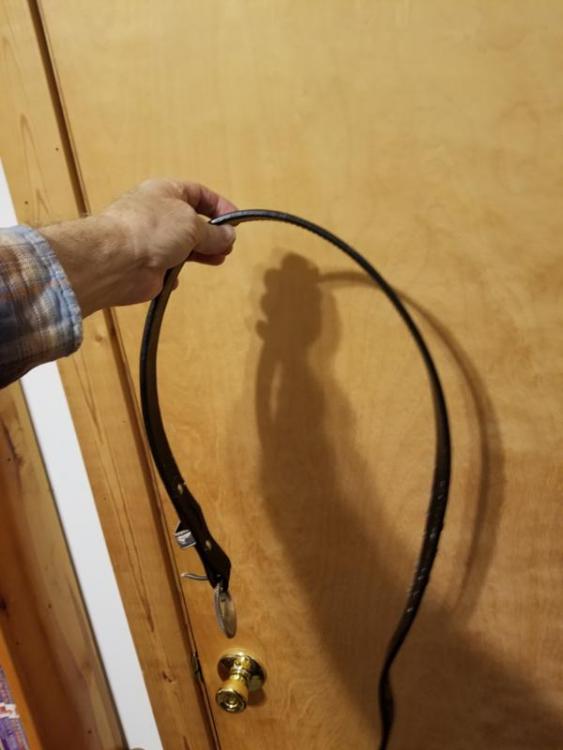
First of all, . . . if my belt felt like a soft, rich leather, . . . I would toss it in the trash. Belts for women ''can" have that feel, . . . but if you are making a belt for a man, . . . he needs to be able to thread it by pushing it around his waist, . . . not like having to pass it thru each loop like he was threading a shoe lace. That only occurs when there is a "stiffness" to the belt. When my belts are ready for my customer to pick up they have been rolled in my hands so that they would drape over a large ice cream bucket (see picture). If the customer wants it any floppier or looser, . . . it is up to him/her to do that. In almost 20 years, . . . have never had a complaint about my belts being too stiff. I do have one "ranger" belt I made for myself that I don't like because it is too floppy. But that has only come from years of use. One other point I'll make then leave you, . . . my belts are designed for CCW, . . . carrying a firearm, cell phone, spare mags, . . . . and still keep the britches up and look great even with the weight. The thickness of my belts range from .180 to .250, . . . depending on length and width. May God bless, Dwight
-
The way I would beat that rap, . . . cut the stitches, . . . separate the layers, . . . put the snap only on the piece that will allow it to make contact with the other side of the snap. Re-stitch the piece, . . . it should work like a champ. It would also totally remove the possibility of the strap scratching the weapon as it is drawn from the holster. May God bless, Dwight
-
Please help me figure out how to make this fursuit.
Dwight replied to unokitsune's topic in How Do I Do That?
The suit we can help you with, . . . basically go to Joann's and buy a pajama pack of the right size, . . . you will have your pattern, . . . and they will have most if not all of the material to make the suit with. The "head" is a different story. You'll need to look into how Jeff Dunham made Achmed the dead terrorist, . . . as it would get you started in the materials and process you need, . . . except your puppet head is worn, . . . Achmed it hand operated. May God bless, Dwight -
YinTx, . . . wrap that puppy in a gallon freezer bag, . . . stuff it down in the holster, . . . come back tomorrow, . . . remove the bag, . . . you may be surprised how well it will fit then. I do that all the time with gun holsters, . . . works like a champ. Have even done it with cell phone cases and knife sheaths. If one layer doesn't work, . . . try two, . . . then three, etc. May God bless, Dwight
-
Hey, Hondo, . . . we have the same problem, . . . mine is just the Tandy version. Quite honestly, . . . God has blessed me with a very good set of eyes for 75 yrs old, . . . and a very good sense of balance when looking at something. I look straight down on mine, . . . looking to see it is absolutely centered on the roller, . . . check both ends as well. Usually, I'll lock down the end that looks the best, . . . then fiddle with the other end. Course, . . . I don't polish mine as much as you do, . . . probably don't use it as much. Tell you what, . . . take a picture of the top, . . . as close as you can get to it with your camera, . . . showing all the top you can, . . . then a closeup of one end. Maybe there is something we can see there. May God bless, Dwight
-
First Holster Template (Sig 1911)
Dwight replied to superpacker's topic in Gun Holsters, Rifle Slings and Knife Sheathes
If you have done belts and wallets, . . . you should be up to doing your own pattern. If not there are several tutorials on here to help you. THEN, . . . do a Google search: image: 1911 holster You can go blind on there looking at the alternatives, . . . May God bless, Dwight -
Thanks DrmCa, . . . I think I've seen that before, . . . but either way, . . . always good to have ideas refreshed at times. May God bless, Dwight
-
Got any pictures you care to share with this messenger bag, . . . All of us here love to see what "the other guy" is doing, . . . so most of us share May God bless, Dwight
-
One thing you can do to help your leather dying process, . . . first give it a good coat of neatsfoot oil. Don't use the oil "compound", . . . get the real oil. Use a cheap bristle brush, . . . coat the hair side (smooth side) liberally with the oil, . . . then lay it up to dry. Don't "hang" things like belts and straps from one end, . . . lay them on one edge, curled up on a piece of cardboard, . . . leave them for 24 to 36 hours, . . . the color will return almost perfectly to where it was when you started. THEN, . . . slowly curl it thru a pan of dye, . . . I use 9 x 14 cake pans, . . . and the leather piece will stay in for about 6 to 10 seconds, . . . depending on what I'm dying. Again, . . . don't hang long or large pieces by one end to dry, . . . lay them on cardboard, . . . put little blocks under them at various places, etc, so air gets under them as well. After they have lain flat for a couple hours, . . . you can hang them then if you want. If it isn't dyed to your satisfaction, . . . re-oil, . . . then re-dye. Works for me. May God bless, Dwight
-
Ideas for a leather sheath?
Dwight replied to Plainsman's topic in Gun Holsters, Rifle Slings and Knife Sheathes
Doing the pancake style will cause some headaches, . . . a simple slotted back, . . . or straps coming off the back fairly close together, . . . allows the sheath to stay straighter. The point where you wear it will also add to that. Wearing it directly above a rear pocket would not cause much stress on the ends of the sheath, . . . as well as above a front jeans pocket, . . . in gun parley its called appendix carry. Carrying it on the point of either hip (3 o'clock or 9 o'clock) is where the stress and bending will come in, . . . especially with the pancake. Also, . . . if you do the pancake style, . . . remember to put a welt in all the way around that blade, . . . otherwise, . . . in time, it will cut the stitches you are trying to use to hold the whole thing together. The pancake style with the little snap belt coming around the handle, . . . it will also forever be a nuisance, . . . trying to get the knife out or putting it back in without cutting those straps off. May God bless, Dwight -
Forward cant Western holster?
Dwight replied to dikman's topic in Gun Holsters, Rifle Slings and Knife Sheathes
Not that I know of, . . . MikeRock, . . . but the whole thing is being blown out of proportion by someone trying to make up the rules as he wants them to be. Drawing you weapon from a forward cant holster will NOT make the barrel automatically point to the rear. Try it in front of a mirror for crying out loud. As the weapon is drawn, . . . it straightens up or goes fwd, . . . depending on the skill of the shooter. The fwd cant is a trick to allow the shooter to get a better grip on his handgun before he begins the upward movement. Yes, . . . I'd make a 29 degree fwd cant for a customer if he wanted it, . . . and be happy that I had the opportunity to help him. I'd balk at the 30 because I might make a mistake and have to do it over again for no cost. Some of these people need to DO more things and then they would find out how things work. May God bless, Dwight -
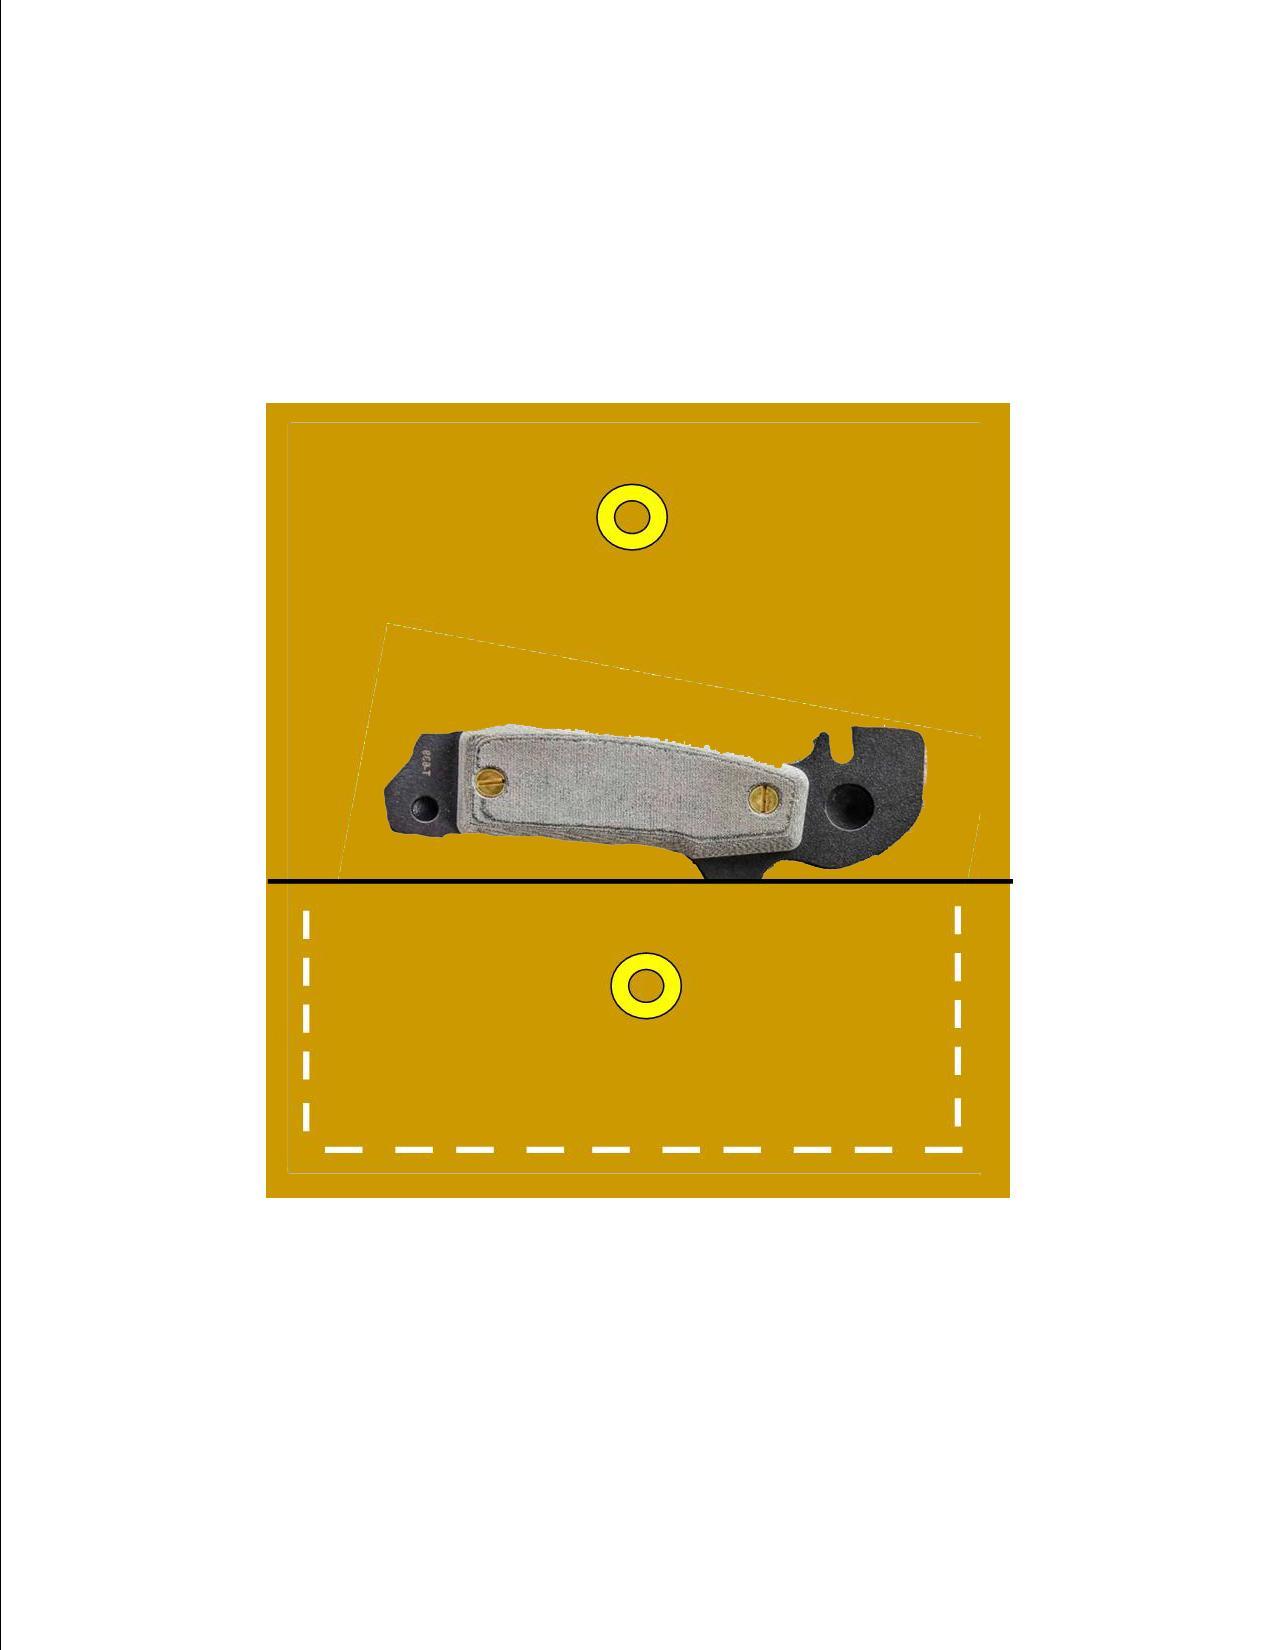
Ideas for a leather sheath?
Dwight replied to Plainsman's topic in Gun Holsters, Rifle Slings and Knife Sheathes
This is more or less what I would do. It would be vegetable tanned leather, . . . probably 8/9 oz with full outline welt, . . . top piece folds over and snaps (yellow circles). Back would have two belt loops, . . . they could be snapped on, . . .it would be a "owner's choice" thing. May God bless, Dwight
-
Forward cant Western holster?
Dwight replied to dikman's topic in Gun Holsters, Rifle Slings and Knife Sheathes
Not sure who you talked to, . . . but they do not know the SASS rules, . . . or decided to make their own up as they went. Copied straight from the SASS handbook: SINGLE ACTION SHOOTING SOCIETY Shooter’s Handbook Copyright© Single Action Shooting Society, Inc. 2020 Version 24.1 3 HOLSTERS, CARTRIDGE BELTS, & BANDOLEERS Holsters - All handguns must be carried in a safe holster capable of retaining the firearm throughout a normal range of motion. - Main match holsters must be located one on each side of the belly button and separated by at least the width of two fists at the belt. (Note: Pocket pistol and derringer holsters are not “main match” holsters) - Holsters may not depart from the vertical by more than 30º when worn. - Although cross draw and shoulder holsters are legal, extreme care must be exercised when drawing a firearm from a cross draw or shoulder holster or retuning the firearm to leather. The user must “twist” their body, if necessary, to ensure the muzzle never breaks the 170° safety rule during the process. - When drawing a revolver, the muzzle may be oriented into the straight down (180°) as it clears leather; but must then go immediately into the downrange 170° (and vice versa on the return). These restrictions against breaking the downrange 180° angle apply to all holsters and methods of draw/re-holster. This allowance applies to all types/styles of holsters, from canted double strong side to cross draw, to shoulder/Huckleberry rigs. _____________ May God bless, Dwight -
What I do is only buy the Feibings dye in the little 4 oz containers. When I buy one of them, . . . right down the counter, . . . I buy a 4 oz container of their dye thinner, . . . it comes in a bottle that looks just like the dye, . . . I then pour the dye into a bigger jug and rinse that little bottle out with the thinner, . . . and when the two mix together, . . . it is always a 50-50 mix, . . . I got rid of a lot of dye and thinner "troubles" when I adopted this procedure some years ago. That was also about the time I gave up on Eco-flo, . . . AND, . . . I've never used the vinegar and steel solution for dying leather, . . . I've heard great things about it working, . . . but there is another step after you use the vinegaroon, . . . and someone more knowledgeable than me will have to tell you about it. But it is something necessary. May God bless, Dwight
-
Well, Amy, . . . first off, . . . I tossed my ecoflo dye a long time ago. Went back to Feibings oil dye, . . . will be here for the duration. Secondly, . . . give the flesh side of the leather a light coat of neatsfoot oil (not the compound, . . . it is junk), . . . with a bristle brush (just make sure you cover the whole piece, . . . again, flesh side only. Let the oil soak in for 24 to 36 hours, . . . then dip dye it in the black dye that has been cut 50-50 with thinner. Just dip it in, . . . pull it out, . . . don't leave it in any longer than to pick up the color, . . . wipe excess off with a paper towel. Allow it to dry for 24 hours, . . . and rub it real good to get rid of the excess pigment that always is there with black. Use an old wash cloth. The edges should burnish really good for you if you did that, . . . I use only water, . . . edges look like glass when I'm done. May God bless, Dwight
-
This is how I do them, . . . this one holds a Samsung Note 8, . . . but I've made several others of varying dimensions, . . . usually I make a plywood or pine wood model, . . . gives me a little something to shape it around. May God bless, Dwight

-
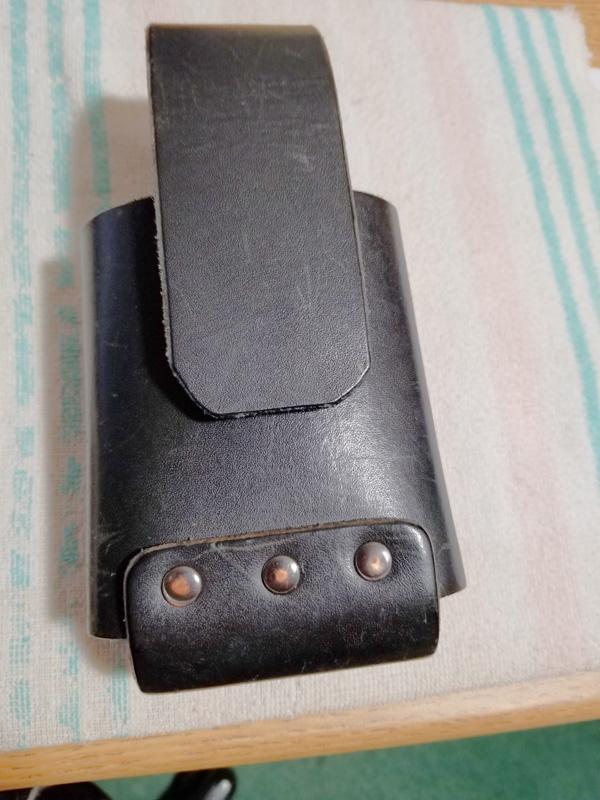
Pocket Holster with backing plate tutorial?
Dwight replied to RyanWyvern's topic in How Do I Do That?
OK, . . . looks good, . . . just wondering how tight it is though, . . . May God bless, Dwight -
Pocket Holster with backing plate tutorial?
Dwight replied to RyanWyvern's topic in How Do I Do That?
Ryan, . . . quite honestly, . . . you are basically going about it ALL wrong. 1. A pocket holster has to be "floppy" to a certain extent, . . . as you never know what position the leg will be in, . . . the garment will be in, . . . or how you are going to have to stick your hand into the pocket to retrieve it. Making a hard holster for pocket carry is asking for your customer to rely on something that has a very strong propensity to get him shot barn yard dead while he is attempting to retrieve his weapon. 2. Here is a picture of a revolver pocket holster, . . . sewn in front, . . . but only contact cemented in the back. This allows the holster to "adjust" to changing garment conditions if necessary, . . . and will open up a slight bit if somehow it gets bound up, . . . probably won't happen, . . . but beats the heck out of not being able to get the weapon out. If the customer wants a plate on one side or the other, . . . put the plate on with a couple of hand stitches at the top and the bottom, . . . OR, . . . a rivet at the top and one at the bottom. One of the sad things about the holster industry as a whole, . . . WAYYYYY to many makers have forgotten that the holster is a tool that is fully necessary to function or it should be tossed in the trash. Far to many makers out there are more committed to the looks of the final product than they are to the function. You seem to be heading down that road, . . . and I hope you get off it. Learn to make functional firearm accessories, . . . then later you can detail them. Your customers will appreciate you much more for a plain holster that they love to use . . . than that fancy piece of crap they paid good money for and is in the drawer with the rest of the "has been" holsters. May God bless, Dwight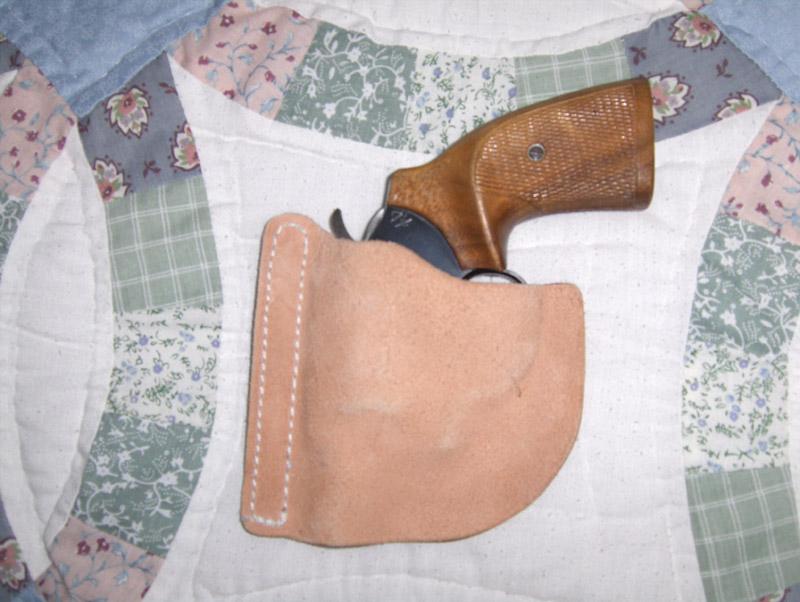
-
Pocket Holster with backing plate tutorial?
Dwight replied to RyanWyvern's topic in How Do I Do That?
For all my pocket holsters, I use 5/6 oz veggie tan, . . . and before I use it, . . . I roll it tight against a 3/4 steel rod, . . . up and down, . . . right and left, . . . turn it over, . . . do it again. It "limbers up" the leather, . . . making it somewhat pliable. Then I just put two pieces together, . . . rough side out, . . . slip the gun in, . . . mark for cut, glue, and sew, . . . and get it on. For the backer plate like you are talking, . . . I'd just run the front an inch long, . . . turn it under, . . . and rivet it to a piece of stiff 5/6 and cut it to be somewhat smaller than the pocket. Two rivets at the bottom and one in the center at the top. Oil the two pieces for the weapon, . . . hair side only before you put it together, . . . you'll have a holster that will work for years, . . . should never be a problem re holstering if you cut the outline tall so his index finger can find the outside of the holster as he slips it in. May God bless, Dwight -
My personal rig .45lc
Dwight replied to Albob's topic in Gun Holsters, Rifle Slings and Knife Sheathes
Cowboy leather is always fun, . . . and with the hundreds of makers back then, . . . you cannot do it "wrong", . . . but maybe some are more right than others. One time I had myself convinced I needed a Lone Ranger rig, . . . really studied it, . . . decided against it, . . . mine is more personal for me, . . . as yours is for you. AND, . . . my rig is adorned with a Tandy shelf buckle set. Good job. May God bless, Dwight -
1911 Duty Rig
Dwight replied to Bayou Bengal's topic in Gun Holsters, Rifle Slings and Knife Sheathes
Good lookin stuff, . . . even if it is easy to make a 1911 look good............. May God bless, Dwight