


Dwight
-
Posts
5,231 -
Joined
-
Last visited
Content Type
Profiles
Forums
Events
Blogs
Gallery
Everything posted by Dwight
-
Well, honestly, . . . I had to go check mine, . . . and I was sure I was right on mine. It has a thin strip of leather working in place of the bias tape on fabric, . . . it wraps around the edge, . . . showing on both sides, . . . stitched all around the outside of it. I've done similar, . . . not as intricate, . . . on a bag I made for a lady once, . . . spent hours and hours on it and gave it to her for a wedding gift, . . . she dropped it off at a flea market. Just don't get discouraged, . . . it can be done with a good sewing machine and a bottle of Weldwood contact cement. May God bless, Dwight
-
It is a common technique in fabrics, . . . it's called bias tape, . . . this is just the leather version. It will of course, . . . have to be contact cemented or glued together before it is sewn, . . . otherwise it would run away and look some kind of ugly. Go to a Joann Fabric shop and let one of the ladies in the sewing machine dept show you how to to it. May God bless, Dwight
-
I wanted a small clicker die for a key ring tab, . . . Weaver Leathercraft made it for me for less than $80 if I recall correctly. I would never have cut out that many by hand, . . . you can be assured of that, . . . the clicker "does the job", . . . May God bless, Dwight
-

Sig P365 pocket holster
Dwight replied to chiefjason's topic in Gun Holsters, Rifle Slings and Knife Sheathes
Great looking holster, . . . Sig 365 is one big pocket gun in my estimation. My son has one, . . . and outside of my Vietnam jungle jammies, . . . ain't got no pockets that big. May God bless, Dwight -
Used to stitch, . . . went to staples, . . . punch holes, . . . bend over with pliers, . . . no problem. May God bless, Dwight
-
The worst thing you will wind up with is a good lesson, . . . so go for it. I'd wet the bottom half of that until it was some kind of soaked, . . . then take my thumbs and flatten out the outside piece. It will take a while to get it "flat" flat, . . . but if you mess with it a bit it will get to where you can hand sew it. Then you finish getting the rest of it wet, . . . allow the whole thing to dry down to a good "case" and re-do the molding. Then put it in front of a heater, . . . or in a cool oven, . . . keep it below 140 degrees, . . . the molding should take, . . . and you will have the sheath you wanted. May God bless, Dwight
-
Protecting Brass and Copper rivets from tarnishing
Dwight replied to SilverForgeStudio's topic in How Do I Do That?
Absolutely NOTHING you will do will STOP leather from attacking any metal it comes into contact with, . . . with the exception of Gold. All others will at one degree or another be attacked by the chemicals used in the tanning processes. Copper is at the top of the list for getting funky fast, . . . iron right behind it, . . . then steel and then brass and aluminum. You can mitigate it to a certain degree with various coatings, . . . but just remember that you are not going to STOP it altogether. May God bless, Dwight -
The 50/50 beeswax and neatsfoot oil is an old, . . . old, . . . recipe from what I've been told. I got it from the Pacific northwest, . . . believe the lady said her grandfather or father gave it to her. Been using it for over 10 years, . . . no complaints so far. May God bless, Dwight
-
I think if this stays here long enough, . . . someone will chime in with "You can also use coffee to stain leather, . . . don't ask me how I know". May God bless, Dwight
-
Since I have a 6 inch jointer, . . . I can make boards any thickness I want. I would build a "pocket" in the top of the work bench that the stone would slide down thru with maybe 1/8 of an inch clearance left/right and front/back. That pocket would be the 3 inch deep, . . . depth of the stone, . . . and the bottom of it would be bolted solid up thru spacers that make the pocket 3 inches deep. I would also leave a 1 inch or so hole at each end, . . . in the center of the stone, . . . just in case some day I need to push it up and out of the pocket. May God bless, Dwight
-
Holster for Bersa Thunder Plus 380
Dwight replied to bcraig's topic in Gun Holsters, Rifle Slings and Knife Sheathes
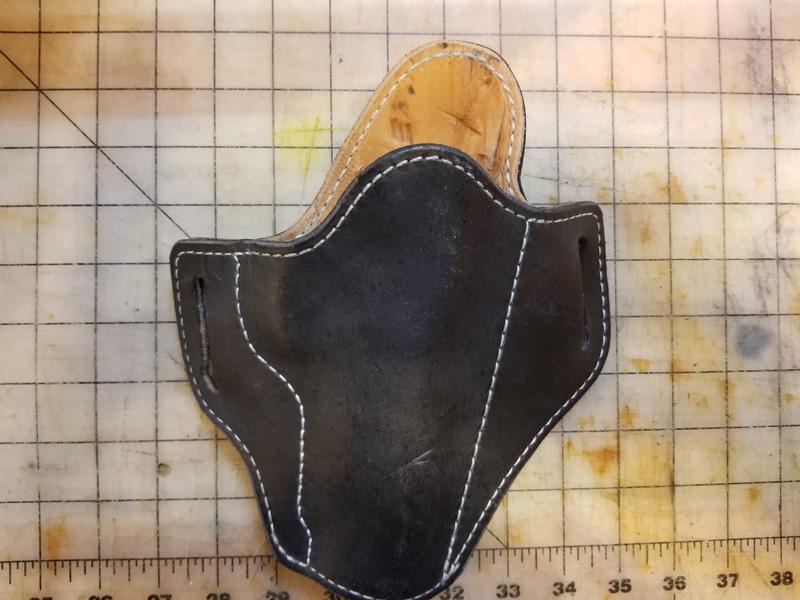
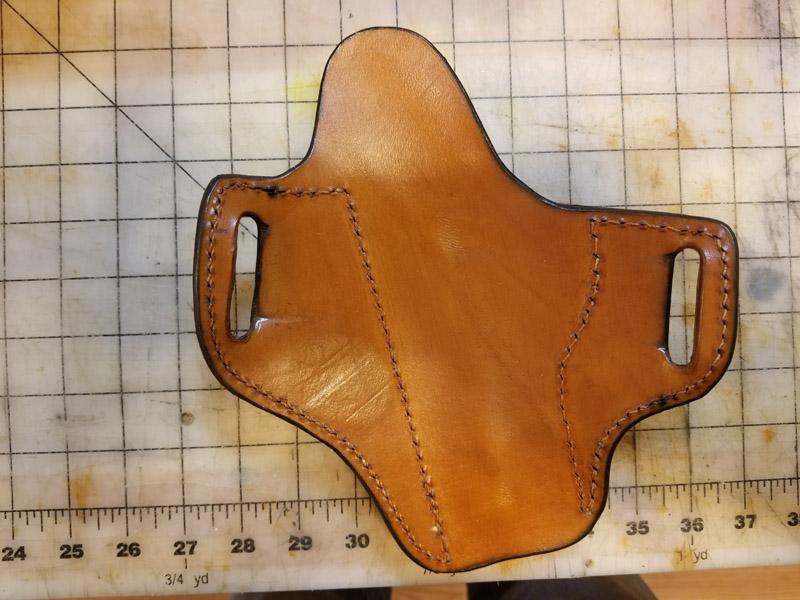
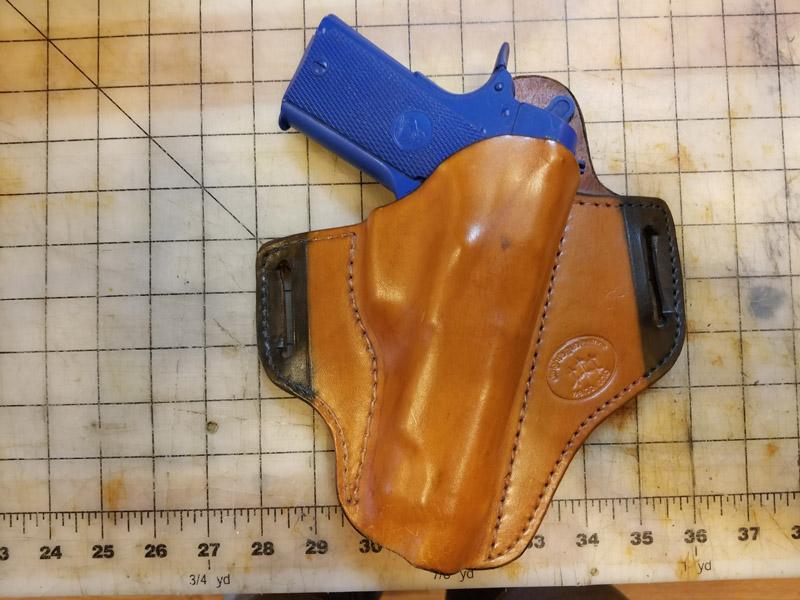
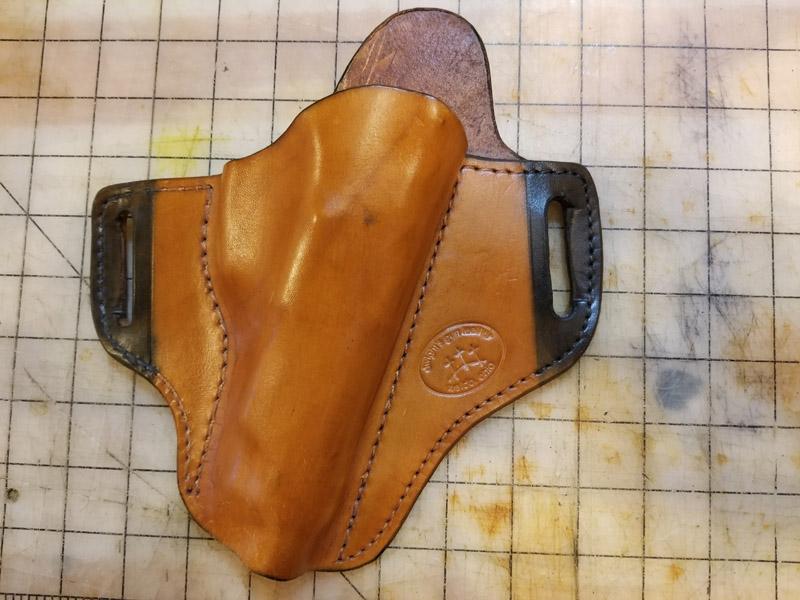
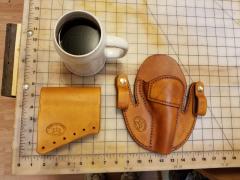
bcraig, . . . Yes, . . . rougher side is the flesh side and the smoother side is the hair side. Avoid buying any leather that has a "really" rough back side to it. Generally it is not worth taking home as you will have to sand all the loose pieces off of it yourself, . . . and they in general do not produce good or good looking projects. The holsters you see in the enclosed pictures are good examples of the lines and shapes I use for my business. But to answer your question with a number, . . . there is always at least 1/2 inch of leather between the stitching on the holster and any belt slot I would cut. The two holsters you see here, . . . they are closer to one inch of leather. The holster with the black outside is a 4 layer holster as I told you about earlier, . . . 4 layers of 3/4 leather, . . . two layers bonded together for the back, . . . 2 layers making up the front. You can see the inside picture, . . . and count the 4 layers, . . . 2 black and 2 natural. The other holster shows you the flat back that would be made if you use the method I described earlier where you form the two outside layers, . . . let em dry, . . . then bond them with contact cement. ( That particular holster is made of one piece in the front one in the back, . . . it is 6/7 oz leather. ) You then insert lay the gun down on the back, . . . outline it with contact cement, . . . put contact cement on the corresponding places for the front, . . . glue em together, . . . stitch it tight, . . . cut the slots, . . . voila, . . . you have a holster. Using the 4 piece method produces a holster that is rigid beyond most folks wildest dreams, . . . that particular holster could knock a person out if thrown at their head with any force at all, . . . it is that rigid. Single layer holsters are just easier to make, . . . that is why you see so many more of them. I noticed JLS's post, . . . and he is right, . . . that is a bunch of cash for questionable leather. If you are only making a holster for a Bersa Thunder .380, . . . decide which way you want to go, . . . I'll see what I have here, . . . may have just what you need. Just PM me and let me know. May God bless, Dwight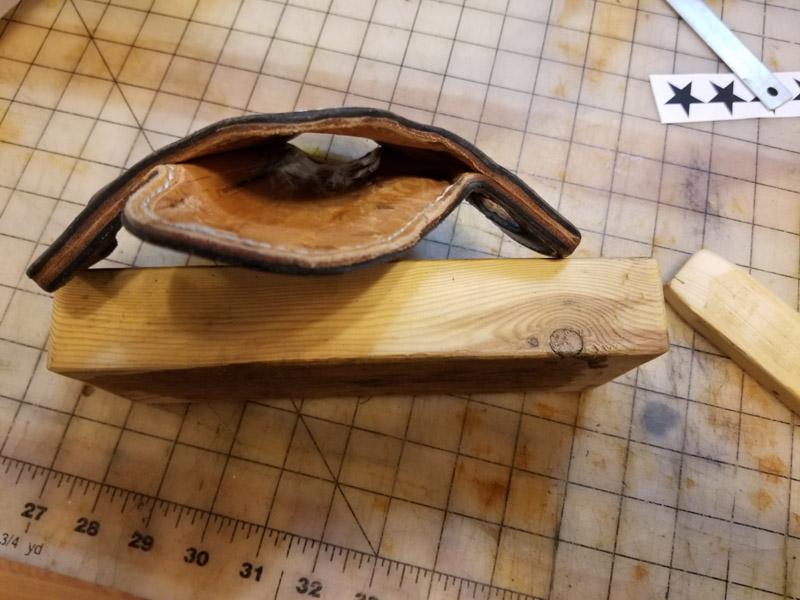
-
Holster for Bersa Thunder Plus 380
Dwight replied to bcraig's topic in Gun Holsters, Rifle Slings and Knife Sheathes
The holster you want to make is somewhat tricky, . . . especially with the laser, . . . BUT, . . . using 2/3 leather, . . . glue two pieces, . . . flesh side to flesh side, . . . for the back. Wet form another piece to the Bersa, . . . hair side down, . . . carefully form it as close to the Bersa as you can. Let it dry. Place a piece of saran wrap over the last piece you did, . . . then carefully form another piece, . . . flesh side down, . . . let it dry. Contact cement the last two pieces together, . . . sew the whole thing together. THEN, . . . dip it in water, . . . wrap the gun in saran wrap, . . . and final form it to the weapon, . . . cut the slots, . . . enjoy. May God bless, Dwight -
I have done this for any number of projects, . . . holsters, . . . cheek risers, . . . platforms, . . . etc. I always use solvent based Weldwood contact cement. The most important thing to remember and do here, . . . take a wire brush to all the pieces on the hair side, . . . scrub it real good so it is scuffed up enough to hold the contact cement and you will be all right. You do want to be in a place with good ventilation, . . . I just open the door if I'm doing a serious bunch. You can't see the end of the shaped piece in the picture, . . . but it has at least 5 layers in it, . . . contact cemented into shape, . . . then final formed on a big disc sander and a small belt sander. May God bless, Dwight


-
The difference between 6/7 and 8/9 is at the very least 1/64th of an inch, . . . and at the very greatest, . . . 3/64ths of an inch. You can have some success adding 3 oz leather, . . . but not much of anything any thinner. Remember that each "oz" is 1/64th of an inch, . . . take a pair of calipers to the store where you buy the leather, . . . measure the pieces and get one of the thicker ones. That would be my solution, . . . other than using the 6/7 an using several coats of resolene to stiffen up the final product. May God bless, Dwight
-
Make him a double layer 4/5, . . . it makes a pretty holster, . . . and a tough holster. Honest to goodness WW2 holsters I have seen were all in the 8/9 weight, . . . and were unlined. They only had an oil finish, . . . some were dyed black, . . . most were some shade of brown to darn near black. None had any finish other than oil from what I could tell. May God bless, Dwight
-
Why do you want to put a smartphone in a wallet?? Phones belong in a pocket, purse, or phone carrier, . . . wallets are for money and credit cards. May God bless, Dwight
-
-
In a one word answer: no. I have not done this, . . . but leather is very similar to soft wood, . . . your bit MUST BE very sharp, . . . recommend BRAND NEW. But then again, I've never done a belt like that If I did, . . . I'm a lazy rascal, . . . and I just will not take the long, rough, hard, intensive road for anything, . . . just my nature. I'm constantly trying ways to make things easier for this 74 yr old coot, . . . and after giving it some thought, . . . looking at my available tools, . . . that was the idea I came up with. It will not, I am sure, work on anything thinner than 7/8, . . . and that belt looks more like 11/12 leather. I would also cut the blank as high up on the side of leather as I could get. Leather nearer the spine tends to be denser and harder than belly leather. If it is a 1 1/2 inch belt, I would cut my blank probably 2 1/2 inches wide, . . . soak it good and when it gets back to a good "in case" do the stamping in the middle 1 1/2 for the belt, . . . then lay it out to dry. It will harden as all veggie tan does, . . . and then you glue it to the plywood and go for it. Knowing me, . . . I'd take a 12 inch piece of leather and try this first, . . . get the knack of doing it by practice, . . . and then hop on it. I think it would make a fantastic looking weight lifting belt or something like that. May God bless, Dwight
-
Tandy often has some sheep skins with very short fibers, . . . like maybe 3/8 inch, . . . I've gotten them for projects, . . . and they were not that expensive as I recall. Been a while, . . . though, . . . There is also a synthetic sheepskin, . . . I''ve seen a few of them, . . . they would work. May God bless, Dwight
-
Being an old wood worker, . . . I would stamp the letters in the belt blank, . . . then rubber cement the leather to a piece of 1/4 inch mahogany plywood. Then I would clean the bottom of my router off real clean, . . . put in a 1/4 inch bit, . . . and hog out the biggest parts of the areas, . . . then switch to a 1/8 inch cutting blade, . . . finish up the cutting out of the letters. Up at the top and down at the bottom where the straight cuts are, . . . I'd use a wood chisel, . . . it makes really nice straight cuts that are super clean. Pull the leather off the plywood, . . . and like Hildebrand said, . . . glue it to a contrasting backer, . . . sew the edges, . . . and you are in business. May God bless, Dwight
-
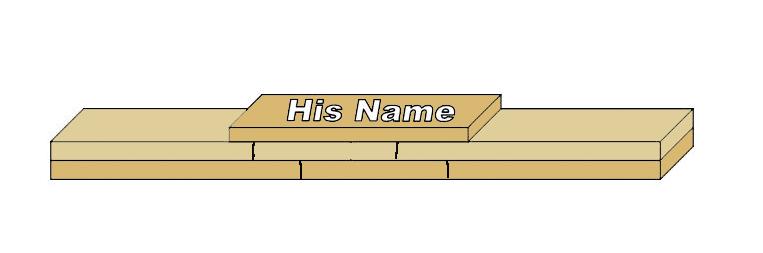
This is a rough drawing of what I did. The bottom layer is the inside layer of the belt, . . . the middle layer as you can see is butt joined in the center, . . . and the patch with the name is what covered up the obvious butt joints. I did this only because I did not have a long enough piece of leather for his belt on the finish side. I would use this same process to extend a belt, . . . cutting the top layer, . . . then the bottom layer maybe an inch apart, . . . and staggering pieces between them to lengthen the belt, . . . and cover it all with a top patch. The belt was of course sewn from end to end as I do all my double layer belts, . . . the patch was sewn around the inside of the patch, . . . He loved it. I see him occasionally, . . . and he still wears it. May God bless, Dwight
-
Some time back, I had to make a double layer belt but for the outside layer, . . . I had to splice it (he was a BIG guy). Over the splice . . . I put a thin piece (3 oz??) and stamped his name in it. He was totally thrilled, . . . never guessed the reason for the "patch". You could do something similar, . . . a 6 inch long "patch" on the outside of a 3 inch extension piece. I did my splice dead in the middle of the back so his name is visible as he walks away. May God bless, Dwight
-
I make cheek risers for friends this way. They are sandwiched layers of leather, . . . contact cemented together. I put one on the stock, . . . hold it down with rubber bands, . . . then contact cement the next layer on and keep going until I get it as high as I want it. I take the finished "height" piece, . . . sand the sides smooth on a belt sander, . . . I then put the outside covering on it, . . . after any tooling or stamping, . . . dye, . . . and send it out. May God bless, Dwight
-
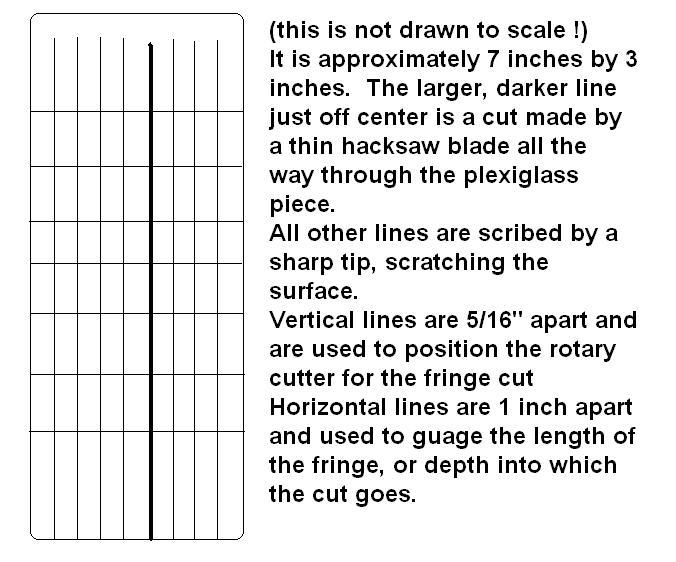
When I make a pair of chaps or anything else using fringe, . . . my fringe is cut all in one piece, . . . gave up long ago trying to make smaller pieces of fringe all line up right and hang correctly. I found the template for this a number of years ago, . . . this is what I use with a 2 1/4 inch rotary knife, . . . and a lot of care. I can cut about 8 inches a minute with this, . . . and you will have to spend some big $$$$ to get a lot faster than that. The one picture gives you the idea how to make it, . . . the one I use mostly is in the other picture, . . . the center one. May God bless, Dwight

-
Dye is not severely expensive, . . . but it DOES ADD to the total price of the project. For that reason, . . . all cutting, fitting, sewing, sanding, buffing, etc. is done before I dye a project. When I dye, . . . project has passed the construction and assembly parts, . . . needs only finish, polish, and send. May God bless, Dwight