


RockyAussie
-
Posts
3,265 -
Joined
-
Last visited
Content Type
Profiles
Forums
Events
Blogs
Gallery
Store
Everything posted by RockyAussie
-

Help a guy out with his new skiving machine!
RockyAussie replied to YinTx's topic in Leather Machinery
If you have not bought a skiver already I would urge you to seriously consider getting one with suction as I said earlier in this post with this link http://www.techsew.com/machinery/techsew-sk-4-leather-skiving-machine-with-vacuum-suction-device.html For that sort of money and finance and back up I would be going that way. As for the roller I think this one would fit and be a good all rounder https://campbell-randall.com/product/fav-1498c-roller-foot-with-30mm-1498-roller If you really want one the same as my brass one after you get a machine with some standard feet you could send me one down and I could make one up. Cost would be $100 + about $20 postage. The only mention I have made of setting one of these machines up with an extractor is referred to earlier in this post and as I only have 2 of these machines that both have extractors I don't have any reason to make one up. I would love to if I had one here to do as I think it would be fairly simple and fun to do. If anyone gets serious about doing it I am more than happy to walk them through it. For a start all of them wipers could go in the bin.
-
Help a guy out with his new skiving machine!
RockyAussie replied to YinTx's topic in Leather Machinery
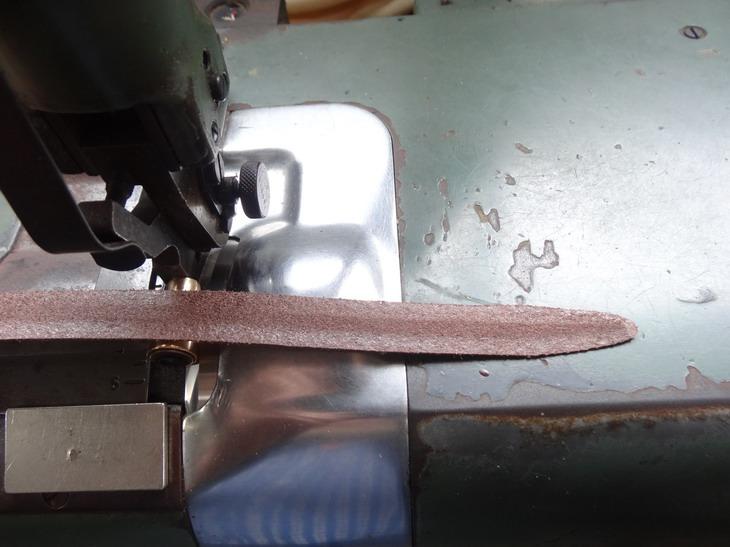
That is how they should all go. Note that the flatter end on the guide helps the leather to not pull in and the leather quality can have a fair bit to do with how well it feeds through as well. Some leather have feel agents (waxes/silicon's)on them which allows for less top friction and therefore beautiful skiving. -
Help a guy out with his new skiving machine!
RockyAussie replied to YinTx's topic in Leather Machinery
Thank you soooo much for the info and pictures there @jimi .I note that your wiper looks to be metal, Is that so? and does it actually make contact as the feed roll revolves or is there an adjustment screw to set it just clear? I notice also that yours looks a lot more to the centre of the feed roll than on YinTx's and I think that is better if it can be done. On yours where you have some kinks in your brass deflector,it is worth when you have it out next to tap them out and just a little past so that it keeps them pressed in tightly. As you would know little pieces get stuck in there and can be hard to get out and if you need to do any cardboard skiving it will play havoc getting stuck. It is interesting in the manual from that other post that the wiper blade has open ends where it bolts on which to me makes since if you want to increase or decrease the pressure or adjust out more when it wears down. -
How I make crocodile skin leather belts
RockyAussie replied to RockyAussie's topic in How Do I Do That?
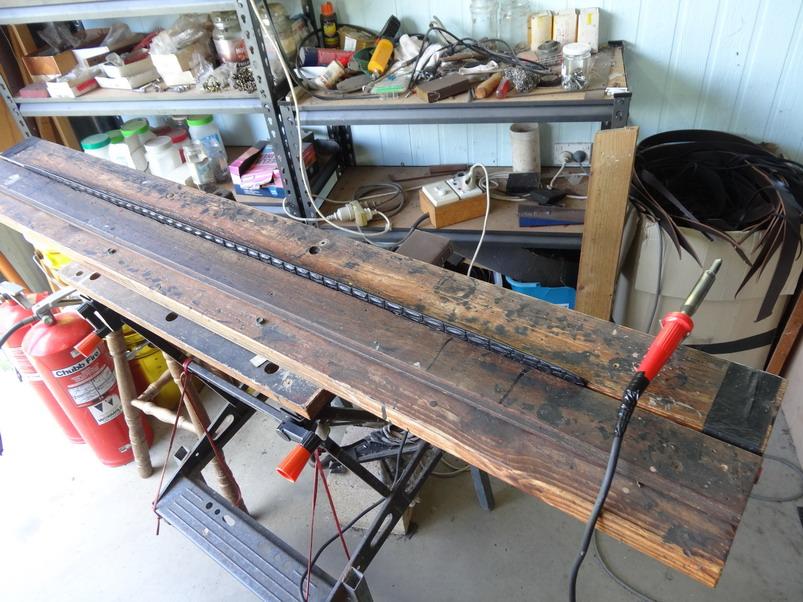
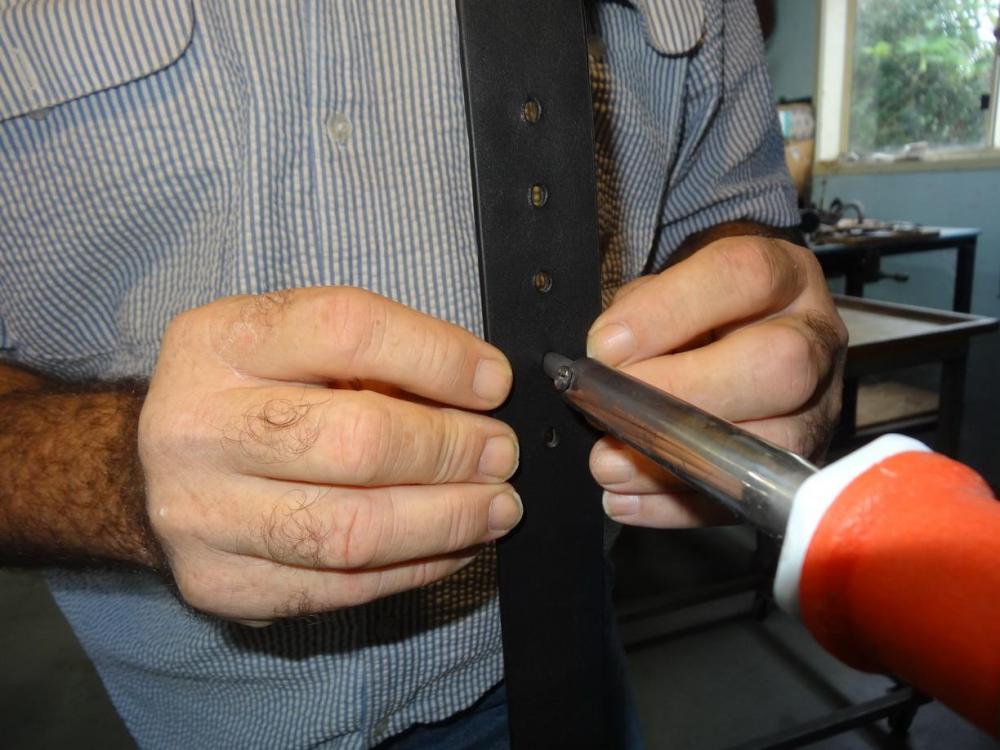
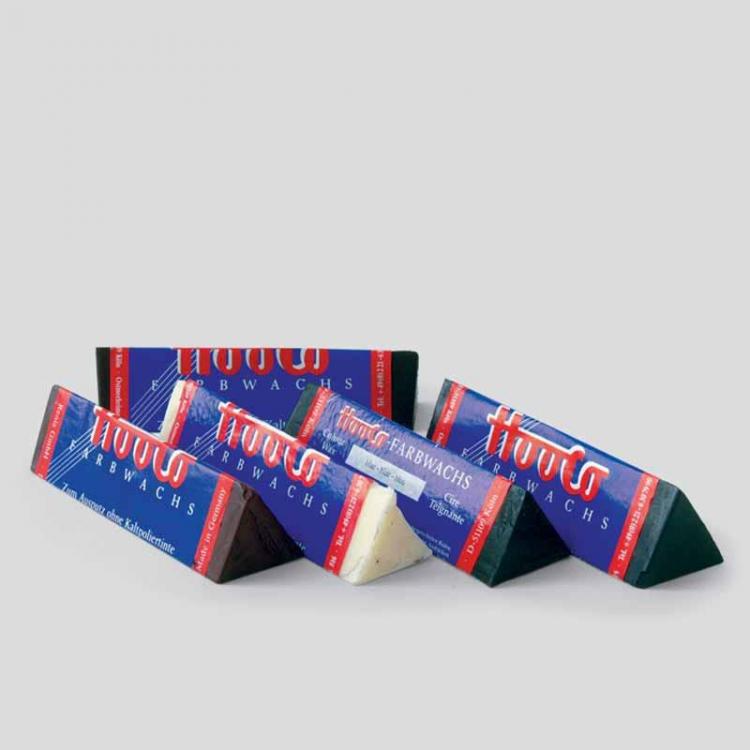
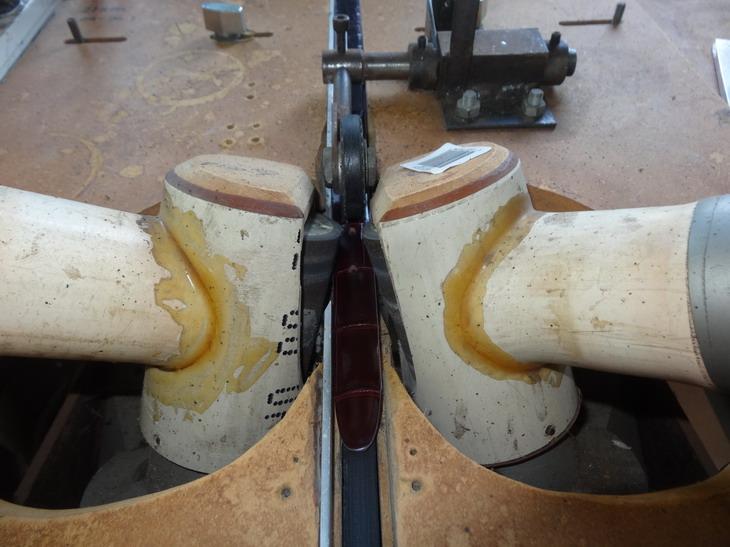
Ha Ha ....I have no idea. the temp varies depending on how fast I can do the wipes and the size of the job etc. On my light dimmer turn knob I have a nikko mark that is generally an average but for thick belts its higher and thin belt lower. You know when the edging smooths and runs along nicely that it is right. Some colours are high and some lower etc. The brightness of the light changes as it goes up and I mostly go with a 60 watt iron. Here an old workmate has had extended boards put on to clamp the hornback belts better and note that the angled nails keep the iron in place between changes. Scientific worked that out. The legs at the back on the workmate are extended to have the belt comfortably closer to work on. Note that I tape the irons up where the wire goes into them because they start to crack up there after a couple of years use if you don't. Cheers for now Brian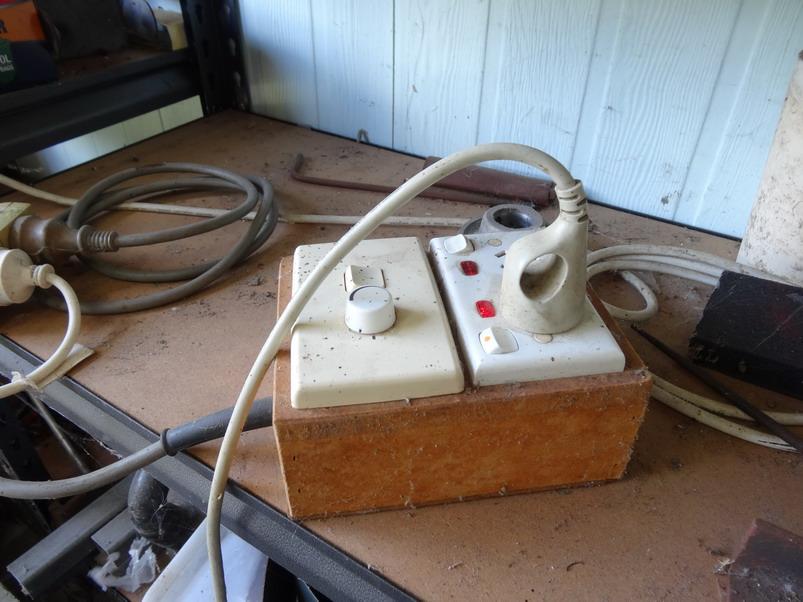
-
Help a guy out with his new skiving machine!
RockyAussie replied to YinTx's topic in Leather Machinery
Sounds like you are getting it figured out alright. Does the parts manual show a diagram of the feed stone wiper with a spring? Could you post a picture of it if so? Where you say pressure foot pressure, do you mean the feed stone pressure? I am not aware of any pressure foot pressure adjustment . I only have a Fortuna and a F.A.V.2 skiver so perhaps these may have something else I am not aware of. -
Speed Reducer mounted directly onto Servo Motor
RockyAussie replied to Constabulary's topic in Leather Sewing Machines
Great thinking....Hang around some @Pterytus I love to see more of this type of thinking. -
Help a guy out with his new skiving machine!
RockyAussie replied to YinTx's topic in Leather Machinery
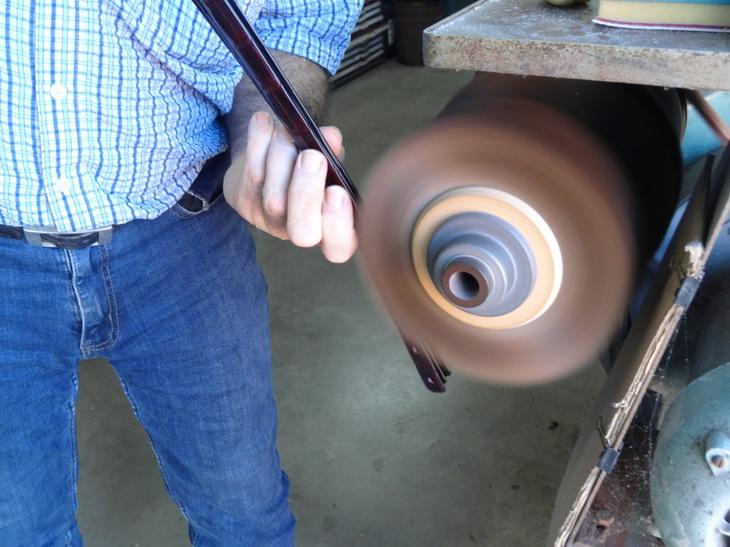
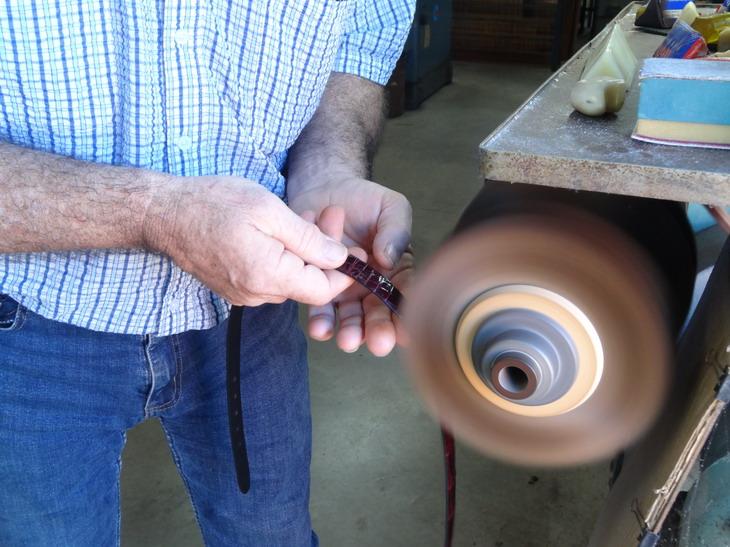
Do you not get any manual with this thing? I just spent ages going over the videos on skiving machines and .....mostly was horrified at the amount of misinformation out there. Why anyone that makes video's on how to set them up when they have just got one is beyond me. These videos get thousands of views and that is a bit sad I think. I am not knocking that some may think they are helping perhaps and for that they should be commended. I saw one deler video that I think does some pretty decent video's on sewing machines but as for his skiving machine information .....IT is nothing but crap.For anyone that ever sees this post please understand that there should NEVER be an occasion for you to ever have to pull the leather through a skiver. If that feed stone or roller is not feeding it through by itself then you have unwanted friction that is distorting/stretching the leather and on finer leathers you will get a lot of inconsistency problems. If your leather is not going through smoothly as I show in this video then something is wrong - By my standards the smoothness shown here is not even optimal but against many other video's I just looked at you'd think I might know what I am doing. My normal brass roller I made and use allows me better control than shown here. @YinTx I have to ask if it would be possible to do a short video of the machine in action? This may help to establish if you are getting anywhere closer. -
How I make crocodile skin leather belts
RockyAussie replied to RockyAussie's topic in How Do I Do That?
Thanks to you both and I hope that it may help and have some useful answers sometime... if not now -
Thank you. Thankfully the customers love what the 3D printer allows me to come up with as well.
-
How I make crocodile skin leather belts
RockyAussie replied to RockyAussie's topic in How Do I Do That?
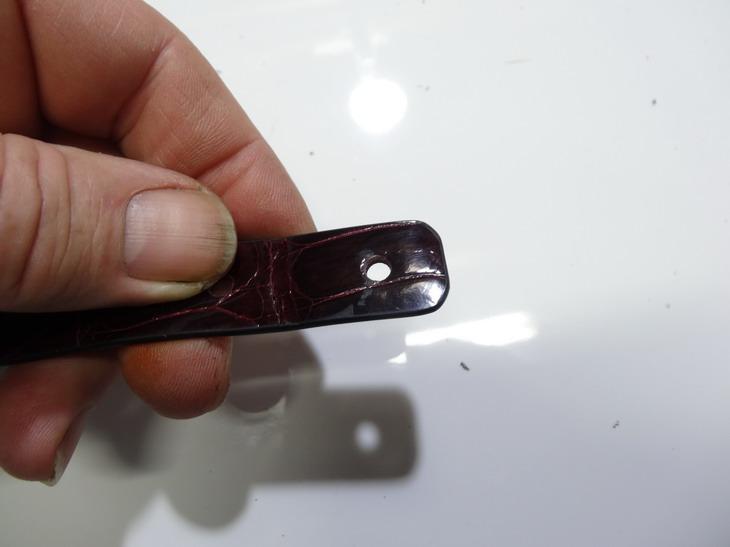
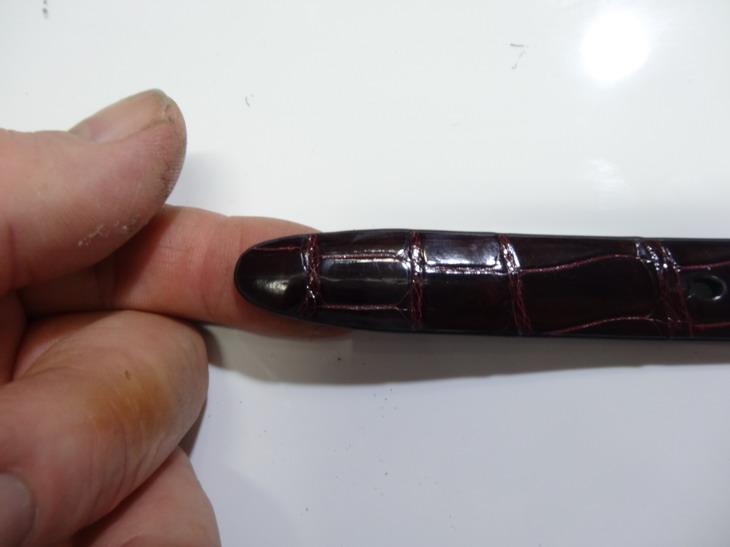
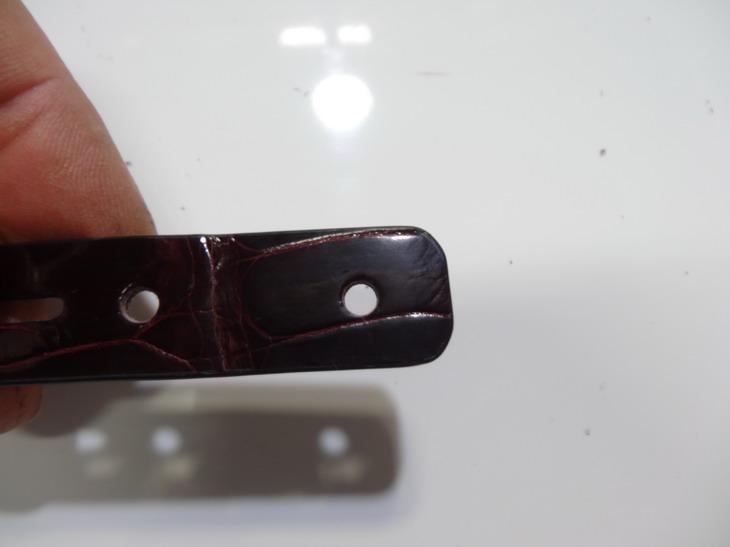
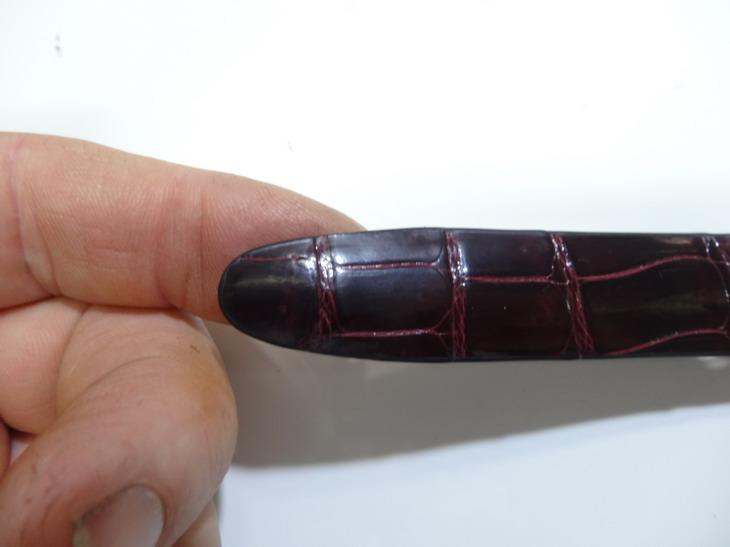
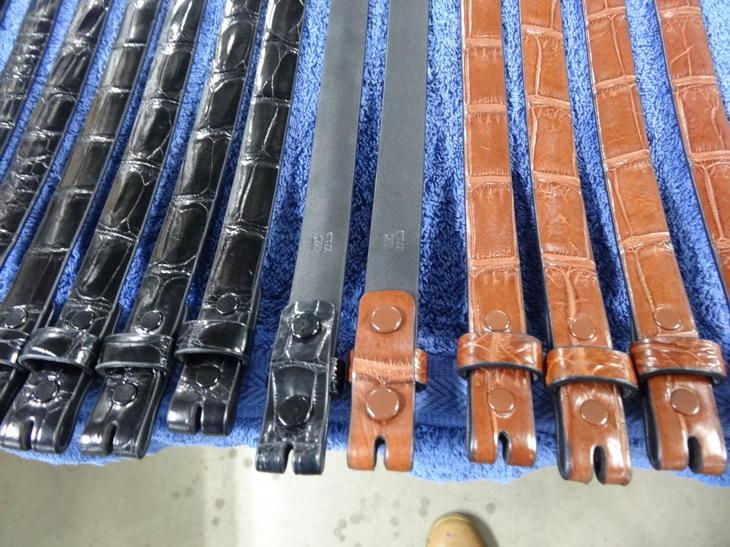
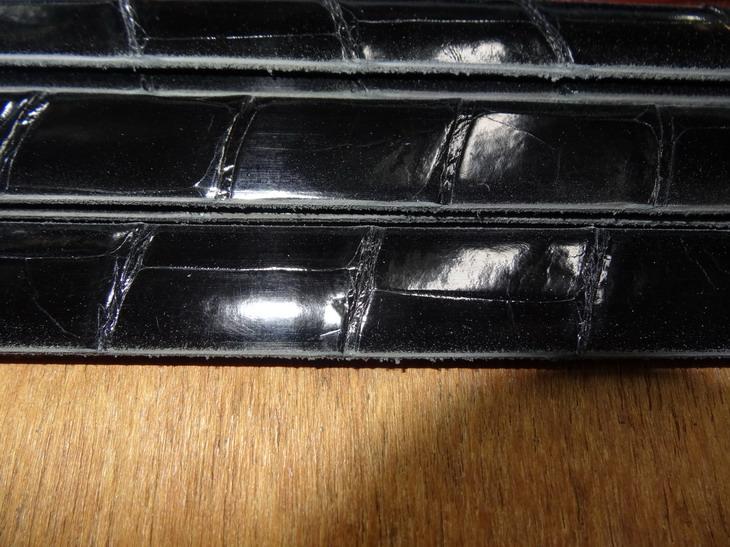
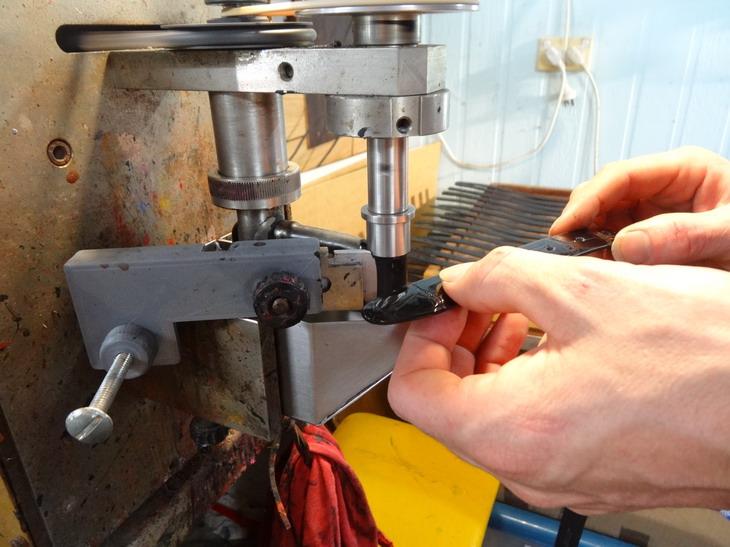
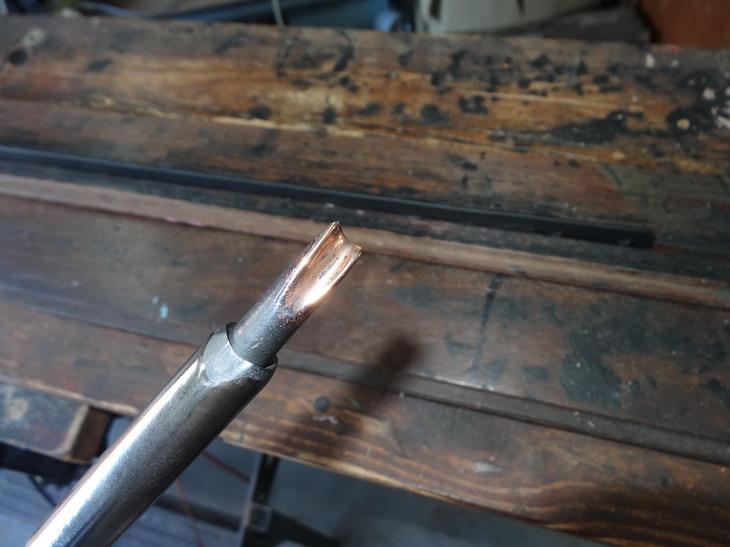
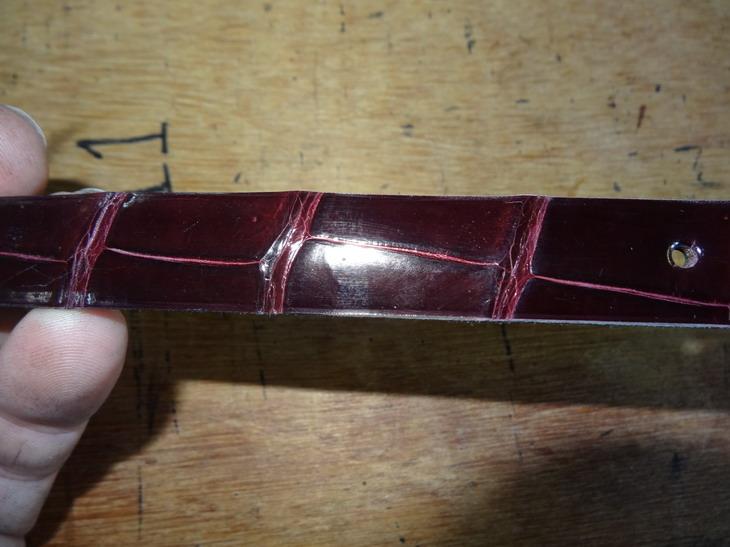
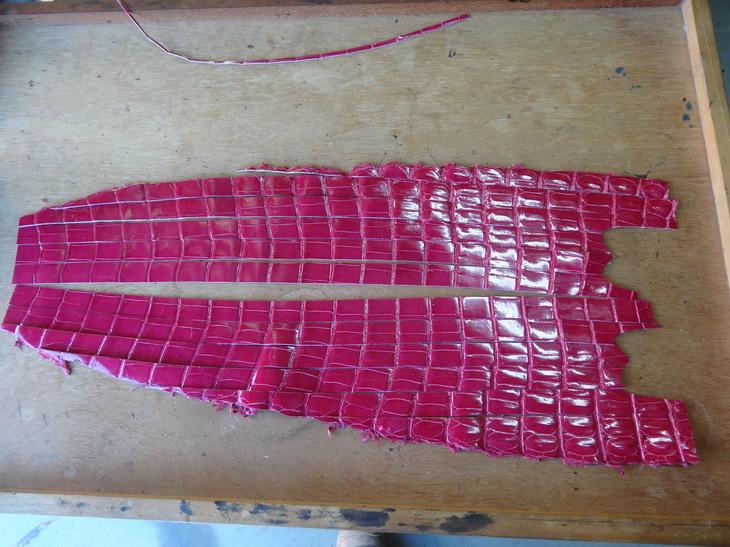
After the Scotchbrite sanding it should now look pretty clean like this - They then go through the edging process as before shown and then the detailing is done prior to the polishing. you can see here where having some smaller fingers would come in real handy. Note the edging on top... and again this comes off with a lot of wetting back and spit and hard rubbing and oh did I forget BAD LANGUAGE? Somewhere in there I forgot to take some pics of the hole burning in but this pic should give you the idea. The crew punch holes and tongue holes are all smoothed in and shaped a bit with this purpose shaped soldering iron tip. Mostly the back lining is concentrated on as I like the buckle tongues to slide into them nicely. Following that is the polishing so back at the finishing machine and with some clear Hooco wax polishing stick With the polishing I like to get all of the edges done first as I can generally get 4 or 5 belt edges done together as shown then the tops and backs get done and then a cotton glove really brings them up nice I have found it best to use towels when doing a lot of polishing and handling from this stage onward. Some like these get snaps put in and they often need to be 2 pack painted in an earlier operation. PITA. take note that I like the smaller snap fitting to the front of the belt. That is about it all so other than getting a few more shots of some buckled up belts later on... please feel free to comment. I must add that the methods here are only what I have worked out to do myself and any improvements and criticisms are equally welcomed and sort after. Regards Brian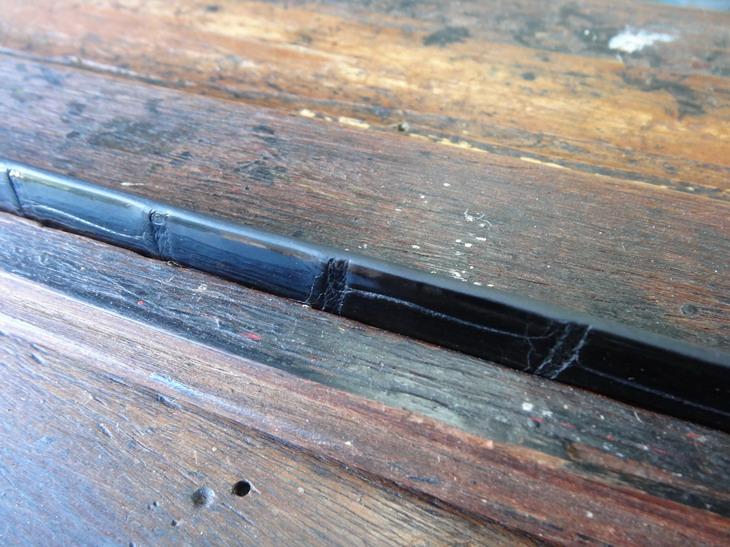

-
Help a guy out with his new skiving machine!
RockyAussie replied to YinTx's topic in Leather Machinery
Just another thought ....I think that plastic wiper thing will be spring pressured and with the plastic block being somewhat thick it may act as a funnel and be excellent at trapping the leather until it wears down to where there is no edge left and it is firm against the feed stone. Try having it run with the feed stone engaged until you can see no ledge. What have you got to lose? -
Help a guy out with his new skiving machine!
RockyAussie replied to YinTx's topic in Leather Machinery
Oh mate i am feeling the pain from here. I dont have any of that scraper stuff on mine and I suppose that is because of the suction equipment on them. That dish shaped ejector thing at the back is about 15mm or less in and that keeps the bigger strips from going around and around. From what I can make out in your photos the scraper is a plastic wear style thing and should be adjustable to run right up against the feed stone. If it is held against the feed stone with a spring pressure it may not be adjustable in which case a smoother feed stone may be an answer.Almost any gap will work to trap the thin skived pieces so if it is adjustable I would give it a try right up lightly touching myself. Hopefully others here hopefully may have experience with this arrangement. The other thing is that if you bring the dish ejector forward you will need to bring back as well that other metal scraper as well and that should work to eject the strips better. You probably have already seen this post but in case you want to see it again this is it - You know if I were making that style of ejector wiper thingy I would have used a shaped out bristle brush to really scrape that fluff out of the grit. -
How I make crocodile skin leather belts
RockyAussie replied to RockyAussie's topic in How Do I Do That?
Yea I know ...quite often the left overs make the profits worth it... wrist bands and such. -
How I make crocodile skin leather belts
RockyAussie replied to RockyAussie's topic in How Do I Do That?
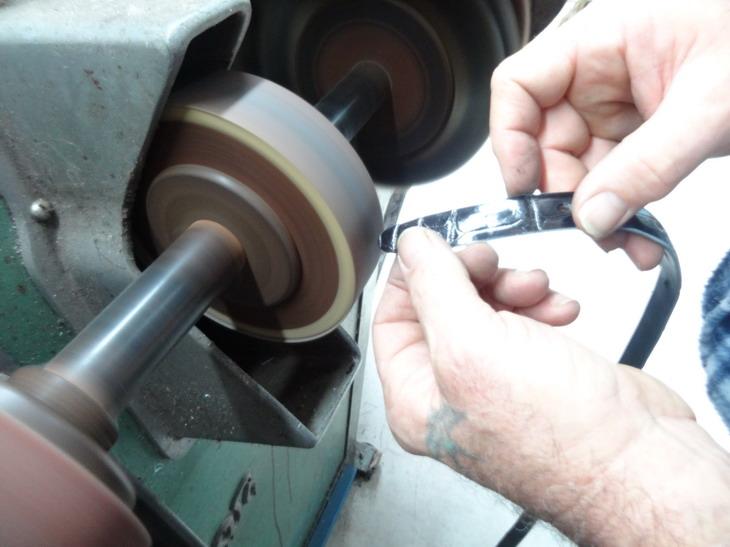
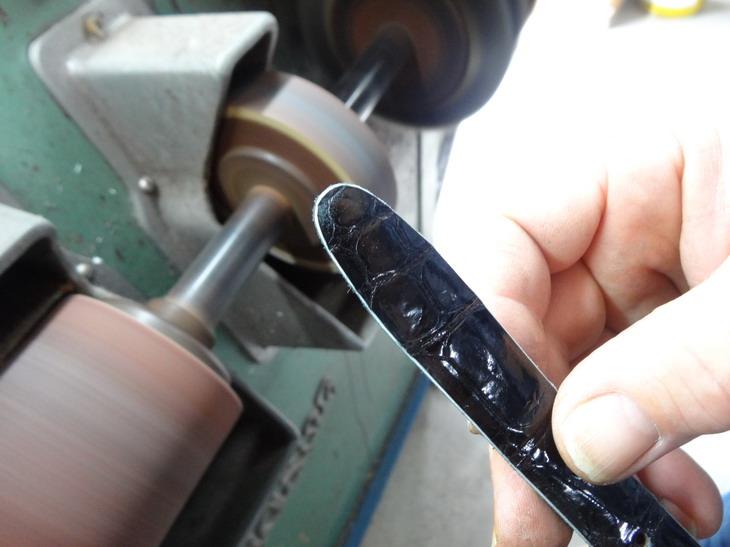
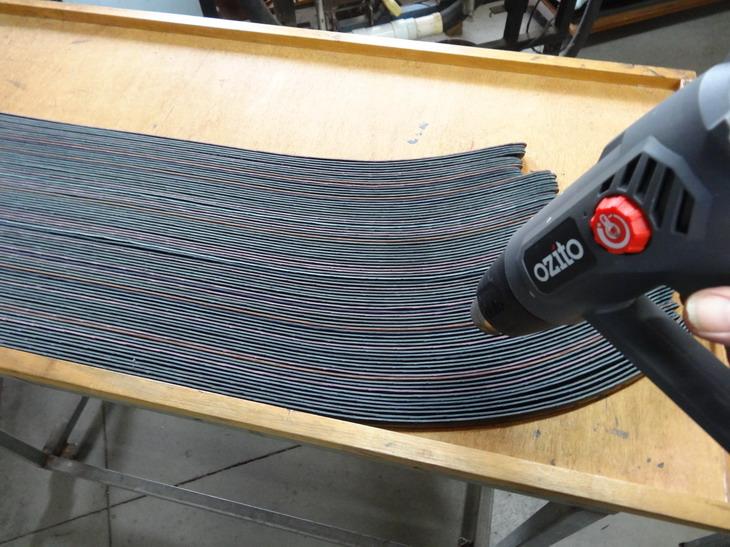
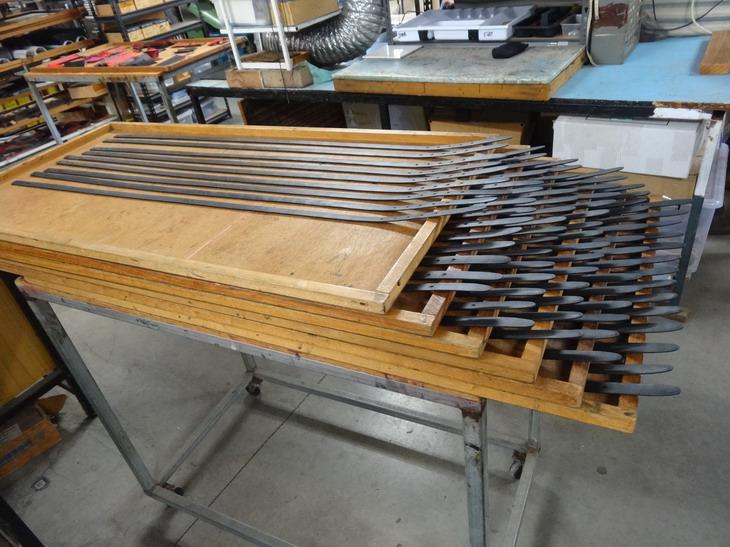
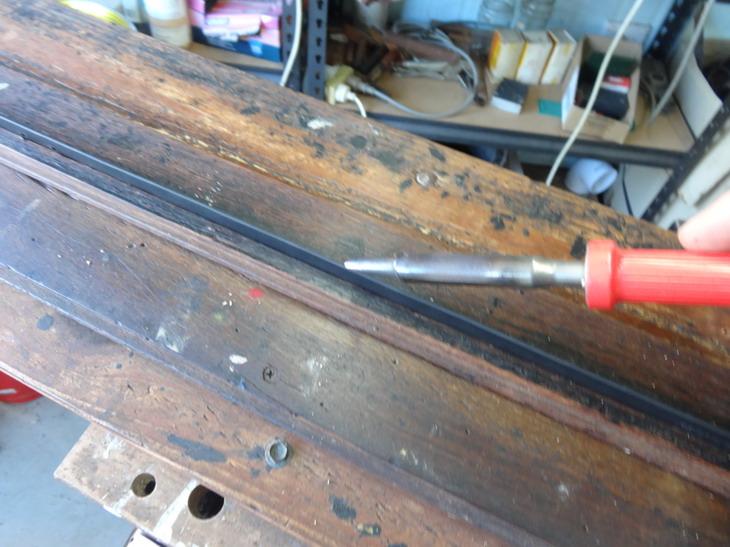
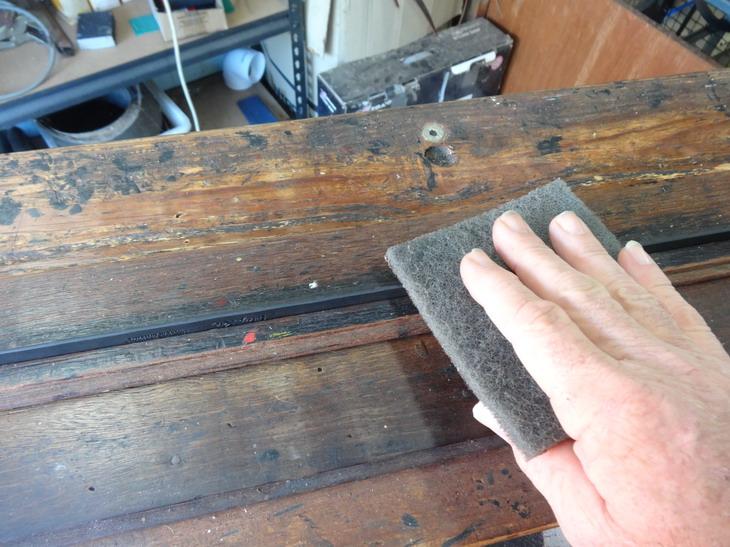
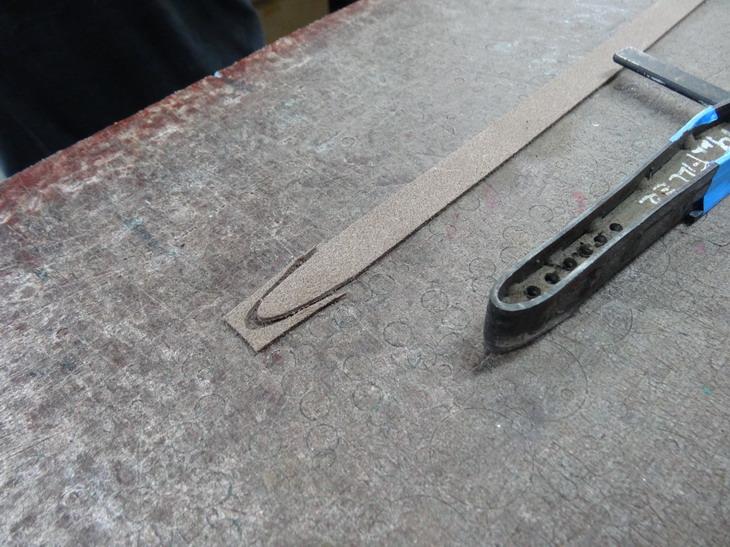
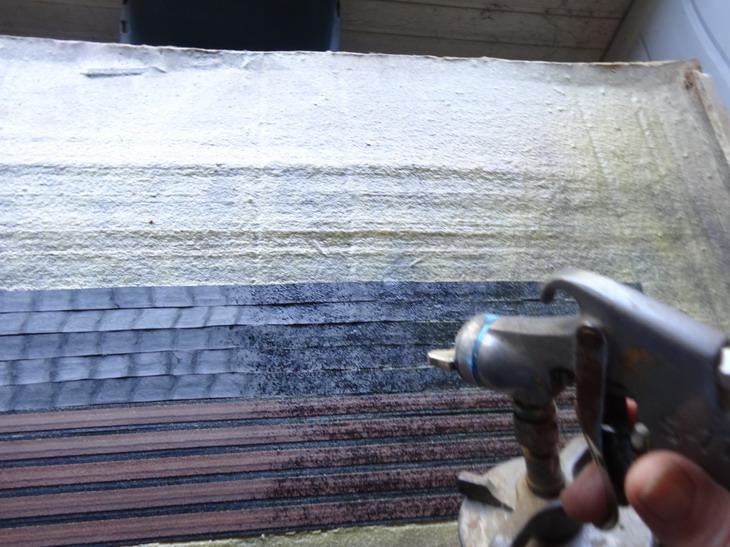
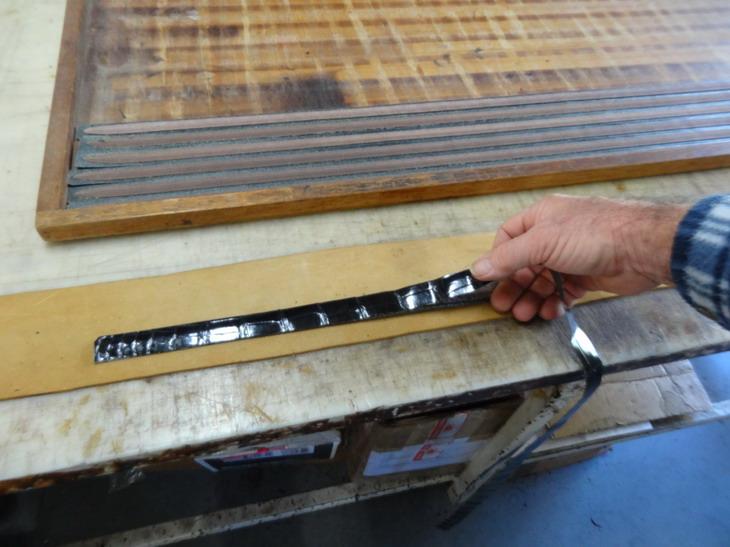
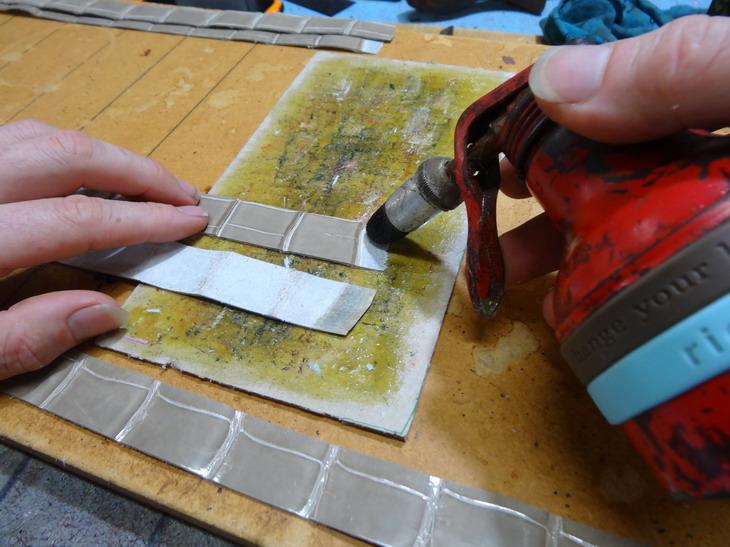
After the edges are all sanded the tips and ends must also have a little bevel sand and to do this I have a finishing machine that can sand and polish and a few other things. This can be tricky to not sand too much and does need to be done carefully as to not over sand. An angle as shown is generally best. This is about what it should look like when done sanding Note that close up it is now looking all a bit furry/rough before any edging is applied I carefully singe the fibres in with the aid of a heat gun. This must be kept moving fairly quickly and not allowed to get overly too hot or the glue will also soften and start to release. Quick and close is best. NOTE: I do not go for getting extra smooth before the edge coats are applied as I want the paint to grip as well as possible and I have found that if it is overly smooth the paint can be peeled off in long strips. After that I apply some edging through my belt edging machine (another purpose made machine of mine for the job) Normally I apply 2 or 3 coats at this stage. Here is a link that shows this machine in action - As can be seen below it is necessary to lay the belts with the profile facing down in order to stop any edging from touching the tray on which they lay. This does not mean on these skinny buggers that I won't wipe edging on with my huge fat fingers. I will show you this later. After this step the ends need to be done and that I do on another single edge machine as shown below. This is also done with 2 or 3 coats. At this stage once the edging has dried well, normally overnight I go onto the ironing in stage which is done with a temperature controlled soldering iron with a purpose shaped tip. With this thickness belt I just use a long piece of hardwood with a saw cut about 1/4" deep used to hold the belt steady. I press the iron to the back side and wipe it down the length first and then the front side and finish with one wipe down the middle normally. A grey Scotchbrite pad is then used to give a extra smooth finish and a little grip for the finish edge coating. On some jobs this could go to the polishing stage and still look better than most other makers edging. In this case it goes on to have the extra finish coats. Be back with more later.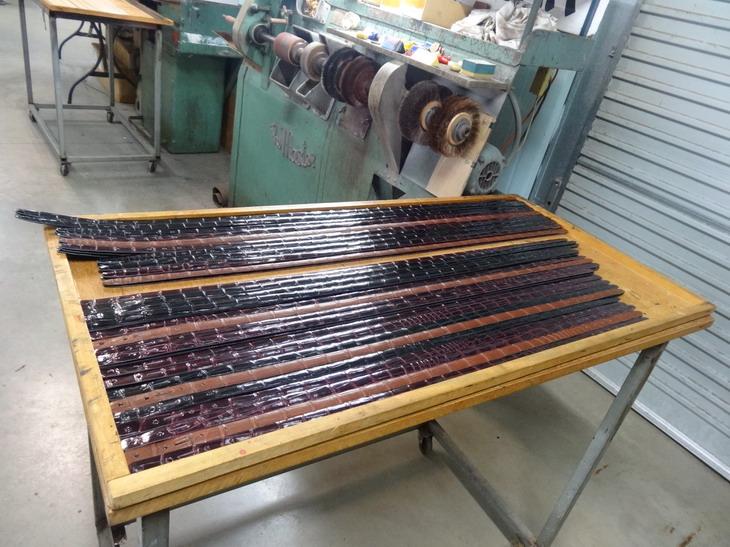
-
How I make crocodile skin leather belts
RockyAussie replied to RockyAussie's topic in How Do I Do That?
They look good and sturdy. I bet you had some fun adding the leather over the first 2 crown bones and then stitching through them as well. Did they not have a couple of inches past the crown bones? normally there should be 2 to 3 inches past them bones. Let me know if you want some more. No the skins come already coloured the only colouring I have to worry about is mixing the edge coat colours. I will touch on some of that later. As for workers and numbers that is mostly my wife and I and a couple of part time assistants. I could use a lot more, but the training times and labour costs make that difficult. I sort of hope that by sharing the knowledge here that some others will pick it up before my time is gone. Some more competition here would be nice as well. Thanks Gary. To be honest I like designing and making the equipment more than making the products most times. Although I do croc mostly, many of the steps and the equipment used are usefully applied in other applications. I hope that some parts at least can be of help to you and other lookers as well. I will be back...... -
Thanks @toxo kind words like that, are more than enough and people like you that bother to say so make the sharing all that much nicer to do.
-
How I make crocodile skin leather belts
RockyAussie replied to RockyAussie's topic in How Do I Do That?
Boring as hell for many I'm sure but for any interested in working with croc I reckon they will like it some. I am starting to make waaaaay to many typos so until tomorrow ...goodnight to you all. -
How I make crocodile skin leather belts
RockyAussie replied to RockyAussie's topic in How Do I Do That?
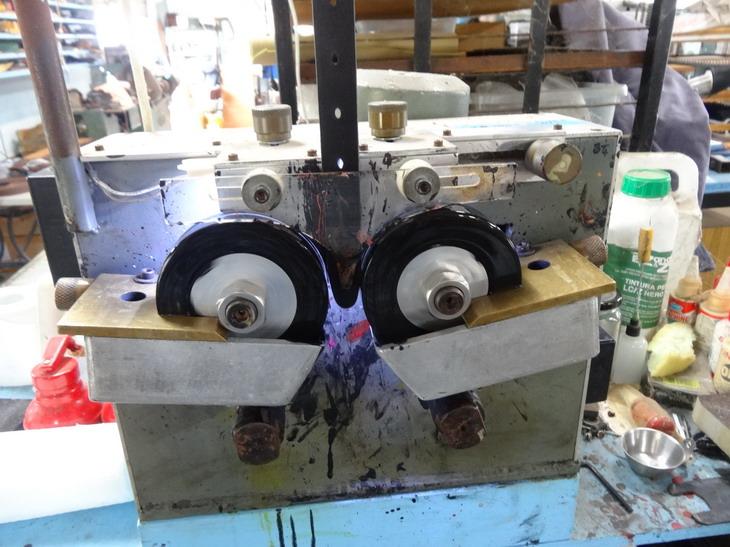
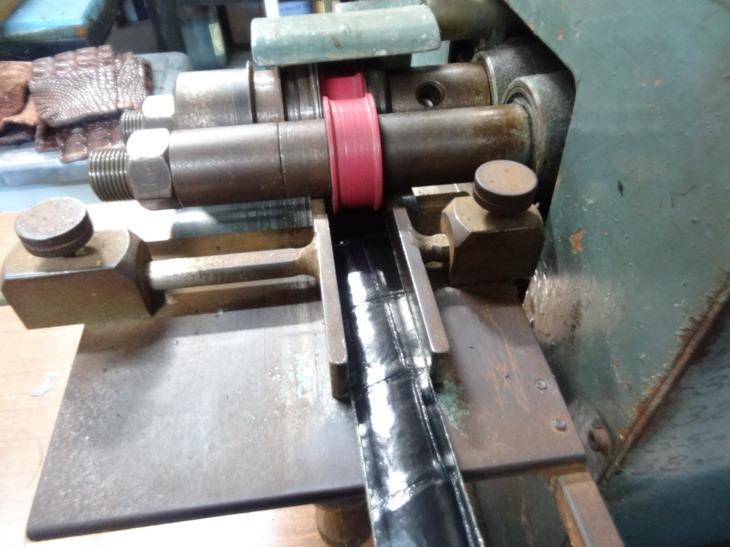
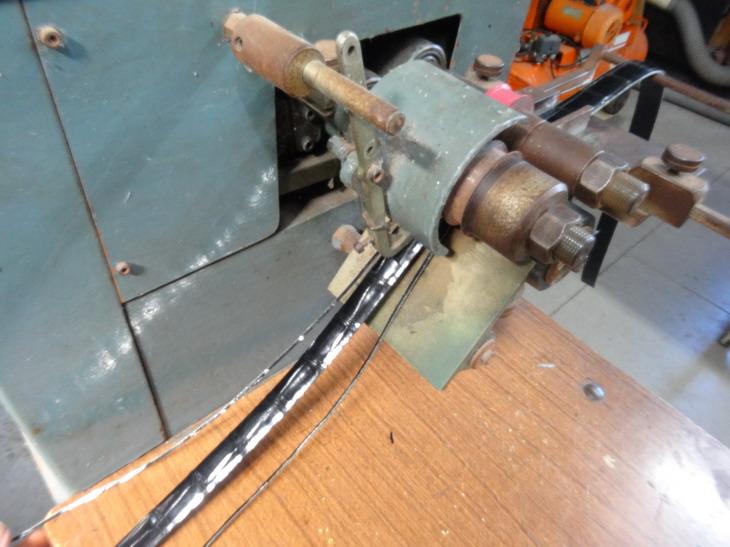
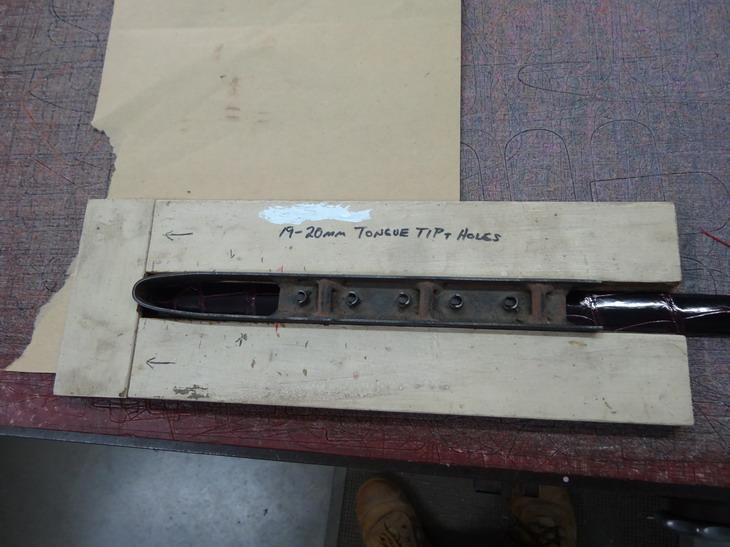
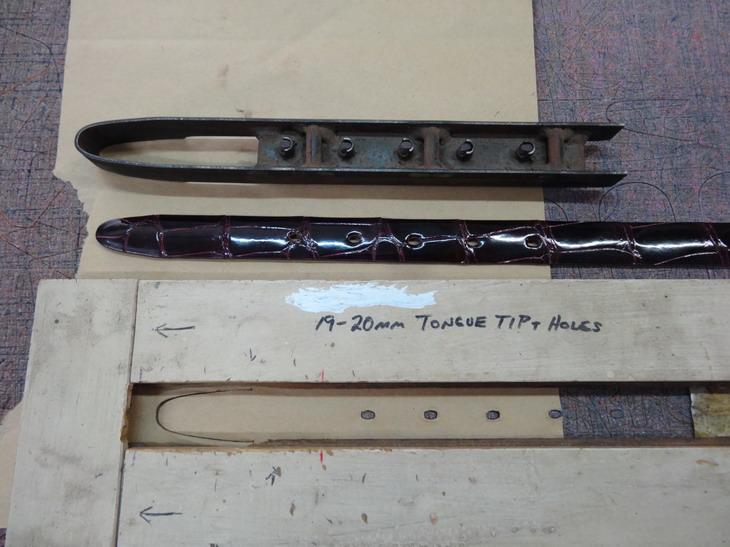
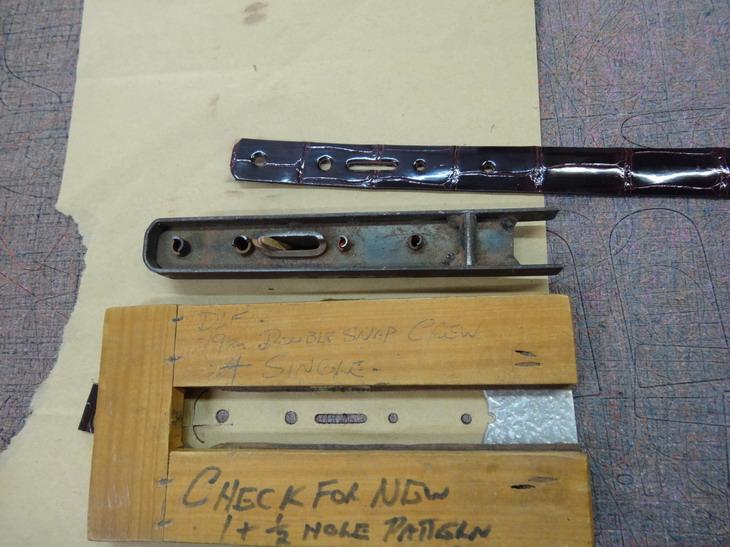
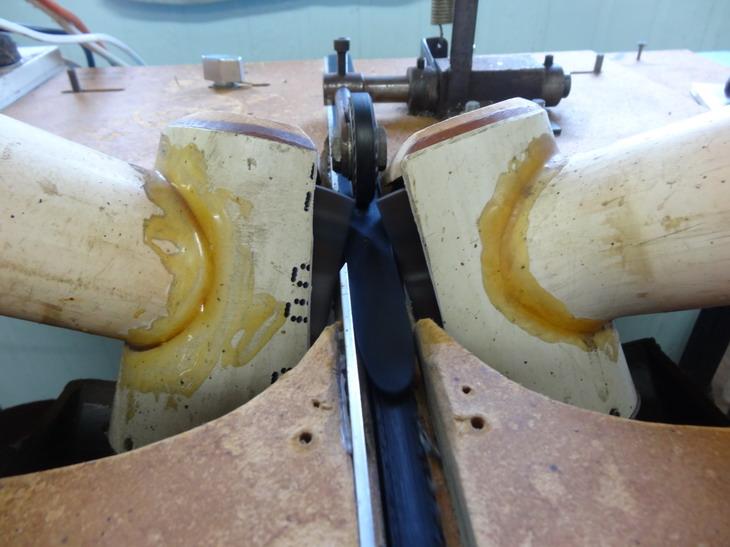
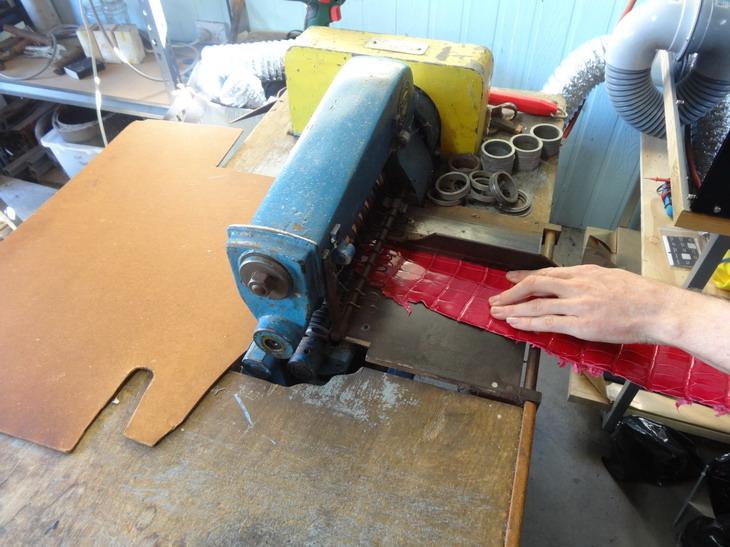
After they are together I press down around the edges with my cow horn slicker very firmly as this particular belt style is not stitched and it is very important that the adhesion and edging methods used are done well. they are now ready to go through the combining machine that will take about 1.5mm off each edge as it goes through. note that the roller on the front helps to press in the profile a little as well as it runs through. Here at the back you can see the edge strips being removed. After they are all combined they go up to the clicker press to have their tongue and buckle holes done. Purpose made jig holders keep the knife in place as they get press cut into shape. How these jig holders are made can be seen in this link - After the holes are done the edges all need to have a bevel sanding and that is done on another one of my purpose built machines made for this purpose. Basically it is 2 bench grinders set in a table that allows me to move them closer and further apart as well as adjust up and down and angle in and out and back as well. That's it all for tonight I will add more tomorrow. See this link of the edge sanding machine in action if you wish - and say you like it (even if you don't) The back is set and sanded first Then the top checked and set how much removal is wanted as well.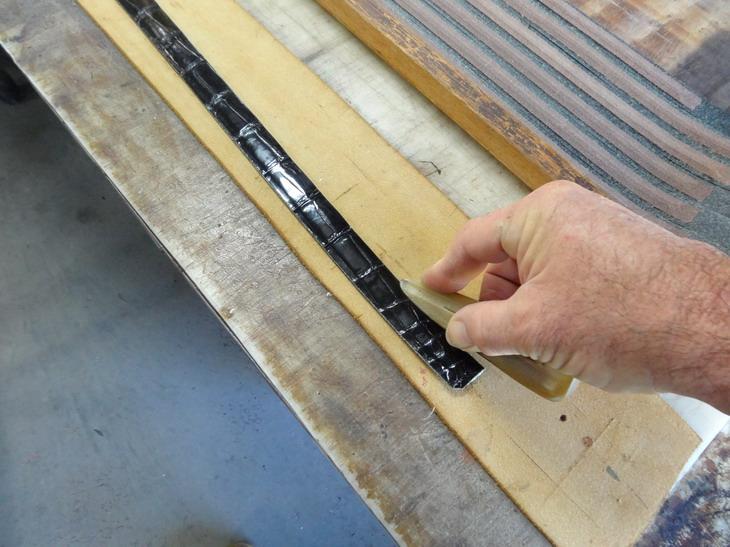
-
Thanks for the kind words @paloma. I expect that one day it will be well within your capabilities.
-
How I make crocodile skin leather belts
RockyAussie replied to RockyAussie's topic in How Do I Do That?
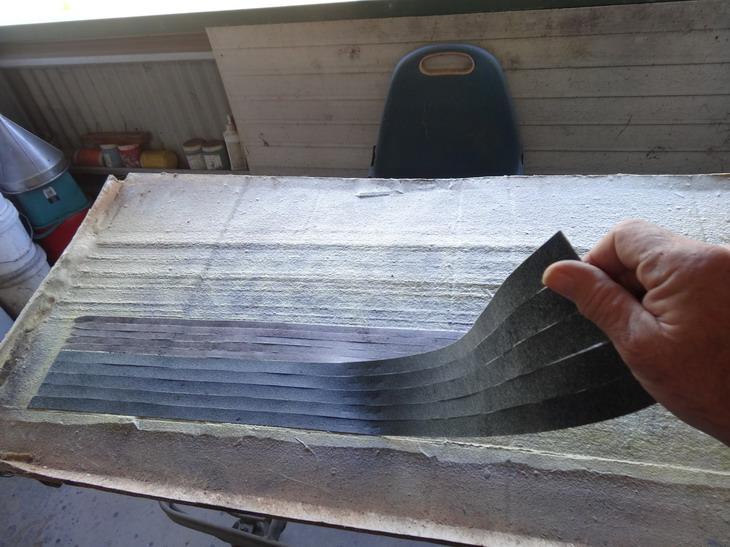
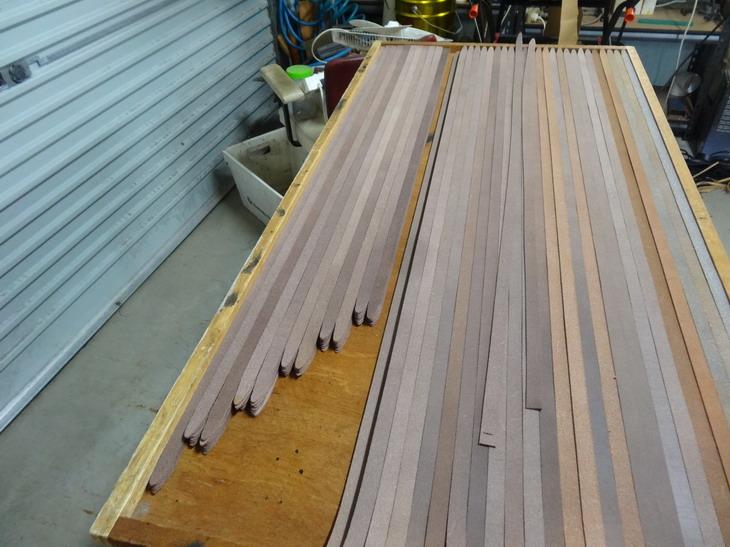
The tips on the fillers could be done on the clicker press but in this case I've decided that cutting them could be just as quicker by hammer and punch After this they get split to 1.4mm thickness (yes.... I know I should have done this before cutting into strips) After that they get their edges skived. A strong magnet helps to make this easy and quick. I do this one side at a time as I like to get the tip done along with the edge skive. Now the fillers are ready to attach to the backings. They get sprayed all together on a purpose built spray table that I can tilt toward the operator for better application. They now can be lifted off and placed for another operator to peel apart and attach as shown below. Next the croc pieces are glued up along with the combined filler and backs. This takes some practice to not have the croc flip up while spraying. These are then carefully placed together as shown. If it were not croc and only leather tops, they could be fed together straight into the combining machine all together. Normally my hand that is holding the camera here would be walking along holding one side down whilst the other is pressing down the croc into place. I think that is about the picture limit now again so I'll be back later.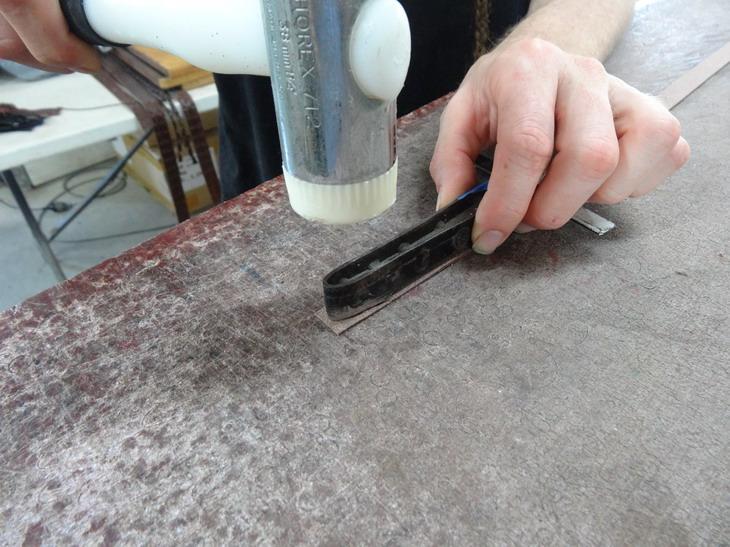

-
How I make crocodile skin leather belts
RockyAussie replied to RockyAussie's topic in How Do I Do That?
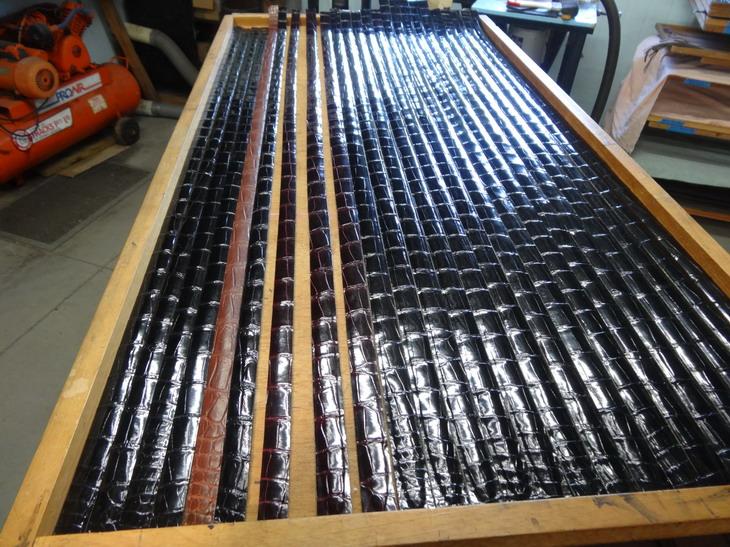
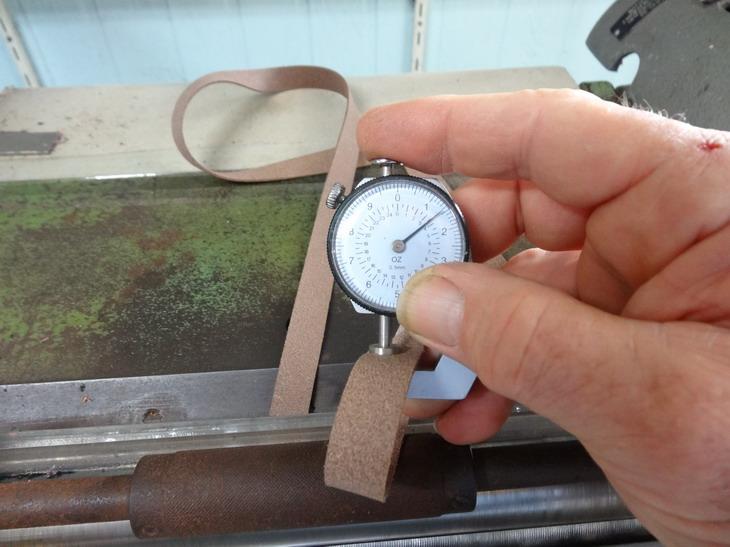
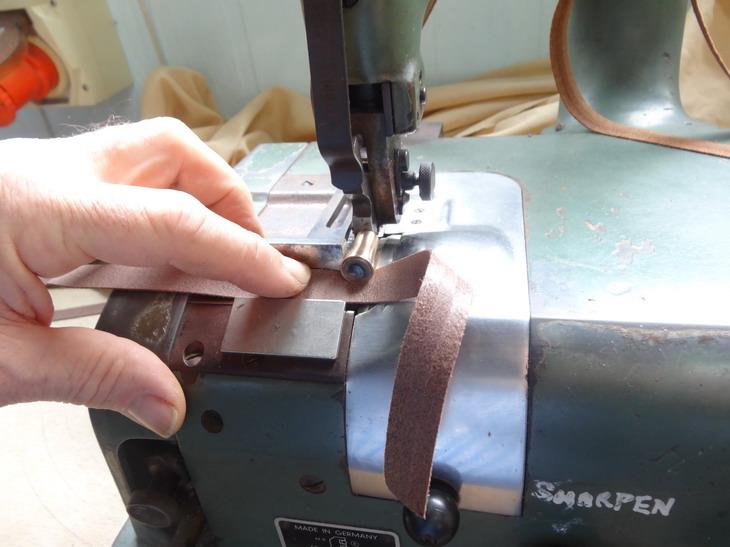
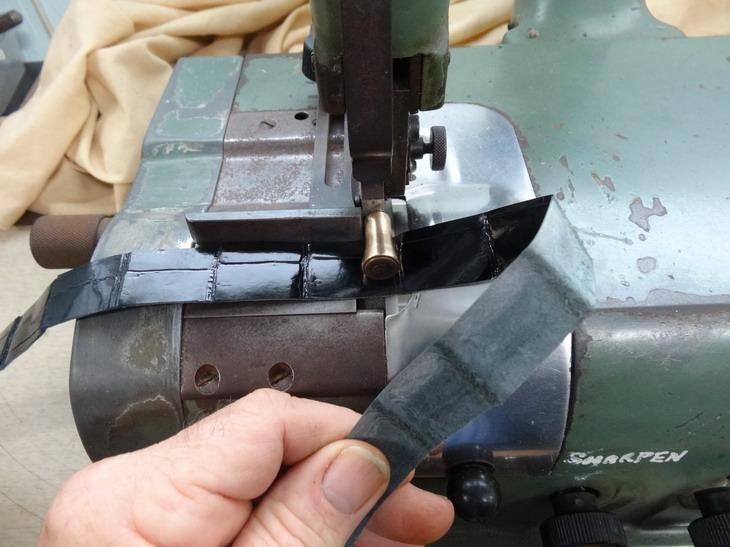
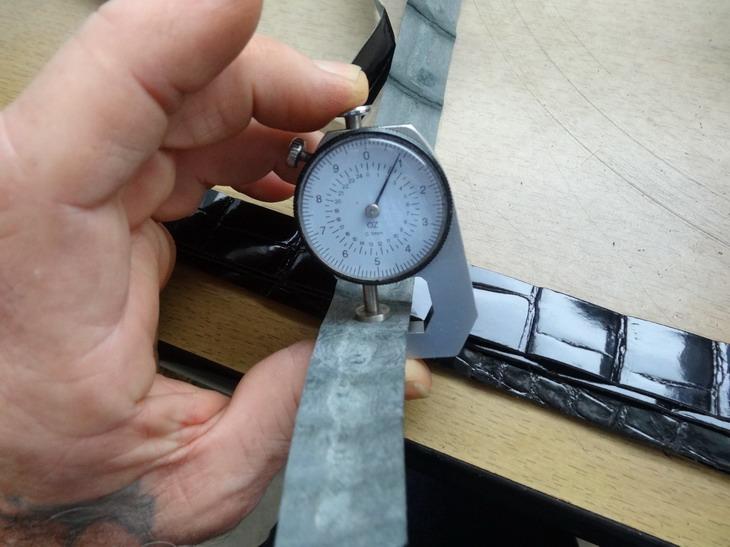
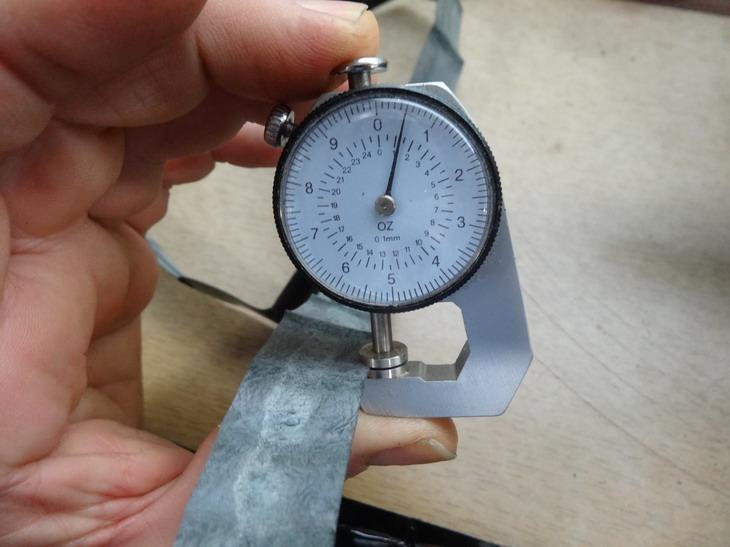
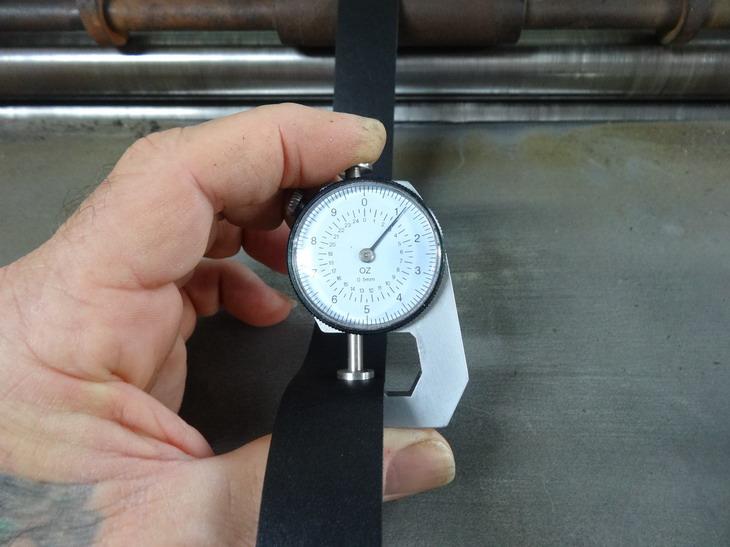
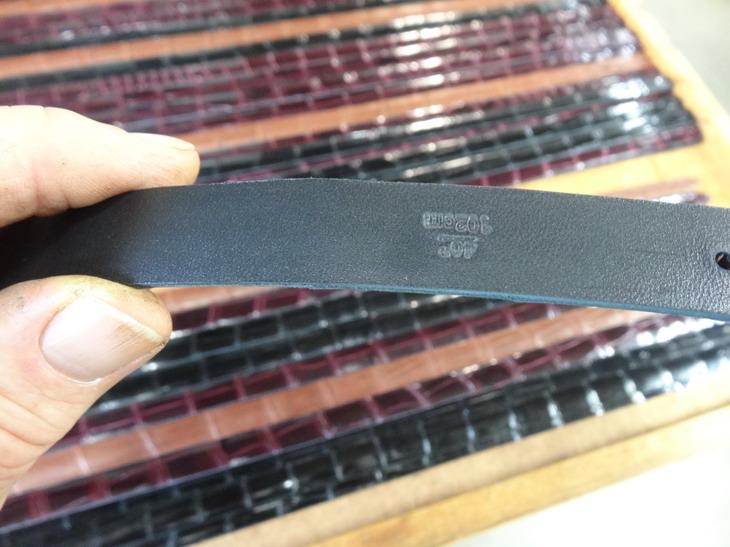
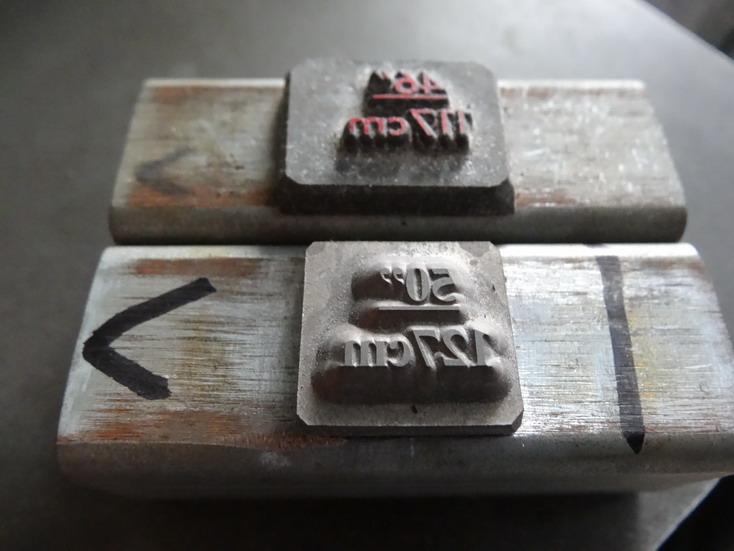
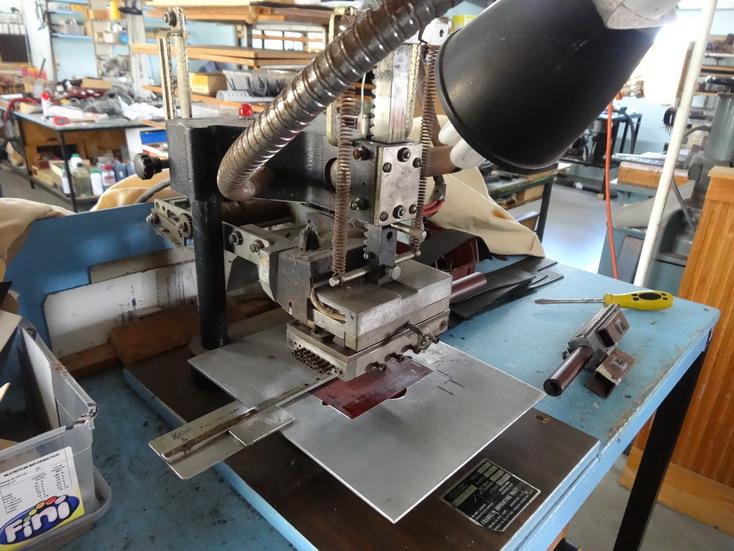
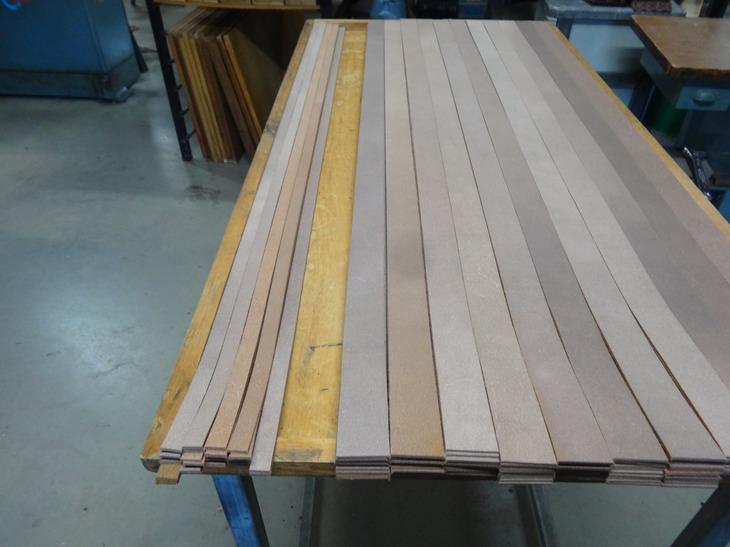
I should have pointed out that the first cuts of the croc and the backings starts at 22mm wide and is later cut down to the 19mm width. Here shown joined up there is over 200 pieces for a couple of customer orders As many of these colours have to have matching edging I will separate the black edged ones with black backings first and go onto the skiving stage of the tops next. This is done on my Fortuna skiving machine with the aid of a roller foot that helps to prevent craze cracking in the glazed crocodile skins. The skins are supplied at around 1mm thick and therefore do not need to be split any thinner in this case. The thickness at the skived edges is taken down to about .5mm in order to make 1. Cleaner and better for gluing. 2. allow the croc to flex over the filler more easily and improve the profile. 3. thinner edges make for better edge coating results. Next the backings are cut and split down to around the 1 to 1.1mm range And then moved on to the embossing of the sizes and customer branding. The sizes are done quite quickly by making the size stamps onto blocks that I can lift out on the run from the holder and put in a new size that gets preheated on the top of the embossing machine. The metal box holding the size stamp is held in with a strong magnet and a pair of pliers is used to get them in and out. The next step is making up the fillers that give a high profile to the finished appearance. For this I have used some splits from earlier larger width belt job. I used my belt combiner machine with 3 knives for this job but a strap cutting machine would also work fine. Following this I have then taken them to all of the belt lengths of the orders. Will be back later......Cows need to be fed.

-
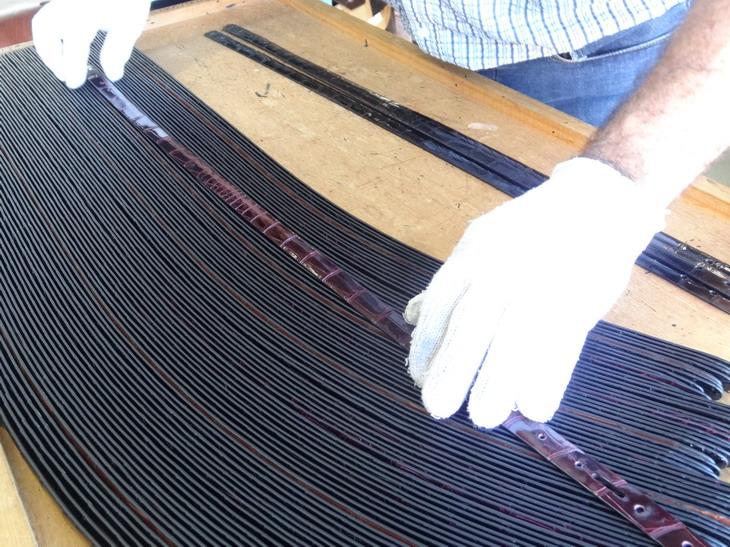
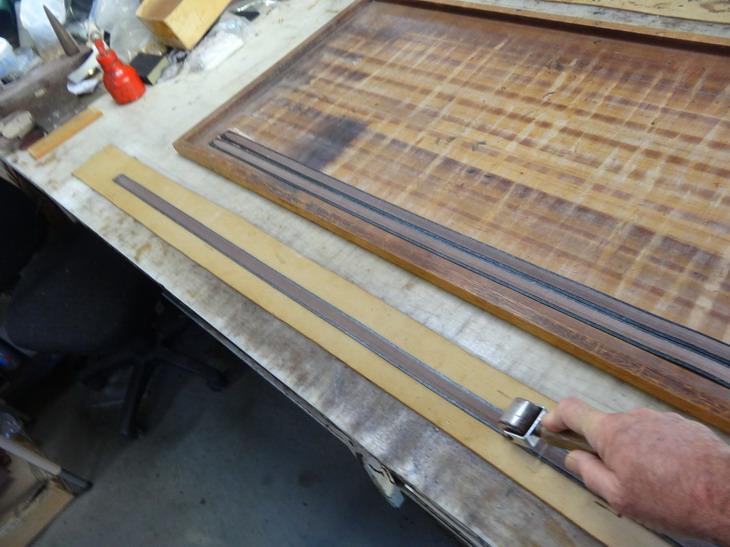
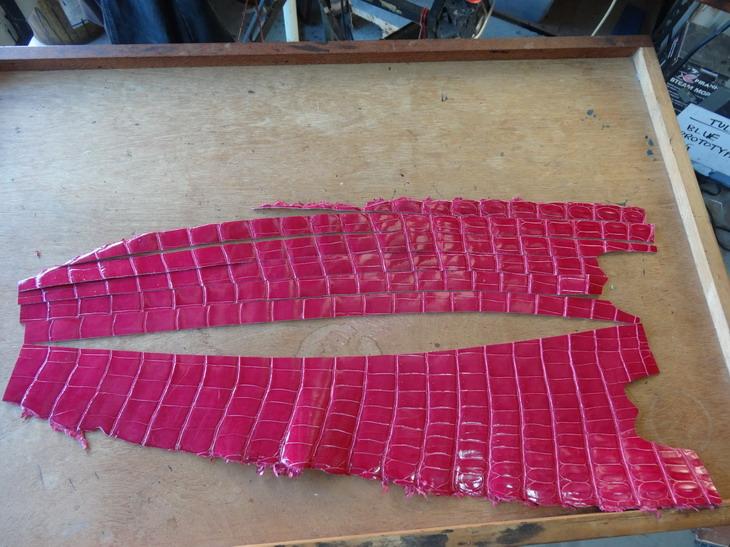
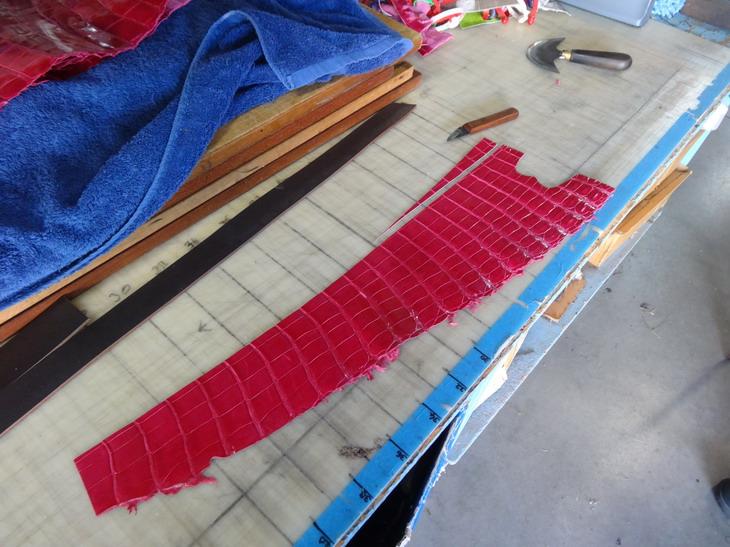
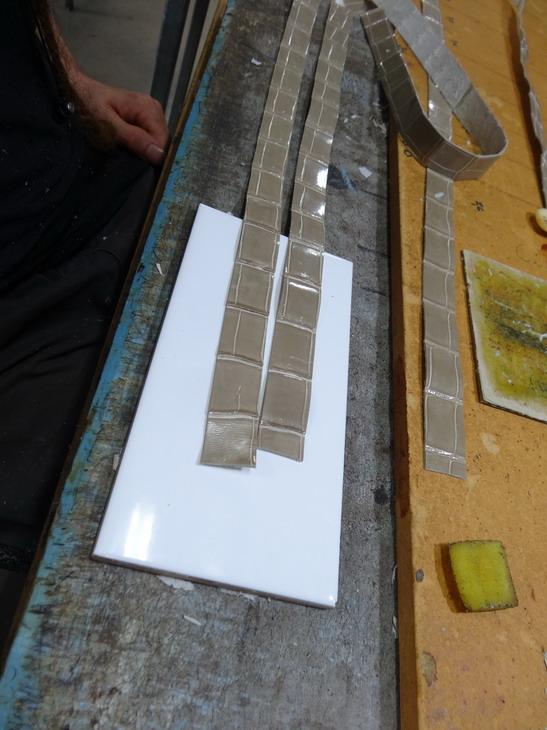
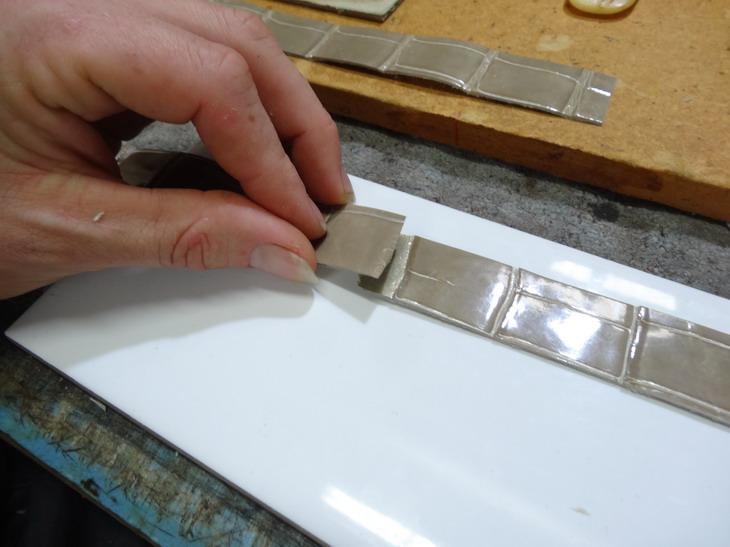
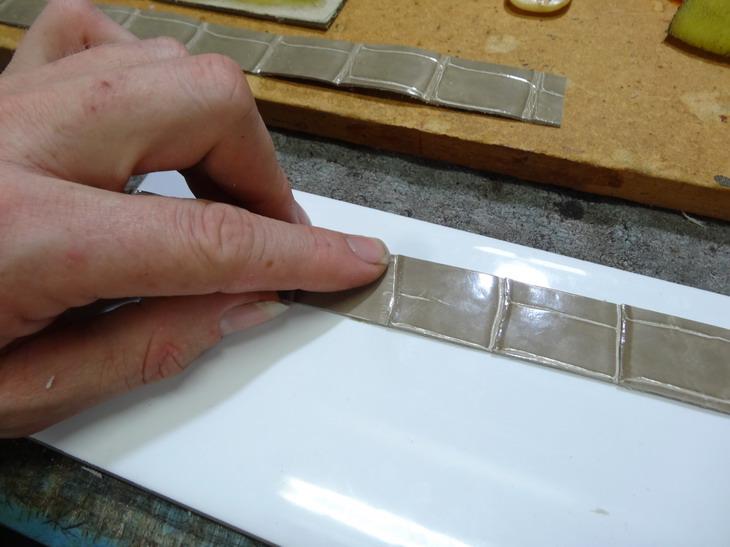
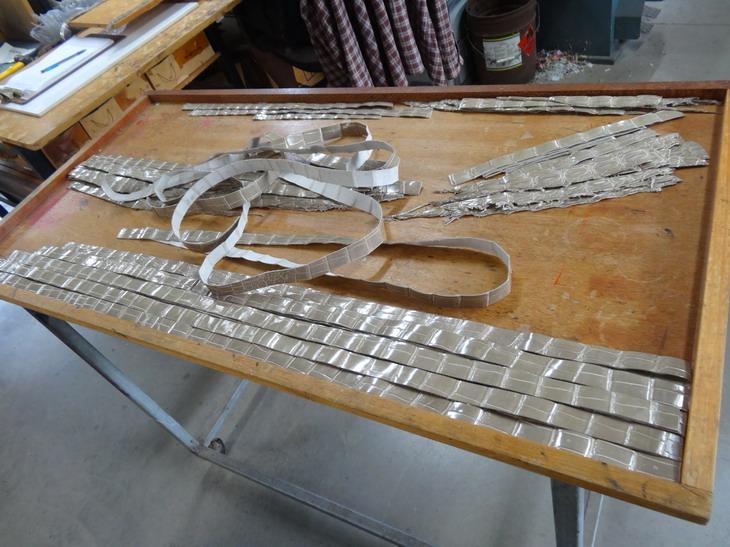
This is the process where I make our 19mm (3/4") crocodile skin belts. I must first say that this is more of a manufacturing style of post and I will try to give small scale alternative methods where and if I can. The first step in making these belts is the cutting up into strips the crocodile as this sometimes affects the numbers of backing and fillers that need to be made to go with them. As a general rule I keep back the tails of the skins after other products are made for the purpose of making the belts. My strap cutter is not wide enough for the full width of a tail normally and this must be done in one or sometimes 2 runs through. Note that there is now a wide sweep after the cutting and this makes it difficult to manage running the next part through the belt cutter. To overcome this we take a bit out to straighten up a little better This time we can use the fence guide on the strap cutter As you can see it still has a fair amount of curve but this is overcome latter on in the processing. After this we need to join them up into lengths long enough for the belts. We now end for end the pieces to find comparable size scale size and angle to hide the joins as much as possible. He3re a very sharp knife and and experience is a must. There should be at least a 1/2" of overlap at the join. Contact glue is then applied and given some time to tack off. Normally several are done at a time. This is then carefully lined up and pressed and tapped into place making sure that no excess glue is left behind. This process is repeated until all the sizes are made up for the order. That is the upload limit for now so I will be back with more later. There will be a link to a little video on the belt sanding as well.


-
Help a guy out with his new skiving machine!
RockyAussie replied to YinTx's topic in Leather Machinery
-
Help a guy out with his new skiving machine!
RockyAussie replied to YinTx's topic in Leather Machinery
In case you don't have one the scrap ejector @jimi is refering to is a brass bell that fits snugly inside of the bell and helps to prevent some of the leather from staying in there. Do you have it in there? Other than that I think the sharpening on your blade looks like it is to aggressive and should not be showing quite that amount of scratching. If I have taken out some sizeable nicks it would have that appearance but I come back again with a lighter touch pressure on the sharpening stone for a bit than proceed to do the stropping step. What you have there looks like a little saw and it would be easy to get a deflection on the blade particularly upward. There is way too much leather scrap sticking to your feed stone as well and that will need to be brushed off. Another thing I notice is that the guide stop looks very pointed at the front and I would suggest grinding it a bit flatter at the front in order that the leather might not be pulled into it too much and cause a possible bunching that may create bad skiving. Those pointy ones are mostly for shoe upper work and the like where you need top get around extreme curves and such. The fence/guide I mostly use has a flat about 2 1/2" long and if doing long straps you can box it in with a flat magnet as well.Then you can just hold it and let it go. Lastly and after giving it all a clean check, back your bell back a 1/2mm or so and see if it goes any smoother. I do that when doing thicker leathers normally though. Another thing when starting a skive take a little slice off the corner first by holding it 1/2 way in the go around the job in an anticlockwise action so that each new start is not on the thick. That will help not get chop out holes if you are careful when you start the feed each time.
-
This will be the stupidest question you’ve ever answered.
RockyAussie replied to Antonella's topic in How Do I Do That?
So long as the needles are correct then it is possible over the years that the metal thread that holds the screw for tightening the needle has stretched and extended. I Back the needle screw out and put the blunt side of a smaller size drill bit up in where the needle goes and feel for any lips/protrusions where the screw goes in. If it catches there then I would try and clean it out possibly by using a drill bit that fits in the hole without being overally tight and carefully spinning it with your fingers until any obstructions are removed. Do be careful not to break the drill bit in there as getting that out may be very difficult and involve a lot more work.

