


HaloJones
-
Posts
382 -
Joined
-
Last visited
Content Type
Profiles
Forums
Events
Blogs
Gallery
Store
Everything posted by HaloJones
-
Leather work swap who would be interested?
HaloJones replied to Rossr's topic in Leatherwork Conversation
All ready to go, I will be able to post it on my return home, as I am currently in a camp site in Germany back home next week -
Leather work swap who would be interested?
HaloJones replied to Rossr's topic in Leatherwork Conversation
All ready to go, I will be able to post it on my return home, as I am currently in a camp site in Germany back home next week -
Leather work swap who would be interested?
HaloJones replied to Rossr's topic in Leatherwork Conversation
Works for me -
Leather work swap who would be interested?
HaloJones replied to Rossr's topic in Leatherwork Conversation
Ohh this sounds fun, count me in as long as the timing is right as I am off for the 1st 2 weeks in June -
Kudu hide messenger bag
HaloJones replied to plingboot's topic in Purses, Wallets, Belts and Miscellaneous Pocket Items
Nice design there, good use of materials -
Both please:)
-
Can I ask; what software do you use to design on the Cricut ?
-
....lost for words, that is amazing
-
Nice, thanks for the video & idea I know a few friends that would like one Also, I really do like Aye, Dark Overlord
-
Album cover bag
HaloJones replied to gordond's topic in Purses, Wallets, Belts and Miscellaneous Pocket Items
Ohh, I like that, good contrast of the design -
Dog Collars Using Angelus Paints from FrogJelly
HaloJones replied to hashtagartz's topic in Collars, Cuffs, Leashes and Leads
Love them, are the paints oil or water based? what did you use to seal it? -
Dog Collars Using Angelus Paints from FrogJelly
HaloJones replied to hashtagartz's topic in Collars, Cuffs, Leashes and Leads
Love them, are the paints oil or water based? what did you use to seal it? -
Thanks, so I take it that there is a bag / storage in front of the arrows?
-
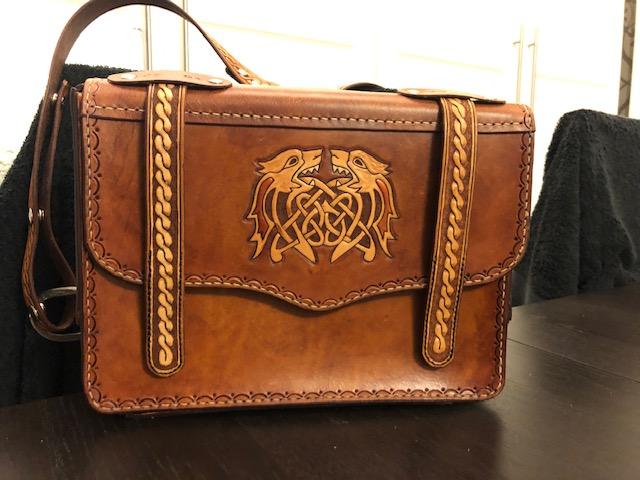
Celtic Bag
HaloJones replied to HaloJones's topic in Purses, Wallets, Belts and Miscellaneous Pocket Items
All that is the application of the dye used on the bag generally, but to the flesh side, did not want to line that piece in case it came out too thick to close properly -
Very nice, out of curiosity can we see a photo from the top? does the swing hook & flap open, if so why as the arrows seem to go through it? thanks
-
Celtic Bag
HaloJones replied to HaloJones's topic in Purses, Wallets, Belts and Miscellaneous Pocket Items
Thanks all yes I do appreciate a craft aid as I can’t draw / trace very well yet -
So I wanted a new day-to-day hand bag, it needed to be sturdy - I tend to chuck it about, be worn as a back-pack & look a bit different. I have made a couple of bags before & I am still learning - gussets & edges I do need to work on still, my carving is getting better; but again more practice needed. No pattern, just made up as I go, So its a veg tan I got from Tandy (c.5mm thick) hand stitched with a thread, again from Tandy, the colour is the eco flow light brown cut 50/50 with water & buffed with snow paste for weather-proofing, lined with a finished pig skin lining. All comments & suggestions from improvement welcome, thanks for looking


-
Male Nightingale Armor Skyrim - WIP
HaloJones replied to PerniciousDuke's topic in Historical Reenactment
You could wet form the ridges in a thin leather & then attach the shaped piece to a thicker leather to make it thicker & longer lasting. -
Plain ol wallet luxury leather
HaloJones replied to VYO's topic in Purses, Wallets, Belts and Miscellaneous Pocket Items
Love the colours -
Last minute gift
HaloJones replied to CelticPrint's topic in Gun Holsters, Rifle Slings and Knife Sheathes
I judge it to be ingenious:) what are you making? -
Thanks, the two sets do show the difference between pro (yours) and hobbyist (me) but I am still in awe of yours
-
No where near as good as yours but the owner is happy & it has survived battle. Not sure if I can insert the picture (Currently mobile) but here is a link to it on my Flickr page
-
Wow! Is all I can say, I just finished an armour Set so I feel your pain on sewing it.
-
Matching set for wedding
HaloJones replied to stormcrow's topic in Purses, Wallets, Belts and Miscellaneous Pocket Items
Now that is pretty, I have yet to find a brogue punch in my budget -
A few Fun recent projects
HaloJones replied to Crispin's topic in Purses, Wallets, Belts and Miscellaneous Pocket Items
Looks good but what is the middle picture?