


kgg
-
Posts
3,369 -
Joined
-
Last visited
Content Type
Profiles
Forums
Events
Blogs
Gallery
Store
Everything posted by kgg
-
According to the parts manual there are two screws (position and a set screw) holding the handwheel on. Parts manual reference ( https://southstarsupply.com/wp-content/uploads/2020/04/Singer-211G165-G166-G265-G266.pdf ). I would remove both and put a couple drops of diesel in each hole and let sit for a few hours before trying to remove the handwheel. You may have to use a wheel puller and a hammer to move the handwheel back and forth as it maybe seized onto the shaft once you remove those screws. Getting those screws will also be difficult to remove. With all that work done and the new needle positioner install the question remains why do you want / need to install the needle positioner??? kgg
-
I use good fashion contact cement. I don't think the brand name really matters much. What I have found that bests works for me and gives me the best holding is to apply one coat on the flesh (fuzzy) side of the pieces, let dry then add a second coat until dry (about 10 -15 minutes), mate the two pieces, use a roller to evenly press the pieces together, clamp or weight down the pieces and let sit for 12-24 hours. My theory is the first coat of contact cement sinks into the fibres and binds them together. The second coat holds both surfaces permanently together. I have found sometimes with only one coat of contact cement the two pieces can be pulled apart. kgg
-
Glad you got a machine. Now you are going to have to learn the "poor mans reverse". Three stitches forward, turn the material 180 degrees, sew three stitches, turn the material back 180 degrees and do your seam. Rinse and repeat at the end of your seam. This method will lock your seam at the beginning and at the end. kgg
-
What size of thread are you trying to use??? The max size of needle ( #18 / 110 ) in the manual indicates it could handle maybe V69. Even through the machine could handle the same thickness of fabric when you are dealing with any type of leather or thickness the machine is going to struggle. In a nut shell this is the Wrong machine that was made / designed for fabric. kgg
-
I have seen something similar while wet forming on some hides not all, cost effective 2/3 and 4/5 oz veg tan leather and not from Tandy. It has appeared as dots or small lines. I figured it was fat appearing but this topic caused me to do an AI search related to the Tandy Econo and probably applies to other suppliers the results were: i) "The milky substance rising from Tandy's Econo Veg Tan leather while casing is likely natural oils and tannins leaching out of the leather as it deeply hydrates. Casing involves thoroughly wetting the vegetable-tanned leather so the water penetrates evenly through the fibers, which can draw out waxes, fats, and residual tanning materials causing a cloudy or milky appearance on the surface. This is more common in economy grades like Econo Veg Tan because they may have more natural variations and less refined finishing compared to higher-grade leathers." ii) The regions most commonly associated with these Econo vegetable-tanned hides are South America—especially Brazil and surrounding countries—and in some cases Asia, depending on availability and market supply. These regions are major global suppliers of cattle hides used in mass-market leather production, which matches Tandy's focus on affordable, large-batch material for their Econo line. @chuck123wapati I agree Not helpful. Could have been worded a little differently. kgg
-
Like @Dwight and @AlZilla have said break it up into various pieces. Check and see what the items can be purchased for new and ask fair reduced price. I think you would have to take a lot less selling them as one big lot. Someone maybe interested in leather while others may want needles and thread or tools. I have in the past bought bulk lots but got them for a real cheap price and then sold off the items that I didn't want for a profit. kgg
-
Nicely done I like the collars a real labour of love. The only word of caution is for the more powerful dogs that the dead ending of the rope lead at the clip where the leather folds through the ring of the clip and being secured to the lead by thread is a real weak point. I have seen a lot of that style fail due the leather weakness, wear of the leather, leather rot and thread failure particularly the inexpensive leads. Nothing worst then pulling back on the lead and the dog is gone leaving the owner holding a pretty lead. Since I deal with a wide range of customer breeds I have to be sure that no matter the breed the lead will not fail. To that end for nylon / polyester leads I pull back a couple internal core strands of the rope for about 4-6" (100-150mm), thread the end through the "O" ring, heat compress and melt two #9 copper rivets through. Then I install burrs and cover the end using shrink tubing to cover the end. The shrink tubing helps protect the rope from the dogs that like to chew at the clip. I do the same thing for kennel quick leads ranging in length from 4' to 8' (1.2m to 2.4m). The funny thing is I have a husband and wife who I made a 6' (1.8m) rope lead for the husband and a 4' (1.2m) leather lead for the lady. The dog loves to chew on the point where the clip attaches to the rope and never touches the leather lead. I had to install a extra layer of shrink wrap to protect the rope lead. kgg
-
The design is a pretty simple one but personally I would check what products are designed to meet the safety standards related to fire clothing and equipment before applying anything. I am sure their are standards to cover-off any and all things a fire fighter has on their bodies. Also ensure the leather thickness and sewing thread meets those standards. This for me work be a project best left to those certified and insured to do that type of work. kgg
-
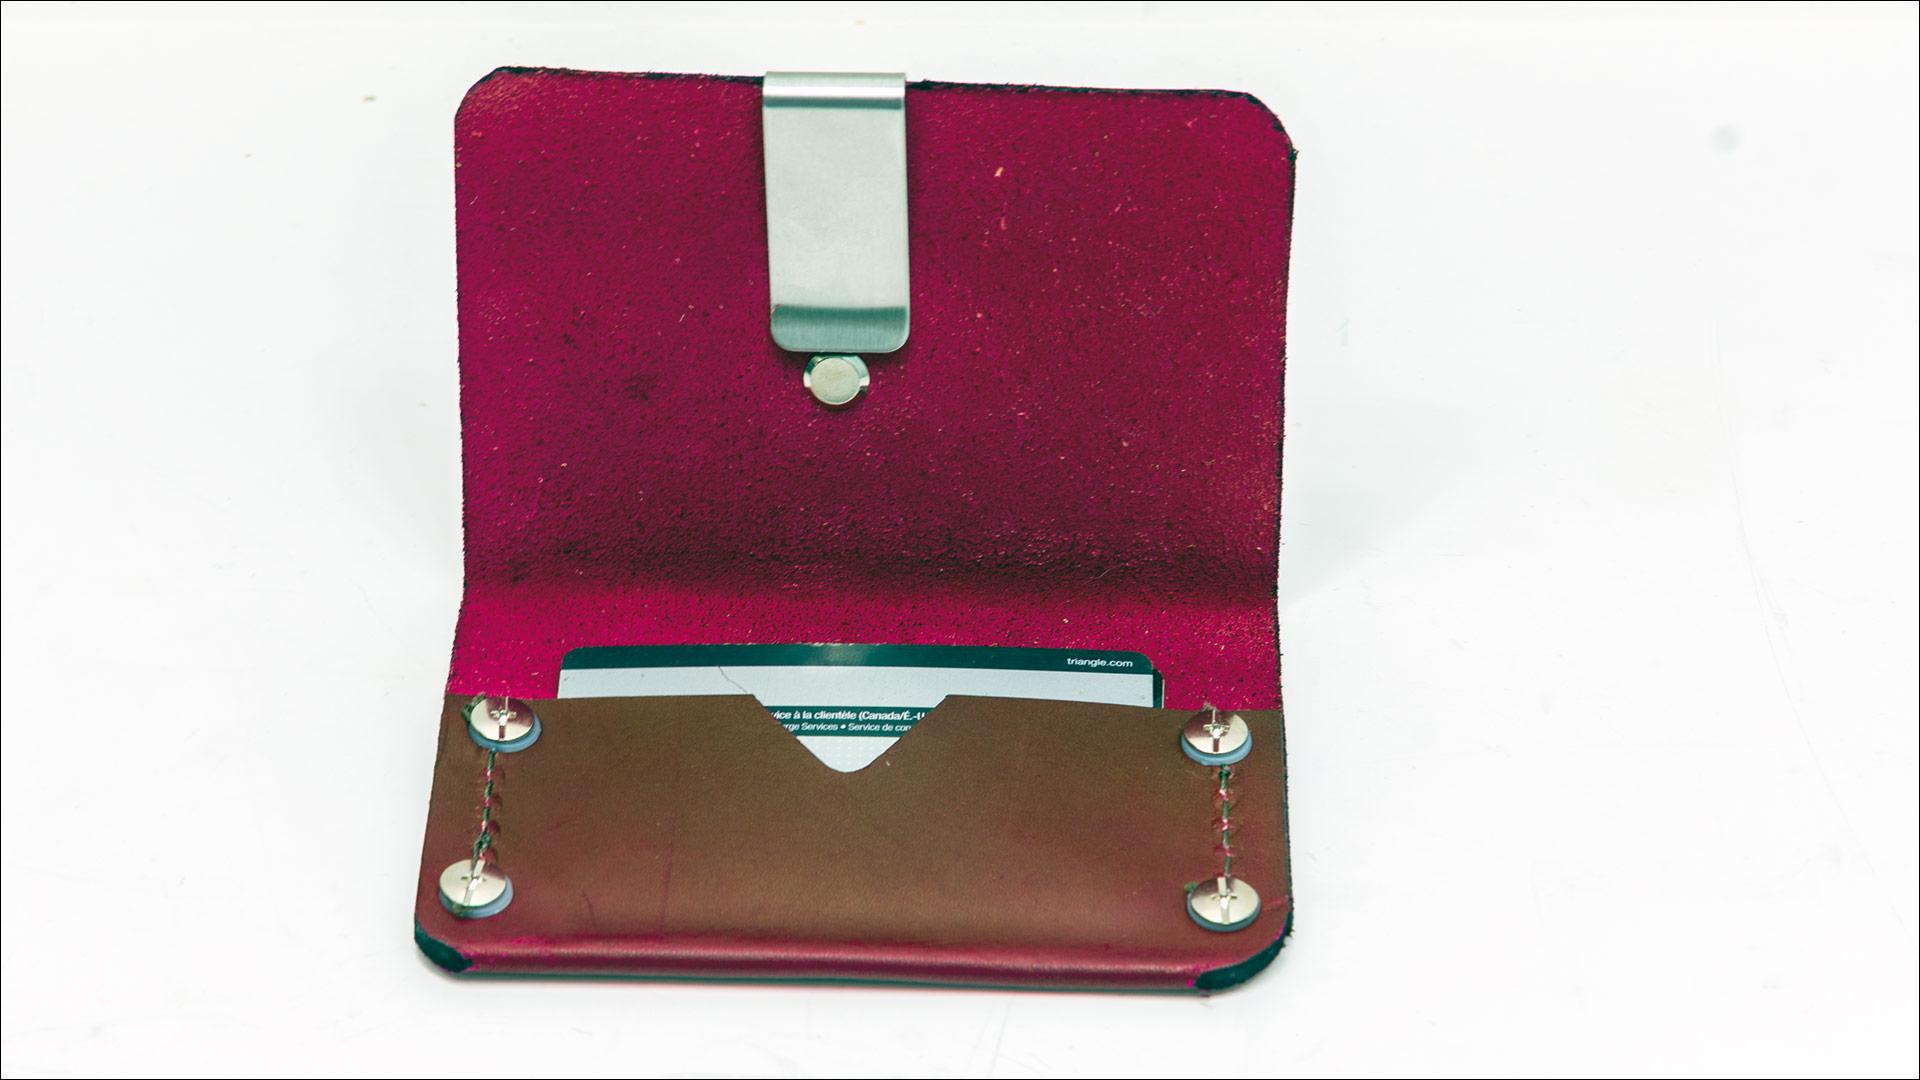
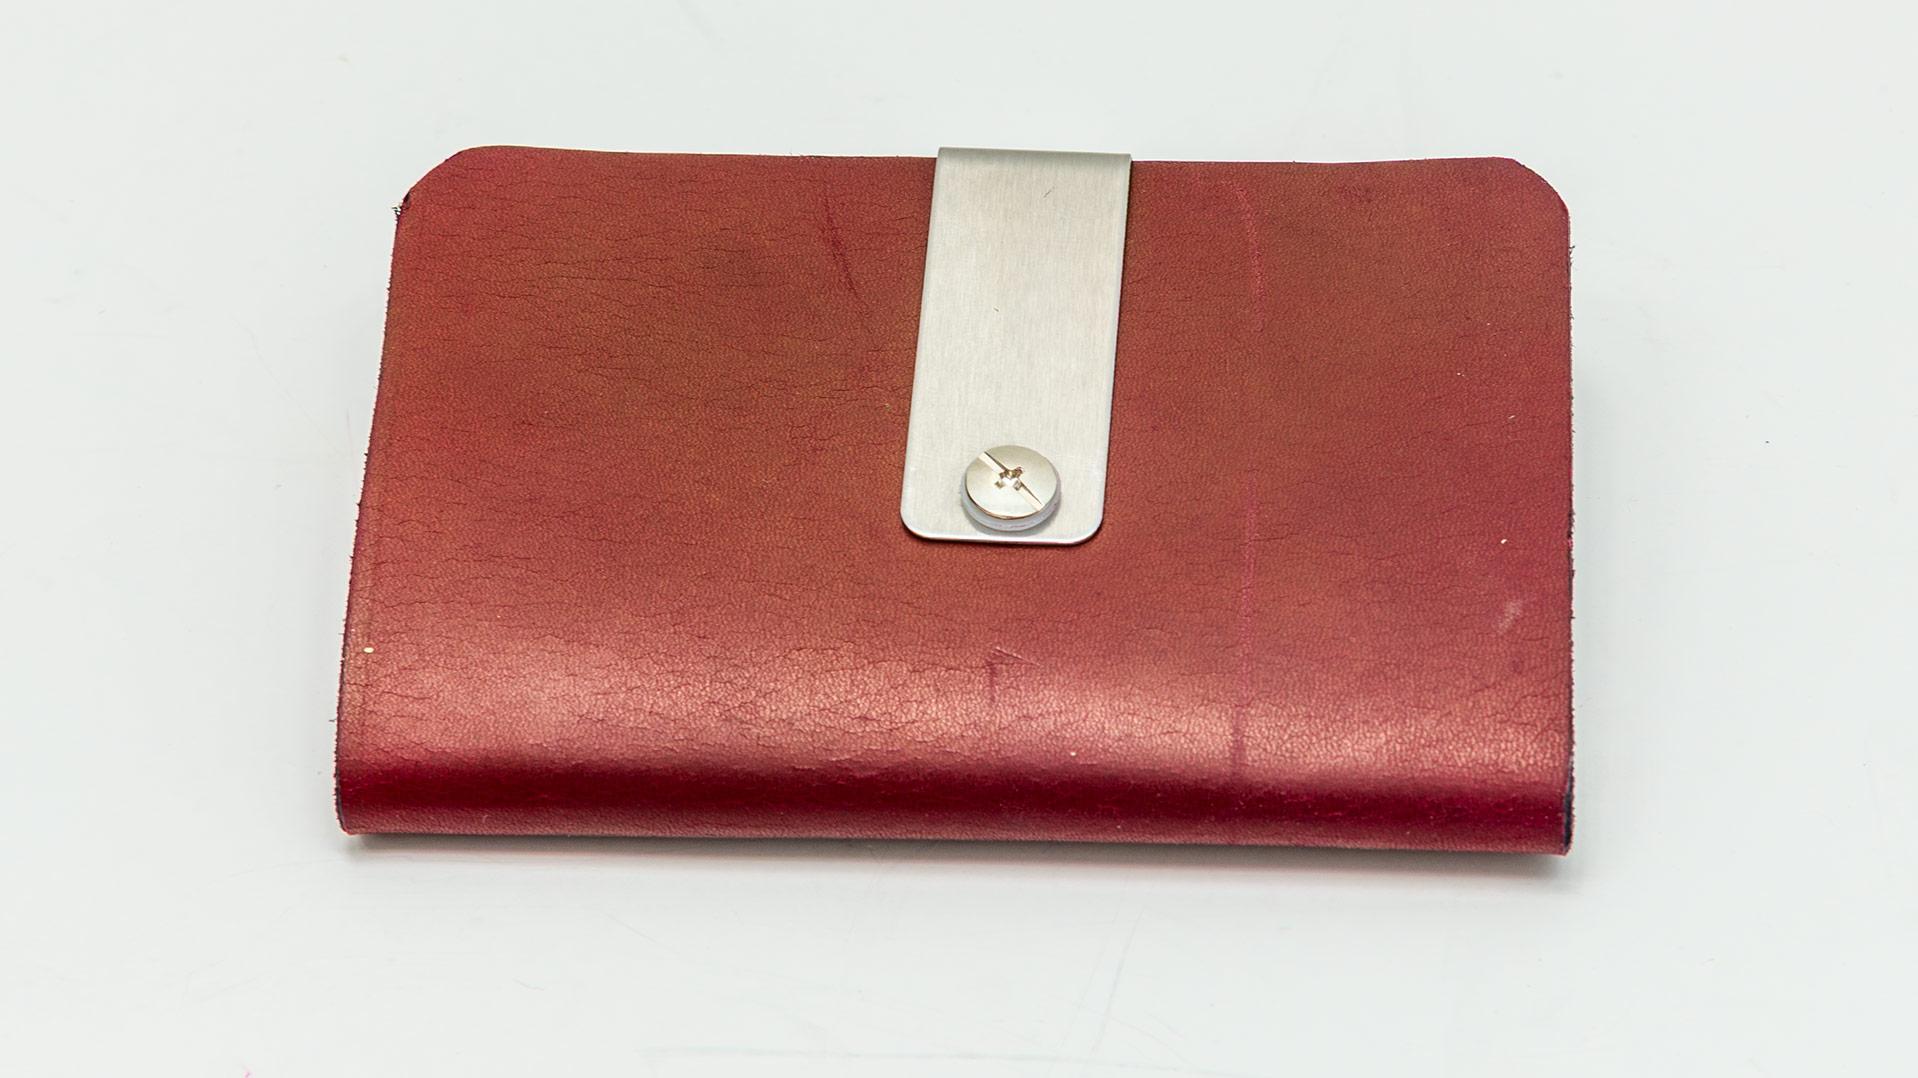
Thank you. The thickness from the head to the base of the Chicago screw including the silicone washers and the wallets leather is a touch over 1/4" at 0.2814961" or 7.15mm. Personally I like 6 stitches to the inch. kgg
-
Thank you. If we all had the same taste we would all still be driving black model T's. kgg
-
@PastorBob I use a lower profile stainless steel money clip that I drill a hole in so I can put a Chicago screw or copper rivet through to hold it to the wallet. I have one on wallet that is about 4 years old and no problems. kgg


-
Looks good. If you can find a Singer patcher treadle stand I bet it would fit perfectly. kgg
-
Nicely done. I do like the rod drive verses the square tube drive. I am going to assume you made the base larger on the new one as you had the metal hanging around. kgg
-
Presser for wheels are generally used on bottom feed machines like post bed machines. An example would be the Techsew 810. They will not work on a walking foot or a compound feed machine, the Techsew 5100. kgg
-
I decided to replace my current veg tan fold-over wallet. Not because it failed but didn't like how the copper rivets held up over the last 4 years. This was done over the last few days and will be my daily wallet which lives in my front pants pocket. I keep my wallet pretty basic, drivers licence, credit card, health card, dental card and cash. How I done it: i) Leather used was 4/5 oz natural veg tan. ii) The raw veg tan leather was airbrushed with 100% pure organic JOJOBA oil with no dilution at 34 psi on the exterior first and sat for 24 hours. iii) The oiled veg tan leather was airbrushed with OX Blood at a 50/50 dilution of dye at 34psi iv) The wallet pattern was cut, the cutout for the credit card was cutout and the fold over glued using LePages Heavy Duty Contact Cement. Let it sit for 24 hours under clamp compression. v) The wallet was cut to final dimensions, Chicago screws and corners were punched. vii) The interior was airbrushed with JoJoba oil let to sit for about an hour. viii) The interior was airbrushed with OX Blood at a 50/50 dilution of dye and sat for 24 hous. ix) The stitching in the credit card section was done with V138 bonded nylon using a Juki LS-341 clone with a 3D printed table top attachment x) The Chicago screws were installed in the credit card and the money clip. xi) The raw edges dyed I got to touch up a couple parts on the corners and add another coat of oil to exterior.

-
In a nut shell don't walk away, run away from the portable walking foot machines. This is a poor cousin clone of the Sailrite LS. There has been a lot of discussion and their pitfalls on this style of walking foot machines. IMHO the three biggest cons are: i) it will sew approximately 1/8" thick material, ii) as the thickness of what is being sewn the stitch length will decrease iii) max thread size is V92 and the list go's on and on. kgg
-
As a note the higher the number at the end means the more recent the machine was made with the Consew 206rb-5 being the most recent. Base on my own experience of owning a couple of Consews with the last one being a Consew 206RB-5 I can not recommend them. From your list it appears you have decided on a flatbed so the next thing is decide on a budget otherwise you are going to drive yourself nuts. Is this machine going to be your main machine and your first machine? kgg
-
You didn't mention if it was a motorized strap cutter or a mechanical one that you are looking for. ????? kgg
-
I think your are right the lady should have sent the client to a someone that does that kind of work. The leather patches seem to be a stop gap measure. The straps to me hold the saddle and rider to the horse be it I know nothing about saddles the repair seems iffy at best. I think the straps should have been completely replaced as the new leather straps were scabbed onto the old leather that looked like they were gone way beyond their best before date. kgg
-
I have a Juki DNU-1541S and it is a very nice brand name compound feed (needle / feed dog / presser foot) machine. I also bought a Juki DU-1181N walking foot (feed dog / presser foot). The reason for the Juki DU-1181N is my Juki DNU-1541S absolutely hates thin stuff and can drive softer material down into the feed dog hole and create problems. I have never sewn or seen German square weave carpet except on Youtube but if had to I would probably consider binding the carpet with the Juki DU-1181N rather then the Juki DNU-1541S. Since you have other projects like head liners / leather I would purchase the Juki DNU-1541S and do any necessary work around's for the thin stuff. Another alternative to consider is a cylinder bed machine like Juki LS-1341 or clone with a table top attachment. If this is your first machine I would suggest taking a sample of your stuff to a dealer and see what would work best for your needs. kgg
-
Totally Agree. The next project is going to be a small spray enclosure with exhaust for the house. Glad it helped kgg
-
Thank you. kgg
-
It appears the price went up from the $9.99 CAD when I ordered it to $10.69 https://www.amazon.ca/Airbrush-Splitter-Disconnect-Regulation-Compressor/dp/B09XDYFG93/ref=sr_1_1?crid=3Q6F555AR3IIX&dib=eyJ2IjoiMSJ9.wE4XqJHbKH9dn79iiZk-EH1t-_Jmt1oZ7neTJr9ZKPxohuZnpVvwpU1yIvUXgiwOzoTAebFLHjntt9ZW0wvYsVeALoPaLkJPHr2218LLQuSBgPGUvBEporcPt_4adYb7yizB6HVkyOu5hy1C7qAQZIAyuzV8xGNNiZUlYiL_lE_tzm58kUgZYrBseG8m_Oy8BtJrtV5_dM_4h7ZvHL_g_V9xVBNCaGzdkGUX-Pz5328KvUKLdM22rGWoJyq4BTIypNIs3C3KPV4BOEbcOmVCsqA89TlC0sSNQ5n5DptkaqY.UTa_EHjXPEQqqPzvA02-2XfKfSD_5cp3R5p6ffLqCmA&dib_tag=se&keywords=Tiiyee+Metal+Air+Hose+Splitter%2C+3-Way+Cross+Lever%2C+Quick-Connect%2C+Silver%2C+6.3+mm+%2F+0.25+inch%2C+Airbrush+Adapter&qid=1758242082&sprefix=tiiyee+metal+air+hose+splitter%2C+3-way+cross+lever%2C+quick-connect%2C+silver%2C+6+3+mm+%2F+0+25+inch%2C+airbrush+adapter+%2Caps%2C206&sr=8-1 kgg
-
The brake in a clutch motor is to stop the sewing machine when the "go" pedal is released even through the motor continues to run. In a servo motor the motor stops rotating when the "go" pedal is released so a brake in reality isn't necessary when sewing at slow speeds. At high speed sewing it would be possible to get some run on. kgg
-
Thank you. You know me, no machine is complete until it has been 3Ded. I do use quick connectors on my other compressors but had difficulty finding them or this setup. Thank you. No method is the best it just depends on what will work best for the project. kgg