kgg
-
Posts
3,364 -
Joined
-
Last visited
Content Type
Profiles
Forums
Events
Blogs
Gallery
Store
Everything posted by kgg
-
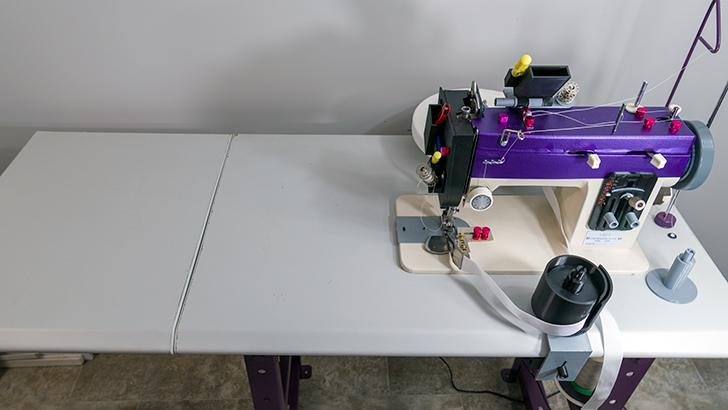
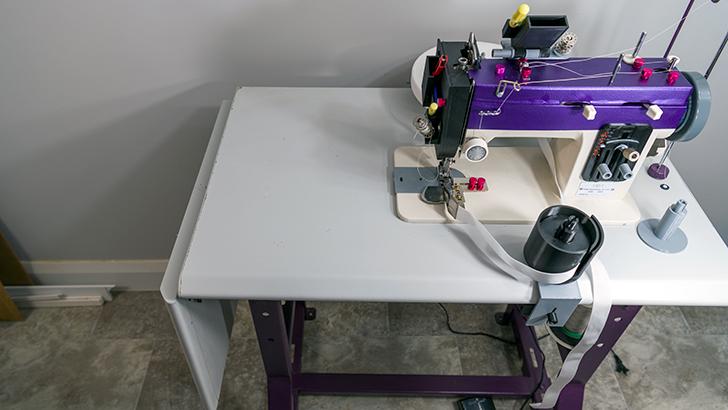
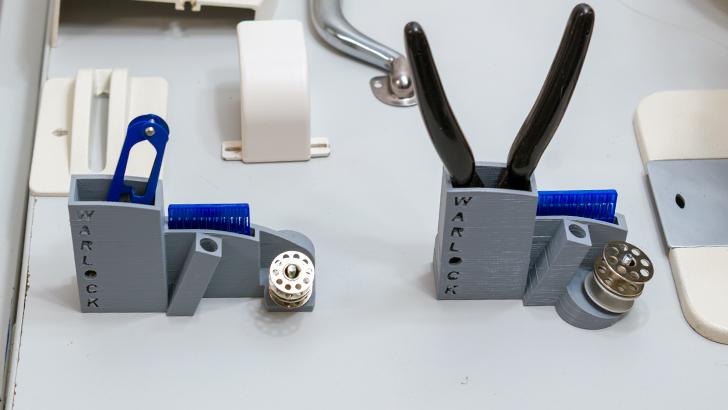
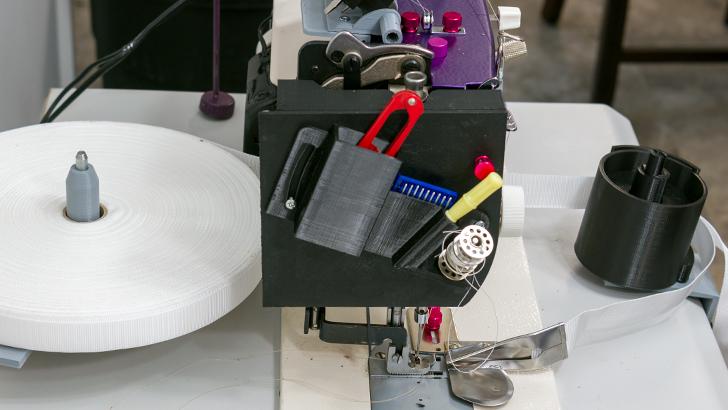
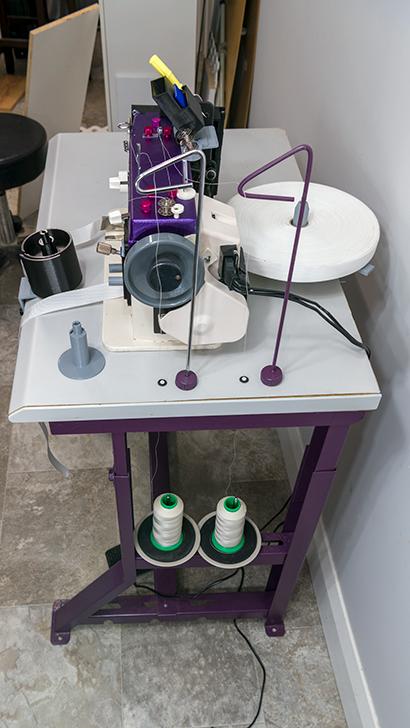
Thank you, that is a fair question. I'll give it a try. Thank you. In the photo's it was my attempt to show that you could use it with or without a large spool of binding tape. The black cup at the front of the table for all intents and purposes is a large bobbin holder. There a photo showing the actual bobbin that sets inside the black cup stood up on the right side of the table. The black cup is made up of two parts and the cup has to do double duty. The black cup as well as the binding tape platter can be quickly removed / installed by just loosening one tightening knob. It was designed to cover off both types of projects that need binding tape. When you have a project that is: 1. Going to need more then 30 ft. of raw edging binding tape you probably are going to need the larger flat spool of binding tape. This posed two main problems: i) Getting the end of the binding tape to the folder / binding attachment at the right angle. Since the spools of binding are generally over 6 " in diameter finding a convenient mount and place the spool. It needs to be placed so it doesn't interfere with operating the reverse level of any machine and feeds the tape with the least amount of resistance. You really don't want you machine trying to tug and feed the whole weight (resistance) of the tape spool. So, I think, the idea location is at the rear of the machines table and the platter that the spool sits on has to have a decent mechanical bearing to reduce the spool friction. ii) With that solved it is just a matter of directing the tape to the folder / binder. The exterior of the black cup has a track that is adjustable and allows at the correct angle to direct the end of the tape to the folder / binder so the tape is kept off the bed and eases the angle rather then making a sharp 90 degree turn. 2. Going to need less then 30 ft. of raw edging binding tape you probably going to use leftover binding or store bought flats. For this you would use the oversized bobbin inside the black cup. The black cup is a big bobbin holder with a bobbin that can accept binding up to 2" wide and about 30 ' of 0.048 inch or 1.20 mm thick Polypropylene. Then there is the problem of winding this oversized bobbin. You could wind the bobbin by hand I guess but whether you use my setup with a domestic, portable walking foot, flatbed or cylinder bed sewing machine the one thing they all have in common is bobbin winder. So it was just a matter of figuring out how to get the bobbin on a winder. So you wind the bobbin up using the machines bobbin winder, put the bobbin cap over the bobbin shaft to help keep the tape neatly in place and insert it over the center post in the black cup. You then just pull the end out of the second slit in the black cup much like a regular bobbin and feed it to the folder. Bob's your uncle. kgg
-
May not be pretty but it is functional, inexpensive and convenient. Which it is all about. kgg
-
Thank you. under the table for the most part is underutilized and to mount them on the table top would have been a waste of space and to get the proper 2 1/2 times the height of the thread spools would have put to much of a downward angle in the thread path. If I win the lottery I'll buy a metal 3 D printer for that project. kgg
-
Both, as two of my hobbies are sewing machines and 3D printing. The parts I come up with speeds up the process by adding convenience and functionality to the process which makes it more enjoyable as I can concentrate more on the task at hand. kgg
-
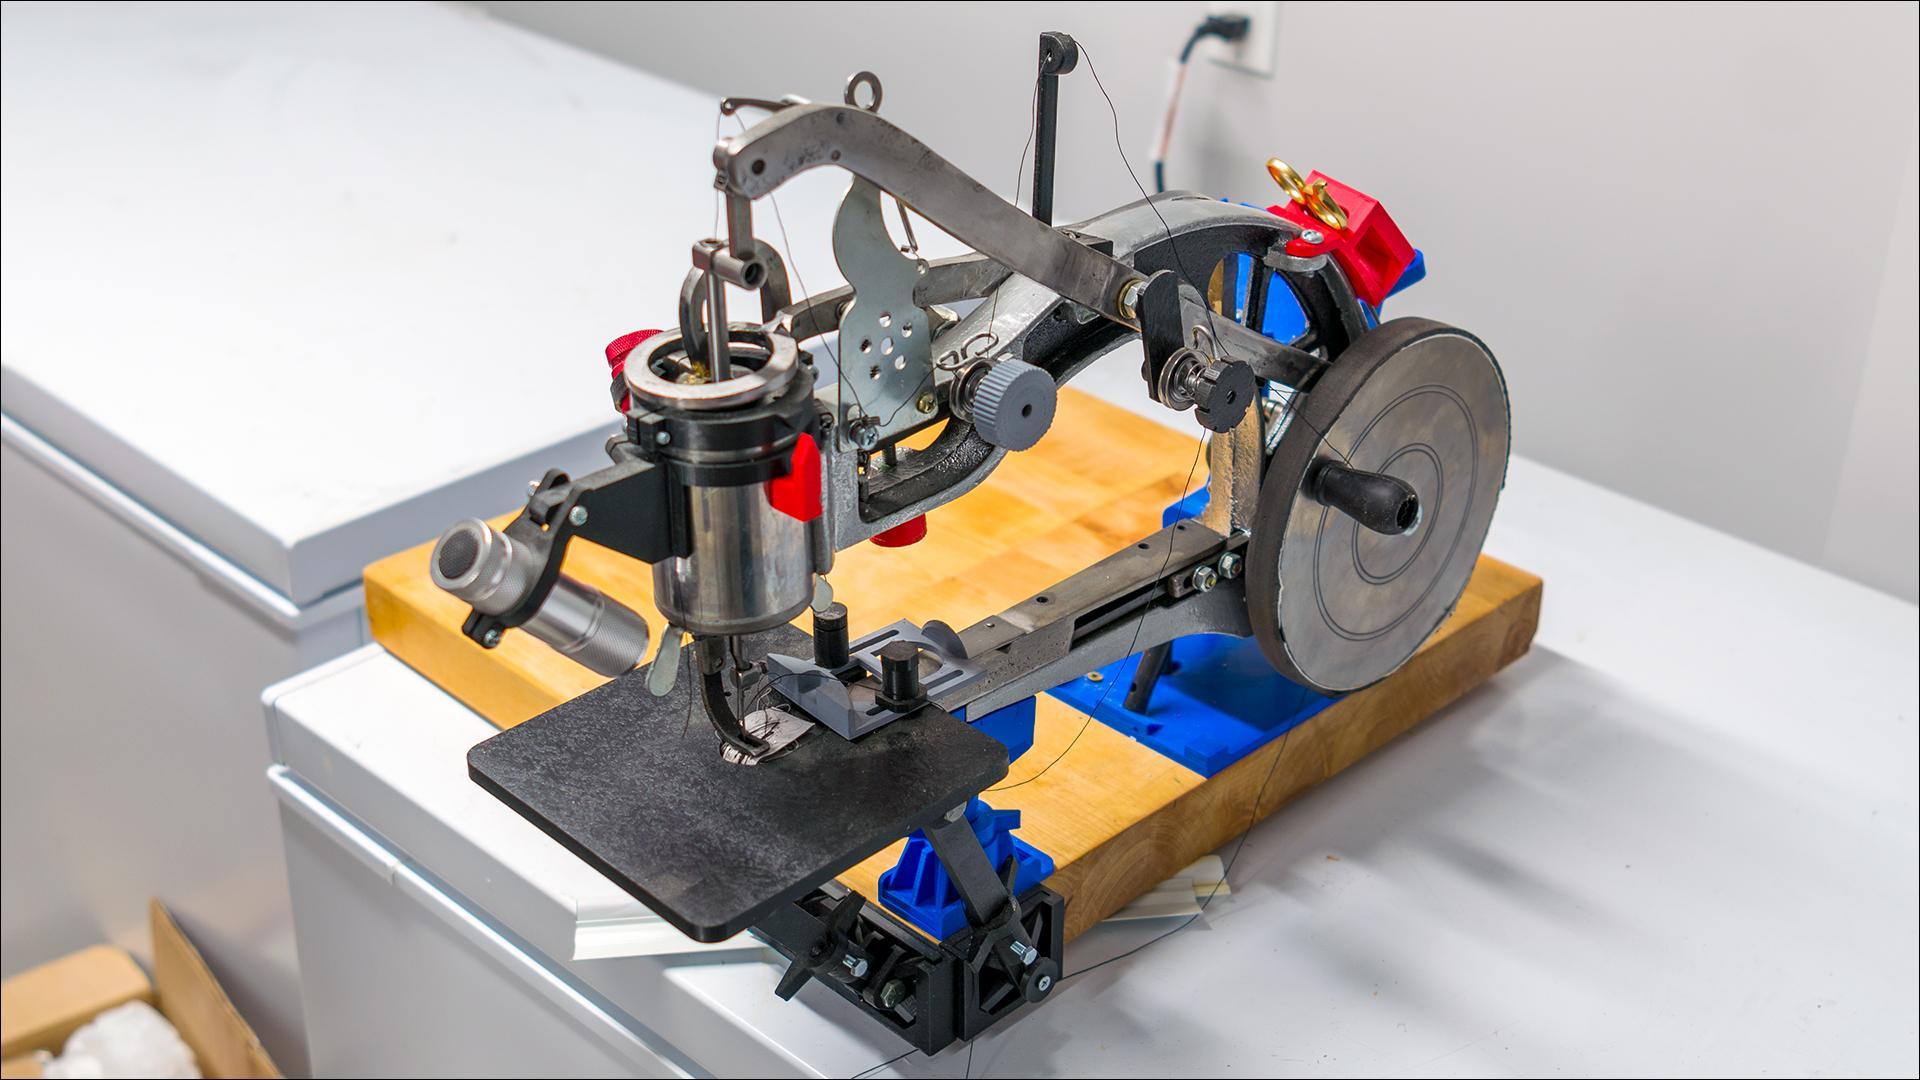
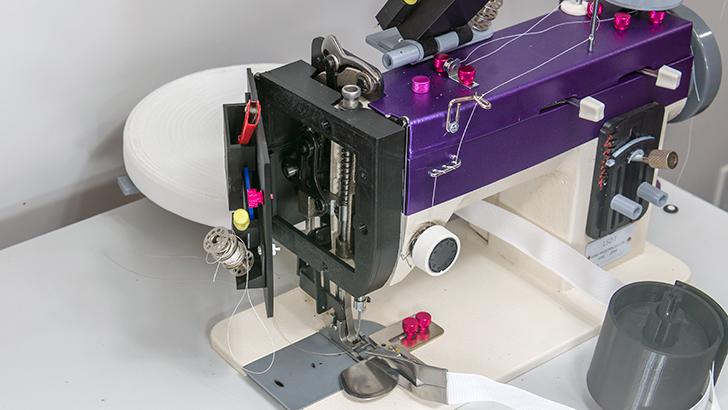
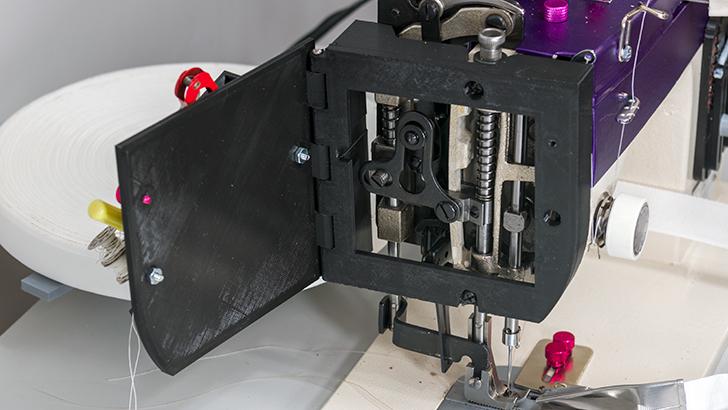
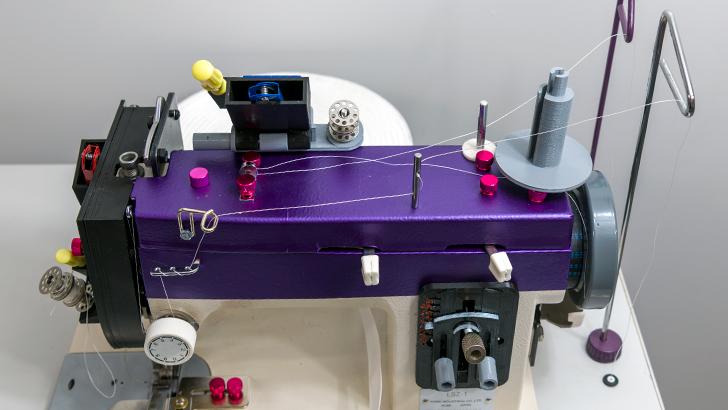
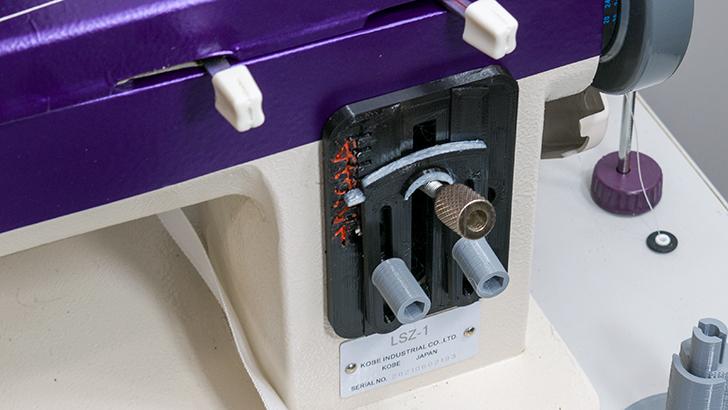
I had a special need for a small footprint machine and table to do basically one function in a particular location and at a low cost. I decided to get a portable walking foot machine and build a small table. The machine is one of the Sailrite clones so it is the same as the Reliable Barracuda, Rex, Consew and Omega to name a few. The job of this little machine is to do edge binding with either spools of raw edge binding or short lengths of binding with V92 thread. The Warlock purple color is to protect the innocent and is just some purple car wrapping I used. The problems I needed to solve: 1) Have an almost full industrial size table in the least amount of space. Solution: Build one. A standard table is 22"x48". Mine is 20"x47" when the 17" extension is in the up position. Which should I ever need to install a servo motor there is space. 2) Have quick access to such items as scissors, needles, bobbins, screwdriver, seam ripper, etc. Solution: Design and build an Accessory holder for the left side head cover and one for the top of the machine. That lead me down the rabbit hole as the Sailrite has a real metal front but an Aluminum top cover while the look a likes have Aluminum front and top covers. So I had decided to a version for: i) the Sailrite that uses real earth magnets ii) flat faced machines like the Juki LS-341 and Juki 1341 and clones iii) side mounted one that uses real earth magnets for the 441 style machines like your Cowboy's, Cobra's iv) The version for the Sailrite look a likes required the Accessory Holder to be mounted to the left side head cover. 3) Have quick access to the left side head parts for oil and not having to remove the cover as those tiny little screws always go on a wonder. Solution: Design and build a whole new left side head cover that had a hinged door that would accept an adjustable angle (horizontal to about 25 degrees) Accessory Holder 4) Fix up the clumsiness of having to reroute the top thread to the bobbin Solution: Remove the top carry handle and utilize the existing holes to mount the modified top / bobbin thread guide, install a thread guide pin and replace the tiny screws with thumb screws. Never like the handle even when I own a Reliable Barracuda, the tiny hinge screws are, I think, just not strong enough to support the weight of the machine for much abuse. 5) Replace the cheap top thread guide with a proper one. Solution: Remove and replace the guide with a proper one. 6) Get proper height distance from the top of the thread spool to the machine guides. Solution: Install two thread spool holders under the table for both the spool height clearance and space savings on the table top. Route the threads up through the table to both table mounted guide rods. The purple one is one I made to look close to the original. 7) How to contain short lengths of edge binding rather then having it drape to the floor. Solution: Design and build a large binding bobbin, bobbin holder guide that can be quickly installed on the front edge of the table top up to about 2 1/4" thick. My design can be used with domestic, portable walking foot and flatbed industrial sewing machines. I also designed and build one for cylinder bed industrial sewing machines. 8) How to wind short lengths of edge binding. Solution: Design and build a binding bobbin that can be wound by hand or using either a domestic bobbin winder or a industrial sewing machine winder. 9) How to use the cost effective spools of raw edge binding up to 2" wide. Solution: Design and build an adjustable spool platter with a bearing that can be quickly installed / removed on table tops up to 2 1/4" thick. The platter can accept up to 2" wide spools of raw edge binding up to 14" in diameter. 10) Getting the stitch length back to the same length after doing a reverse stitch is near impossible unless you always return to the max. stitch possible. Solution: Design and build a new stitch length guide. I could have bought the Sailrite EZ for $49.95 but that required the existing stitch length threaded level to be remove, a new longer one installed and re-adjustments. So I made a simple one that just requires the old stitch level base to be removed and install a new one, about two minutes work. All the upgrades are designed and built in Canada. These and others will be available shortly on my website: www.warlockdesigns.com email: parts@warlockdesigns.com All comments greatly appreciated. kgg
-
The purpose of left stand sewing machines
kgg replied to Constabulary's topic in Leather Sewing Machines
Found the answer both Elias Howe and Isaac Singer were lefties. kgg -
The purpose of left stand sewing machines
kgg replied to Constabulary's topic in Leather Sewing Machines
My take / rant: In the beginning machines were design and made for the dominate hand users, the right handed person so the hand wheel which operated all the machines of the day was placed on the right side of the machine. You got to remember back then lefties were considered to be defective. Even when schooling became popular for the masses a lot of lefties were forced to right with their right hand. Having the hand wheel there meant that the work was guided alongside the needle by the left hand. This for the right handed beginner was somewhat difficult to master where as for a leftie it was much easier process as their dominate side was the left. I guess the thought of the day was the control of the machines speed was more important then the work or was the early inventors like Singer lefties? Then came the drive systems which eliminated the need for the hand wheel to be manually controlled but by then most of the work force (right hand) were trained and use to handling stuff with their left hand. Also by then it was probably too expensive to retool the machines for mass production to take full advantage of the new drive system which would have allowed the right handed users to take full advantage of using their right hand to control the work under the needle. So in conclusion the manufactures of machines of today are as lazy as the old manufacturers and just continued the manufacturing practice which still puts the leftie at an advantage over the rightie when it comes to controlling items under the needle. Remember the first time you as a rightie used a machine with all that fumbling around by the needle. This follows the old way of thinking / manufacturing " We always done it this way and it was good enough for my grandpa." The left handed machines by all rights should be the dominate machines of today to allow the dominate right handed users to take full advantage of their machines. For those of us that are ambidextrous it really doesn't matter much. Singer 18- models 22,23 and 37 single needle Singer 18 models 25,26,27,35, and 36 double needle Singer 45w53, 18u322 and 145k kgg -
You could try and take apart the motor and check and see if all the connections are good, the brush is good, the windings are good. But honestly it is probably not worth the effort as you can get a new 100 watt domestic sewing machine motor off Amazon for about $25. kgg
-
How to save time and money by investing in machines
kgg replied to chrisash's topic in How Do I Do That?
The cost of the laser is probably in the $15K US range, the bartacks at about $5K US each and the sewing machines at about $2K each. The costs are very reasonable. The only drawbacks I can see is not everyone is CAD capable which means investing in either training or hiring someone with those skill sets and the maintenance / repairs on the laser. The other machines can be maintained by just about any sewing machine mechanic on an as is need basis. It was nice to see that this company did invest in brand name equipment for their operation. kgg -
Left Stand Singer 45K Variant → Singer 145K1
kgg replied to Constabulary's topic in Leather Sewing Machines
That is good to be a nice machine when your finished doing the restoration. Always nice to see the old iron running again. kgg -
Way to go. Post a couple photo's. kgg
-
I might have gotten OP confused with someone else's location. But the used price in US dollars for the Consew falls in roughly the 30 percent mark of a new comparable machine. While the Juki is running at about 25 percent of a new comparable machine. kgg
-
Decent price, $550 ( ~$430 USD). Any photo's as someone may spot something to ask about with the machines. kgg
-
What are they asking for the machines? kgg
-
Both the Juki LU562 and Consew 226 have reverse. The Juki LU562 it is a compound feed but has a small " G" bobbin whereas the Juki LU 563 would have the larger "M" bobbin. The Consew 226 if it isn't badged as "226R" is the an older version before they started to indicate that the machine had reverse. If the Consew doesn't have reverse it would be a Consew 225. If both are in the same condition I would always choose a Juki over a clone as it will be easier to get parts and to resell later on. kgg
-
The only one arm bandits I know of within this class of machine are: 1) Tippmann Boss at a base price of $999 US, V69 to V415 with a 794 needle and a stitch length adjustment of 4 to 16 spi ( https://tippmannindustrial.com/tippmann-boss-leather-sewing-machine/ ) 2) Cowboy Outlaw at a base price of $1395 US, V69 - V346 with a 794 needle and maximum stitch length of about 3.3 spi ( https://www.tolindsewmach.com/cowboy-outlaw.html ) 3) Master Tool Cub at a base price of $1950 US, V69 - V346 with a 794 needle and a stitch length adjustment of 4 to 9 spi ( https://www.weaverleathersupply.com/catalog/item-detail/63500-01/master-tool-cub-manual/pr_59274/cp_/shop-now/machinery/master-tools/cub-manual-sewing-machine ) kgg
-
You can get a new one for $999.99 plus about $50 for shipping. I have seen items go for more then the cost of a new one at on site auctions where people have gotten into "it's mine" mindset. So it is really is going to depend on the crowd at the auction. I would set my price probably at the 40 to 50 percent mark and should the biding go above that mark I would walk away. kgg
-
If you notice my thread path, the tensioners were relocated and now only one is used for the top thread and the other tensioner is used for the bobbin thread. I would remove the thread tensioners and clean / smooth all the surfaces and oil them and see if that helps. You may have to just turn the tension screw counterclockwise a bit to not buy so much tension on the disc's or you may have to change or clip a bit off the length of the tensioner spring.

-
What I has never given me any problems is A & E thread. Which is made in both Canada and the US. A good source is WAWAK. There is the US WAWAK link: https://www.wawak.com/Thread/Thread-By-Brand/AE/ kgg
-
Someone was busy. You did an outstanding job on the table particularly with the alignment of the legs directly under the weight of the machine and the foot pedal arrangement is excellent. Nice compact size and on wheels to boot for moving the machine around. kgg
-
Efka AB321/DC1550 Seiko SLH-2B-FH-1 Lessons learned.
kgg replied to VanRhodes's topic in Leather Sewing Machines
I agree. For me it and the price it would have to be spot on perfect. I still wouldn't be pleased particularly at the price. I did find a price from College Sewing for about £970.00 / $1275 USD / $1600. kgg -
Efka AB321/DC1550 Seiko SLH-2B-FH-1 Lessons learned.
kgg replied to VanRhodes's topic in Leather Sewing Machines
The last video has better performance then the first two but I wouldn't be satisfied with that shuttering. I would suggest you send those video's to the your local rep that recommended the setup and ask them what the problem is the Efka. If it was mine I would just repackage it and sent it back for a refund. kgg -
I don't know if this helps but when I buy used machines my guideline for a brand name machine like Juki I am willing to pay up to 50 percent of the cost of a new same model machine. kgg
-
I do hope you do get the machine. I assume you paid for the machine the day you ordered it months ago. How long is the vendor going to let this go on before they declare it lost / stolen and ship another machine or refund your money. It seems this is happening more often these days. Most times it isn't the vendor at fault except they choose the shipper to handle the item. It doesn't seem to matter whether it is a small envelope size item or something needing a pallet. I ordered 25 meters (82 feet) of 21 oz canvas which is 60 inches wide. So it isn't a small package. The vendor had it pickup up by NationEx on Feb 8 in Montreal, Quebec who handed it off to Midland in Toronto, Ontario. who shipped it to Moncton, New Brunswick then someone figured out it needed to go back to Toronto, Ontario. It then was shipped to Ottawa, Ontario where Midland handed it off to Canex who did the final delivery to me on Feb. 17. I asked the vendor if it came with a mileage warranty. At least I did get the item where as a small envelope sized item I order from Amazon being sold by an US supplier on Feb. 17 is still on a walkabout. My main rant these days is the shipping costs. I was am looking for two single hole singer style sewing machine hinges and found them in the US for $5.10 plus shipping plus import taxes to Ontario, Canada. I decided against the purchase as the shipping cost was $16.95 US. kgg
-
No.. Since MtlBiker is a Canadian he should use a Loonie ($1coin) and on the other side a Toonie ($2 coin). kgg