


Hardrada
-
Posts
698 -
Joined
-
Last visited
Content Type
Profiles
Forums
Events
Blogs
Gallery
Store
Everything posted by Hardrada
-
An arbor press.
-
It's probably been suggested above (too lazy now to scroll up or turn to the previous page), but I never burnish with water prior to dyeing edges: it's my belief (maybe wrong, who knows) that by flattening the fibres the penetration of the dye is reduced. I've not gotten bad results so far dyeing with fuzzy fibres, so I'm sticking to my process.
-
We probably bought the same kit or similar: mine was their stitching kit. Yes, I don't use the pricking wheel, have bought a sharper awl and ended up using the scratching awl tip for dyeing edges, the thread was useful for test projects but I still have most of it as I now use Tiger. I'm still using the needles and the groover, although I use the latter not for marking lines but for gouging channels for bending the leather 90°. You really save more buying things separately. Another good place to get tools is goodsjapan.com. Their Seiwa and Kyoshin Elle chisels and edgers are top notch (plus, the KE edgers come with a sharpening rod and papers), and they supply Tokonole. RM Leather Supply stocks some of Kyoshin Elle products and they carry Tokonole too, but if you can't find stuff at RML, do go to goodsjapan.com
-
What I took from him on that video, added to what I had learnt from books and other sources consolidated my edge finishing process to this: Trim or glass to make joined edges even. (I don't like sanding them because they mushroom, and also because I don't like using machines. I was using a Dremel, but the results were unsatisfactory to my liking.) Apply Edge Kote. Let dry (about 30 min). Sand with 400 grit with a light touch in one direction only. Apply second coat of Edge Kote. Let dry. Seal: with Tokonole. Slick. I tried using wax, but the slicker was getting too greasy. I tried to burnish with denim but the fibres from it were being left on the edge and it was a pain to remove them, so I gave up. I used to use gum tragacanth, and for the English bridle belts I made a solution of white school glue and water (as per suggestion by one of the members here) because I was afraid of the Edge Kote rubbing off and ruining somebody's dress garments; but once I got the Tokonole and saw that it has consistency not unlike white glue, that's all I've been using. I wanna get ahold of some brown and black Tokonole. Also, sometimes I don't apply Edge Kote at all, but leave them edges natural and just burnish with Tokonole. Again, I was applying wax after the Tokonole, but stopped for reasons explained above. When I get to order some canvas, I want to try the wax again. I was using beeswax, but I wanna buy and try some of the Columbus wax RM Leather supply sells—it's supposedly superior to regular beeswax. Oh, by the way, I was really concerned about the edge coating rubbing off, so I went to a local shoe repair shop and asked the guy there about it. I asked him if it would be better to use regular dye, or the Fiebing's Pro dye instead of Edge Kote to prevent this problem, and he said that really, Edge Kote is the most versatile thing to use for edges, and that rubbing off shouldn't be a problem. He said that even though that meant I put back the bottles of dye I had grabbed from the counter with the intent of purchasing them: if he was willing to lose the sale, I assumed he was telling me the truth.
-
Wow! Can't say I've had that ever happen to me. Maybe the Edge Kote they sell in Bayern is different? I've adapted my process after this guy's (he does use wax, though—I don't): Sorry my process didn't work for you. Honestly, I dunno why. I've been applying Tokonole to the Edge Kote-painted edge within 20-30 minutes of applying the second coat (it seems to dry fast) and burnishing and my wood slicker isn't even black yet. I get nothing on my fingers either. Weird.
-
I'd avoid Tandy's splitters. Looks like someone here got a hernia trying to pull a 4" stripe through one: https://leatherworker.net/forum/topic/83495-craftool-deluxe-leather-splitter/?tab=comments#comment-563569 I'd look elsewhere. Maybe Weaver's Heritage splitters? The CS Osbornes are another option, but they are quite pricey.
-
Help with personalized stamps on leather
Hardrada replied to sonataworks's topic in How Do I Do That?
Just got a 1-ton arbor press, but my results haven't been so consistent: the stamp's impression is kinda uneven. More practice and finesse are needed, I guess. I haven't modified it, by the way, aside from adding a magnet to hold my snaps and rivets setters I'm still using the round-cross-shaped plate. These presses are, if you ask me, indispensable in a leathercraft workshop, and they're half or less the price of Tandy's setter press. -
Pardon my ignorance, but, must you use wax? Maybe I'm doing something wrong by not waxing my edges, but so far all I care about is that they look neat, which they mostly do with my process—except for the belts which show a bit of a texture rather than the plastic-like smoothness I'd like them to have. I'm waiting to have something like a Regad to see if hot spatulas burnish better than cocobolo slickers.
-
Help with personalized stamps on leather
Hardrada replied to sonataworks's topic in How Do I Do That?
I use an iron, placed upside down, for heating up my brass stamps. -
I was afraid of having this problem. So far, can't say I've had it. But maybe it's because I never use wax. Just Edge Kote, sand with 400 grit with a light touch, second coat of Edge Kote, Tokonole and that's all.
-
Superb! For some reason, upon seeing the interior I was reminded of a coffin.
-
Ditto! I might need to make another template with a 3" distance. I see no need to go beyond that because my belt loops are only 1/2" away from the prong hole (almost as if it were a centre bar buckle), and even if the client were to use the last hole (which he most likely will not, as the belts are made to fit) the tip would still go through the loop.
-
Not contradicting myself. When I say I never measure from the last hole, I mean I don't do that to measure for fit. I was afraid some might be taking that meaning. I measure from the last hole, more accurately (as I don't do it on the belt but on Illustrator and then print out the billet template) from the centre of the last hole, a distance of 2.5-3" whereupon I place the end point.
-
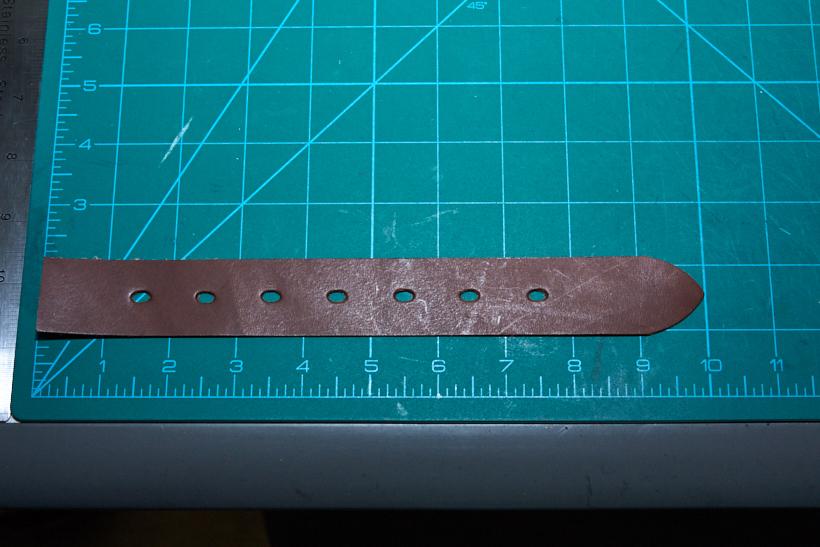
Speaking for myself, the way I understood the question is: "how much of a 'tongue' do you leave on your belts?" I understand as 'belt tongue' (end, tip, lap, whatever you wanna call it) the distance between the last hole and the tip. For mine, I leave 2.5-3 inches. I DO NOT use the last hole to measure the belt. Never ever whatsoever. I measure my belts based on the figure the client gives me for his waist: this is the distance from the 'knuckle' in the prong to the centre hole. I then line my template so that the centre hole matches this distance and the other holes (I punch 7 holes, which leaves 3 to each side of the centre one, with 1" spacing) just fall in automatically. Once I've punched my holes then I measure 2.5" or 3" from the last hole towards the end and that's where I will place the tip of my end punch and hammer away. My process is the same as these belt makers': https://shop-hoffnung-berlin.de/index.php?route=information/information&information_id=8
-
Definitely worth buying! And the good thing about Nigel Armitage is that he doesn't limit you to personal use only for his templates: you're more than welcome to sell wallets/pouches made from them as well as modify them to suit you. The only thing he does ask is that you don't share the pack files, which is a more than reasonable and easy to honour proviso.
-
For conversions, if you use Imperial it's super simple: 1 oz = 1/64". If you use metric, the old 4 Multiplication Table is your friend, as 1 oz = 0.4 mm. Thus, 2 oz = 0.8 mm, 3 oz = 1.2 mm, and so forth. My preferred weight for wallets is 2.5 oz; it keeps skiving to a minimum.
-
2.5 to 3 inches from the last hole. By last, I mean the hole closest to the tip. I use 1" spacing betwixt my holes.
-
It'll be some weeks till I get my hands on one, God willing, but sure, I'll report back. From what I've read, paring machines were invented by a bookbinder so I'd wager they can work with tender leathers such as lamb and goat; but still, I wouldn't want to push twotrees to purchase something he may be disappointed with.
-
What's the weight of your leather and how many panels are you using that need to fold? If you're in the 1.5 oz range, it'll fold OK, as leather stretches to a point. Another way wallet makers deal with this potential problem is by placing all the extra panels to one side and leaving only one layer of leather in the centre/folding area. Yes, chrome tanned is more supple but it's a PITA to skive, and an even greater PITA to burnish. That's why I don't like using it.
-
The way I sussed that out was by using two scraps of the leather I'd use, put them back to back, clamp one end, and fold through the middle, then measure the amount that protrudes from the inner panel beyond the edge of the outer one: that would be by how much I must shorten the inner panel in my template. This distance will vary with different leathers or weights, so I'd keep notes.
-
Nope, unfortunately; though I intend to order one in the next few weeks. I must say this thread helped me find something I need, as I work mostly with veg tan. Yes, chrome tan stretches like bubble gum, so the Schärf Fix might not be suitable for you. Wish I had the machine already so I could test it on some chrome deerskin I have here and I could report back.
-
You bet! After watching this other video, I know I want one.
-
Chromexcel?
-
Shewing my ignorance, but what tools are those? I know the cobbler's hammer and the dividers, but I have never seen the other two.
-
Looking for a vertical wallet pattern
Hardrada replied to PalmieriLeather's topic in Patterns and Templates
Nigel Armitage has a full pack: https://www.armitageleather.com/product-page/simple-wallet-design-pack-1 It's worth every quid, since the pack includes not just the templates but a very thorough explanation on the principles followed for the designs, and on how to modify them or build your own. You can follow along with his Youtube videos. Or watch the videos first to see if you want/need to buy the pack.