


TomE
-
Posts
1,300 -
Joined
-
Last visited
Content Type
Profiles
Forums
Events
Blogs
Gallery
Store
Everything posted by TomE
-
Lovely work. The craftsmanship and materials are first rate.
-
I've had good luck burnishing with hide glue/bone glue and beeswax for firmer chrome tanned leather, such as the SB Foot "oil tanned" sides that Beiler's sells. The hide glue is water soluble so I seal the edge with wax after burnishing. I apply the beeswax with heat to improve penetration. Maybe the plain edge isn't the look you're after?
-

Thread Lubricating Cup for Singer 111w155 . What is it?
TomE replied to LMP's topic in Leather Sewing Machines
I've added a thread lube pot for sewing Biothane on my 441-type machine. The lubrication helps pull up the knots. Biothane is PVC coated nylon webbing that generates considerable friction on the needle. I don't use lube for sewing leather. Plastic add-on lube pots and thread lube are available from sewing supply stores. -
Decorative Stitching/Embossing on a Driving Bridle
TomE replied to TomE's topic in How Do I Do That?
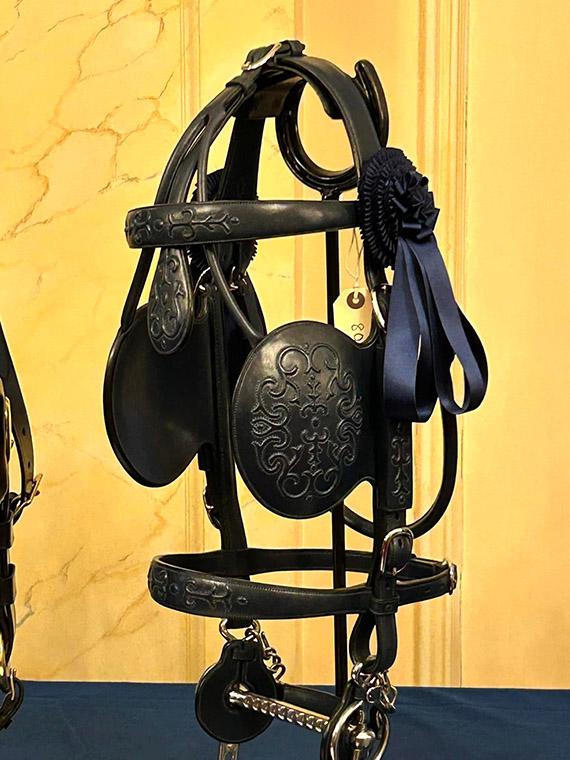
Thank you, @BlackDragon! "Trapunto" gives me lots of in roads for exploring. I also found the Stohlman book on embossing leather as a free download at the Tandy website. He describes using linen thread as a filler for small raised designs with parallel edges, but he doesn't stitch around the borders of the embossed designs. Facebook revealed that Catrien Coppens made the bridle in the picture. She's a saddler at the Royal Mews who has won numeous competitions. She does tutoring and will be teaching classes this month at the Walsall Leather Skills Centre. Think I'll get in touch to see if she's willing to do some long distance tutoring. -
Does anyone know what this style of decorative stitching is called and how it is done? I'm interested in how they created the relief in the decorative design. Any resources for learning this technique? This example is from the Society of Master Saddlers national saddlery competition. Thanks for looking.
-
Equipe saddle, repair of worn saddle flap
TomE replied to Mulesaw's topic in Saddle Identification, Restoration & Repair
I've been to Bergen. Flew into Oslo and took a train to Bergen where I spent 2 days before we boarded a ferry for a scientific conference in a beautiful fijord setting. The conference honored a well known (to us) deceased Norweigan scientist who had trained a legion of scientists in the field of DNA repair. The hide glue produces good results with less work (no sanding once the edges are leveled). The edge readily accepts wax or acrylic finishes that I am testing out for a weatherproof finish. -
Equipe saddle, repair of worn saddle flap
TomE replied to Mulesaw's topic in Saddle Identification, Restoration & Repair
Sounds like good duty inside. We're having uncharacteristically cold weather this week and horse care is taking longer, so I haven't done much leatherwork lately. My 1959 model joints are feeling the cold! I did buy some hide glue (pearl glue, bone glue) and have been experimenting with finishing edges. It does a remarkably good job on bridle leather edges without sanding. Since hide glue is water soluble I am trying a few different top coats to seal the edge after burnishing. My favorite so far is beeswax applied with a heated edge iron and rubbed with canvas. Good luck on the ship. Hope you're going to a warm part of the world. -
Equipe saddle, repair of worn saddle flap
TomE replied to Mulesaw's topic in Saddle Identification, Restoration & Repair
Well done! That is a neat and serviceable repair. Your stitching is immaculate and a lot of thought went into the design of the patch. I guess we see the corresponding asymmetric wear in riding boots. -
The bar was low. The old strap was considerably lighter color than the chapes, and it was dry rotted. I'm thinking it wasn't original equipment. The client bought the purse used as a Christmas present. He was happy with the color. Thank you, Jonas. I did sew by hand to complete both ends of the stitch lines. I will look into the Serabraid.
-
Thank you, gents! I will admit that this was the third try matching the color. I am woefully deficient in dyeing techniques bc I mostly use drum dyed leather. Ended up dip dyeing in 10% Fiebings dark brown Pro Dye.
-
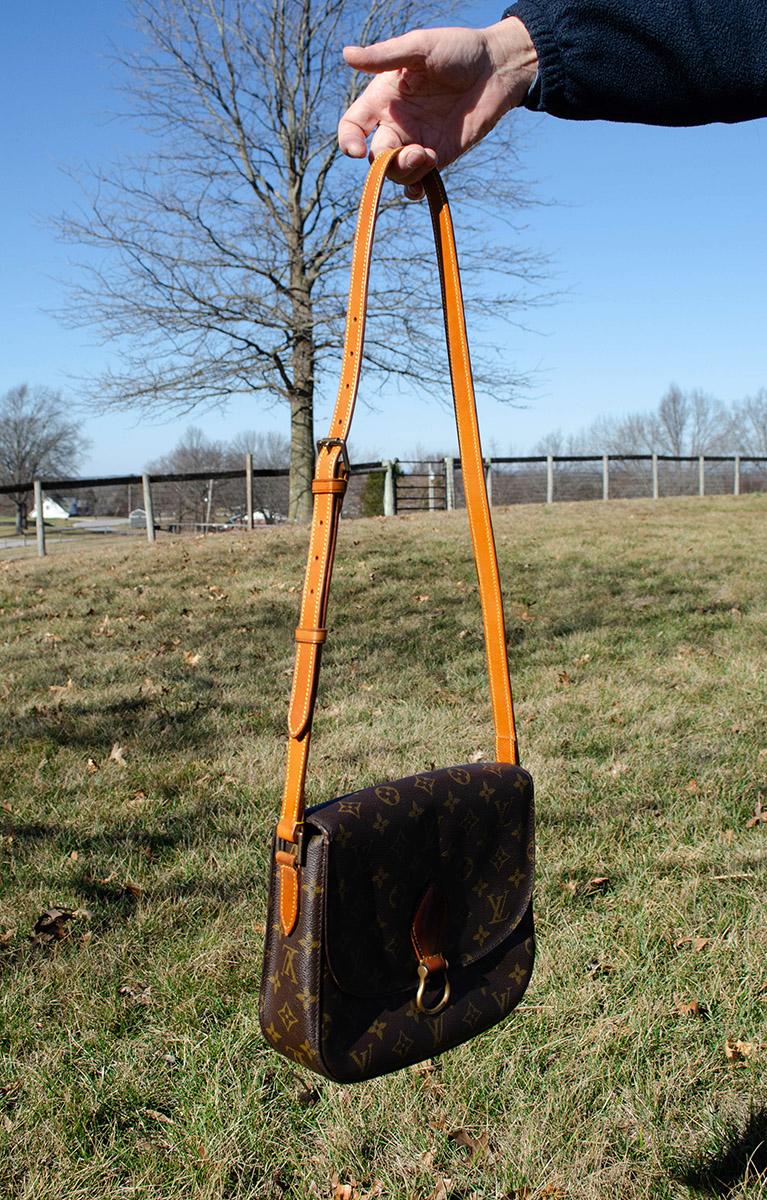
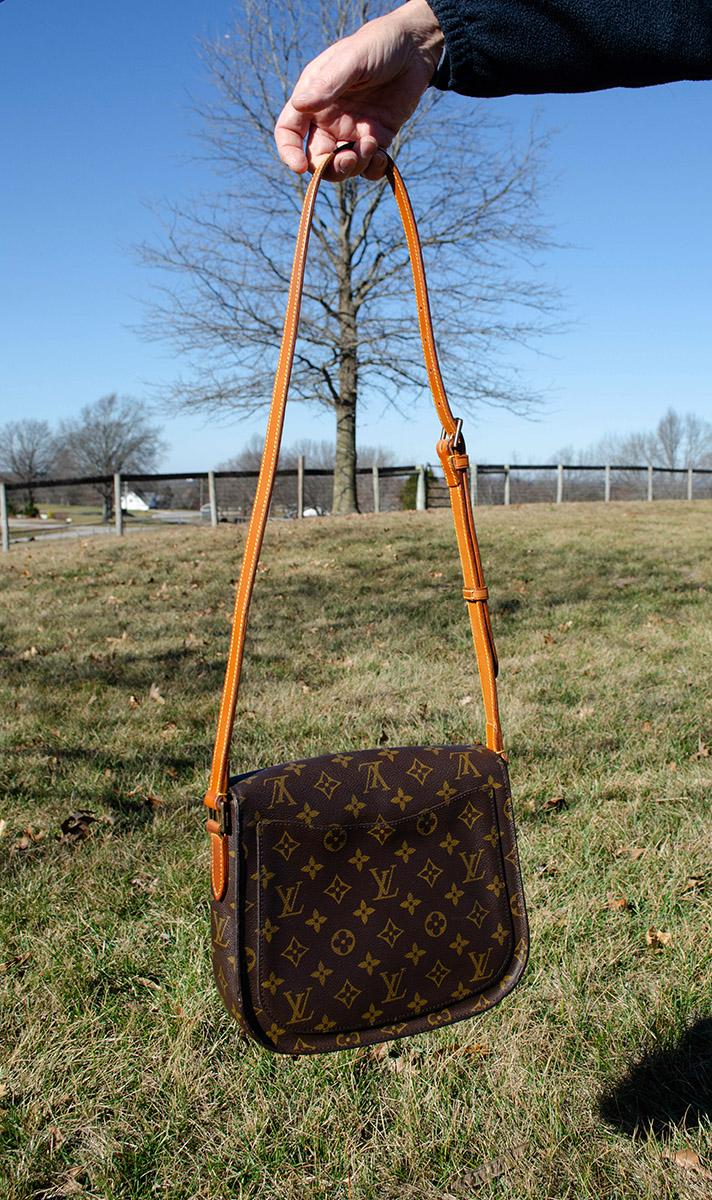
Happy with Amann Serafil thread from @CowboyBob at Toledo Industrial Sewing Machine. It feeds well through my Cobra Class 26 and is a good color match (color #7766) for this vintage Louis Vuitton purse. Lots of colors to choose from besides my usual brown and black thread for horse tack. Made a new shoulder strap for this old purse and considering making other items in a brown/yellow color scheme.
-
Wholesale hardware suppliers beyond Buckleguy, Tandy, Weaver, Ohio etc.
TomE replied to PheesOriginal's topic in Suppliers
Beiler's Manufacturing and Supply in Ronks PA has quality brass and stainless buckles, snaps, rings, fasteners, etc. with good prices and service. Quantity discounts when ordering 100 or more pieces. They are geared towards the harness and tack trade. Amish company with no website. Call for a catalog. -
Cobra NP4 Leather Skiving Machine - bad presser foot mechanism?
TomE replied to NeilMott's topic in Leather Machinery
Hard to know what's wrong with the foot lifting mechanism without taking it apart. LMC is generally very helpful with advising, sending parts, etc. In my limited experience skiver feet typically need polishing for best results. I have a Techsew SK4 and some additional FAV feet that I polished on a buffing wheel. -
To sand the edges or not to sand
TomE replied to ThisIsMyFirstRodeo's topic in Leatherwork Conversation
Reasons to sand edges include leveling multiple layers, removing excess glue before finishing the edge, and smoothing the fibers as part of the burnishing process. What are you trying to achieve? I routinely sand to level an edge or remove glue, and I avoid it when burnishing. If my regular burnishing methods don't produce a smooth enough edge then I'll sand and do more burnishing. Depends on the tannage, moisture content, the part of the hide I'm working with, thickness, etc. -
Turned out nice. I like how you laced the brow band on the crown.
-
That's a beauty! What caught my eye immediately is the way the vine is woven around the flowers to create a criss-cross appearance, and how you decreased the size of the letters to complement the shape of the point. Lots of neat details. Thanks for sharing.
-
For tack repairs I match colors by trial and error, testing dye mixtures on a scrap of the same leather I'm using for the repair. I am usually adding a small amount of Fiebings brown dye to their English bridle (yellow-tan) or mahogany (red-brown) dye as a base. The Fiebings brown dyes I've used are, from lightest to darkest, are light/medium/dark brown, show brown, chocolate, and dark chocolate. To my eye, the show brown has a bit more reddish hue than the others. To simplify, I'd get show brown (dark red-brown) and chocolate (dark brown with a black tone) and dilute them in a tan or mahogany base. Based on the picture of your saddle I'd guess that a pinch of show brown in mahogany dye would be an acceptable match. My go-to dye for dark brown Asian tack is 7% show brown in mahogany dye. Your saddle is not that dark. As others have said, oiling and sunlight will also darken the leather to improve the match.
-
I'm no expert but I would sharpen the knife, working slowly/gradually to avoid overheating. Use a marker on the bevel to see that the stone is creating a uniform bevel. I would also polish the foot to reduce drag - use a buffing wheel if you have access to one. Check that the drive roller is round and without gouges/flat spots by shining a bright light to visualize the gap between the roller and the knife.
-
A gum eraser or "plastic" eraser does a pretty good job of removing excess contact cement. I apply cement sparingly, let dry for 5-10 min then warm it with a heat gun to "activate" the adhesive before assembly. Heating produces a strong bond with less cement.
-
Here's the bitless bridle/halter that I mentioned. As noted in the thread below the rolled leather noseband was swapped out for a soft polyester rope noseband, matching the original. The client's trainer felt that the leather noseband didn't release properly. wa
-
The knot on the Weaver bitless bridle looks like a double overhand knot. This video shows how it is tied. I learned to tie rope halters from this author's 3 part Youtube video. She also has useful videos on eye splices and butt splices for lead ropes. I don't have much experience with bitless bridles but I made one for a client, patterned after the Monty Roberts "Dually" training bridle. She wanted a leather version of his nylon halter for every day use with her older dressage horse. I'll look for pictures of it after chores today.
-
I have a similar challenge sewing next to raised leather features on horse tack. I've used the inline presser feet from Toledo Industrial machine and the narrow presser feet from Hennigan Engineering and Precision. Both foot sets can do a good job. The inline feet require backing out of square corners, in order to give the rear foot a place to land. The narrow presser foot set is a bit wider but easier to maneuver. Another strategy is to leave a wider margin around your raised piece, use a conventional foot set then trim the edge after sewing. I don't like doing this for long stitch lines, like sewing reins with a raised feature in the middle of the length, because it's a lot of trimming and waste. Think it would work fine for smaller items. Here's a video of the inline presser feet. https://www.facebook.com/share/v/18w1DUTZzc/ Here's a video of the narrow presser feet. https://www.facebook.com/share/v/1787akb5As/
-
-
In this short video Tim Alden of Alden Leather Supply shares a neat trick for sewing next to hardware. Wish I'd thought of this. He makes sewing sideways look easy. I've used hand sewing, different presser feet, and backing up towards the hardware to get the hardware sewn in tight. Any other tips to share? https://www.facebook.com/share/r/1Bcjp74xtc/
-
The narrow groove of a power bunisher works well, or using canvas with the leather lying flat on a smooth/slick surface and working the edge.