TomE
-
Posts
1,292 -
Joined
-
Last visited
Content Type
Profiles
Forums
Events
Blogs
Gallery
Store
Everything posted by TomE
-
 Welcome! One way to center holes on a strap is to use dividers. Lightly scribe a short line on either side of center, or just press the point on either side, then punch between the marks. Scribing parallel lines is really helpful when using an oblong/bag/crew punch to orient the punch. JH Leather videos on Youtube show a lot of techniques for working with straps.
 -
Comparing Edge Finishes
TomE replied to garypl's topic in Dyes, Antiques, Stains, Glues, Waxes, Finishes and Conditioners.
That sounds like a robust solution. For the Fenice Glossy PLUS edge paints they mention using a hot glazing tool in the description but I may misunderstand the application. I've read about edge stain recipes for tack that include wallpaper paste, pearl glue, or PVA glue. Seems everyone has their special sauce. I'm hoping that beeswax applied with an edge iron will create a durable seal. -
Comparing Edge Finishes
TomE replied to garypl's topic in Dyes, Antiques, Stains, Glues, Waxes, Finishes and Conditioners.
I think the Fenice edge paints sold by Campbell Randall are all compatible with hot glazing. They are sold in 1 liter bottles. I've been using their Fenice Colorfast dye "with added waxes" on the edge of bridle leather and been very happy with the penetration and durability for tack. I don't think the Colorfast dye is compatible with glazing but it gives a nice edge IMO. I recently learned about applying beeswax with burnishing iron/edge iron in an article by Cary Schwarz in the May 2022 Shop Talk magazine. Has anyone had experience with this? I aim to try it on bridles and halters. The edge irons are hard to find so I ordered a brass "lollipop burnisher" from Duane Watts. -
I think a burnishing iron is too big for your work. The lollipop has a 1/2 inch wide U-shaped groove. I’m planning to use it on tack made with 1-3 layers of 8-10 oz leather. I don’t know anything about the electric heated burnishers but think they are for light weight projects.
-
The burnishing iron/edge iron is heated in a flame - alcohol lamp or propane burner - or on an induction hot plate if you have a ferrous metal tool. Similar to heating a creasing iron. Beeswax is softened and spread on the edge then the warm burnishing iron is used to work the wax into the leather. Hard to find the old burnishing irons. I ordered the brass "lollipop burnisher" from Duane Watts on Etsy and am waiting to try it out. I learned about this method from an article by Cary Schwarz in the May 2022 Shop Talk magazine (I think it's Cary in the video I posted). Cary says he learned about it during a visit to sellier Jean Luc Parisot.
-
Spirit Dye Or Oil Dye
TomE replied to LAPat's topic in Dyes, Antiques, Stains, Glues, Waxes, Finishes and Conditioners.
As stated above, Fiebings leather dye and oil dye (now called Pro Dye) are both alcohol based. The pigment in the Pro Dye has been changed to resist rub off, and the difference is significant in my experience. I think there are quite a few colors of Pro Dye available. Another interesting dye is Fenice Colorfast (sold by Campbell Randall) and the related dye Fenice Diamond Waterstain (sold by Springfield Leather). These are water based dyes with added waxes. They produce good coverage and seal up the leather. I use the dark brown Colorfast fairly often when matching color for tack repairs. -
Like all Osborne tools of late, the #67 will require a fair amount of sharpening. I find that after I spend the time shaping and sharpening they are good tools - just not completely finished at the factory. This cheap knife is the one I resharpened last night and it works surprisingly well https://www.amazon.com/BANYOUR-Leather-Cutting-Working-Leathercraft/dp/B07LD4PC2D/ref=pd_lpo_1?pd_rd_i=B07LD4PC2D&psc=1. See the Harry Rogers video on cheap skiving knife.
-
Indeed! Thanks again.
-
Worked over my square Japanese style skiving knife according to HAKU video, and it is now skiving like a champ. Needed to flatten the bevel and do a better job of following the bevel when skiving. Thanks for the tips. This is the cheap Chinese skiving knife on Amazon that Harry Potter has given a favorable review. Not sure if it will hold an edge but for now it's great. JH Leather's videos have been an excellent resource as well. She's the real deal. I am on a waiting list for a small head knife from a local maker.
-
Thanks for the video. Good tips there that I will try with the square skiving knife. Not sure if this grip and angle of work is possible on a 1 inch wide strap, but I'll try it. I've found it easier to skive the narrow straps placed on the flesh side of a leather scrap instead of glass. The small strap slides all over the glass, especially true for bridle leather. I'm thinning both edges of 9 oz leather straps to about 3 oz then wet molding 2 skived straps together in a rounding block to create a swell.
-
I have better luck skiving with a rounded blade, using a round knife or Osborne #67 knife. I am left handed and work from left to right along the edge of a strap, using right-to-left strokes and tilting the handle in the direction of the stroke. I've tried using a square skiving knife and tilting it the other way, but I can't get the hang of it.
-
You could achieve a similar look making a padded strap. I typically use 1/8" neoprene and 3 oz leather for the padded liner, sewn on a 8-10 oz strap. JH Leather has several videos with variations of this construction. Also, those bracelets look like raised leather - a thin filler inserted between the front and back of a split strap, wet molded and sewn. JH Leather covers that as well.
-
Another method is to burnish with water and canvas then apply hot beeswax with a burnishing iron. French sellier Jean Luc Parisot has some beautiful examples on Instagram. Duane Watts sells a lollipop burnisher for this on Etsy.
-
I use a regular sewing awl and harness needles, per the method shown in this JH Leather video https://youtu.be/ZmgxmtkvISs which is essentially what Stohlman describes. It is helpful to pre-awl the holes in the strap that will be covered by the loop before inserting the loop end and sewing the second/final side of the loop. That way, you can feel your way through existing holes in the correct location while piercing the end of the loop with your awl . Also, Stohlman inserts the awl from the front side/loop side while deflecting the loop. I prefer how it's done in the video, awling from the side opposite the loop and watching the point of the awl appear underneath the loop. Gently withdraw the awl and insert a needle in its place to keep the holes aligned then pass the other needle through the hole while withdrawing the place holder needle then finishing the stitch as usual. I aim for 3 stitches securing each end of the loop and adjust stitch length accordingly. I am typically sewing 9 oz straps and splitting the loop stock to about 6-7 oz. I also do a lap skive to help the buckle turn lay down nicely, without taking too much thickness around the crew hole to maintain strength.
-
Green and Englush Tan Deco Tote
TomE replied to Silverd's topic in Purses, Wallets, Belts and Miscellaneous Pocket Items
That is a beauty! Interesting construction and a work of art (deco). Now my wife wants one. -
I learned to hand sew before buying a machine, and I still sew a fair amount by hand. The hand sewing gives me perspective on what a machine can/can't do, and how to set up a project to run it through a machine. Books by the Stohlmans (hand sewing, case making, leather tools) were a foundation in leather construction methods that I use as a yardstick to judge what I see online. Of course, they didn't use a sewing machine.
-
He's using a common edge shave. Probably a Dixon https://www.tooltique.co.uk/shop/vintage-t-dixon-son-shoemakers-leatherworking-edge-shave/ Abbey England sells a similar style with a shorter shank https://www.abbeyengland.com/workshop-materials/tools/
-
The loop stick enables you to stretch the dampened loop a bit to size it and to block the corners, making them square. Particularly handy for fixed loops sewn on a strap with the stitch lines running through the ends of the loop, and for narrow fixed/running loops on a bridle.
-
Sure. I use a round knife for skiving. For skiving small pieces I will switch to a smaller skiving knife like an Osborne #67. A small half round knife might be even handier.
-
Finally solved the mystery of the Vergez-Blanchard plough gauge. Moving the blade 3 mm back from the fully forward position relieved the pinching and binding of the strap against the guide. It now slices through 12 oz HO veg tan with little effort. This fix was suggested on FB by a Kelsey Watson from White Hall, VA. I think he fabricates leatherworking tools. Thanks to everyone for tips on sharpening the knife - my skills continue to improve and I am sure that helped as well. Now if I could get more brass hardware that has been out of stock for 6 months.
-
Not sure about the process but haltertags.com in Wilmore KY makes very nice brass name plates that are engraved and filled with paint (enamel?).
-
Thanks for the link!
-
7.5 in Ruger Super Redhawk 480
TomE replied to Hags's topic in Gun Holsters, Rifle Slings and Knife Sheathes
That's a handsome piece of work! If he runs out of bullets that gun will make a good club. -
Can a Pricking Iron be used as a Stitching Chisel?
TomE replied to DoItYourself's topic in Leather Tools
Maybe not just a legacy. I bought a new Vergez Blanchard pricking iron a few months ago that looked like a high school shop project. Stubby teeth with rough unfinished edges. Spent hours shaping, smoothing and polishing to make it useable. On the other hand, I am very happy with the Rocky Mountain European style pricking irons. -
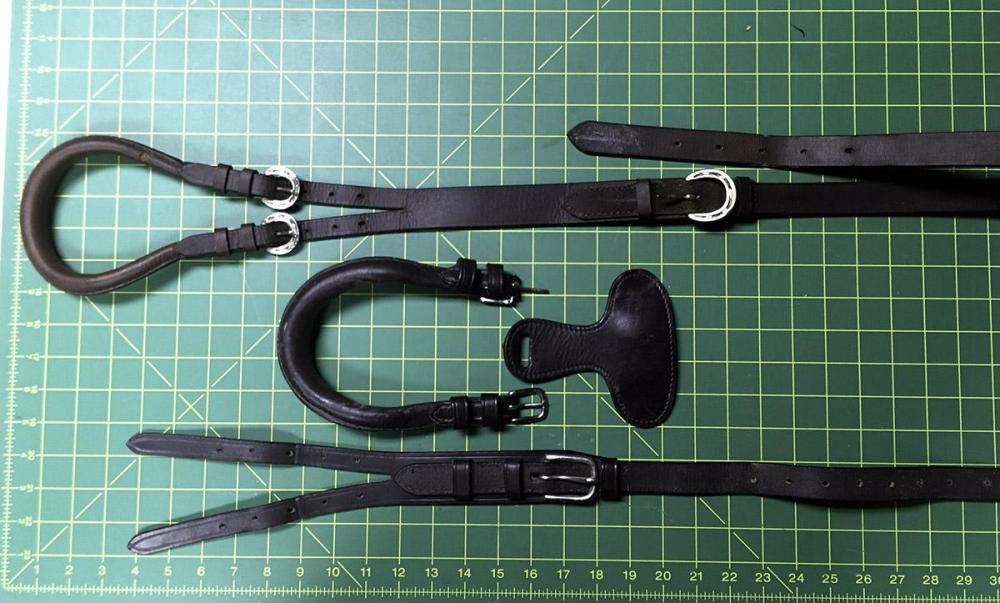
No pattern, but here are a couple of pony sized cruppers photographed on a 1 inch grid. The larger crupper at the top of the picture loops through a dee ring mounted on the cantle. The other crupper loops through a T-shaped tab that slips into the slot between the panel and flap underneath the cantle. The dock is constructed like a suitcase handle with a leather cover sewn around a flexible material (felt?). These cruppers have a 1 in buckle securing the point, and 5/8 in buckles for the dock. Steinke ("Bridlework") suggests making the dock from a piece of liner leather folded in thirds and sewn flat. His dimensions are Point: 22-28 in x 5/8 in. Buckle piece: 13 in x 1 in, tapering to 5/8 in where point and buckle attach. Splits: 8 in x 1/2 in. Dock: 11 in x 2 in, folded in thirds.