


TomE
-
Posts
1,300 -
Joined
-
Last visited
Content Type
Profiles
Forums
Events
Blogs
Gallery
Store
Everything posted by TomE
-
 There are 2 aspects to consider. The spacing and the size of the holes. A pricking iron is designed to mark locations of holes that will be created with a sewing awl. Awls are shaped and sharpened to create different sizes that are matched to thread size. The goal is to use the smallest awl that will accommodate the thread size and needles, so that the holes will close around the thread. Fine bridlework features stitching at 12-14 SPI, which you can't achieve with larger holes created with a punch or chisel. So the optimal stitch length is a matter of aesthetic, but limited by the size of the holes you create. With small holes you can do fine stitching that is very strong.
 -
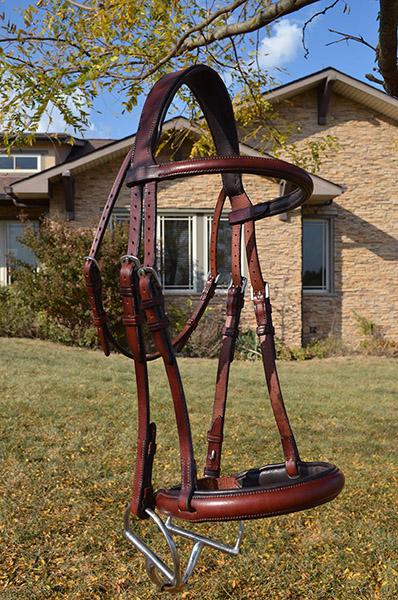
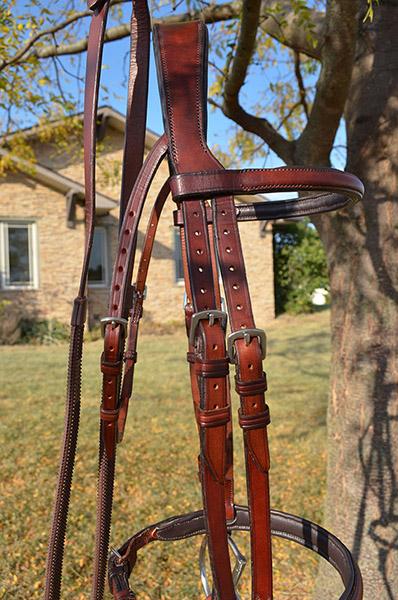
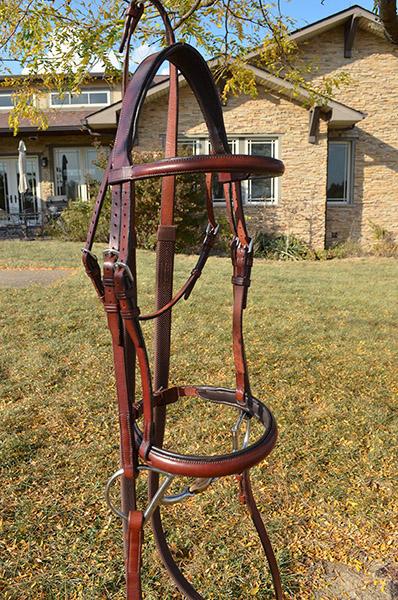
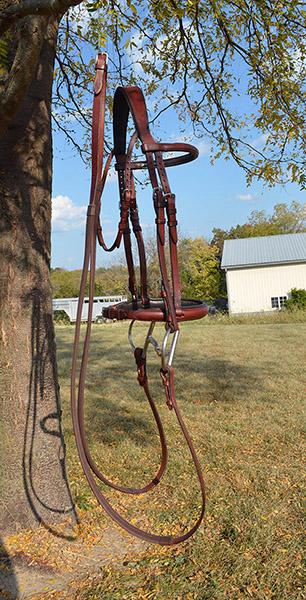
Well, you probably can't see it in the pictures but all the buckles are sewn with the fixed loop tight to the buckle and with side stitches to gather the buckle turn, as you recommended. My process for the rubber reins is to bevel the edges of the strap, punch a hole near the best end (to become the billet end), loop parachute cord through the hole, fish the cords through the grip, tie the cords to my workbench, and milk the grip onto the strap. I trim and finish the ends, crease the strap, etc. after the grips are in place. The 3/4" grips with rubber cuffs were a struggle to get on. I just received 5/8" Equus grips without rubber cuffs and they went on snugly without any problem. I need to make cuffs for the 5/8" reins on my bench now, so I'll try splitting some bridle leather for the cuffs. How many times can you recover reins? Wondering how the small pips will hold up in comparison to large pips. Thanks, @Backwoodsman.
-
Thanks, @chuck123wapati!
-
You could machine stitch the belt and finish the keeper end by hand, leaving long tails of thread to incorporate a fixed loop/keeper next to the buckle. I do this on some halter parts where the hardware creates a bulge that my machine won't climb. If you'd rather have a sliding loop/keeper that is secured with Chicago screws here is a video showing the traditional way to make sliding loops using a single needle backstitch.
-
Thanks. I guess I should learn something else to use the remainders of several hides. Thank you. Yes, these are Equus rubber grips from Abbey England. I worked on a pair of Antares reins that had nylon webbing under the grips, stitched to leather pieces on the billets and buckle ends. I made mine from a single leather strap. These are 3/4" reins (grips are about 1-1/8" wide) and I plan to make 5/8" reins for our petite horse trainer. The grips come with either small pips (very grippy) or large pips (smoother). It takes enough force to pull them over the strap that the strap stretches a bit, so I put the grips on before sizing the length. I placed a line of machine stitching down the center to secure the grips. Some of the Equus grips have rubber cuffs on the ends, which I left exposed. The traditional style is to cover the ends of the grips with a leather cuff made of 3-4 oz chrome tanned leather.
-
This is bridle #3 for me and I am enjoying the learning process. At this stage, I give away everything I make to people who use it and give me feedback to improve my craft.
-
Prize Winning Hand Bag
TomE replied to Handstitched's topic in Purses, Wallets, Belts and Miscellaneous Pocket Items
Congratulations! Very nice work. -
This knife is called a "crease" on the English version of Vergez-Blanchard's website.
-
Thanks for the info. Looks like a very handy tool. Nicely finished too.
-
I really like @chuck123wapati's knife but I'm confused about using it for long straight cuts. Based on my experience with a single bevel plough knife I'd expect the blade to track away from the bevel. I use a traditional round knife for long straight cuts when squaring up hides. This looks like a pattern knife or skiving knife for fine work. Interested in learning more about this.
-
Contact cement
TomE replied to Scottgallagher's topic in Dyes, Antiques, Stains, Glues, Waxes, Finishes and Conditioners.
Ha Ha! The only thing I don't like about the original is the price, but that's a small fraction of supply costs so I keep using it. -
My favorite conditioners are Fiebings Aussie and Effax Leder Balsam, which are both balm type conditioners that don't darken the leather. The Aussie conditioner is a bit more waxy than Leder Balsam, which soaks in faster. Bick 4 and Blackrock Leather N' Rich are also good but I see some change in color.
-
The leather stretches as i start to skive it what do i do
TomE replied to hickok55's topic in How Do I Do That?
Haven’t worked with goat leather but I do most of my skiving on a scrap of heavy leather with flesh side up. Glass or marble is too slick and the bridle leather I’m skiving slides around. More friction might keep the goat leather from stretching?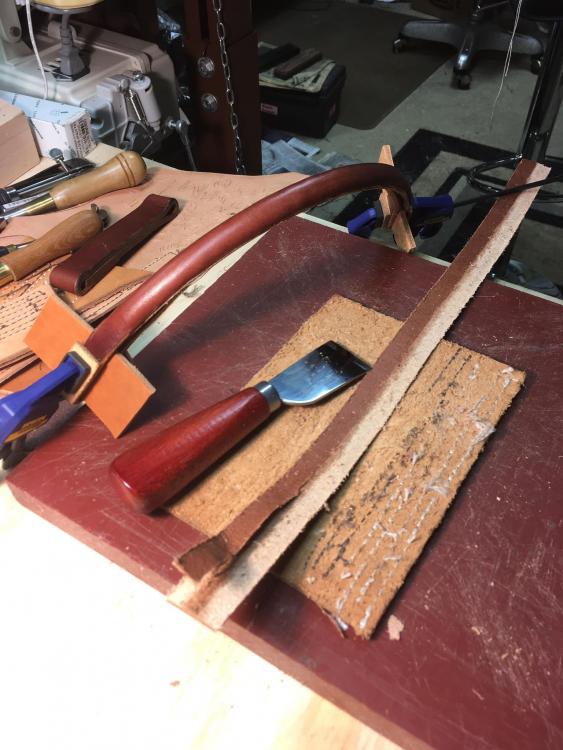
-
Kangaroo skin bag
TomE replied to AndrewWR's topic in Purses, Wallets, Belts and Miscellaneous Pocket Items
@AndrewWR, makes sense. I’ll be interested to know how the Tokenole holds up. Did not know about the kangaroos in CA. Chrome tanned cow hide seems perfectly adequate for liners although I did plan to use kangaroo lace for laced reins. -
Kangaroo skin bag
TomE replied to AndrewWR's topic in Purses, Wallets, Belts and Miscellaneous Pocket Items
That's a handsome bag! I do a lot of strapwork with bridle leather. My favorite edge treatment is burnishing with canvas and sealing with beeswax using a heated edge iron. Adding a crease line will also dress up a strap. Thinking about trying kangaroo for padded liners on halters and bridles. I like the design of your bag. -
Good looking bags! I especially like the tulips. Is it correct that chrome tan is stronger than veg tan with respect to tearing and seams ripping out?
-
Good advice when working with a piece of leather that can be picked up. I typically buy sides and cut full length straps of various widths, leaving the belly for other projects. The draw guage and plough gauge work well for wider straps. I can cut narrow straps from scraps of wider straps using the wooden cutter and pushing the leather through.
-
Sorry my earlier reply didn’t get posted - operator error. Thanks for your reply, @sbrownn. I am typically cutting straps from sides of 9-10 oz leather so I am drawing the tool along the edge. For sure it’s operator error and I’ll take all the help I can get. The above modifications seem to have improved the consistency of my narrow straps.
-
Thanks, @tsunkasapa and @Gezzer. I added a few center punch craters and put a dab of anti seize compound on the threads. This Craftool cutter had thread locker on the threads holding the disk on the screw. Now it locks very nicely at the set width and stays there when I cut heavy straps. I used 3oz chrome tan instead of cardboard to make a shim to cant the blade. I have better luck with the shim on the side next to the blade instead of the opposite. At any rate, I’m happy with the modifications and cranking out 3/8” loop stock for fixed and running loops. Thanks for your suggestions.
-
Thanks for the suggestion. If I can break the disk free from the screw then I'll add a few craters. Curved channel lock pliers might reach around the wooden housing to grip the disk. My idea of a fun Friday night.
-
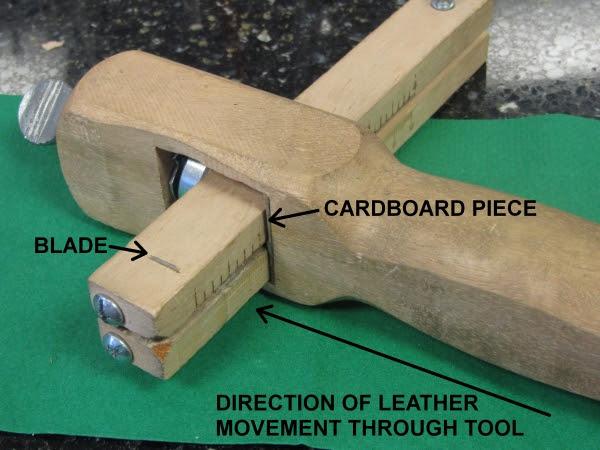
I see what you're saying. I am thinking the slightly angled blade puts pressure on the strap passing between the blade and body of the strap cutter. This counters the tendency for a gap to open up between the edge of the strap and the body of the tool and keeps the strap feeding through at full width. I can test it by placing the shim on either side of the tool and comparing results. The other thing I don't like about my wooden strap cutter is that the metal disk that fixes the wooden bar in place turns together with the adjustment screw. I think the clamping mechanism would work better if I could tighten the screw without the disk spinning around. The screw is firmly seated in the disk. Maybe if I can back the screw out a half turn then the disk will stop turning once it contacts the bar. Not sure how this is supposed to work.
-
Yes, that's true. I thought the idea is to pinch the cut strap against the body of the strap cutter to stabilize it. I'm thinking it's akin to the single bevel on the inside edge of a plough gauge knife. Did you see an improvement with the shim on the other side of the strap cutter?
-
I see a wandering cut when cutting 3/8" from a side of 9-10 oz leather. For sure it's something about how I'm using the tool. I think it's awkward to hold it steady on the edge of a hide. A work around is to cut my narrow straps from a shorter piece of 1" strap since I don't need the length for narrow straps. I cut the wider straps from sides using a draw gauge or plough gauge. I'll try this strap cutter modification and report back. Thought someone might have already tried it.
-
OK, I'm all about straps. I like the wooden strap cutter particularly for narrow straps (3/8") but it has a tendency to wander on long cuts. The author of this blog recommended the following modification to slightly tilt the blade and maintain a consistent feed. https://www.leatherlearn.com/2011/12/strap-cutter.html I'm guessing others have tried something like this or have other ideas. I'd welcome your advice and ideas.
-
Work of art! Thanks for sharing.
