TomE
-
Posts
1,299 -
Joined
-
Last visited
Content Type
Profiles
Forums
Events
Blogs
Gallery
Store
Everything posted by TomE
-
The Cobra Class 4 (or Cowboy CB4500) really shines when sewing 12-30 oz of material, but it's not practical for 6 oz or less. I have a Class 4 and hand sew about half of my projects. Sometimes it's easier to sew by hand than to configure a project for machine sewing. I have the Cobra burnisher and use the sanding drum more than the wooden slicker. The sander is handy for leveling up edges made from multiple layers. I covered the burnisher with a canvas sleeve and it's handy for the initial burnishing of long straps like reins, but I still finish the edges by hand to get a smoother finish. My advice, as someone who recently returned to leathercraft after a ~50 yr hiatus, is at first to focus on a few types of projects using hand tools. Learn how to use and maintain the tools while figuring out how a machine would enhance your productivity or enjoyment. As we saw in the Terminator movies, machines have their limits and don't always carry the day.
-
Better yet, could train an AI algorithm to value leather goods based on pictures/prices of items posted online. We could use the app could to set the price of our goods. I'll match any advertised price, etc. ...Am I on the right track?
-
Better days ahead in MO. Stayed above 0 deg F last night and the wind has moderated. Power stayed on. Horses are doing fine in the cold, eating lots of hay and some are blanketed. Predicting 60 deg. F and rain later next week. Merry Christmas and happy holidays everyone!
-

Couple of belts
TomE replied to Nooj's topic in Purses, Wallets, Belts and Miscellaneous Pocket Items
Those belts look great to me! What types of leather and finish did you use? I know what you mean about the time involved. It takes me 20 hrs to make a bridle and I don't feel comfortable charging what I think my time is worth. I could cut corners (e.g., simplify the design and machine sew) but I'd rather do the job in a way that builds my skills and satisfies my standards. I have the luxury of treating this as a hobby while gaining more experience and building a reputation. -
Highly skilled work right there. I'm interested in the modified awl. Heated and bent in a curve? How long? How do you sharpen it?
-
Nice work! I'm sure they will be pleased.
-
Thank you, @Basically Bob. I'm getting faster but I am basically a 2-trick pony -- bridles and halters.
-
Well done! Handsome bag and pretty fabric for the liner. The medallion makes it even more special.
-
Thank you. Yes, she's cute but even better she is a highly skilled craftsperson who teaches the traditional methods of saddlery/harness-makng. We use biothane for every day halters. I buy them from 2 Horse Tack bc their stainless hardware is first rate and I wouldn't save much buying the materials and making them.
-
Thank you! The pad is 1/8" thick neoprene wrapped with 3-4 oz. chrome tanned leather. The pad is assembled with glue then glued to the crown/headpiece and sewn. Can see the process on JH Leather Youtube videos for padded dog collars.
-
I would begin with a light coating of 100% neatsfoot oil (not compound) and let that soak in for a day or two. I would then condition, working the conditioner in with fingers. If you don't make your own, some popular conditioners are Bick's 4, Blackrock, Aussie, and Lederbalsam. The key to longevity is to maintain the leather during use. For tack, that includes regular cleaning with saddle soap, applying conditioner as needed, and periodically oiling (but not over doing it).
-
You have 2 leather resources in PA. Wickett and Craig of America, and Keystone Leather. I would call them. I previously mentioned Hermann Oak Leather Co, which is another well respected tannery in Saint Louis with good customer service.
-
Saddle skirting (unsplit hide) is typically up to 16 oz thickness. The Hermann Oak Leather Co (tannery) is very helpful and could advise you based on your specifications. If you're new to leather, download the Springfield Leather Co catalog and read the introductory material about choosing leather for your project.
-
I think the problem is biological; there are no 20 oz cows.
-
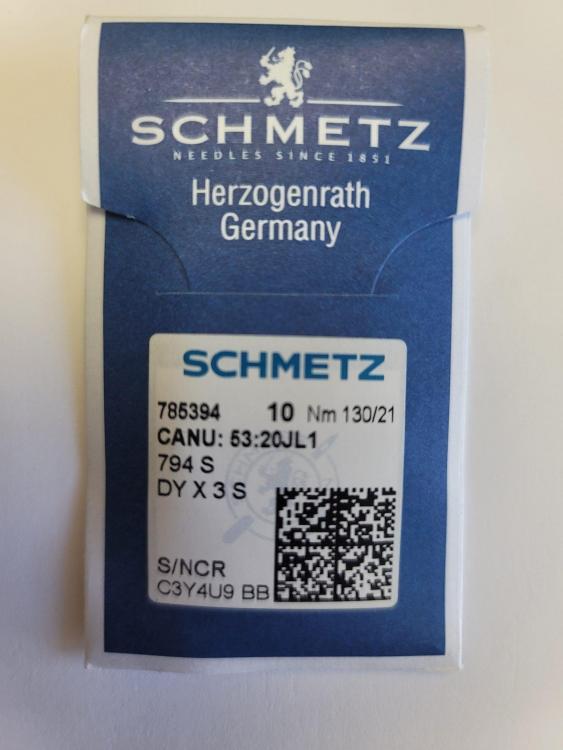
Just ordered size #21 needles from Leather Machine Co for my Cobra Class 4. Previously hadn't seen anything smaller than size #23 in 794S. Going to try lighter threads with the adjustments described in @Wizcrafts blog. https://www.rw-leatherworks.com/blog/2019/02/dumbing-down-a-cowboy-cb4500-cobra-class-4-or-similar-harness-stitcher.html.
-
Beautiful work! I'd need new spectacles for this realm. What is the tool used for creasing?
-
That's a work of art! Look forward to seeing more of your creations.
-
Nice work, @Klara and @Tugadude. It looks like that shape would be tricky to sew.
-
Thanks, @DJole and @Klara for the tip about Inkscape for vector drawings. Thinking about escaping the tyranny of the Adobe subscription. I mainly use Illustrator, Photoshop, Acrobat and Lightroom from this expensive package. Any recommendations for a less costly photo cataloging software?
-
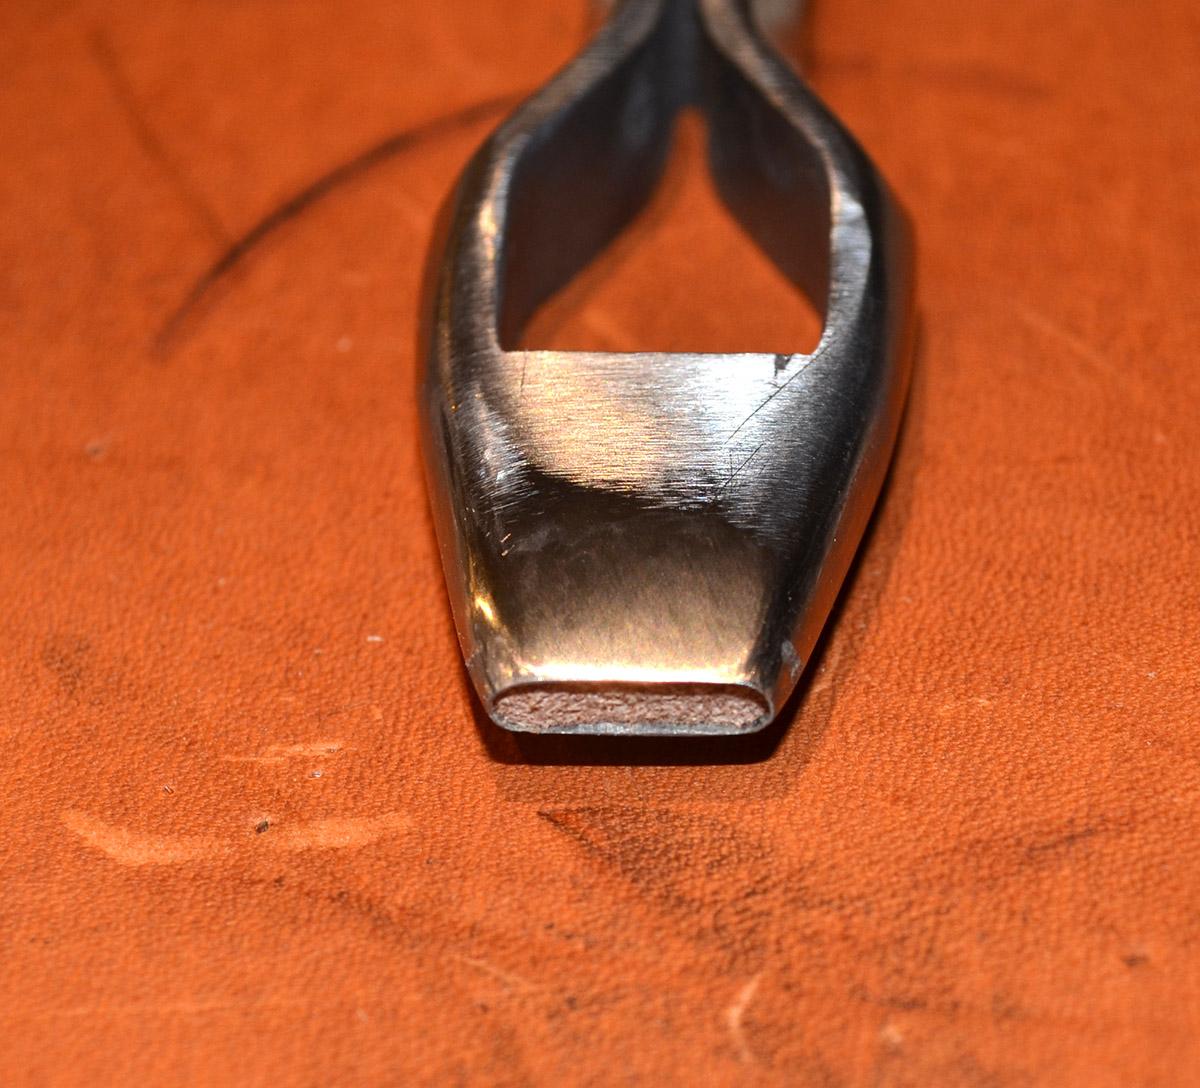
I sharpen them by hand with oil stones, working the flat sides and rolling onto the ends. For this 1/2" Osborne punch, I spent some time with a coarse stone reshaping the flat sides then making a ~20 deg. bevel. The cutting edge remained flat and I didn't touch the inside. Worked the bevel with medium and fine oil stones, polished on a buffing wheel, and finished sharpening on a fine stone followed by stropping. Alternatively, you could hand sharpen by attaching wet/dry abrasive paper to a smooth surface like plate glass using 3M #77 spray adhesive. This punch isn't razor sharp but I am happy with it.

-
Good tip, @tsunkasapa. Been using my fingers but this sounds better.
-
Beautiful design and craftsmanship. At first glance it appears symmetric then I see all the asymmetries as I look more closely. Neat!
-
First project: rifle sling
TomE replied to Redbeeerd's topic in Gun Holsters, Rifle Slings and Knife Sheathes
Highly recommend Stohlman's book on hand sewing leather, and Neil Armitage videos. Using an awl will give you lots of flexibility in constructing and repairing items. -
First project: rifle sling
TomE replied to Redbeeerd's topic in Gun Holsters, Rifle Slings and Knife Sheathes
Looks like a very solid job on the strap. I can't see the thread along the edges but it looks like it is marked for sewing? That's an impressive varmint gun - a big upgrade from my .223 ranch rifle. Hope you enjoy leathercraft as much as I do. Lots of good folks with expertise on this site. -
I haven't used GIMP in a while, but I see it has a "Fuzzy Selection" tool that functions like the "Magic Wand" in Adobe Photoshop. The Magic Wand selects a group of pixels with similar color/intensity values from a contiguous area, or noncontiguous areas, enabling a background to be distinguished from artwork. The stringency of selecting "like" pixels can be changed to improve the selection. The invert selection command toggles between the magic wand selection and everything else (the artwork). Once the artwork is selected, an outline can be created by editing the selection to add "stroke" and "fill." I would guess that the GIMP has many of the same commands to work with the fuzzy selection tool. ADDED: Gabor Pinter wrote a 3 part article on "Digitalizing Patterns With Adobe Photoshop" in the 2022 March/April, May/June, and July/August issues of the Leather Crafters and Saddlers Journal. He is tracing the outline of a digital image using transparent layers and the brush tool in Photoshop.