-
Posts
1,294 -
Joined
-
Last visited
Content Type
Profiles
Forums
Events
Blogs
Gallery
Store
Everything posted by TomE
-
https://www.springfieldleather.com/SLC-Pro-Beveler_3
-
The inline feet are listed among the accessories for the CB4500. https://www.tolindsewmach.com/cb-acc-pack.html
- 8 replies
-
- tack
- inline presser foot
-
(and 1 more)
Tagged with:
-
Thanks, Wiz. I'm fiddling with proportions and getting used to the look of the machine stitch but I think it's headed in the right direction. Thank you, Mulesaw. I still haven't worked out a method to machine sew swells that taper continuously to a thin edge. That might be a hand sew only option. Thanks for your encouragement!
- 8 replies
-
- tack
- inline presser foot
-
(and 1 more)
Tagged with:
-
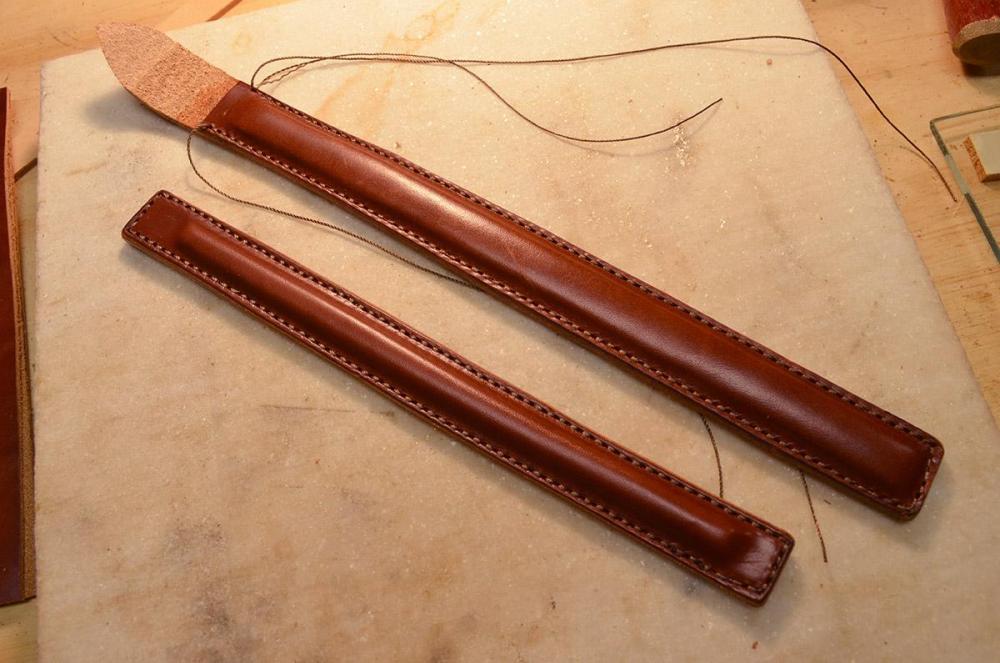
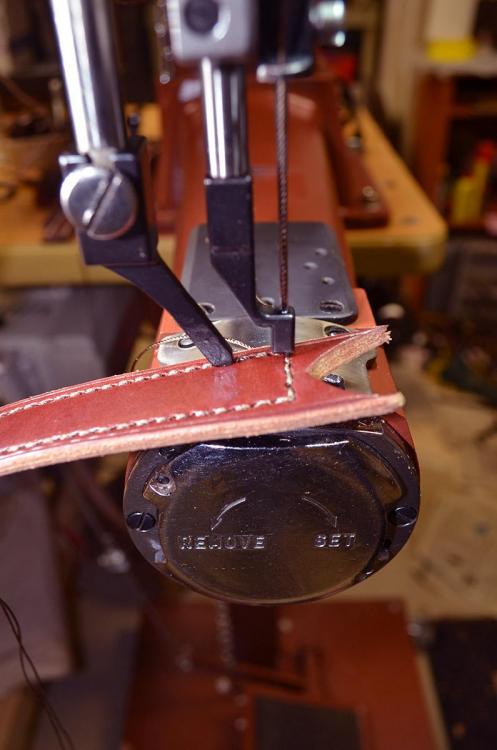
Taking a break from hand sewing to practice machine sewing raised leather straps (again). Think I'm making progress with inline presser feet from @CowboyBob on my 441 clone. I've been able to sew tight to the raised filler and maintain a 1/8" border. Took me a while to adjust the presser foot timing to my liking, but now it's a quick change over between the inline feet and the regular center/side feet. Very happy with these compact feet for sewing tight to an edge. Took a little practice to smoothly back out of the corners, so that the rear foot has a place to land. The raised pieces are made from 2 pieces of bridle leather, split to 3 oz for the cover and 7 oz for the back. I use a veg tan filler piece 1/4" or 3/8" wide on these straps, and figure about 1/4" (2 x 1/8") of additional width for the cover wrapping around the sides of the filler. I glue the cover and shape it with a glass slicker and bone folder then sew and trim the edges before finishing the edges. I will use raised leather for bridle nosebands/browbands, dog collars, and belts. I've been sewing these by hand, but getting closer to production by machine sewing.
- 8 replies
-
- tack
- inline presser foot
-
(and 1 more)
Tagged with:
-
Those are pretty and nicely constructed collars, @BlackDragon. Well done. Was thinking the same for the handle. Stohlman's case making book Vol #2 describes this and other methods to attach handles. An alternative would be to sew a tab or shield on each end of the handle to distribute the load over a stitch line. A different look would be a rolled leather strap for the handle. I learned from the Stohlman book above and posted a summary here: https://www.leathercraftmasterclass.com/forum-1/leathercraft-techniques/rolled-leather-strap
-
With my manual splitter I pull the leather through at a constant downward angle to maintain a consistent split. I also keep an index finger next to the blade guard to keep the leather entering the blade from drifting upwards when approaching the end of the strap. I am typically splitting straps of 10 oz bridle leather to 5-7 oz thickness for liners and chapes. If the leather has uniform substance I can get an even split for 2-3 feet of length on a 1" strap. I don't know how your machine's feeding mechanism is configured but you might see if you can manually support the leather exiting the blade to maintain a consistent angle of feed.
-
The sweet spot for my hand splitter is with the blade aligned at the top/center of the roller up to 1/8" behind the center position. What type and weight of leather are you splitting? Does the split change in a continuous manner, becoming thicker or thinner along the length of the split, or is it moving up and down throughout the length of the split? Can you try something easy like splitting a firm 8-10 oz veg tan to half thickness?
-
Interesting design. No need to back out of corners as for the typical inline feet (?). Is the piece in the foreground made of 2 layers sewn together? Did you sew the bottom layer after stitching the layers together? I am interested in using inline feet to stitch tight against a raised leather feature. I can do it with the inline feet from Bob Kovar, which are quite nice, but I often sew raised leather pieces by hand in order to get closer to the raised edge and keep the border narrow.
-
Those are lovely straps to go with some eye-catching guitars.
-
I’ve had good luck with HO bridle leather. Nice finish, not too waxy, and uniformly good substance.
-
This is why I avoid dip dyeing. I haven't found a way to prevent the pieces from becoming overly stiff, but a light coating of neatsfoot oil on the grain side will help. Could also experiment with oiling or casing the leather before dip dyeing. I use Fiebings deglazer to clean up Barge cement on bridle leather. It dulls the finish a bit but that is fixed with a conditioning balm like Aussie or Leder Balsam.
-
Handsome piece of work, and so nicely constructed. The colors, the shape, the details of the handle and zipper closure. It's all first rate.
-
Yes, that makes sense. Need a sweatshop in the USA to make good for the Danish market. This Youtube channel is where I learned to tie halters and lead ropes. I think there are 3 videos for making a halter, 2 videos for the eye splice, and a video for the butt splice.
-
Good luck with your new business, Jonas. Look forward to following what you do. I like the tack holders. Ideas for other products: name plates for show stalls with farm name/logo/contact number and place for horse name (chalk/eraseable marker/taped on), quality lead ropes in various lengths (eye splice for snap, butt slice on end), rope halters for training young horses, leather side reins and surcingles. We use quite a few hay nets for ponies and replace them when a hole is torn. Not sure if repairing these nets is profitable. Keep up the good work!
-
Lots of different treatments for smoothing the flesh side. Typically involves a glass slicker to apply a wax or adhesive. I use this water-based adhesive when I split bridle leather, in order to replace the moss-back (pasted) finish. It creates a smooth, flexible surface that is sealed.
-
Great job of repairing the awl. I typically sharpen the point of the awl and only strop the remainder. I think the idea is to pierce the leather with the cutting edges then stretch the hole a bit as the awl is advanced. The hole then relaxes around the thread to make a tidy looking stitch. I like the gradual taper you put on the point. Osborne awl blades have a stubby point that I modify.
- 16 replies
-
- vintage tool
- awl
-
(and 3 more)
Tagged with:
-
Great experiment and lucky dogs! I bought a couple of 1 oz tins of mutton tallow (McQueen's from the Anita Baker Co) for more than I should have paid. Planning to make a leather strop with tallow and carborundum powder but haven't gotten around to trying it. Think I'll find a friend with sheep and try your recipe. Would be interesting to compare this dressing to Effax Leder Balsam and other pricey conditioners.
-

Best places to get the finest Veg Tan shoulder (UK)
TomE replied to cordwainerbec's topic in Leatherwork Conversation
If you fancy black or shades of brown, bridle leather has a nice finish and a smooth pasted back (moss-back). It is veg tanned leather stuffed with fats and waxes. Sedgwick bridle leather seems to be a favorite in the UK. Available from Abbey England and other shops. -
This little round knife has been a handy addition for cutting and skiving in tight places. It seems to hold an edge. https://www.abbeyengland.com/abbey-round-knife-68mm-fs0480
-
I’ve seen this wear pattern on stirrup leathers with rotted linen thread. The thread on the surface is lost but the holes contain plugs of thread. Haven’t seen it turn black but I haven’t worked on pieces that were recolored.


