


Mulesaw
-
Posts
798 -
Joined
-
Last visited
Content Type
Profiles
Forums
Events
Blogs
Gallery
Store
Everything posted by Mulesaw
-
Great idea! I think that it would be interesting to see if the leather retains it strength depending on what treatment it has received. E.g. Neatsfoot oil soaking vs mineral oil soaking. Dry veg tan vs. veg tan that has been given a bit of oil/grease Brgds Jonas
-

Large stainless D-rings manufacturing
Mulesaw replied to Mulesaw's topic in Hardware and Accessories
@TomE Thanks Tom, I think that even that 1" D-ring isn't long enough. I tried to see if I could find some D-rings for harnesses, but I wasn't able to find any of the same size and thickness. The D-ring needs to be extra long to accommodate the leather from the double wrapping around the lower part of the D and still leave enough room for the 30 mm straps that come from the noseband. I am not sure if it really needs to be that beefy, but I wanted to make a 1:1 copy of that old stallion halter. Technically I think that the buckle for that original stallion halter was also homemade, but I "cheated" and bought a stout 30 mm buckle instead of making one myself :-) Brgds Jonas -
Large stainless D-rings manufacturing
Mulesaw replied to Mulesaw's topic in Hardware and Accessories
@DieselTech Thanks, I normally just make one of a kind of hardware, so it was a bit new to me that I had to make a jig, but it worked better than I had hoped for :-) Brgds Jonas -
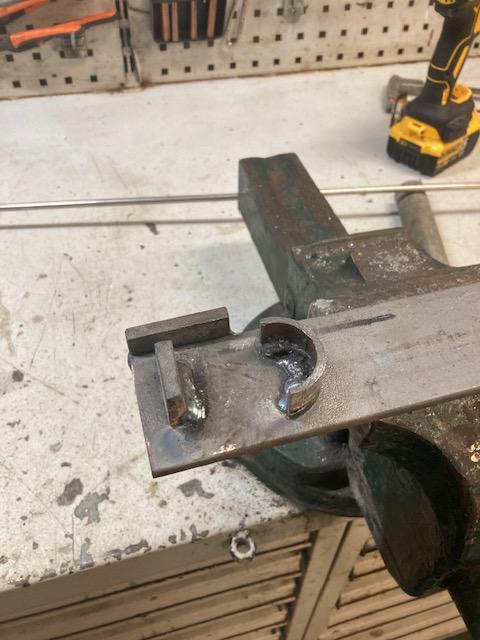
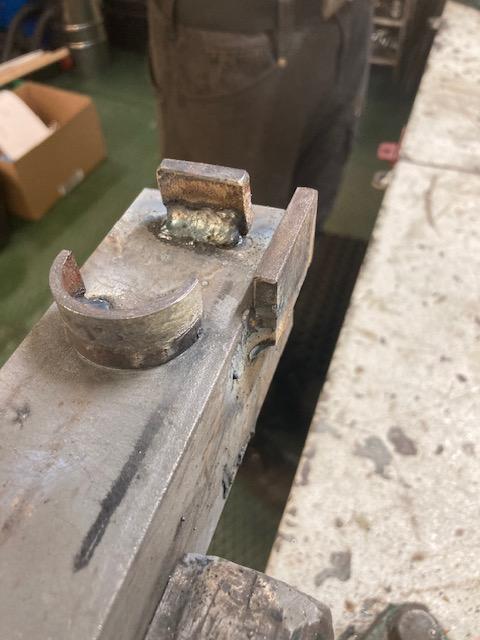
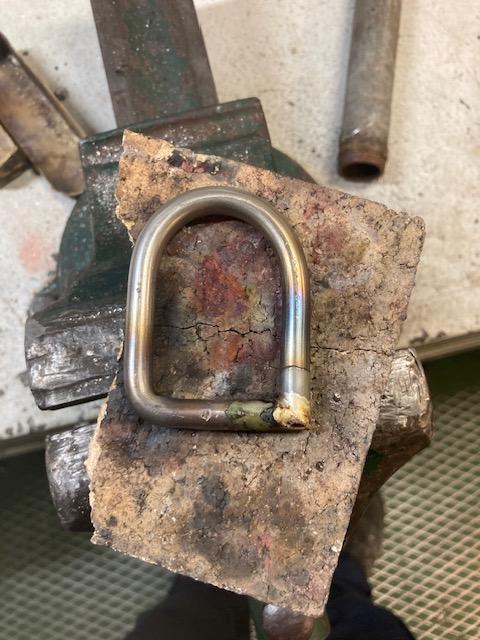
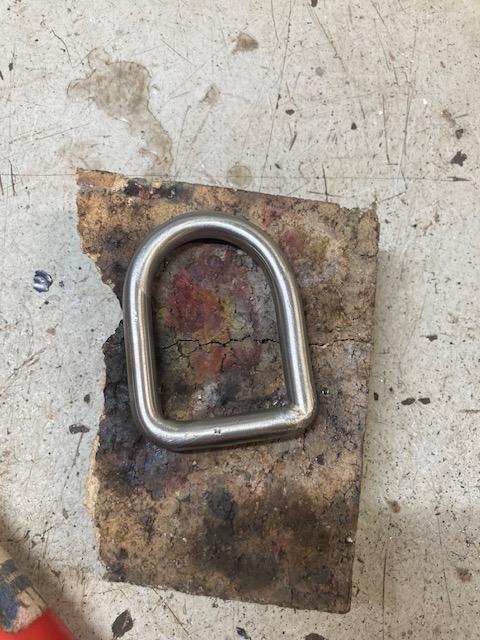
For the stallion halter project I needed some large D-rings. The D-ring on the old halter that I copied looked like it was homemade. At first I tried to search the net, but I couldn't find anything in that sort of size, so instead I made a small production run. I made a bending jig out of some old angle bar and a few bits of flatbar that was welded onto it. A piece of a pipe made sure that the rounding of the D-ring would be somewhat neat. The stainless steel is 8 mm (5/16") in diameter, and first I heated it to red-hot and bent it in a right angle. That part was inserted in the bending jig and the rest of the bending was done in the jig. I tried to heat up the steel for making the rounding, but after a test I discovered that the bending looked better if I didn't heat up that part. When the D-ring was shaped, I used a hack saw and a file to make sure that the corner mated nicely and then I silver soldered the corner together. When cold I cleaned up the corner with a file and sanded everything with some emery cloth- Silver solder is incredibly strong when the mating surfaces are well fitted, and I'd say that on a D-ring like this where the corner is filed round afterwards it is as strong as the welding I could have made using welding electrodes. Perhaps TIG welding would have been marginally stronger, but I kind of doubt it. The advantage of the silver solder is that it fills the entire opening between the two parts, so there is also bonding in the middle of the steel, that is harder to achieve with welding unless you are willing to risk melting it all. I ended up making 12 D-rings as far as I remember, so I've still got enough for a couple of halters. It is definitely easier to buy the hardware, but once in while it is also satisfying to make it yourself, especially if it is something that can't readily be bought. Out here on the ship I have sometimes made some belt buckles, mostly that has been to show some of the trainees and apprentices that it is possible to make something from scratch. And they have been incredibly proud of their belt when it was done since they made it all from the buckle to the sewing. Jig for bending large D-rings Jig seen from the other side. A D-ring after silver soldering D-ring after filing the corner round and cleaned up using emery cloth. The D-ring mounted on the stallion halter


-
@toxo I experimented a bit using old thread rolls, and then I just start by winding some thread on it and use it afterward to "feed" the bobbin when it needs to be replenished. Mainly I use the same colour and size of thread for 95% of the time, so in that case I just purchase an extra roll of thread so I can always wind a bobbin. Gütermann has got some really nice thread rolls where you can lock the thread in one end to prevent it from unraveling on its own, So whenever I happen to have an empty one of those I keep it to rewind it with those odd colours that I sometimes use.
-
One happy little customer
-
I really don't see the need for restricting persons by forcing them to write 100 posts before they are allowed to post about wanting to buy or sell something. From the top of my head I think I have seen once or twice in the recent years someone trying to sell the leather tools from their deceased family members. Those people seem genuine to me as most of them clearly states that they would just prefer the stuff to go to someone who will appreciate it. Also if a person has had this hobby for years before deciding to sign up on this site, why shouldn't that person be allowed to post a genuine post about wanting to buy a sewing machine/splitter/headknife or whatever? The same with the payment, I prefer to trade in cash, but that requires that I see the item in person. But to make a rule about it when you can't enforce it seems a bit of a waste to me. It is OK to suggest that people use this or that type of payment, but I'd leave it up to the buyer and seller. A few people seem to join to sell cheap leather jackets and post it in the wrong sub fora's ,but to me it seems as the moderators are very efficient in weeding those out in a short time. I am not a moderator, so I guess I don't see all the problems, but if there is a need for restricting selling/buying ads, I think that the payment part needs to be left up to the buyer / seller. Brgds Jonas
-
Does it have to be a loop type cartridge holder? I once had a Mosin Nagant ammo pouch that I really liked the look of, I just never had the need for making a single version of it. Something like a single part of the picture sized to house 6 rounds. If it has to be a loop type, could you use a piece of thick leather maybe 3/8" wide that you sewed under the loops, for the shoulders to rest on? Kind of like your idea with paracord except the leather would be on the outside. Another option is to make the loops with a bottom, but then you'd have to put the rounds in with the projectile facing up. I've attached a picture of an old experiment of mine for shotgun shells. So kind of the same system.
.jpg.9c48ba7d6747182f0fa0f02270d99f5a.jpg)
-
@NatesLeatherGds I use a small manual press, and that has done wonders for me. The fact that it is able to press absolutely straight means that the caps don't flare to either side. Whenever I try it with a hammer I manage to get it slightly shifted no matter how much I concentrate on the job. An alternative could be a drill press if you have one? you just need to put a small bolt in the jaws and make sure that it is filed flat and smooth at first. But I am afraid that you need what you describe as: a proper snap button bench press Brgds Jonas
-
The leather work looks really good, but I can see the problem with the zipper. Admittedly I only replace zippers in riding boots, so I haven't made them on a "round object like yours". But what I have learned over time is that if the zipper needs to bend around a curve it greatly helps to make a bunch of small cuts in the fabric of the zipper where the curve is going to be. Also when installing the 2nd side of the zipper, it is easy to stretch either the leather or the zipper a bit more than on the first side. (used riding boots are probably more soft than a new piece of leather) So a tip here is to start by marking your zipper for say every 3-4" with something like a silver coloured marker or a pencil etc. Just leave the zipper closed and mark out on the fabric all along its way. Next you make the same marks on the leather. from start to end. Since your shape is so curved I'd might use a divider to step off the distance. When you sew in the zipper, check that the markings on the zipper and those on the leather match in pairs. It is OK that there is a difference between the leather marks and the zipper marks, as long as the difference is the same on both sides. (If the left side zipper is lagging 3/8" behind the next mark on the leather, then the right side zipper should be lagging by the same amount) I use double sided tape to hold my zippers in place before sewing, that can help a bit too, and it will let you check the markings and rearrange a bit in case that is needed before doing the actual sewing. God luck. Brgds Jonas
-
Congratulations on the position :-) I think that I'd add small telescope magnet and maybe some sewing machine oil and some brake cleaner. Brgds Jonas
-
Welcome :-) I don't know if you have looked around on the forum yet, but there is a subforum on here dedicated to holsters of different sorts. and lots of other specialty sub foras. Brgds Jonas
-
Does anyone have a good saddle soap receipe
Mulesaw replied to ToddW's topic in Leatherwork Conversation
In my experience neatsfoot oil doesn't soften that much. And I wouldn't worry about it in the amount used in connection with soap. (I can't see the video because of poor internet onboard), but lets say that there is used a total of 1/4 cup of NF oil in the soap batch, maybe that is 20% of the total volume. To clean your backpack or a bag you might use a tablespoon's worth of soap. and 20% of a tablespoon is probably half a teaspoon, and that is not a lot of oil :-) There have been some discussions in earlier threads about whether or not to use mineral oil. Working with a lot of oil in my day job (marine engineer), I just want to mention that a lot of oils have additives in them, and while pure mineral oil might be OK (think petroleum jelly), a lot of those additives aren't good for your skin. So you might want to stay away from e.g. gear oil, two stroke oil, motor oil and hydraulic oil. But then again, in those volumes there probably won't be any problems. Brgds Jonas -
Does anyone have a good saddle soap receipe
Mulesaw replied to ToddW's topic in Leatherwork Conversation
I think that grating up soap and adding a few other ingredients might be an easy way into making your own saddle soap without having to invest in a lot of different chemicals that you might be difficult to get hold of. I have made some regular soap as a small hobby a couple of years back, that is fairly easy and gives an old fashioned soap without different chemicals. But if it is better than modern soaps - I don't know? The advantage of making it from scratch is that you can make sure that your soap is "over oily / greasy" meaning that you can make sure that there is more fat/oil than the sodium hydroxide can react with. So you won't get an aggressive soap. The recipe book I use has got a recipe for a milk soap as well, so you could make something like that and use for a base if you wanted to. I'm not near my recipe book at the moment, so I can't remember the ratios between different types of fat and sodium hydroxide. But I have to admit that I have never really seen the use for a specific saddle soap. If I have to clean a saddle, I use grated soap and tepid water. The idea for me is to clean the saddle with the soap, not oil it or wax it at the same time. When the saddle is clean - I let it dry and then I ad a good conditioner or some neatsfoot oil or some leather grease (tallow). Good luck with whatever you try :-) Brgds Jonas -
That's a really good idea. Do you just put the screws in the corners? Brgds Jonas
-
Child's leather saddle literally falling to pieces.
Mulesaw replied to SUP's topic in Leatherwork Conversation
@SUP What a beautiful piece of work :-) I can understand that you feel inclined to restore it. But it sure looks like a lost cause.. I think that the leather itself has started to rot, and I am afraid that there isn't much to do about that (I hope that someone more knowledgeable than me can give some better advice). An option would be to use the old saddle as pattern and make a copy of it. The problem here is that it looks so well made that it is going to be kind of a big project. I can only speculate in how expensive a toy horse this must have been back when it was new. The issue with spending lets say 25 hours on a project, it had better be something that either I could use or some grandchildren could use or it could be sold for something that would justify spending the time to do it. But on the other hand it could also be a fun project that one could be proud of afterwards. And a hobby should be about doing something that we find fun, challenging and rewarding :-) Regarding the age of the saddle, I would guess sometimes in the 50'ies based on the branded longhorn stamp. Back when every kid wanted to grow up and be a cowboy like in the movies. Just curious, but is the horse a rocking horse or something from a carrousel? Cause if it was from a carrousel then maybe it would could give some hints to the age of it, and it could explain why it was so well made in the first place. Brgds Jonas -
Child's leather saddle literally falling to pieces.
Mulesaw replied to SUP's topic in Leatherwork Conversation
Good idea, mold is a pest if it spreads. It seems as you already have taken the upper hand by spraying with vinegar. Looking forward to the picture :-) -
Child's leather saddle literally falling to pieces.
Mulesaw replied to SUP's topic in Leatherwork Conversation
@SUP Sounds like an interesting project. Do you have any pictures? Without having seen it, my first guess is that the threads might be rotten. That would make the entire thing come apart at the seams. Brgds Jonas -
I would give it at least some varnish. It will add some protection if someone spills a cup of coffee or just some water. I don't think it will matter much to the leather work that you do on the table, but it will look nice and be much easier to wipe over with a damp rag to remove any dust etc. You could also give it a coat of stain first, to darken the colour a bit. And then varnish it afterwards. But the staining won't have any practical use except for making it look nice, and that is also important. Especially since you have been "shooed" into the basement :-) Might as well make it enjoyable to go down there and work. And if your workplace looks good, I think it is easier to maintain since it just looks nice. The edges of plywood can often fray and look ragged, so if it was my bench I think I would glue on a strip of wood to all edges of it. It can also be secured with some finishing nails. If you have access to a router with a rounding bit, I would round the upper edges of the table after mounting the strips. That will lessen the chance of scratching the surface of any large piece of leather that you scoot around on the surface. Good luck, brgds Jonas
-
That looks like a very logical way of doing it. That would also give the chance to make the inner liner out of some thin leather/skin, I would love to make some experiments with that right now, but I am sea, so it'll be 3 weeks before I get home to my shop :-) The most difficult thing will probably be to make the folds fairly consistent. But either double sided tape or contact cement should help in that respect (and a bit of practice).
-
@bvdv Striking elegant bag! I can see why you like it. I have made a sketch that sort of explain how I think those ribs are made. Mind you that I haven't tried it, so it is just a guess. Also I'd probably experiment a bit before cutting up and entire hide. To me it looks as the bag is made with a double layer of skin. So the ribbed part is made by first making a bunch of ribs with the sides folded over. Those ribs are then sewn onto the flat backing piece of skin which is visible between the folds of your lower picture. (It might take a bit of practice to make it look so sharp) When the sides are made I reckon that I'd do the ends next finally I would install a liner, if you look closely you can see how the top stitching passes over the rib stitching, that could also hold the liner in place. Good luck and please let us see if you make a bag :-) 20240303_162413.pdf
-
Great work, It looks really good.
-
@MarshalWill Thanks for a great and clear set of instructions. I have never thought about the possibility of making a basketweave stamp from scratch.
-
@Bobby hdflame My best suggestion is to ask around, perhaps on FB, if anyone near you do any woodturning. It is a fairly easy thing to turn, either on a metal lathe or on a wood lathe. I reckon that I could make one in about half an hour or so. Right now I am at sea, so while I could make one, I won't be able to get it shipped until in about a month, and I think it is still cheaper for you to get one made locally. Good luck with the project. Brgds Jonas
-
Hi Rainydayleather It might be a good idea to specify in what part of the world you are located :-) It is an international forum, and even within the US there are some substantial distances. Good luck with the hunt. Brgds Jonas