All Activity
- Past hour
-
 For some reason today I watched this bag making video. Maybe these are common practices. I thought it was interesting that he made several subassemblies with double sided tape and glue before he got near any sewing. I'll be looking to incorporate this into my own work.
 -

Accurately cutting "stretchy" leather.
fredk replied to Shadders's topic in Leatherwork Conversation
Heavy weights to hold down and a very sharp rotary knife. I use a 60mm diameter blade rotary knife -
Hello, After taking a rather long and unintended break away from leathercraft, I've returned to it, and completed a couple of basic wallets as my first couple of baby steps projects. I used Walpier museum buttero for the first and Badalassi carlo pueblo for the second. For the latter, I lined the note holder with napper lamb. I found the napper to be more challenging to cut correctly due to it's stretchines. Now, I've purchased some goat from Tusting & Burnett. I find that the goat has similar qualities when it comes to cutting it accurately. The line is not straight, even though I'm cutting against a cork backed steel rule. I don't think my blade is a problem, it's stropped enough for a good polish and shaves arm hair easily. I think the ruler could be a problem, the cork side is not flush with the rule, stopping ~1mm from the steal edge. I also feel my technique could be better, maybe inconsistent pleasure and/or angle. If there's anyone out there who'd like to share how they cut the more flexible hides, I'd love to learn from their experience please. Best regards, Shadders
-
 What do you use for thinner?
 - Today
-
Still getting my leatherwork room sorted. Its been a good opportunity to tidy it up and put things in proper places! and . . . I found an ice cold bottle of Newcastle Brown Ale on the bottom shelf of the fridge It ain't there no more !
-

Necchi 840 - Custom Large pulley 3d printed
Moti replied to marinicarlo's topic in Leather Sewing Machines
Nice -
 I used to make and sell some leather goods, but I got out of the game before COVID. Now I'm restarting the company and I'm looking for a solid veg tan to use for wallets, journals, and small goods that won't break the bank. I realize that no quality veg tan will be cheap, but I am trying to land on the frugal side of quality if that makes sense. Does anyone have any suggestions? Thanks.
 -
Looks good - congrats
-
 Michaelmis joined the community
 -
 Thanks for your reply. I do not thin the dye. It's 100% out of the gal jug. All the other colors do fine hanging - just the lighter browns are having problems. And we let everything hang over night. Light Brown and Sad Tan we spray and then come out fine. Just a pain.
 -
Thanks guys. I'm getting pieces of good knowledge from each of you and it's helping a lot and with my engineering background I've no doubt I'll get there but what would really help is to know what sort of folder you use and for what purpose. I can see where I'd like a leather binding on a handbag say or maybe a herringbone tape to tidy up the inside of an inside out tote or maybe a canvas bag. @nylonRiggingI'm certainly not averse to a bit of cutting and grinding and it was interesting to hear you say everything needs to be close up. I'll bear it in mind.
-
The PDF manual I typeset is attached to this post.
-
Jonas, Thank you for your response and I'm sorry for the delay in replying to your comment. My friend retired from his boot repair business and sold out his equipment several years ago. I might just have to bite the bullet and purchase one. I'm most interested in trying the welt roller along the edges of layered and glued leather belts. I will keep investigating and will keep an eye out for one on the used market. Thanks again for your response.
-
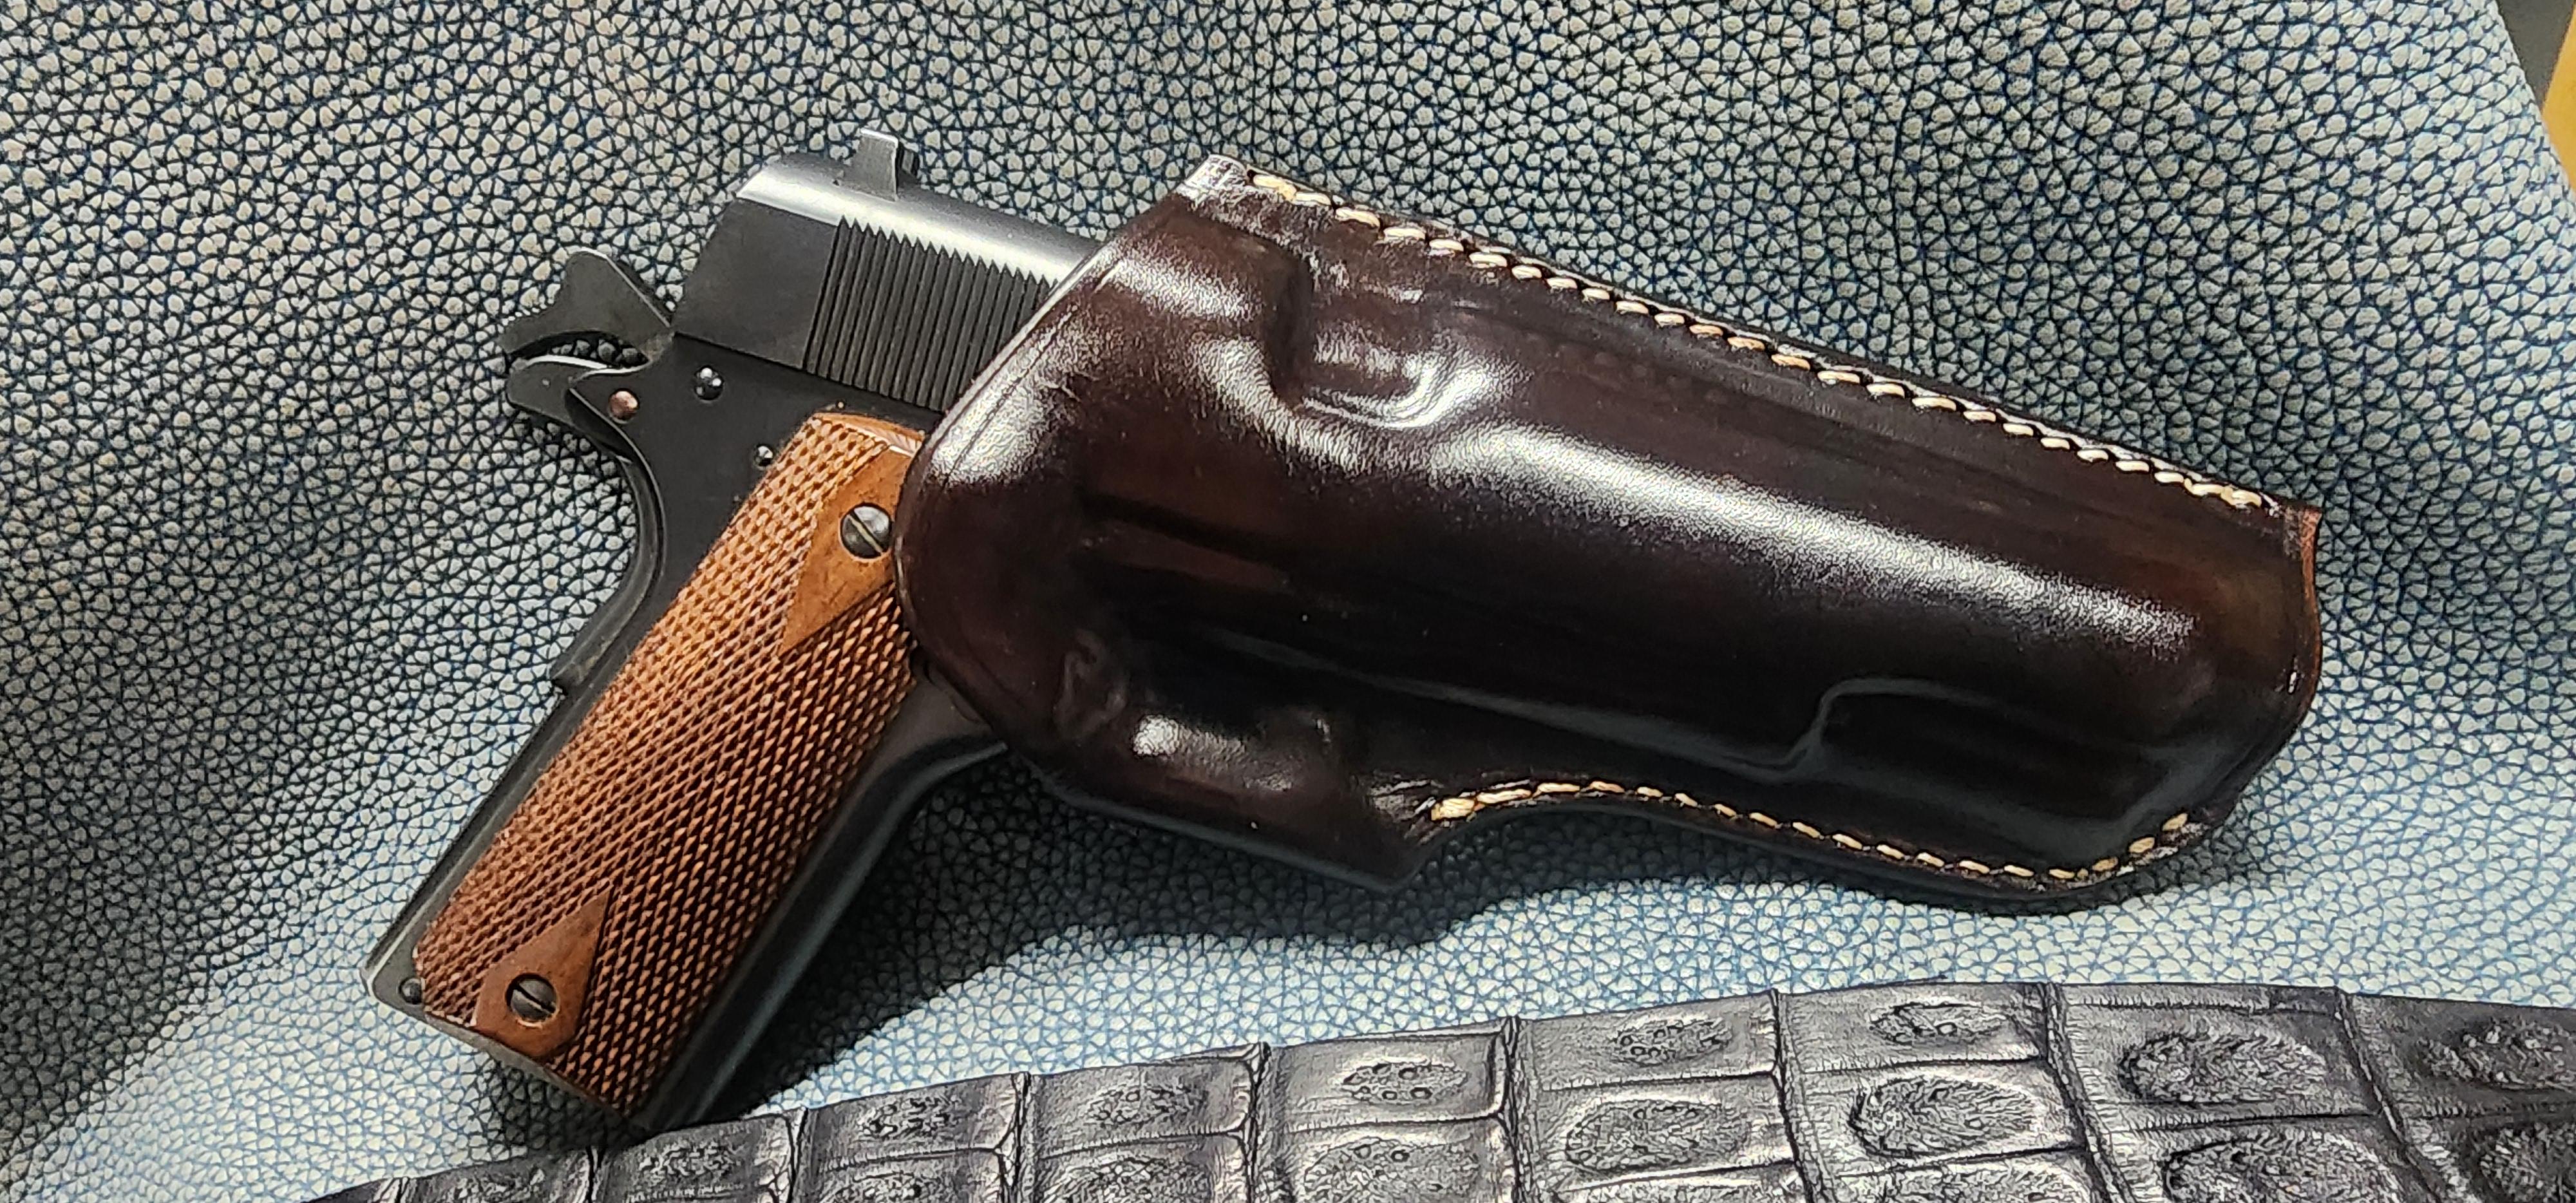
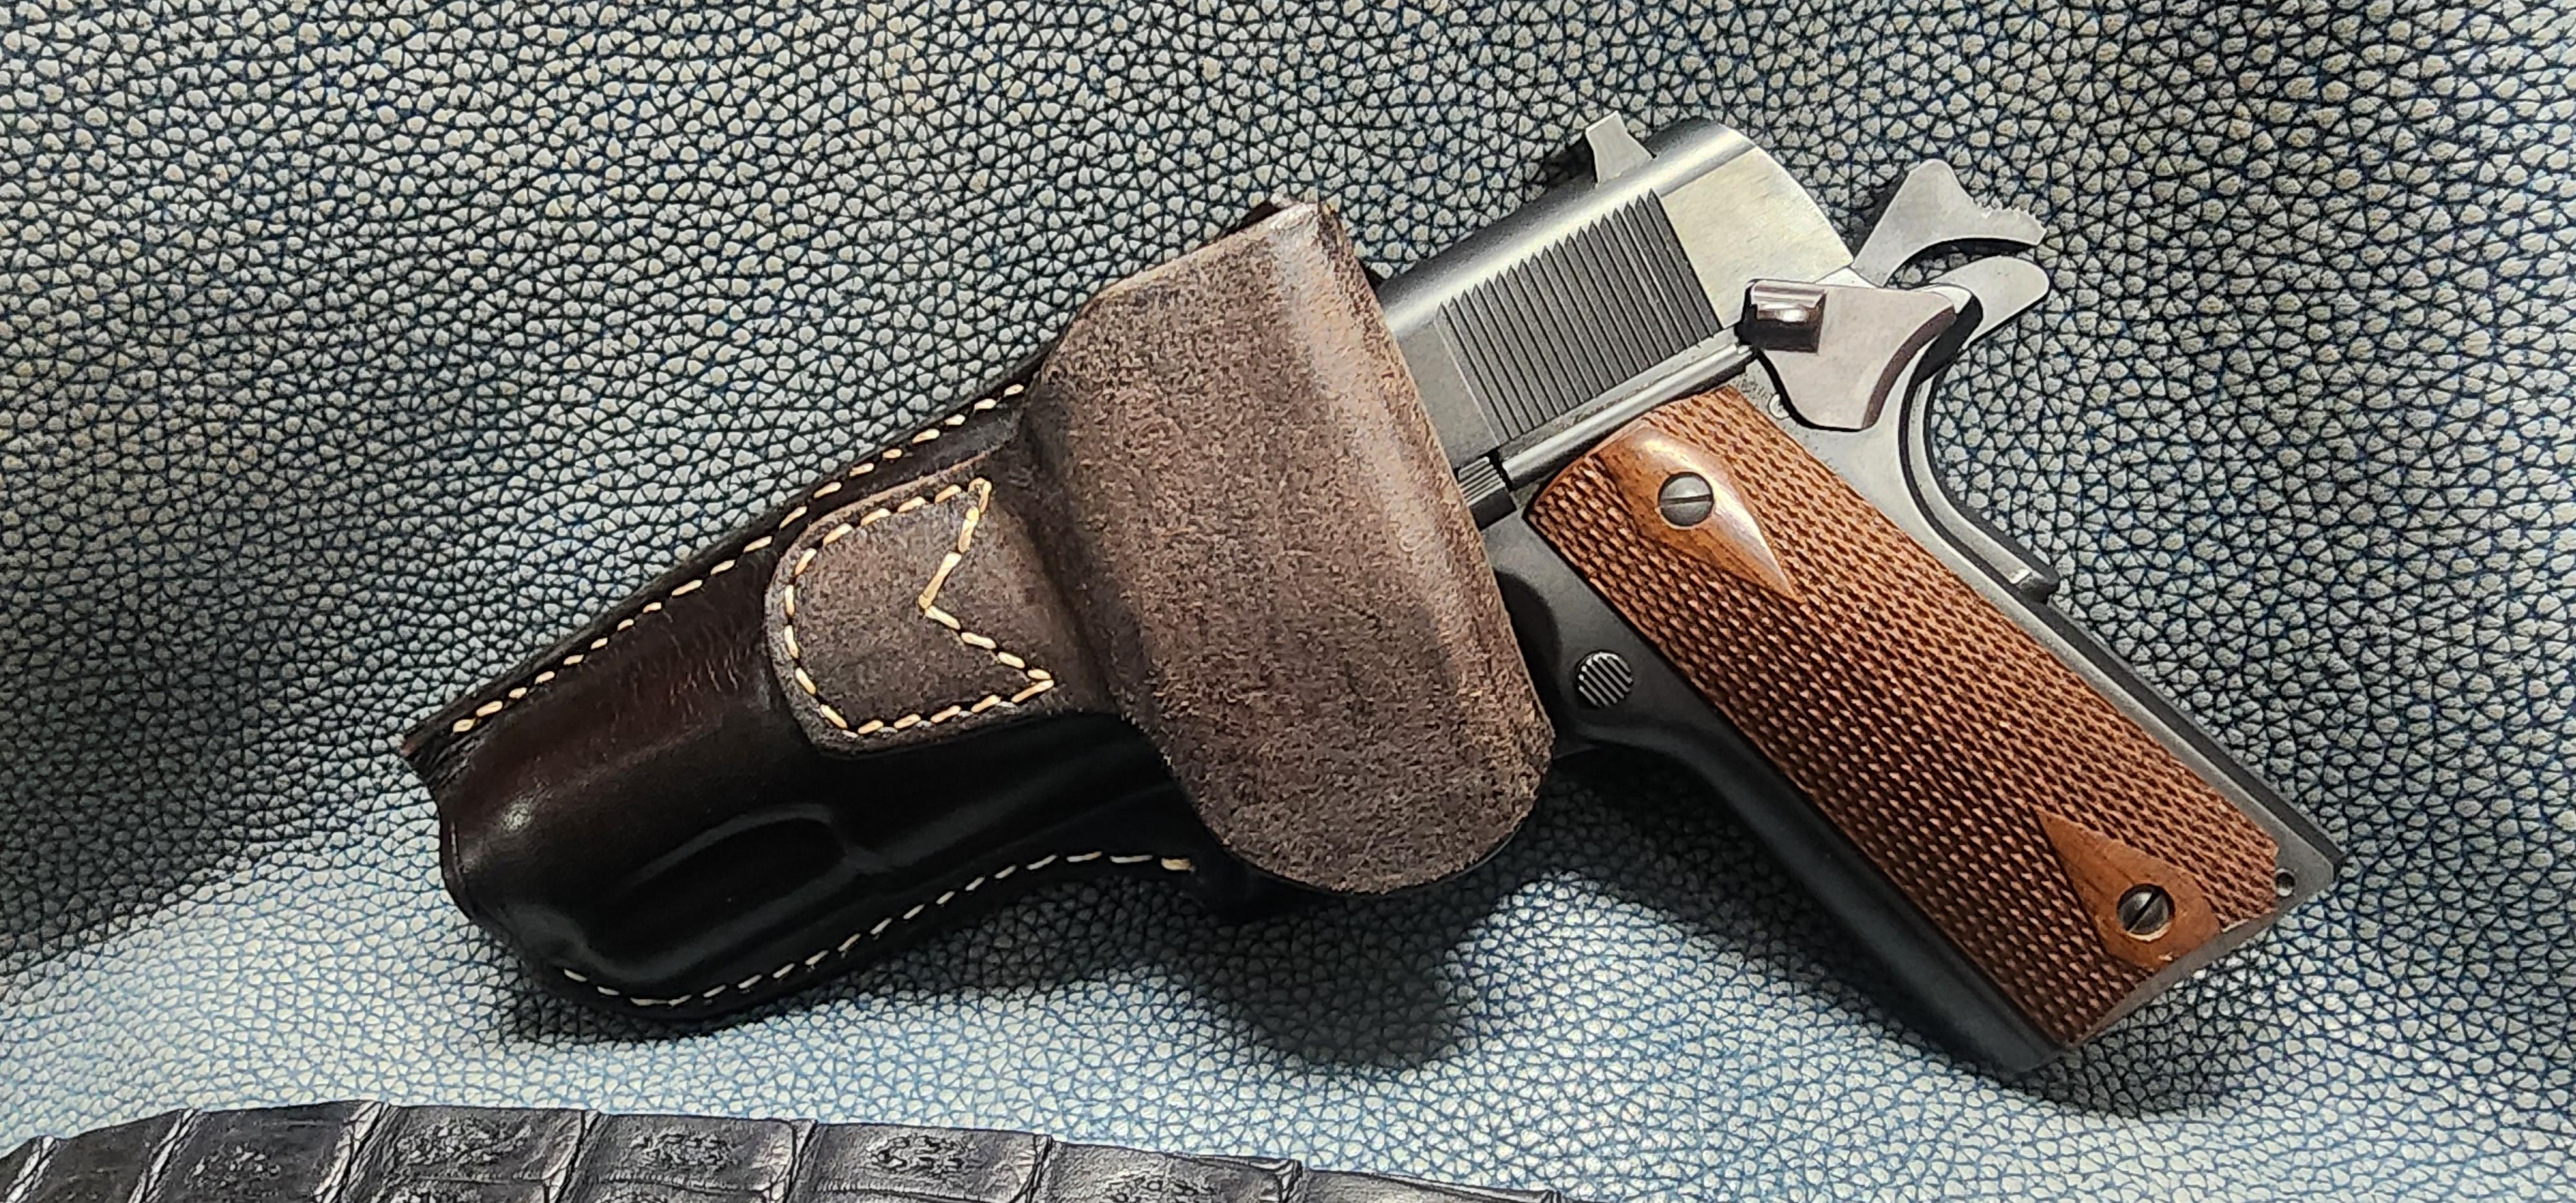
I like how this came out. Simple design but kind of unique. 1911 rhodesian holster in show brown. This leather is heavier than i like at about 9 oz. But it still works.
-
No offense taken. This job requires a sense of humor and I love working outdoors, except during a heat dome or polar vortex.
-
 Are you thinning your pro dye 50/50 or using it straight up out of the bottle. Also instead of hanging your project, try laying it flat on some cardboard. Also when you dip dye it takes a good 24hr or longer to fully dry.
 -
Beiler's Manufacturing sells line 24 snaps in 1/4" and 5/16" lengths. Can cheat a little and bevel/skive around the hole to recess the base of the snap.
-
 Jeff Mosby joined the community
 -
Might be tricky to get good results with aluminum rivets using a manual rivet setter(?). I have replaced solid aluminum rivets that secure the billets to the tree of a dressage saddle using a domed rivet setter like the one shown below. It fits in an air hammer and is handy for directing the peening blows straight on the axis of the rivet. I set 3/16" solid aluminum rivets with a washer/burr using this setup and it was fairly foolproof. Need to support the back face of the rivet with a bucking bar or small anvil/dolly. McMaster-Carr sells a variety of aluminum rivets and setters. PS For halter buckles, I would sew them on. Rivets can pull out.
-
Have you thought of using Chicago screws as you can get them in various sizes (diameter and length). Like @fredk I would be more concerned with using AL but then again I have had Copper rivets turn green. kgg
-
Can't help re strength but aluminium corrodes quickly in damp/wet environments and leaves a blue stain on the leather
-
There's a twelve step program for holsters. Step 12 is your twelfth holster. Then you start over.
- Yesterday
-
Has anyone used aluminum rivet and burrs? I was in Tandy this weekend and saw some for sale, it got me wondering about their strength and durability. They were marketed as decorative which is what sparked the question. I really like using copper rivets they are pretty strong and give a nice look; however when used with stainless hardware it clashes. Aluminum would solve this problem. I know aluminum is a reasonably strong metal so I think they would be fine but anyone with experience using them that has any input would be appreciated. If it helps my intended application for these would be for attaching buckles onto horse headstall or show cattle halters. Thank you for any help.
-
When we dip leather into a pot of Fiebings dye (light Brown or Saddle Tan ) for 3 to 4 seconds and hang to dry it comes out very dark brown or almost black. Does anyone have an idea of the problem?
-
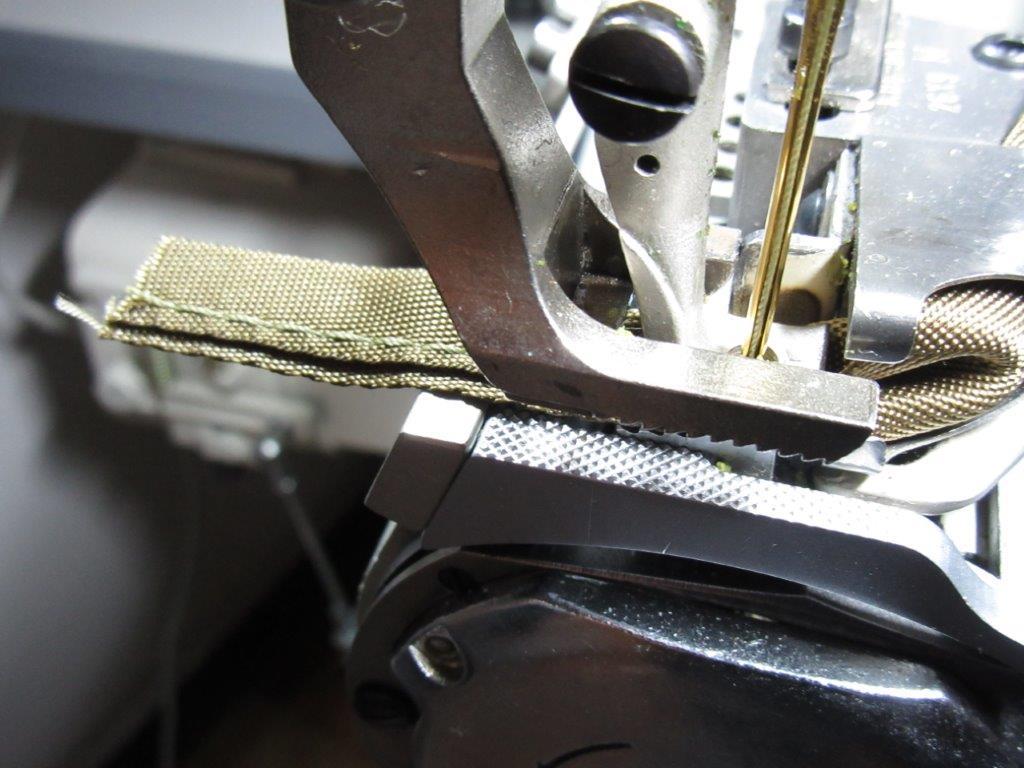
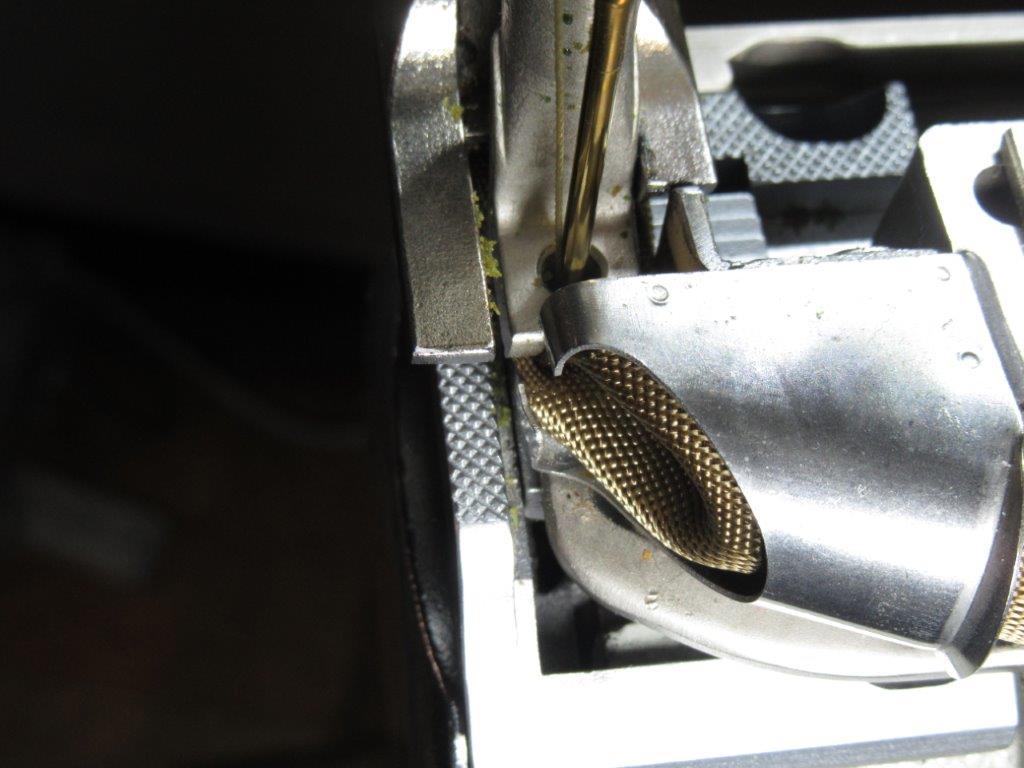
This is just suggestion, and everybody different in their setups and their techniques. This just my technique that been using for long time setting up and binding. and just my opinio for your binding using Cylinder Bed and compound feed, with syncro-move with your feed movement. Don't be intimidated by cutting and shaping both Inner and Outer Feet to make things work , Also Cut/trim that push-stop plate that leads out from the binder throat that you pushing your material up against on the Feed. Your length of that push-plate really does not have to be run out past the needle plunge to do it job with you pushing material against it. Leaving it long, is just working against you on your final results . Also, Your outer-press foot . Your inner R-side toe. ( me ) I like to 'leave it there' . but trim it off and shape it . Your outer L-side toe, just leave or trim to suit the need. Rather than just using only the L-side toe and foot-Heel . Keeping a little of that R-side foot ( even small ) is to your advantage in press/hold down and feed of binding and material. Very Rarely do I ever keep the outer press-Foot that is sold to me with binder kit. I end-up making my own off generic stock Press Foot. And, your inner Foot. I like to trim/shorten and shape the toe of it also . Needs to end-up as tight as possible, and trimming the inner foot and shaping toe let's the binder in more tighter/closer . Also when your holding and feeding your material into the binder and sewing with cylinder bed, make habit of, Don't let it sag lower than the binder. I like to hold and feed material into, on a little higher angle than a flat level feed to binder. Surprising how even angle of material feed can change the binding tracking on the cylinder bed. -- Not same cylinder bed machine as yours, but here in this Pic. this just my technique . In the Pic. The needle is just coming 'out' of it's plunge and just on the rise. Where everything is at it's tightest in it's syncro-feed movement . You can see where the outer press-foot R-toe just shy of touching/meeting the Press-plate tip/ending. With the press-plate length cut just a tad past the needle . Binding system, all has to end-up tight and smooth, movement back and forth. - - -
-
I've gone through this recently with raw edge 90* binders and it wasn't long before I realized the above to be all correct and very important. Also, practice (PRACTICE? we talkin' bout PRACTICE!?!) how you are feeding the material into the binder. I went through a lot of tape, material, and time before I figured things out. I worked with a few different over the counter binders and ended up modifying my binding foot, throat plate, AND binder brackets to get my desired results. Now it works every time on smaller radius curves. This is with a synchronized Juki 246 cylinder arm.
-
Before you know it, youll be on you 10th attempt and still going till it becomes a fever. I think I have about 20 holsters laying around my house. I guess its obvious why Im single?