


camano ridge
-
Posts
1,907 -
Joined
-
Last visited
Content Type
Profiles
Forums
Events
Blogs
Gallery
Store
Everything posted by camano ridge
-
Not necassarily, it depends on the type of work you do or want to do with them. I use a 16oz and 24 oz for most of what I do. If you decide to go with Bearman Mauls give them a call they will ask questions regarding the type of work you intend to do and make weight reccomendations. You will find people using a wide range of weights again it is a personal preference thing as well as based on the type of work you want to do.
-
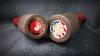
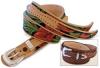
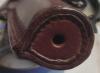
I have two Bearman mauls and I am extremely happy with them. Here is a link to Ed and Bearys site http://www.leatherburnishers.com/ they do leather burnishers and Mauls. here are pics of mine.

-
I have seen the 12 ga concho and snaps at Tandy. I have not seen the smaller size at the Tandy I go to. I have not found a comercial producer of cartridge end rivets. I make my own both for leather and for knife making.
-
You get to color in the black areas and depending on the type of Penguin there may be a little yellow or orange.
-
 If you select USPS it shows $6.45. My sugestion is call springfield leather they sell the same ones. They can qoute shipping for you and if you are only ordering one or two my guess is their shipping would be significantly less. They usually try to shipp cheapest possible. If that doesn't work PM me we might be able to work something out for you. Scott
 -
Here is some great info on Dixon Pricking irons including how to use them sizing and a video on proper use. http://www.sharkdesigns.co.uk/bushcraft/Products%20Folder/leather_tools/dixons_pricking_irons_2_teeth.html
-
A pricking iron is normally used to mark the stitch holes not to make them. After marking the holes you would use a diamond awl to actually make the holes. The holes will heal up some around the thread giving a tighter looking hole. The pricking iron tines are tapered so the further you push them into theleather the bigger the hole. Refer to the Al stohlman book on stitching or watch the video by Leodis Leather on saddle stitching. Looks like Macca and I were typing at the same time sorry about the duplication here is a link to Niegels video
-
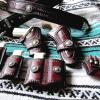
Not one hundred percent sure what you are trying to make. A rough sketch might help. If you are trying to make a collar similar to a ranger style belt 9as pictured below) the part with adjustment holes is the billet (some call it a tonque. The part that holds the buckle is the chape. I know of no company (that does not mean there isn't) that sells those ready made parts for collars. Any experienced leather craftsman should be able to make them for you. I could make what ever you wanted however not sure what shipping would be. Or are you trying to attach leather ends to something like nylon or codura ?
-
The pattern says to punch a 1/4" hole for the button stud. 1/4" is close to 6mm If you look at tandy's button stud punches you use a 6mm punch for a 10mm button stud. 10mm is about 3/8". The 10mm is what I use on most of my belts holsters etc. that use button studs.
-
It is dificult to tool when the leather has been molded. Leahter is best tooled when properly cased and laid flat on a firm work surface. If you are planning on molding tooled leather be aware that yoou wil loose a lot of defenition in the tooled areas that get molded. a knife sheath or cell phone case can be tooled on the flat face of the case. If you are going to tool a holster that will be detail molded you will destroy the tooling any place you rub with a boning tool. Cruse the slings holsters sheaths forum and you will see examples of tooled items and see where they did their tooling or to what extent the moldded the tooled item.
-
Spray Setup
camano ridge replied to Red Cent's topic in Dyes, Antiques, Stains, Glues, Waxes, Finishes and Conditioners.
If you do a search on these forums for spray finish or spray dying you will find several threads that discuss just what you are asking. Harbor freight has a compressor a lone for spraying currently on sale for 64.99. They have a complete setup with compressor, hose regulator and spray gun for around $89.00. Several people on here use this set up myself included. It works well for what I do, which is mainly holsters and belts. There are some other brands listed in the threads that are supposed to be better but of course cost more. Here is one thread, there are some good links demonstrating and discussing the Harbor Freight and badger sprayers. There is also a you tube in the thread that shows spraying techniques. http://leatherworker.net/forum/index.php?showtopic=29323&hl=airbrush&st=0 -
Need A Pic Of A Tippmann Boss Bottom Stitch
camano ridge replied to LeatherHead99's topic in Leather Sewing Machines
Thanks Aaron, no matter what I did in the first post it would not let me paste (the paste option was gray). When I created the second post there was no problem pasting. -
Need A Pic Of A Tippmann Boss Bottom Stitch
camano ridge replied to LeatherHead99's topic in Leather Sewing Machines
Here is the link, this should help you. http://leatherworker.net/forum/index.php?showtopic=22058&st=30&hl=+top%20+and%20+bottom%20+stitch%20+tippman%20+boss#entry197431 -
Need A Pic Of A Tippmann Boss Bottom Stitch
camano ridge replied to LeatherHead99's topic in Leather Sewing Machines
For some reason it would not let me copy and paste the url for a thread on these forums. So if you search the forums for top and bottom stitch of tippman boss a thread started by particle will come up. On page 2 there are pictures of the backside stitch. There is also a 4 page discussion on adjusting the Boss to get a proper stitch. -
In regard to your last post I glue flesh side to flesh side so you have the hair side or smooth side on the outside and inside facing the muzzle. I use the same glue i use on the main seam and let it dry before I stitch.
-
Stohlmans book gives good insight, however practice is the only way you will get it right. I do quite a few with toe plugs. There are varied opinions on how to dit. I glue and stitch my main seam first then glue in the toe plug. When you first lay out the stitch line on the holster lay out the holes on the bottom of the holster as well. After your toe plug is glued in. Gouge a stitch line then insert your awl into the first stitch mark on the bottom edge of your holster, I usually use my awl to poke each hole as I stitch. When you push the awl into the stitch mark aim it up toward the stitch line you made in the toe if you watch carefully you can line the tip of you awl so it comes out in your stitch line on the toe. As to marking out your toe plug the way i do it is once I have sewn the main seam and shaped my holster and left it dry to it's final shape I use a black or brown marker (sharpy) and color the bttom edge of the stitched holster then quickly press against my piece of leather, this will mark the outline of the toe. Cut on the inside of the out line and you should have a plug that fits. Some people like to champher the inside edge of the holster to 45 deg then cut the edge of the plug to 45 deg. I have not done mine this way and they seem to work out ok for me. I usually use two pieces of 8 - 10 oz leather laminated together to give a nice thick toe. In laying out your pattern and constructing the holster make sure you are making the holster long enough to allow for room between the muzzle and the toe. You don't want the gun sitt to high in the holster because it is resting ton the toe plug.
-
If you want a slight flex but not paper floppiness. Use 9 - 10 oz leather. If your paper is 8 1/2 x 11 find the size of the holders you would be using and figure your leather to be a 1/4" inch or so larger ( I would do it 1/4" larger both to and bottom. Figure the width of your bindeer metal. So essentially let say the leather would be 9" 1/2" high to accomodate the height of the sheet holders then 12" for both fron and back figure 2 - 2 1/" binder backing so lets say the leather woould be 26 1/2" long and 9 1/2" to 10" high. lay the leather out measure 12 " from each side edge and gouge a creas this will give you your 2 1/2" binder space. Center binder metal and rivet the binder metal in place. If you are going to tool a design, do it before placing the binder metal. For a more rustic look flip the leather so the rough out side is the face of the binder and gouge the smooth side. Then burn or brand any design into the rough out. Either way once you have the binder metal in place wet the gouged creases and fold the sides to form you binder. THis is a very simplistic method. You can get as fancy as you want, you can use double thicknes of leather ( your choice of thickness) glued together and stitched or you canb lace or braid the edges etc. There are refinments that can be made such as burnishing the edges, dying etc. SPringfield leather has the three ring binder metal 8 1/2" long for $3.49 http://springfieldleather.com/19537/Binder%2CMetal%2C3-Ring-8-1-2%22/ Hope this gets your creative juices flowing in the right direction. I am sure others will have some sugestions and different ways of doing it.
-
A Skinny Kid, For A Change.
camano ridge replied to Eaglestroker's topic in Gun Holsters, Rifle Slings and Knife Sheathes
That looks great. What dye did you use? -
Don't show those to Bruce Johnson he will be putting them up for sale.
-
Urban Cowboy Rig
camano ridge replied to Eaglestroker's topic in Gun Holsters, Rifle Slings and Knife Sheathes
Great looking out fit, I like both rigs. The color combo really makes them stand out. -
Level 2 Retention Question
camano ridge replied to JJLeatherworks's topic in Gun Holsters, Rifle Slings and Knife Sheathes
wolfe, it is more or less what y0ou said. I was working on it and had to leave the computer when I came back you had already posted, after all that typing I decided I was going to post anyway. It is in support of wha tyou said I just used more words to say it. -
Level 2 Retention Question
camano ridge replied to JJLeatherworks's topic in Gun Holsters, Rifle Slings and Knife Sheathes
Retention levels are a hard thing to understand because there is no governing body setting standards and even testing for level of retention among makers is not standardized. Basically my interpretation ( and others will have their own) is level I retention is just a holster if some one attempts to withdraw your fire arm by exerting force in any direction but after 5 seconds the gun is still in the holster and the holster is still attached to the user then the holster meets level I. If there is a means of retention added such as a thumb break that creates an additional obstacle to overcome then it is considered level II. If you have a holster that by itself is a level one then a thumb break or other obstacle has brought it up to a level two retention then adding a locking mechanism such as a trigger guard lock requiring a lever or detent release, depress release system such as on Safari Land holsters etc, then it is considered level III . Many agencies have come up with their own requirements, some agency require a thumb break as a level one retention device, some say a tension adjusting screw is a retention device. I don't think there is a clearer then MUD interpretation. I have the person I am building the holster for get the requirements for the agency they are affiliated with then build the holster accordingly. As to where to get a trigger guard clamp, as one of the other posters said and it has been my experience that there is no one mass producing locking retention devices for general sale. Most of the major holster manufactures that build retention system holsters design the holster then have what they need manufactures accordingly and you can bet each manufactures devices have patents. Safari Land did not invent retention levels but they were the first ones to publish their test standards and to compare levels. You can go to their site and find their test standards for retention level. -
If you are refering to one like pictured below (done by one of the members here and found under show off) there is a pattern for that type in Tandys Holster and Gun belt Pattern Pack., The Tandy I go to has it so you might be able to get it at your local Tandy if not it is down loadable from the Tandy Leathercraft library. The Holster and Gun Belt Pattern Pack is DOwnloadable for $3.99 and canains the pattern. They call it a Gun Caddy. I have the pattern pack and it is pretty much like the picture. If you want a hard sided case like a brief case there is a pattern for that in Tandy's Leather cases volume Three. Hope this helps.
-
Horizontal Carry Sheath
camano ridge replied to camano ridge's topic in Gun Holsters, Rifle Slings and Knife Sheathes
Thank you all, appriciate the kind words. -
Looking For A Hard Find?
camano ridge replied to CeilingUnlimited's topic in Hardware and Accessories
Not sure what you mean by stud, if you mean button stud have not seen any with horseshoe, if you mean spots I have not seen those either. If you mean horseshoe conchos smaller then 1" or smaller these might help http://www.tackwhole...o&search=Search http://www.amazon.co...pd_sim_sbs_ac_1 http://www.tandyleatherfactory.com/en-usd/search/searchresults/7401-05.aspx


