-
Posts
1,183 -
Joined
-
Last visited
Content Type
Profiles
Forums
Events
Blogs
Gallery
Store
Everything posted by Josh Ashman
-
Hello Geary, I've replaced worn rigging on a few saddles over the years and it's a job but doable. A lot of how difficult it will be depends on how the rigging is currently installed vs. how you want to install the new. From your post it's located at 5/8 I'm guessing it's a large ring with attachments going both forward toward the forks and back toward the cantle. Say you want to change it to 7/8, keep the large rings and add a back ring or D. you'll need to make the various leather pieces and skive them to a feather on the edges, take the back jockies off and get the seat leather up and out of your way then remove the old and install the new. The hardest part will be to get the installed square and balanced. anyway, if you wanted to install flat plate rigging it gets more complicated, but still probably doable. If it were me and I wanted to do the job and wasn't sure about how to go about it I'd get the Stohlman saddle making books, at least the first one. the 2nd would be helpful but probably not needed. It would give you a lot of good info to get going. Fair warning, a lot of the info is dated and I don't think anyone would accuse his methods as being done the "easy way", but it is thorough and will give you a starting place. Anyway, good luck with your project! Josh
-

Lil guy with a flower
Josh Ashman replied to Josh Ashman's topic in Gun Holsters, Rifle Slings and Knife Sheathes
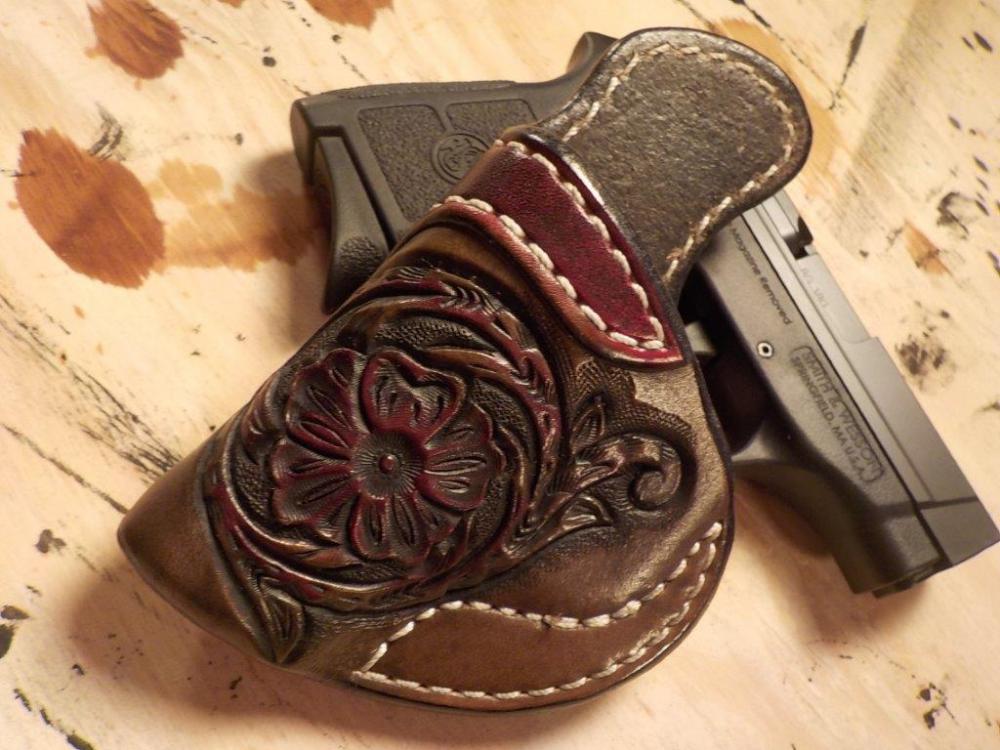
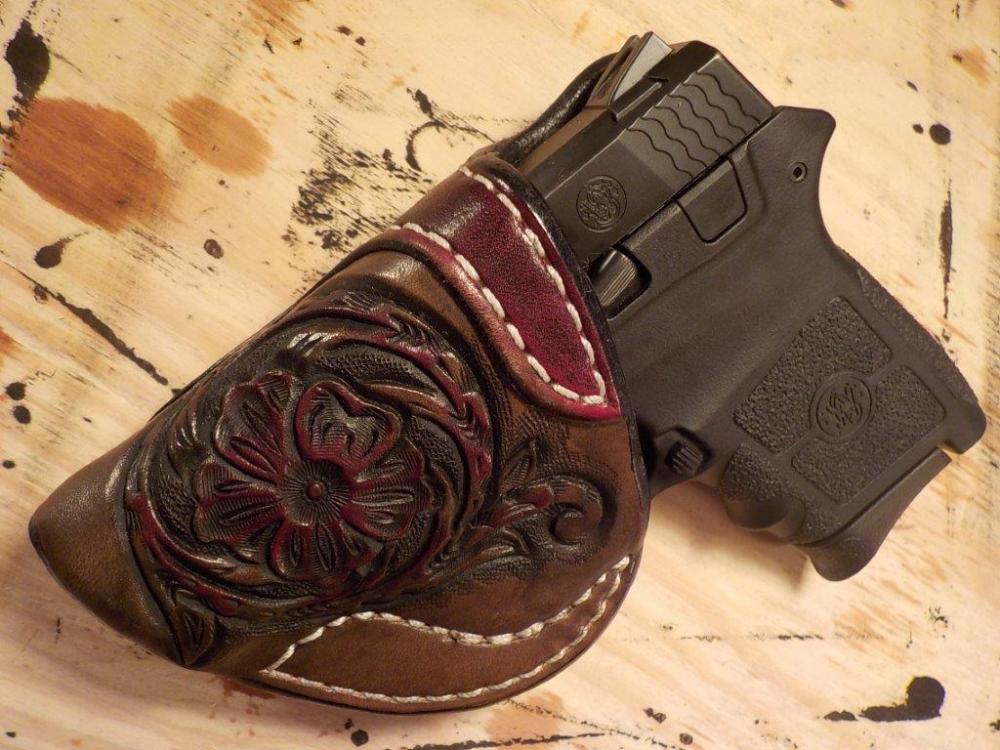
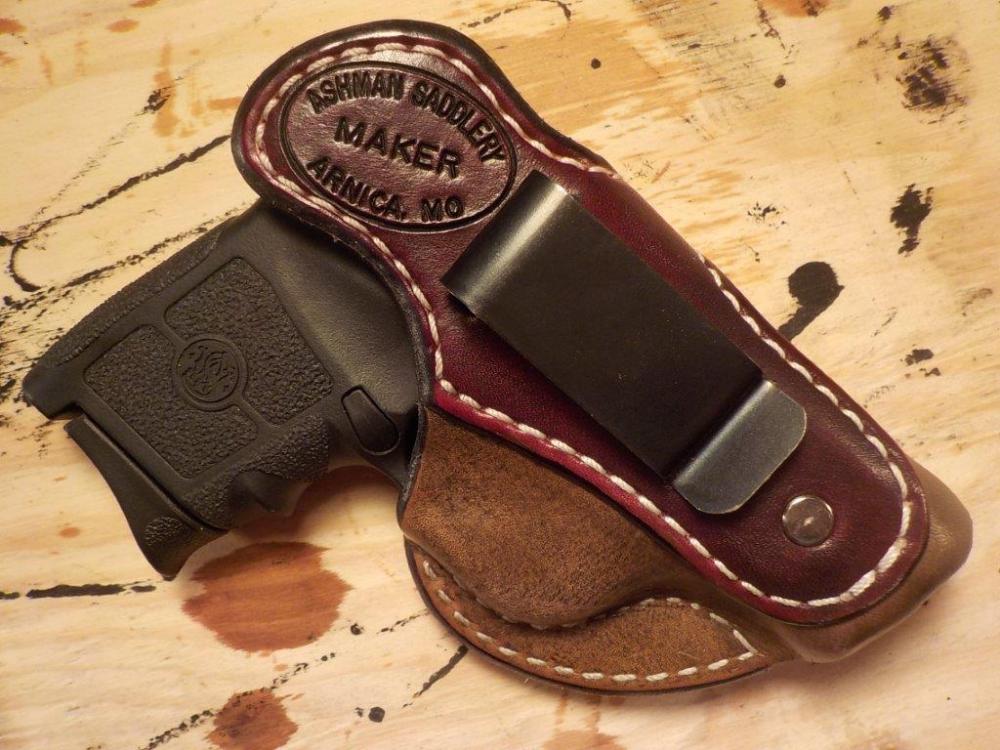
Thanks Jeff! Yes sir, M&P380 or BG380 and I'm not surprised to hear it's about interchangeable with an LCP holster. Jeff, yup, just the one little flower, nothing else would fit! Thanks you! and it's an outy for a lefty. Thanks Bobby! Nice of you to say! Semper Fi! Have a great day folks! -
Been a little quite so I figured I'd share this little guy I recently finished up. I don't knwo qabout anyone else but holsters for tiny pistols are more difficult to get right for me. This one turned out quite nice IMHO. 7/8 oz HO for the main body. 5/6 for the overlay/clip cover. Fiebings liquid black antique over Fiebings oxblood dye highlights, some NF oil and topped with M&G and a little neutral Kiwi. All the best, Josh
-

colt officer dummies
Josh Ashman replied to JLSleather's topic in Gun Holsters, Rifle Slings and Knife Sheathes
You could use your Colt Commander sticking out the bottom of the holster and get everything molded but the end of the barrel then pull it up 3/4" and finish it out. It's not ideal but I've done it with my 4" GP-100 to make holsters for 3" GP-100's. However you tackle it, good luck! -

colt officer dummies
Josh Ashman replied to JLSleather's topic in Gun Holsters, Rifle Slings and Knife Sheathes
No idea on the mold Jeff, but I have an RIA Officer's size pistol and have used it to make holsters for both 3-1/2" Colts and 3" Kimbers without any issues. Maybe the mold runs wide? I'd expect it to be bigger than the EMP since it's a scaled down 1911, not just a shortened one but it should match up to the full size and commander, aside from being shorter. I've also used a 5" RIA pistol as a mold for Kimber, Colt and Springfield full size pistols and never had any fit issues. I don't think the actual RIA pistols are noticeably different than any other "typical" 1911, just my $0.02. Good luck getting an Officers size mold that'll work for you. Maybe it's a reason to treat yourself and add a pistol to your stockpile for Christmas -

Anaconda Holster
Josh Ashman replied to Samalan's topic in Gun Holsters, Rifle Slings and Knife Sheathes
Nice work! -
Good morning SouthernCross, I like to oil the belts I make, usually a coat or two. If I antique them then I oil them first. I use the liquid antique from Fiebings and it doesn't allow the oil to work in very well if I try to oil after. It's been long enough since I've used the paste antique that I don't know if it does the same thing. If I'm dying the leather then I'll oil after the dye has dried. I finish coat with Mop & Glo instead of Tan-Kote, but either one would be applied after the oil has had a chance to work in. Just my $0.02, I'm sure others do it differently but this has worked out well for me. Good luck on your belts! Josh
-

Mexican Loop Holster
Josh Ashman replied to Forester's topic in Gun Holsters, Rifle Slings and Knife Sheathes
Looks great, nice job all around! -
Nice job!!
- 2 replies
-
- customheadstall
- headstall
-
(and 1 more)
Tagged with:
-

Dressing up the ugly duckling
Josh Ashman replied to Treed's topic in Gun Holsters, Rifle Slings and Knife Sheathes
I wish my stuff looked as good as your "mistakes" Bobby! Good stuff as always and nice job at dressing up a Glock! All the best & Semper Fi! Josh -

Veg Tanned Leather Holster questions
Josh Ashman replied to ABB's topic in Gun Holsters, Rifle Slings and Knife Sheathes
He is that guy !!! I don't always laugh at Jeff's comments but I dang sure did on this one! Happy Thanksgiving folks! -

a new buscadero
Josh Ashman replied to MattW's topic in Gun Holsters, Rifle Slings and Knife Sheathes
Very nice! -
"Mr. Ashman" would be my dad, I'm just Josh I'm glad you've got a little inspiration from looking at any of my work, I'm sure there's someone out there doing the same looking at this work of yours! Again, nice job! I applaud you for working out your own pattern and making it all work. All the best, Josh
-

Western Holsters
Josh Ashman replied to chrisash's topic in Gun Holsters, Rifle Slings and Knife Sheathes
Hello Chrisash, There are many different styles of holsters and cartridge belts and a lot of what is shown on TV and in movies is inaccurate. That said, I am not aware of any true 1 piece holster/belt combinations. The "buscadero" and other similar styles feature a drop in the belt with a slot that the holster attaches through. This "fixes" the location of the holster on the belt and is likely what you are seeing. This is also generally thought to be more of a Hollywood design than a using design. A low slung gun belt with a leg tie down may look cool and seem like a fine idea when you're walking down main street but it's really not at all comfortable on a horse or for doing much of anything at all. Carbine or rifle in a saddle scabbard and pistol in saddle bags or pommel bags is how I go armed when on horseback 90% of the time. If I have a pistol on a belt it's strapped high and tight to my side and only when I'm on something I trust not to blow up. The reasons that make this true for me today would have been the same to someone 100 years ago. That's my $0.02 anyway. All the best, Josh -

Western Gun Belt
Josh Ashman replied to GuyNC5's topic in Gun Holsters, Rifle Slings and Knife Sheathes
Hello GuyNC5, I'd suggest you aim for a total thickness of between 10 and 12 oz. including the liner. Depending on what leather you have on hand or what you want to stock up on will likely determine the best way for you to get to that. I like to keep a supply of 8 oz for carry gear and to use for double layer belts, 4 oz. for bullet loops and liners and 10/11 for single layer belts and western rigs. So, if it were me I'd use 8 oz. with a 4 oz. liner. If you don't have any leather on hand you might want to get a 6 oz double shoulder or back and double it up. Good luck with your project! Josh -

Repairs to an old ranch saddle
Josh Ashman replied to thenrie's topic in Saddle Identification, Restoration & Repair
Murphy's is good stuff . Here is a link to an old thread where you can see the before and after pics of an old Hamley I cleaned up with a process as described above. All the best! Josh -

holster Two new holsters that I made.
Josh Ashman replied to 3248tm's topic in Gun Holsters, Rifle Slings and Knife Sheathes
Good job! -

Repairs to an old ranch saddle
Josh Ashman replied to thenrie's topic in Saddle Identification, Restoration & Repair
Hey Dwight, I've cleaned up a bunch of old saddles and I have a system that works pretty well. It may shock some of the "light coat of conditioner over the course of several months" types, but it has worked very well for me on saddles that were over 80 years old as well as newer ones that were neglected. Here's what I do; 1) Remove the fenders and stirrup leathers. Also the cinches, latigos , breast collars, etc. 2) Remove the back jockeys and the skirts. I just cut the old strings as they'll be replaced anyway. I also toss any old nails/screws as they will also be replaced. I'll also separate the skirts if they are laced. 3) Fill a large bucket with water. I use empty sweet lick tubs, anything around 2' in diameter or bigger would be good. 4) Dump half a bottle of Murphy's Oil Soap in the bucket. You can get it in the laundry isle at most any store. 5) Dunk the jockeys, fenders, back cinch, basically everything except the seat/tree and the skirts. If you have to replace the sheepskin remove it from the skirts and dunk them too. Let the pieces get good and wet and start washing them. You can use a rag or on roughout you can use a bristle brush. 6) Once a piece is clean give it a thorough rub down with straight Murphy's soap. I pour it into my hand and just rub it in, front and back and put on heavy then hang the piece to dry in the shape it should roughly be in when it goes back together. I usually hang stirrup leather/fenders over a fence panel and lay out the skirts on a table. 7) I don't dunk the tree but I do sit by the bucket and thoroughly wet the seat leather where you can to it (front jockey area, etc). Once clean lather on the Murphy's. Then put it aside to dry out. 8) Once it's getting towards dry but not all the way dry I'll hit it pretty heavily with NF oil. 9) Let it sit 24 hours and you can begin to repair what you have seen that needs done. 10) Before it goes back together I'll rub everything down very well with Aussie Wax then sit it in the sun to let the Aussie wax work into the leather. Then I'll give it a good rub down with liquid glycerin saddle soap. 11) From there it's just a matter of putting it all back together. Good luck however you decide to proceed! Josh -
Good suggestions above, but if you already have the M&P it's as easy as gluing the pieces together, forming it, letting it dry and then stitching it. Easier to do if you're hand stitching as you won't have the foot of your sewing machine walking around the molded portion of your holster. You'll want to edge the top and bottom where you can't get to them after assembly and do any tooling, dyeing, etc first. If a close stitch line is your top priority, you can't beat forming it first and putting the stitch line exactly where it needs to be. Good luck, Josh
-

Couple Old School
Josh Ashman replied to Treed's topic in Gun Holsters, Rifle Slings and Knife Sheathes
Nice work, as always Bobby! Thanks for sharing!! -

A few knives sheaths
Josh Ashman replied to Eddie Q's topic in Gun Holsters, Rifle Slings and Knife Sheathes
Very nice Eddie! Good job on the sheaths and on the knife. All the best, Josh -

Most likelly my last one
Josh Ashman replied to katsass's topic in Gun Holsters, Rifle Slings and Knife Sheathes
Hey Mike, great looking work! Thanks for sharing it! All the best! Josh -
Thanks Ray & Battlemunkey! Pretty interesting Dikman! I bought a pair of elk stag grips for a 1911 from Ray a few years ago and used wood stain to darken them up. My process was just as you noted above. If I had another pair of light colored stag grips and wanted them to be darker I wouldn't hesitate to do it again. Bullmoose, I should have had a comma in there. Fiebings antique black (comma) top coat of M&G cut 50%. Meaning, I dyed it with Fiebings antique black (I use the liquid acrylic type that comes in a bottle, not the paste that comes in a jar. Although I have used both over the years, I just like the liquid type better) then I top coated it with Mop and Glo cut 50/50 with water. This is something I picked up from a member named Katsass and I have been happy with the results. I do give it a final wipe down with liquid glycerin saddle soap so it smells like a leather product not a kitchen floor. Have a great day folks!


