-
Posts
181 -
Joined
-
Last visited
Content Type
Profiles
Forums
Events
Blogs
Gallery
Store
Everything posted by artycpt
-
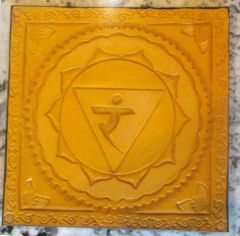
Thanks Shaun, and I agree with you. The pictures don't show it very well but I did antique the orange and red ones. The yellow was harder as I wanted to keep the overall yellow and not change it with too much of a brown antiqued tone. I am going to try a light wash over it to see if that will help. There are some variances in the yellow as I did a base dye then resisted some areas then another dye but the pictures don't show it.
-
If it is what I am thinking it is; a round elastic cord, then you can get it at sewing supply stores or fabric stores. Some hobby stores may have it also in their sewing section.
-
From the album: from the workbench
The Solar Plexus Chakra represented in hand tooled leather, measuring 6"x6" -
From the album: from the workbench
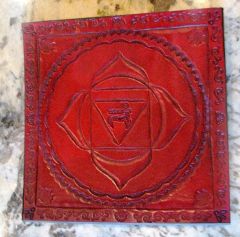
The Root Chakra represented in hand tooled leather, measuring 6"x6" -
From the album: from the workbench
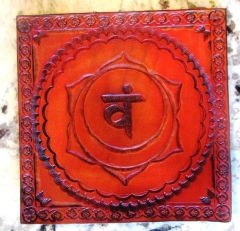
The Sacral Chakra represented in hand tooled leather, measuring 6"x6" -
Anybody have a good source for oblong or oval grommets? I am looking for something with about a 1/4" opening for feeding lace through flat.
-
Something Different
artycpt replied to Red Cent's topic in Gun Holsters, Rifle Slings and Knife Sheathes
Very cool! As another SASS shooter (although I have taken a break from it this year) I totally understand the gamer rig. That one looks really slick! Never got to gamer status myself.....hard to do when your shooting cap and ball and I love the smoke and noise too much. -
Check this site out: http://www.peggysuealso.com/servlet/StoreFront If I need something specific I go to them. They are local to me so it is nice to be able to go in and look for exactly what I want but they are really good to work with even by mail.
-

What Material To Use For Patterns/templates?
artycpt replied to SouthernCross's topic in Patterns and Templates
I use quilting pattern plastic. Very much like the plastic cutting boards but come in a variety of thicknesses. -

2 New Hand Bags
artycpt replied to dentat2's topic in Purses, Wallets, Belts and Miscellaneous Pocket Items
very cool! great work on the coloring of the flames. -

What Color Is This?
artycpt replied to vaalpens's topic in Dyes, Antiques, Stains, Glues, Waxes, Finishes and Conditioners.
Depending on how old the holster is there were various methods of creating dyes to dip them in for overall dying. Vinegeroon for black and for brown I think they used some type of walnut husk solution. Maybe somebody with more knowledge about the old dying methods will help me out.... -
That is cool. What did you use to form the skull? And how does the bag open and close? Is the skull solid all the way around?
-
Hey Branden, Welcome from another northwesterner. Where are you located?
-
Only once have i padded a shoulder strap and I used a small thin piece of closed cel foam I had laying around. I covered it with sueded pigskin and sewed it onto the strap. Seemed to work well.
-

How Does Lining Work With Slicked Edges?
artycpt replied to tboyce's topic in Leatherwork Conversation
when I line any binders or portfolios with pigskin I will do my edging on the outer leather before sewing in the lining. Than I roll the edges of the lining prior to gluing and sewing. If any stiffener is going to be used I wrap the lining around whatever material I am using for the cover stiffener and sew it in. It does create the appearance of two peices sew together and not one solid edge of lining and outer cover but I have found this works best. If I don't want the outside edge to look like the inner lining is a seperate piece I will do an overall rolled edge (called a french edge or something maybe....) or will lace the edge. The only time I have lined a holster it has been with another thin layer of veg tanned leather and I edged as normal. -

Newest Binder Style Photo Album, Artist's Portfolio
artycpt replied to artycpt's topic in Books, Journals and Photo Albums
Rich, I do just that quite a bit. I have ended up with a few custom orders out of this so it is working out pretty good. I find a lot of artists who want to trade tattoo work for leather work. I am starting to do a lot of marketing towards the tattoo artist group. Being in the market for a new tattoo always helps with a lead in as well. The only problem is I may run out of space to get new tattoos...- 3 replies
-
- photo ablum
- tattoo portfolio
- (and 7 more)
-
I have yet to go to a craft fair to sell things. I am seriously considering it but haven't really built up an inventory. I am curious to know how much of an inventory you are going to create for a fair and what other needs are a must have (tables, chairs...)
-

How To Create A Wallet Template For Consistent Pieces
artycpt replied to leatherorpleather's topic in How Do I Do That?
For a reusable template I draw out the shape on a piece of clear plastic that is designed for quilting. It comes in various thicknesses and is found at most sewing stores. Then I do what was mentioned above and trace it out and cut it. I will lay my pieces on top of each other to make sure they are the same size and shape and I didn't slip a little somewhere. -

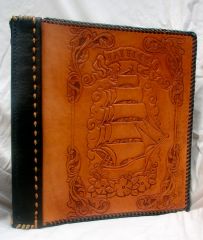
hand tooled, 3 ring binder style artist's portfolio or photo album
artycpt commented on artycpt's gallery image in Gallery- Our Leatherwork
- 3 comments
-
- tattoo album
- photo album
- (and 4 more)
-

Shoulder Holster
artycpt replied to artycpt's topic in Gun Holsters, Rifle Slings and Knife Sheathes
I kind of modeled the harness off of some old army gear I had. I didn't like the way the usual shoulder holsters just had the straps that crisscross in the back and remembered the old harnesses I had to hold my field gear (before they made everything fit on a vest). Basically it is like a wide "H" that goes over both shoulders and fits across the back. The harness fits over the back and shoulders and creates a comfortable piece that doesn't pull like criss crossed straps tend to do. I think it distributes the weight more evenly and holds the holster even. It allows for adjustment of any one strap to make sure you get the exact fit you want on the holster or accessories without having to adjust the entire rig. Simply adjust the strap that you want adjusted. Plus it makes the whole rig kind of modular in that you can replace any strap with one of any other size and can change out the holster or mag pouch configuaration. This was my first time making a shoulder holster but I have used this again and people seem to like the way it fits. I have found that it sits totally flat on your back with no buckles or straps that protrude which to me makes it more comfortable when sitting or leaning against something. -

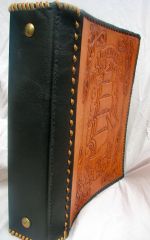
hand tooled, 3 ring binder style artist's portfolio or photo album (binder view)
artycpt posted a gallery image in Gallery- Our Leatherwork
From the album: from the workbench
-

hand tooled, 3 ring binder style artist's portfolio or photo album
artycpt posted a gallery image in Gallery- Our Leatherwork
From the album: from the workbench
- 3 comments
-
- tattoo album
- photo album
- (and 4 more)
-
Here is the lastest creation. Initially started out wanting to make this a post bound portfolio then changed my mind half way through and ended up with a three ring binder style. This was one of those projects I just kept adding more too every time I picked it up.
- 3 replies
-
- photo ablum
- tattoo portfolio
- (and 7 more)
-
Those will definitely work. But as stated, light tap! it is really easy to get too much oomph and have the letter with a nice imprinted circle around it. I use letters like those for small projects where my makers stamp would be too big. You can see in the attached picture where I stamped out "snakebite leather" below the ID window on the inside of this wallet.


