


Billsotx
-
Posts
533 -
Joined
-
Last visited
Content Type
Profiles
Forums
Events
Blogs
Gallery
Store
Everything posted by Billsotx
-
My experience is limited and I'm not a very big guy, 5'10", 170#, on a good day I can pull a four inch strap through my splitter. If you're going to split wide stuff I think you may want to consider something motorized, with gears or maybe get you a mule and a couple of monkeys to help you out. For whatever the reason, I find horsehide easier to split than cow. Hope this helps.
-
Good to hear you're ok. I agree, we need Rundi to share her creativity. Maybe she'll just meander by here. Later gang.......
-
Some, actually most, dish soaps have a water softener in them and that helps penetration. I've messed with a lot of ways to case, sometimes I use a spray bottle, sometimes a sponge, sometimes I'll dunk until it stop bubbling, I've left it for hours. My next step is it goes in a zip lock for 4 hours minimum. I've left it for 4 or 5 days, this evens out the moisture. When I get ready to tool, carve, mold whatever, I lay it out on the bench away from light, dirt, nosey passers-by and watch for the surface to just start to return to the original color, which is the key to when it right to carve, tool, shape, mold, etc. If I can't finish it, I spray it lightly, spray the inside of my bag a little bit and reseal it. Next session goes the same, if it's too wet looking I wait until it starts to return to the natural color and start working it at that point. Follow-up sessions usually return to natural color quicker that the first since it isn't resoaked. While I working it I rewet it with a sponge if I feel it getting dry. If you're paying attention and keeping your blade stropped you can feel it grab if it's getting to dry. If I'm working with dyed leather I depend on feel more that visual effect. Especially when molding; if you're pushing water out of it, it's too wet and it'll wrinkle and pickup all kinds of marks. The quality of leather makes a difference. I've got a side that I was sold as good carving leather and you can't even stamp it. A hour or so after basketweaving it the impressions were faint. They next day there was hardly any impressions left. So yeah it makes a difference in quality. There's a lot of ways to do this stuff and someone always forgets to mention something they do, some subtle thing. Repetition and careful attention to what does and doesn't work for you is key. Most folks complain that their leather will mold if they leave it in a bag overnight. I don't have that problem. I can leave it in a bag under the workbench for 4 or 5 days, I've even left it a week. I think it's the water that causes the mold, but I have no way to prove that. I can tell you this. If you get mold on a piece that you've bagged, don't use that bag anymore. No matter how well you clean it, it'll spore mold from then on. You can't seem to clean it. I use all sizes of zip locks and I've had good luck with those and I've never worried about the plastic touching the leather. I was told that it should be wrapped in a brown paper before putting it in the bag because the plastic would cause mold. In my experience the brown bag caused the mold. I don't do that anymore.
-
We knew you had a guilty conscience ... lol
-
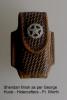
The concho needed a new case as the first one, pictured above, wore out. It was 6/7 oz. veg-tan. The new one is 8/9 oz. I also finished it a little different as per a handout from Hidecrafters, Ft. Worth, TX. - once tooled, sewn and wet molded one coat of neats-foot was applied with shearling and allowed to dry overnight. Resolene was applied as a resist, two coats drying several hours after each coat and concentrating only on the highspots of the tooling and the untooled leather. Medium brown antique paste was gobbed on with shearling and left for ten minutes, then wiped off of the untooled leather and high spots of the tooling with a paper towel, then left to set overnight, and then it was wiped down thoroughly with a damp paper towel and thoroughly buffed with a bristel shoe brush and then left to set another 24 hours. Two thin coats of Tan Kote were applied with 4 hours dry time in between those coats and buffed after each coat with the shoe brush. I mark my shoe brushes as per the color they are used for so that I don't smear a dark color like black, on a Brit tan project or one I'm leaving natural or sun tanning. I'm hard on leather gear but I doubt that original light-weight case would have lasted anyone much longer than it did me - about 11 months is all. I applied two welts before stitching to compensate for the thickness of the heavier leather and it block the belt loop when I wet molded and burnished the inside of the case and it was a perfect fit. I like the top flap because one day in a heavy rain shower I was the only one on the range with a phone that wasn't drowned out; but now I keep a couple of baggies and a piece of plastic wrap in my gear bags just in case - improvised willy-peter bags for all you jarheads and ol' crotchers out there The pix came out a lot darker that it really is. I'm taxed when it comes to photo editing so it'll have to ride as is . . . .
-
my first knife case
Billsotx replied to alvin's topic in Gun Holsters, Rifle Slings and Knife Sheathes
You might try laying out your stitch line with a stitch layout wheel or even an overstitch wheel. I press in a groove inside of gouging out to lower the stitches below the surface and reduce wear. Also you can true up your edges by sanding with sandpaper. I start with medium grit and work to fine using just a few drops of water. You can get a burnish is you go to fine enough sandpaper, 1000 or 2000 grit and you can ditch the rub rag and beeswax. Finish the edges like you did with dye or stain or edge coat, your choice. Right, wrong, whatever, it works for me. I like the design on your case, closing in the belt clip, and your molding looks good too; you've got the casing about right from what I can see. Should be done just as the surface appears to dry. Good luck on your next one. -
If you're making a military sling that'll be used for position shooting you might find out the distance between his sling swivels. Hardware for same is available thru Brownells. I wouldn't use those funky brass frogs you find at these leather craft places. If you're making a carry strap, what most people refer to as a sling it's pretty open as to the hardware you can use. I've seen some that are just tied. Chicago screws seem to be the most common way to attach them and I always recommend thread locker be applied after the swivels are threaded. On my personal rifles I anchor the front of the strap to the swivel with two Chicago screws and blue lock-tite the threads and then use a Conway buckle on the butt end. With QD swivels that allows me to loop up if I want and I can remove the sling quickly if need be. I don't care for those Cobra shaped slings, but I have one and if I use it I put that wide flared part, that most folks think of as the top or front, at the butt. I almost always carry my rifles muzzle down as that's compatible with wearing a handgun on the strong side hip which I've done for more that 40 years now. What you have to remember when you sling up muzzle down, if you bend over, lift the muzzle and maintain control of it so that you don't muzzle the rest of the planet. About the only time I sling muzzle up is a scramble carry when I'm climbing or descending with both hands or carrying something or someone in both hands, but it's a good idea to have that position marked on your sling so you can adjust to that length without trial and error. Those situations don't generally lend themselves to piddling around. Whatever you do use good hardware. I wish I had a dollar for every rifle and shotgun I saw hit the deck because the student brought a cheesy sling to class and didn't listen when it was suggested that they beef it up with some hundred-mile-an-hour tape. The air force does use millions of miles of that stuff for naught. Looks like heck but it can get you thru a tight spot. Sorry to ramble but you got my perspective for what it's worth - that an a buck twenty-five'll get you a cup of joe ... lol! Let us know how it goes or better yet post us a photo of what you do. Buenas suerte amigo!
-
What's the grip made of? Is there a belt loop on the sheath? Pretty interesting piece of work.
-
... thought the hogs eit u ... lol! Welcome back!
-
How can I temporarily mark leather?
Billsotx replied to Kevin King's topic in Patterns and Templates
Hey Dave, Nice stuff! I like your photobucket. What weight leather is best for seats? What do you cement your leather to (hard surface?) before tooling it? Do you rubber cement it after you case it? Do you apply the cement to the leather or the hard surface or both? How do you case it, dip it, spray it, sponge it? Wish I still had my ol' 55 BSA Catalina, it'd probably be about ripe for a new seat by now ... lol! Going back to look thru you bucket ... very inspiring work! 'til later, ~Bill -
Set it by a window with full light or even put it out in the sun for several hours and watch it get better. That'll happen anyway once it's used. Speedup that process. If you lay it outside protect it - birds fly by, trees drip sap, dogs get nosey, sticky little kid fingers leave prints ... don't ask how I know these things ... lol
-
Thanks Monkey!
-
How do you take a screen shot? Once the screen shot is saved or made, can it be put into a jpeg format or will that be an option when the shot is made? I'm hoping I can get it into a photo editor and apply some labels for illustration and then use it as an attachment. I thought we discussed this here before but I didn't find it with search. I appreciate y'all's help.
-
distressed belt buckles
Billsotx replied to Micah's topic in Purses, Wallets, Belts and Miscellaneous Pocket Items
What I've done is create what looks like wear with a wire wheel. You've gone a little further and it sounds cool. You still might want to smooth it up a little if your scraping and gouging left any burrs or sharp places that might catch on clothing, billet, etc. As far as getting that dark patina, I have used 44/40 cold gun blue and aluminum black by Birchwood Casey. There's other brands of blue available. I've seen it a Wal-mart but I don't recall the brand and you should find it at a gun shop or sporting goods store. This stuff last forever if you keep the cap on it and store in a cool, darken place. Don't store it around anything metal that you cherish, just if case .... I have not paid attention to whether aluminum black is still around. In the '70s we used it to keep our aluminum sights and sight ribs nice and black; they were aluminum obviously, and we learned about the stuff from the guy that built and sold the ribs. It was practical and functional for a revolver that got a lot of trigger time and in-and-out of the holster work. Handy stuff, as two decades later I wanted to distress a couple of belt buckles for CAS. Both the blue and black are caustic so after you get the patina you're after, coat the buckle lightly with oil or dip it in water or both. Clean it good with solvent to remove the oil if you do that. It may take repeated applications to get what you want. Use a soft cloth to apply it. I usually apply it with a .30 cal. cleaning patch; you'll probably go through a couplt. Wear protect gloves too. I never did but we're a little smarter now ... lol! Daub and dab and rub the stuff here and there and goop a little more on here and there, until you get the discoloration that you want. If you go too far and get it too dark remove, i.e. polish every so slightly, with steel wool or a wire wheel. Careful if you use the wheel, it goes fast. Steel wool is probably best as you won't go to far to soon. -
gum tragacanth
Billsotx replied to Micah's topic in Dyes, Antiques, Stains, Glues, Waxes, Finishes and Conditioners.
Micah, You might contact Wicket Craig and/or Herman Oak and ask for a swatch (sample) of gummed back (sometimes called pasted back; HO calls it Moss back) strap or bridle leather. You can stamp bridle but may not carve well. This tannery finished back will save you a lot of elbow grease on future projects. The stuff penetrates deeply. Even if you split it down, you'll find it runs pretty deep and cleans up quick (as follows and is aforesaid). There's more than one way to skin this critter. As far as what you're doing now a light touch with sandpaper will work well. A little moisture will help. The fibers will begin to matt down, go with the flow - there's a grain. Work from a coarser paper to finer grit, probably start about 180, then 240, 400 and then 1,000 or even 2,000 and finish it off with a slicker. This stuff is work if you want it nice. Finally, I use a glass slicker, some like plastic, some like wood slickers. I happened to have a piece of 3/8" glass that I've rounded the edges on so I just use glass. One of these days when I fumble and it breaks I've cut a plastic one from an old cuttin' board I'm saving; and round the edges with my router and a little sandpaper. For the moisture, use a sponge or spray bottle (less likely to leave water marks), and go light with this, you'll get a feel for it and you will end up with a nice burnished surface. It's easier to wet it a little more than to wait for it to dry out. Besides wettin' and dryin' and wettin' an dryin' is gonna dry out the strap and then you're gonna have to do more oil. I wouldn't dye it, not a guitar stap or a belt, i.e. not the lining or backside, because it might stain my $3.00 Hanes and I don't want to buy another ... lol. You'll probably get several methods on this from different folks. There's a lot of voo-doo in leathercraft ... lol ... seriously, there's a lot of ways to do this stuff and this forum always makes me say - Why didn't I think of that? What's be fuddlin' is those darn cows are all the same, but different and what works on one hides, don't always work on another. WC and HO is different - they tool and dye different, so you case them different. I make notes because, well because I can't ... re-re-remember ... lol If you want that strap to kind of grab and stick then you may want to line it instead of slick and burnish it, and you might consider calling Seigel of CA about lining leather. Ask for Stephen if you call, and ask him about a piece of suede or kip, I think chrome tan - ask him which as he'll know, or at least he'll make a pretty good WAG ... lol ... at the right material. (That's a Wild A Guess if you lost your mechanics dictionary ... lol) Chrome tan won't tool or carve well but it holds dye good (shoes are chrome) and it's supple and tough. Maybe some of this'll help ya out. I never sling my ol' Taylor because I'm too lazy and I just make noise, but I carry my M1895 on my shoulder all the time ... lol ... straps are slings and slings are straps and you're on the right track with what you're doing here and this bunch of folks. Miss Jo's is a friendly place and crazy sometimes. Stay out of the adult area until you're old enough ... lol ... and let us know how it ends up. Good luck, ~Bill -
streaky look normal for these imported hides?
Billsotx replied to Steel Dragon's topic in All About Leather
I've had the same experience with Wickett & Craig and Herman Oak veg tan and as you did, found the solution oil. I suspect that it's the dye (I've used Fiebings, Tandy and Angelus)because it happens with different brand names. -
Sounds like you've got a plan. There a 3 volumes on making leather cases by Al Stohlman and Tandy usually stocks them. I suggest you look through each volume if can find them and decide from the content which one you want to buy. You may buy all 3 eventually. Buy you a decent piece of leather right from the get go. Don't skimp on that econo-cheapo-pinko grade that they have. With that econo grade you may stamp it only to find a while later your stamped impression all but disappeared and if you try to wet mold something you may be in for a wrestling match. I've seen the stuff so dry it'll tear when you start to work it. No sense making it difficult by buying junk and just about every outlet has something like that; there's not that much of a savings even if it works out. Same goes for tools. Get the best you can afford. Tandy has some decent tools, but they have some junk too. Once you know where you're going, and you've indicated your interest, you can get some high end stuff when your skills have developed. Depending on what you do you may find you have to make or modify your own tools. You'll have to learn to sharpen them no matter how good they are, especially the swivel knife. I don't like those kits but I must admit I have found some good leather in them at times. If you decide to buy one try to go through a few of them and pick out the best of the lot. ... Let us know how it goes and where you're going next.
-
How do I?
Billsotx replied to Chipperi's topic in Purses, Wallets, Belts and Miscellaneous Pocket Items
Contact Herman Oak (Google) ask for samples and make a choice of those swatches. They'll sell you two sides (talk to Julia) on your first buy, after that you'll have to buy 10 or more,most of us don't need that much at once, so go to their middle man Golinger in CA. Do your cut out, dye it, gouge or crease your choice, do your glue up with Barge, case it, shove the gun in and mold and bone, block your belt loops that's the sign of professional, the Barge glue won't turn loose when wet, once you've got the details in place let dry, I don't rush it but some folks force dry with low heat, next you can stitch with contrast stitching as you desire, and then clean up the edges and burnish them, and apply finish of your choice, I use neutral Kiwi because those lacquers dry out too much. I don't dye the inside but your customers may insist on it so give it to 'em. On the belt dye the outer strap including the edge no need to do inside (I say inside because I do a lot of flesh-out stuff), leave the inner natural, no dye, it's less likely to rub-off on clothes, split the billet and chaf edges to reduce bulk thru the buckle, glue up with Barge, crease or gouge layout your stitch line and stitch. Same process for support gear, mag, knife, flashlight pouches, cartridge slides, etc. Black dye is tough to work with, takes lots of rubbing after dying to remove residual especially if you slick your pieces, either way you'll find some rub-off and black may take numerous coats. Fiebings oil dye has worked best for me on HO veg tan. All that said, always test on scrap and don't expect one hide to be like the next. Like hands, cows are all the same but different! Too bad they didn't all pick the same parents ... lol! Hope this helps. -
I'm just guessing but I'd say the gray stuff is ... let's see ... hmmmm ... Oh, yeah! ... just kiddin' ... my guess is that the gray stuff, the lining is chrome tan leather. If you cross section a piece of dyed leather and find a bluish color that's a dead give away that it's chrome tanned. To me that a blue-gray tone and who knows how accurate the photo is in color tone, hence my guess is chrome tan leather; which may resolve issues that Johanna has mentioned before about allergies to veg tan leather, esp. when you're dealing with stuff that is worn, especially worn against the skin. That's just a guess - a WAG! I like to see what you eventually make if you'll share a photo with us. Good luck on your quest.
-
Greg? ... Sounds more like Gus ... lol!
-
Pete, If there's a Bible on hand stitching it Stohlman's "The Art of Hand Sewing Leather." (scroll down the page aways) It has excellent illustrations, 10,000 words there, and like all of his work it's excellent, and it's inexpensive, about 10 bucks. If I were to make a list of must have leatherworking books it would be right at the top of my list. I've seen used copies for a couple of bucks on Amazon and HalfPrice. If you can't afford it right now email me off list and I'll try to make some copy for you. ... You're not the copyright police are you? ... lol! 'til later, Bill
-
info here on Bick-4
Billsotx replied to Regis's topic in Dyes, Antiques, Stains, Glues, Waxes, Finishes and Conditioners.
Y'all weren't kiddin' when you said "Orange"! Must be the wrong color tan in this bottle of Fiebings Brit Tan I'm using. I'll keep adding until I figure it out or run out of scrap. I'm on sample number 12 over two days and it ain't gettin' close to the straight tan straight out of the bottle. I am measuring the stuff so should I find the formula I may be able to repeat it. -
As usual Jo is right-on with sandpaper. I use 80 grit wet/dry sandpaper to prep for glue-ups. (Belt lining, etc.) It makes short work of roughing up a smooth leather surface. If you want less rough use a finer grit. Any sandpaper will work but for prepping a glue-up I don't mess around - 80 grit gets it done. Just do it and drive-on. Use finer grit to true up the edges and even finer to start a burnish. Ultra-fine will burnish in a heartbeat! - 2000 grit. Leather sands better (fast)if it's damp and there won't be much if any dust you might inhale. That's why I use wet/dry. Available at you local hardware or home improvement center. Keep it in order using manila folders. Start off with a couple of assortment packs until you figure out what works for you. It has a lot more use that that expensive callus remover you buy from a leathercraft supply. Sanding sponges are also an options. I even use steel wool to remove marks and blemishes. It's pretty inexpensive and awful handy to have around in my limited experience. Good luck with which ever you choose.
-
info here on Bick-4
Billsotx replied to Regis's topic in Dyes, Antiques, Stains, Glues, Waxes, Finishes and Conditioners.
How are the Bick 4 and Brit Tan experiments going? Has anyone come up with an exact proportion of mix? I just got a bottle of Bick 4 to see how it goes. Right off what I don't like about it is the warning on the label - contains a chemical known to cause cancer in California, birth defects, etc. etc. I'm not in CA so I don't have to worry ... lol! -
Thanks for the reply Hoyden. That's a boss pup you got there!
