


bruce johnson
-
Posts
4,401 -
Joined
-
Last visited
Content Type
Profiles
Forums
Events
Blogs
Gallery
Store
Everything posted by bruce johnson
-
Daniel, one observation here. Do you think it has been rehandled? That purple hue to the finish looks like the handle is more recent and not the original rosewood handles. Any thoughts? Nice clean knife overall.
-
My experience only - I buy a lot of tools and sometimes one person hobbyist to smaller shops. My basic rule (broken occasionally) is that I don't buy anything with a motor. It makes life simpler - shipping costs from a seller to me to a buyer just makes it harder to pencil out on heavy bulky machines and good chance for damage if not professionally broken down and shipped. I usually tell sellers that there is a local market for heavy sewing machines they may not even know about and passing the word around usually gets them sold. Leather groups, supply stores, someone in the leather community, etc. One of the last shops I bought, the machines sold for local pickup before UPS could get me the tools.
-
Yes it is. Stirrup plates shorten up the radius on the cylinder arm to make these squarish corners much easier to sew into and over. I did probably a hundred briefcases and a few hundred shaving kits with the stirrup foot.
.thumb.JPG.8f72afcc7da180f33c8c02c25cb7a3c5.JPG)

-

Need Recommendations for Manual Clicker Press
bruce johnson replied to Stratton's topic in Leather Machinery
Here it is, Sits on a workbench in the tool shop. Weaver used to sell this for around $400 with the plates ready to go. The original hydraulic jack was replaced with a 12 ton air/hydraulic jack before I got it. Works well. The bed is 9x15.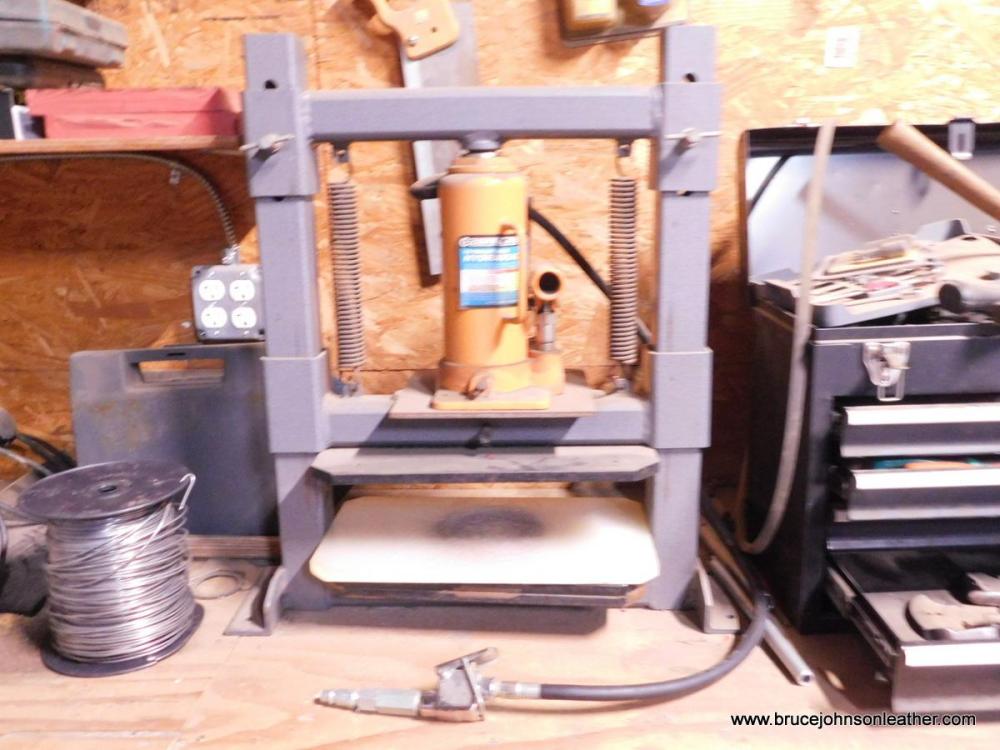
-
printing cow camp saddlery patterns
bruce johnson replied to maggielj's topic in Patterns and Templates
He’s a good guy, figured he would. -
printing cow camp saddlery patterns
bruce johnson replied to maggielj's topic in Patterns and Templates
Please contact Mark. he is aware -
Need Recommendations for Manual Clicker Press
bruce johnson replied to Stratton's topic in Leather Machinery
The cutting board isn't the limiting factor, the head size and leverage advantage is. Weaver makes an 8 ton manual clicker press. The head size is 12x15. 8 tons sounds like a lot - for big dies it isn't really. Good solid units. I have the 4 ton version and it is good for the rating, but you aren't going to do anything with a lot of edge length - coasters, cookie cutter size figures, spur strap dies is about it. I had an 8 ton last year dropped off overnight for another guy to pickup here. I played a little and it was OK too. If you step over to a converted shop press, you can go up to 20 tons and make the head and bed what ever size you want. You just need to make sure the steel plates are strong enough. If you go that way then a air over hydraulic jack makes life pretty simple. Even with the 4 ton Weaver in my wife's shop, if she has many pieces she hops on out to my tool shop and uses the benchtop shop press conversion Weaver used to sell. Its got the air/hydraulic jack and easier for her. -
Cowboy CB4500 or Cobra Class 4?
bruce johnson replied to AngryDick's topic in Leather Sewing Machines
I can see having two similar machines set up to do different things in your business, I heard how busy you guys are! Here is my take. I just bought my nephew a Cobra 4 and picked it up at the Prescott leather show. It comes with a flat bed table attachment, flat throat plate, holster plate, and stirrup plate - a few different presser feet, and a drop down edge guide. Probably was an option for a wax pot but I didn't get one for his. (I never used one on my Ferdco unless I was sewing doubled latigo reins wide open speed). When I got my Ferdco Art Van Hecke told me on the predecessor of this forum to get every available attachment I could when I bought it. The package price will beat buying the attachments later ala carte. Smart advice but then again I was making a lot of different things. I have used every foot and plate and more they added later. Looks like the Cowboy you have is set up with a wax pot and standard throatplate/presser foot. If you are just doing holsters and no plans for anything else you could duplicate what you've got without a "package". Both places have a reputation for service. Cobra is closer to you so shipping cost might be a factor. -
It is called a shell stamp. I’m not sure what Barry calls that pattern but I’ve seen it called loop shell, arched shell, and arc shell. Are you coming to the leather show in May?
-
The concept is not exactly new but this tooling is. It looks like it is a handy size. Several years ago there was an oscillating handpiece sold with a rotary shaft tool. I can't remember the name but had one. Later JJ Maxwell sold one similar. They worked off the oscillating action and at least the one I had came with a chuck big enough most regular stamps could fit with no modification. Some people use the GraverMax for silver engraving and modified tools to fit that handpiece. Barry King offered to turn down the shanks of his stamps to fit in that handpiece and may still do that on request. I am not going to throw out the baby with bathwater on any of these. Several years ago I had dislocated my thumb (done it a few times) and was facing a bunch of orders with hard deadlines. Swivel knives and a lot of stamping hits were a problem. I borrowed a swivel tip cutter and gripped it with a fist to cut lines. I had the oscillating handpiece on the rotary shaft tool and that ran the walking stamps like bevelers and shaders. It saved a lot of hits. There is a definite place for these type tools, I passed mine on to someone with some physical issues to use when I healed. If this had been 19 years ago, Id have ordered this last Thursday.
-
Nate, It took me a while to figure out what this was all about too. I had a few people ask me if had stitching pins at the Prescott show. After I showed the second person the awl blades they explained to me what they were looking for. They are for prepunched or lasered holes on pattern cut pieces. You and I are likely old school - wheel the marks and diamond awl holes or a machine. Glue, bulldogs, and get to stitching - drop the bulldogs in the bucket as you come to them. General question for the people using these. Are you gluing your pieces too? Clamping them in some version of a stitching horse or stitching pony to hold them for sewing?
-
Rocky Mountain Leather Show 2024
bruce johnson replied to RidgebackCustoms's topic in Leatherwork Conversation
King's party is outside their store/shop and the Don King Museum downtown. Realistically no visit to Sheridan is complete without visiting the Don King Museum. Saddles, leatherwork, tools, and a lot more that Don King collected or are donated. One highlight for a lot of people is the Stohlman display. Al and Ann Stohlman's original workbench is there along with many of their tools and the original pages, sketches, and leatherwork from the books. Peter Main put it all together and did a wonderful job. You can walk through the museum during the party but for me, I'd allow a couple hours. If you can get there a day or two before the show it's is pretty easy to spend 3-4 hours in there. I spend a few hours at least now and I've been there a bunch. I still see things I hadn't noticed before. I have had two people call me and one email based on this thread. They wanted to know what would be the ideal first time visit to this show. First off, Sheridan is the biggest leather show of them all. it takes time to get the full experience. Getting there - There is a puddle jumper flight into Sheridan but Billings is a couple hours probably and closest major airport. One year Rundi and I flew into Rapid City (three hours or a bit more) and those flights were cheaper at the time. The difference for both tickets paid for the week's rental car vs just the flight into Billings. Not much taxi service in Sheridan but about every hotel is full of leather workers and can give you a ride if needed. Talk to everyone you meet and you'll find that out. King's Party/Don King Museum - see above Classes - start on Tuesday usually and that schedule is out now. There are bunches of classes taught by good instructors. All the classes are at the college now. Used to be some were at the host hotel, some at the college. Most every class you will do a complete project and the instructors provide the patterns to take home to make more. Materials are provided and Leather Machine Company provides sewing machines in each classroom for projects that need to be sewn. My wife does a one or two classes at every show and she's signed up for a Tuesday class with Ryan King on money clip wallets. Last year at Sheridan she did an alligator wallet class with Broderick Vaughn. They were supposed to make a men's or women's wallet from scratch in the two day class. They all got their first wallets done the first day and he provided materials to make another wallet the next day. She made a men's and women's both there and quite few since. Trade Show - tools, leather, machines, pattern packs, hardware. Most all of the major and minor players in the leather industry are there. It is busy and especially opening morning on Friday is crazy busy. This is a new location starting last year for the trade show. They had a couple months notice that the host hotel was no longer available and pulled it together at the new location. It is spread out through the hallways and atrium of the main campus building and takes a little more walking. The layout may be changing up some this year. World Leather Debut is at the campus too - literally the world. There are entries in this judged contest of leather work from around the world in several categories. Mind blowing to see what people can do with leather. Hour or two at least. Other stuff in the area - Little Big Horn is a close enough drive, and if you fly into Billings you drive right by there. Black Hills and Mt Rushmore are a few hours away. One of our early trips we flew into Billings the weekend before and went west. We dropped down into Yellowstone and Teton NP for a few days, then drove over to Sheridan for the show. It was a nice trip. Other trips we have flown into Billings and gone to the Black Hills for a couple days. Now we have to drive with the trailer and tools for the show and take a scenic route. Any other questions - please ask! -
Edge finishing chrome-tanned leather
bruce johnson replied to SUP's topic in Leatherwork Conversation
There are a few commercial edge treatments that do OK on chrome tan - Martin's Mix and the one Sara Hagel sells. My wife uses Sara's version. I used this procedure. I applied a thin coat of acrylic finish (LeatherSheen, SuperSheen, or Mop-N-Glo). Let it dry and apply another light coat and dry. Then run some fine sandpaper over the edge until smooth. If I edge painted, then this made a nice base. If I wanted a more natural edge then I used wax (you pick - beeswax, paraffin, or Yankee wax). You can rub-rag the wax or heat it with an edge iron. -
Rocky Mountain Leather Show 2024
bruce johnson replied to RidgebackCustoms's topic in Leatherwork Conversation
The Kings party is for everyone. Starts about 5:00 on Thursday. Food, soft drinks, and hosted bar. It’s a really good time to meet and mingle. Cavalry band and lots of fun. One year we decided not to go. Sitting here at home on Thursday afternoon my wife said “if we were in Sheridan we’d be getting ready to go to Kings right now”. Yep, we have gone every year since. Those classes are all good. One of our friends just took the portrait class at Prescott and everyone likes the swivel knife class. Lea is a great artist and that should be a good one too. Trade show is Friday from 9-6, Saturday 9-5, and Sunday until about 1:00. It’ll be a tight schedule for you but it should light a fire to come back again! -
Rocky Mountain Leather Show 2024
bruce johnson replied to RidgebackCustoms's topic in Leatherwork Conversation
I’ve gone several times as an attendee, bunch of classes, and now a vendor. . Quick notes - it’s at the college and all in one location. No close by motels so have a way to travel. That town fills up so make room reservations now if you don’t have them. Kings Saddlery welcome party Thursday night is a must attend event. They are great hosts! The trade show is in a new location starting last year and still a learning curve to lay it out to accommodate vendors AND make it more convenient for attendees. Sounds like you are already signed up for classes- great (which ones?). Make sure you bring what the instructor has on the list at a minimum. Might bring others that are similar also. Trade show - prepare to be blown away. New tools, vintage tools, leather of all kinds, machines, pattern packs…..it’s busy. Don’t sweat the first day morning crowds. If you see a one-of and want it then buy it now. May not be there when you come back. Want to compare different things like mauls or swivel knives? Those sellers usually are well stocked and you can come back. Check out the World Leather Debut. Awesome contest and some truly world class pieces. Mind blowing. Stop by my booth! Stickers, free rulers, and candy available besides tools! Any questions? - fire away -
Has anyone attended Jim Linnell's classes at Tandy?
bruce johnson replied to SUP's topic in Leatherwork Conversation
I wrote a series of articles for ShopTalk magazine about upgrading from basic tools - which tools and what order to do it in, and some recommendations without many if any specific maker recommendations. If you subscribe they may be able to hook you up with back issues or the on-line subscription might link to them. I can't copy it here because of copyright issues. I've had wonderful feedback from experienced makers and several "thank you's" from newer people on that series. Sticker shock is kind of relative and I get that. People who know my background understand where I've been at times. It is all a progression and nobody has the same finances, expectation, or needs as any other leather maker. I'm at a trade show right now. Barry King is here, Robert Beard is here, Clay Miller is here, Horse Shoe Brand Tools, David Mabe is here, Leather Wrangler is here, we are here...all selling new stamps, mauls, and swivel knives at different price points. Some are more expensive than others. I am set up and selling general tools plus new stamps from Wayne Jueschke, new stamps from Richard Brooks, older McMillen, Gore and CLT stamps, Don King stamps, and slew of Craftools. I've got stamps in a big price range. We sold over 200 Craftool stamps today at $5 each. I sold a few $185 flower centers, and a lot in between. I had a few people just want to hold a Don King stamp and look at it. They are all important to me and Rundi and I are just as happy for the customers who got their Craftools as we are the ones who got their Jueschkes and the ones who may buy a Don King before the show ends. Ive said it before but these are our people and this is our tribe. -
Has anyone attended Jim Linnell's classes at Tandy?
bruce johnson replied to SUP's topic in Leatherwork Conversation
I am at the Prescott leather show and both of them are teaching here. If you want to knock two bucket list things at once, they will both probably be teaching at the Sheridan WY show in May. The class schedule should be out in the next couple weeks. Both of these shows are really fun and good classes, comraderie, world class leatherwork contest, lots to see and a big trade show. -
Has anyone attended Jim Linnell's classes at Tandy?
bruce johnson replied to SUP's topic in Leatherwork Conversation
I may be wrong about this one but most of these outside instructor classes at Tandy stores are during times the store is normally closed to avoid interruptions. The ones I've attended may have a store manager or employee present to "host" the event but may not be able to access the system to make sales. These are not necessarily "Tandy sanctioned classes" to specifically sell current Tandy tools. I have sold Jim discontinued Craftool stamps he has used for some of his classes. He has made some of these available for students to use or buy. I don't know what this class is or the specific tools recommended. As far as bringing your own tools, yes that is pretty standard for most classes. Bringing your stamping surface? yeah, pretty much a requirement at most leather classes. I'm at the Prescott leather show right now, and everybody taking a class is packing their stamping surface. Usually a square foot piece of marble or granite with a black rubber punching surface glued on the backside. My wife took a class here Wednesday and has one like most people - marble stamping surface and a black sole material back with a leather wrapped edge and handle. Let's face it - stamping on an 1-1/2 marble on folding banquet table is not optimum, but the first project is not the end goal - learning the techniques to go home and apply them is. -
LCI closed a while back about the same time this thread came up. MSDS sheets might be available from an old reseller.
-
Here is a "be careful" word of warning. Those Palosanto French edgers are very sharp (good thing), they can also very be very brittle (not always a good thing). I have had several through here, some bought sets and after the second or third broken one they decided to bail on the rest. Some sent me the broken ones to try to fix. I don't generally do that for most stuff I haven't sold. A couple broken ones were dropped. Most tools survive a fall, but granted not all do no matter who made them. The most common way these broke was in use. They don't seem to readjust angles in mid stream all that well. The edges are thin enough they want to follow the plane they are in. A little mild prying action from trying to do a "scoop skive" or changing the angle because "Oh crap, I'm getting a little deep" and they can snap a chunk out of the blade. I have done that personally testing some as well. t I haven't tried the drop test because I believe they folks who sent the rest to me. Make friends with these tools.
-
Here's my experience. I don't seek out craft tool stamps to resell, but still over the course of the year in buying sets and estates we end up with about 800-1000 of them. I used to list some on my website but it was not worth the time and effort to break them out even in the small sets for what they returned. Even in a small set someone would just want some one would just want one stamp and ask that we break the sets. It wasn't worth it for a five dollar tool, and then kick about the shipping costs. There are a few rare and collectible craft tool stamps, but not many. Jim Linnell usually buys those that we have. Otherwise it can be a tedious experience to catalog, take pictures, deal with buyers and shipping. We take them to the shows and sell them on the bargain table for five dollars each/your choice no matter how they are marked. I used to charge seven dollars for the prefix stamps and five dollars for the rest. Literally my wife or I spent half the time explaining to people the difference and very few cared. The people that do know and care are happy to sort through the cans and find them. We give a lot of stamps to kids. Makers Leather Supply gives out kids leather project kits for free, and those kids come over and pick out four or five stamps from us for free, and maybe a mallet if we have them. Between the Prescott and Sheridan shows we usually move about half the stamps we get. Usually at one or the other of the shows there is someone looking for tools for kids groups, rehab, or veterans groups and we donate whatever is left over.
-
Personally I would run from the knife. If I got it in a set of tools, I would drop it in the garbage again without a second thought. The deep pitting in that knife is at least halfway through and the rugged edge tells me everything I need to know that it will never restore to be usable and a wasted effort. Sorry to bust your bubble but that's how I see it. There are too many knives in way better condition that would be more worthwhile than this one.
-
Which Hand Operated Sewing Machine works Best?
bruce johnson replied to MarshalWill's topic in Leather Sewing Machines
Will, Here is my take. The Tippmann Boss is made in Fort Wayne Indiana. I am sure not all the parts on any of these are all totally made United States, but all three are ordered in the United States and should have access to parts if needed. I had one of the old original cast iron Bosses, and it paid me back many times over. They were always there with parts and service for anything I needed. When I sold it I had it shipped to them for refurbishing and they shipped it on to the new buyer with a full as new warranty. I'm not sure if they still do that. I have helped a few people set up the aluminum body ones. One just would not sew consistently, the others were okay. Tippmann at that time was good about replacing them but that has been a few years ago. Word-of-mouth has been okay on the Weaver Cub. The Cowboy Outlaw looks to be a good machine and one guy I've talked with likes his a lot. Toledo has a good reputation for service and advice for years, and if I was looking I wouldn't hesitate to call them first. -
You are sure welcome, anytime. The podcast with Steve Van Plew was a blast to do, thanks!
-
You are not that far away but I'm picking one up at the Prescott show for my wife in a few weeks. I'll keep you mind because I get people asking me for machines or advice but I don't deal in them.
.JPG.6a0577cf5334bd4a6e2562cc79f01e57.JPG)

