


plinkercases
-
Posts
1,369 -
Joined
-
Last visited
Content Type
Profiles
Forums
Events
Blogs
Gallery
Store
Everything posted by plinkercases
-
Martyn that is a good description in words and graphically. I can see that if I adjust my awl angle 45 deg clockwise it is then as far as possible is slanted the same direction as the pricking irons. Then if I cross the right side thread over the left as I always have I will get the look you in the photo.. and I just realized that I need to reverse the cross over on the back so when bring the needed form the back it needs to cross over the thread coming from the right. The I will get the slant on both sides. I think your image of the stitches using the pricking iron will away shave slant then my using the diamond tip awl and keeping the diamond faces parallel to the stitch line. The awl is a more open parallelogram than the prick tips. The propose of the angles/sides/faces in the opening in the leather is still the same as it understand it which is to keep the stiches from pulling through. the Stohlman dwgs make this clear and I agree with why the awl is to be oriented as indicated. I don't subscribe the theory that Stohlman only said to use the groover and overstitch because Tandy was paying him to move tools.... he and Anne placed more hand stitches on more heavy use projects than I ever will in 2 lifetimes and if the method was truly as weak as some say Stohlman saddles would not be around any more. Perhaps on thinner leather projects with finer stitching the groove should replaced with a line and I do that for sure but I would throw the whole set of tools out with the bath water. That being said.......My next decision of course is the whole groove and over stitch conundrum. To be honest all my stitching for the last few years has run with no angle on the front and the angle on back overstitched out. I have always been presenting in line stiches and I am not adverse to the look. My experiment was to see the first state of the stitch just after placement not indicative of my end product. As an awl user versus pricking irons and making each hole as I go the back groove line gives me a target to keep the hole at 90 degrees to the leather (which can be accomplished by a light scribe line as well..) and the overstitch from gives me my spacing. I imagine I can find a compromise where I still groove (front and line back) and use the over stich to lightly mark my holes, adjust the awl angle, be aware of reversing the cast on the back side and I will get a degree of stitch angle on the from and the back..... it is a different head space for sure.... I have always hammered the stitches and over stitched them front and back and am producing good, uniform stitch appearance back by the end of the process. Just not slanted. All in all (or awl in awl) I think I will stick with the hand awl, and experiment with the other variables such as scribed lines and perhaps a light run with the overstitch wheel for spacing then NOT run over the stitches again... still flatten them though. One thing that my current process of grooving and overstitching on damp edges is that even when died I can see the pathway clearly and the dimples actually help guide the awl into the right spacing. Place by feel as much by sight usually. Good there is not right or wrong just that we each progress on our chosen path to a result we are pleased with. Thanks for the enlightenment here and I have some new ideas to try out.
-
How to smooth the inside rough leather of a belt
plinkercases replied to atom1's topic in How Do I Do That?
Yup burnishing is the approach. if water dampening isn't getting it done try that gum tragacanth and a wood dowel, or even a fat sharpie. I usually do some flesh side burnishing when dying and it is wet with dye. However some times depending on the quality of the hide it can only get so good.... especially if the flesh side I fibrous and loose. -
thin wallet
plinkercases replied to mike6642's topic in Purses, Wallets, Belts and Miscellaneous Pocket Items
That's an interesting approach putting the clip on the outside. -
That's very cool. it looks like you stitched the main seam and the other to create a sight channel? Or just to keep it low profile?
-
Gents this is a neat thread so to speak and got me thinking... My stitching is never angled on the front. I always thought I was stitching as per the Stohlman hand sewing book but in fact just realised I had the awl orientation 45 degrees off. I wanted to see what the effect was so I ran 4 quick tests changing 2 variables.. diamond awl orientation to the stitch line and which thread passed over which. In all cases I am stitching towards me. Sorry fro the crap shots but all I had working was a phone. What I discovered is that I think I will rotate my diamond all tip and keep using left under right thread. Then the slanted stitch comes to the front.
.jpg.e68043a2dd966e81905b2f229007b69b.jpg)
.jpg.53b799dfced08fe032015487be08dc34.jpg)
.jpg.cf9ea5b285fdce4226f0761b5de50e49.jpg)
.jpg.8a3ff6fb0183e3e35ccef3b520501a00.jpg)
.jpg.e76b62bba38e4e763333e74982963c1e.jpg)
-
Thanks Nigel and it is nice now to be able to put a name to a (cut) face. Say hi to Dave for us.
-
need to put together a work bench
plinkercases replied to Chris B's topic in Leatherwork Conversation
I have 2 bench set ups and in both cases made sure there was direct to the floor support in the centre of the work area. And ironically I got several granite and marble slabs from the dumpster of the counter top shop... beside Tandy... hee hee.... I love seeing people shops and started a thread but no one seems to be sharing: -
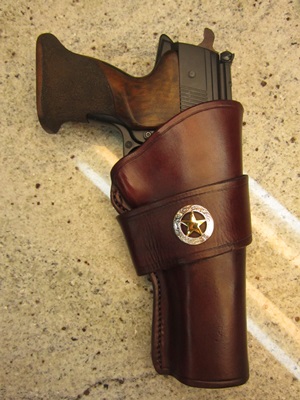
John Wayne El Dorado Holster
plinkercases replied to Forester's topic in Gun Holsters, Rifle Slings and Knife Sheathes
I have used this pattern a lot for guys who bought the Umarex Colt SAA replicas and use it for my own CAS rig and found that whiel I know it isn't a quick draw holster I needed to add a rivet as indicated just below the trigger guard to avoid metal on metal and it helped keep the holster from riding up on the draw. Just a suggestion.
-
Black Rose SAA holster
plinkercases replied to plinkercases's topic in Gun Holsters, Rifle Slings and Knife Sheathes
Agreed....Veiners need laser sights...... and I need way more practice. -
Thanks folks.... usually I am the inspiree not inspirer... weird.
-
My customer wants a snake skin applique NOT inlay on his holster. The skin he sent is of course thin and I have a few concerns and would some advice/experience one following please and thanks in advance: How to you glue it right to the thin edge line and avoid over gluing on the holster body Would it be a good idea to laminate the skin onto a piece of veg to make the edges less likely to curl up, catch stitches pulling through etc.? Is there a stich other than the saddle stitch that could be used like surging stitch to capture the edge of the thin material? The skin is to wrap around the "front" of the holster and how much do I need to be concerned about the appliques being too tight when the pouch is folded and stitched if it is applied and sewn flat... or is there a way to apply and glue with the pouch wrapped over similar to the way I have seen liners applied on an inside curve? I would love to see some samples of a similar deal if I could. Yours in search of assistance....
-
Very nice indeed.
-
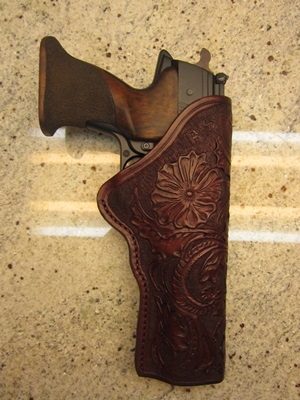
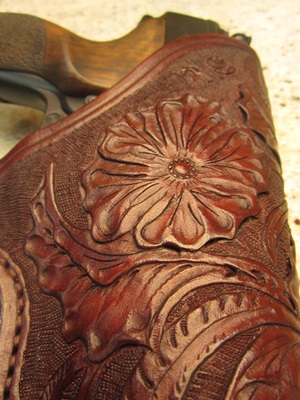
These were made for an airgun forum pal to his specifications. The floral one is based on one I made for a DW 357 and he wanted the same pattern. The second one he just sketched out and I went for. The second one may posted before but they go together.
-
Welcome to the forum and amazing hobby.
-
Thanks.
-
Black Rose SAA holster
plinkercases replied to plinkercases's topic in Gun Holsters, Rifle Slings and Knife Sheathes
I have been at it a few years snow and am still a newbie! I agree on the addiction for sure.... I have always loved western leather gear whether gun leather or saddles and tack. Not a lot of famous gun fighter outlaws from Toronto from the era but we did have the Boyd Gang. Thanks BPM no harm in giving it a go. I am always reading and watching resources on how to do it and has been said her many time...practice practice practice... which I don't get enough of but am happy with a little progress when I do get at it. -
CAS stage load holders
plinkercases replied to plinkercases's topic in Gun Holsters, Rifle Slings and Knife Sheathes
Every kid/man's dream, Cowboy outfits, gunleather, smoke, noise and laughter. cost a bit to get tooled up but if you just want to play and be a heavy competitor you can get guns that will take a long time before they are holding you back for reasonable costs new or keep an eye on gun forums and sales sights. Guys are always trading or getting out and selling good stuff at a fair price. Go for it pardner! -
CAS stage load holders
plinkercases replied to plinkercases's topic in Gun Holsters, Rifle Slings and Knife Sheathes
Thanks. I used them in competition a few weeks ago before finishing them and the concept worked so I am all set for next time. faster than loading from the box Since this way I can dump 5 or 10 at a time and as long as they are all gone when I am done I now I am properly loaded... so to speak. And I don't have to keep going to the ammo table between stages. next is a shell belt that holds enough for a match then I am all set for the day if I preload all the leather. -
Got itchy and worked on this last night and tonight. I think my flowers and leaves are progressing but the fern and vine stuff has a long way to go. Sadly the vines and fern under the strap look the best....This based on the Will G pattern we have seen a lot of lately. Great pattern. This is built with the Tandy Warrior shoulder which I bought to make some economical runs of a particular airgun holster which wasn't tooled and it seems the leather doesn't hold the pebble back grounding too well but not bad on the deeper stuff.
.thumb.jpg.6ea878b8d2ee7db43c0c5a00bb78b20f.jpg)
.thumb.jpg.1f5be3e2f6eefc613a9b79a393011bfb.jpg)
-
I made these for myself when I go CAS competing. I wear tall boots outside the pants I slip 2 sets in each leg on the outside when full and when empty move them into the inside. Each pouch set holds 10+10 rounds back to back for a full stage. Here are 2 of the 4 shown. They are stamped to match my rig.
.thumb.JPG.bb029228825888c3b7bdbce44e298653.JPG)
.thumb.JPG.04d99ab13604b5f9efca4ed3baef0e7b.JPG)
-
New Work Boots
plinkercases replied to Tim Schroeder's topic in Shoes, Boots, Sandals and Moccassins
Holly cow those are superior. And I also was envying the tools.... -
I get updates on their stock and the last one had no old time models. their site is under some work so they say to email for inquiries. glenn.duncan@duncans501.com
-
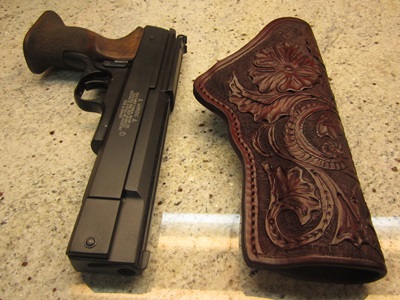
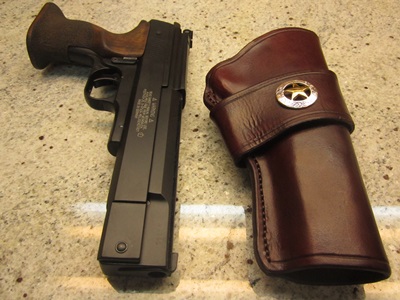
As the title says... made for a S&W 460 mag 5.5 inch barrel but shown here with a Dan Wesson 357 6 inch co2 replica.
.thumb.JPG.73c96e141caab78290111ffa62385e5a.JPG)
-
Considering Selling Tippman Boss In Toronto/bellville Canada
plinkercases replied to plinkercases's topic in Old/Sold
Bump -
Hello from Ontario.. Toronto actually. If you are ever out this way drop me a line.

.jpg.d8a5eb53e122a25a650e442e160c2194.jpg)
.jpg.1cf6042702a862b644418e6009e75574.jpg)
.JPG.d061d43f3d7fa893628321689c1758ee.JPG)
.JPG.afce8df9131e0f32f15d9000ef369e71.JPG)
.JPG.5af9df5ebe20db49ecacb1efc576e63a.JPG)