-
Posts
1,091 -
Joined
-
Last visited
Content Type
Profiles
Forums
Events
Blogs
Gallery
Store
Everything posted by DJole
-
How about this one from Ohio Travel Bag? https://ohiotravelbag.com/products/item/66c6aace-8181-4af6-8e1f-d5e0eb6fb583/Radio+Swivel+Clip+Black Or this one, which is closer to what the video shows? https://ohiotravelbag.com/products/item/0c1c3461-4d53-456e-8a0b-f0ffad4a1c18/Swivel+Clip+Nickel+Heavy+Duty
-

Most Overkill Knife Sheath Ever?
DJole replied to Instinctive's topic in Gun Holsters, Rifle Slings and Knife Sheathes
And if he ever needs it, he has some emergency paracord right there in that sheath! ;-) Seriously, though, that sheath looks like it'll take the beating an active forester will give it. -
It looks like you are in Ohio, so you can easily get waxed linen thread at Royalwood Ltd., in Mansfield, Ohio. Website here: https://www.royalwoodltd.com/ I've ordered from them before, with good results. Lots of good color selection!
-
That's likely the same one I picked up, but mine has a hole in the center of the leg board. Easy to put one in with a drill, of course! Not hunching over is a good thing! It ought to do the trick just fine.
-
Keep the pix coming! this is great!
-
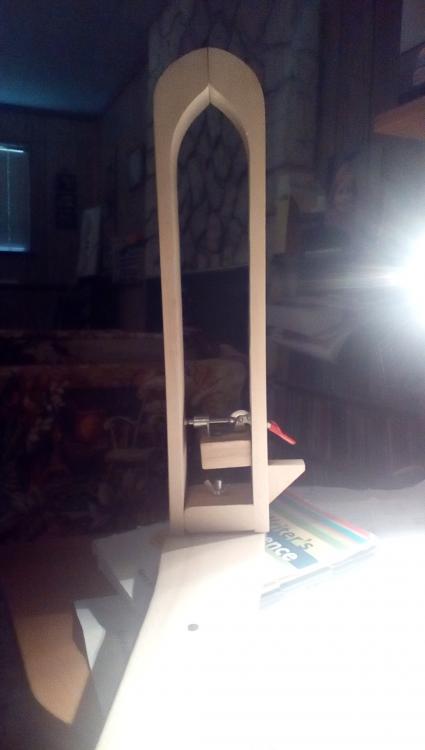
Got this in Seoul, capital of South Korea, a few days ago while on a tour. Cost: 28,000 won (about 28 US dollars). Hardwood (birch or maple), sanded but untreated. Uses a cam lock (red lever on the right, with wooden triangle to help reduce thread catching on the lever, I think) Cam can be adjusted by a screw on the opposite side of the lever. Jaws clamp to board with wingnut; hole in middle of the board and on the end. There were 3 other types of stitching clamps available; one was made with laminated wood, and the other was twice as long as this, going from the floor (I guess floor mounted?) I need to l line the jaws with thin leather before I start any stitching, though.
-
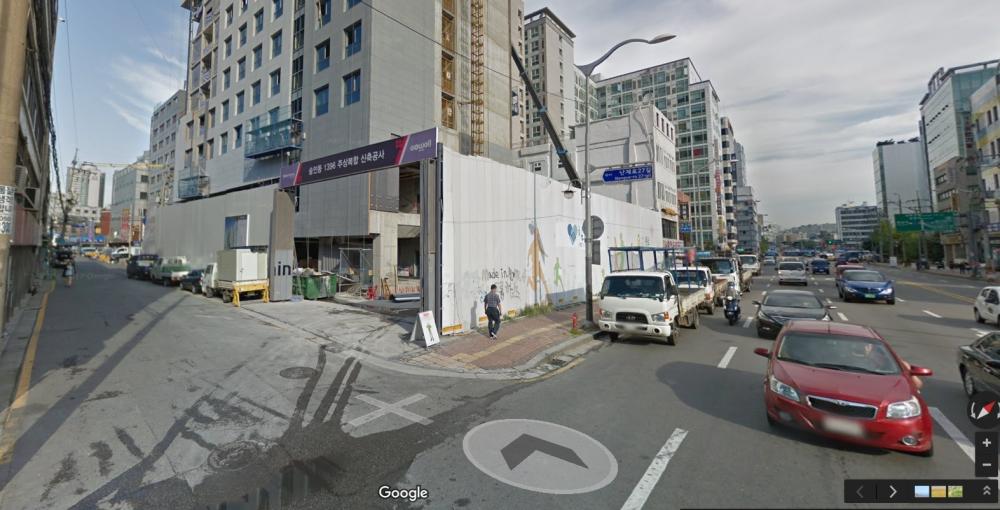
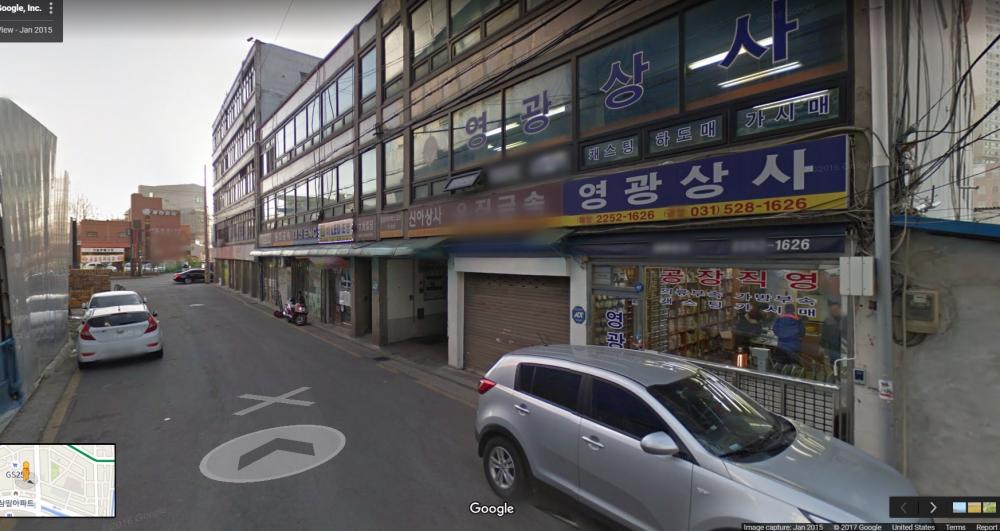
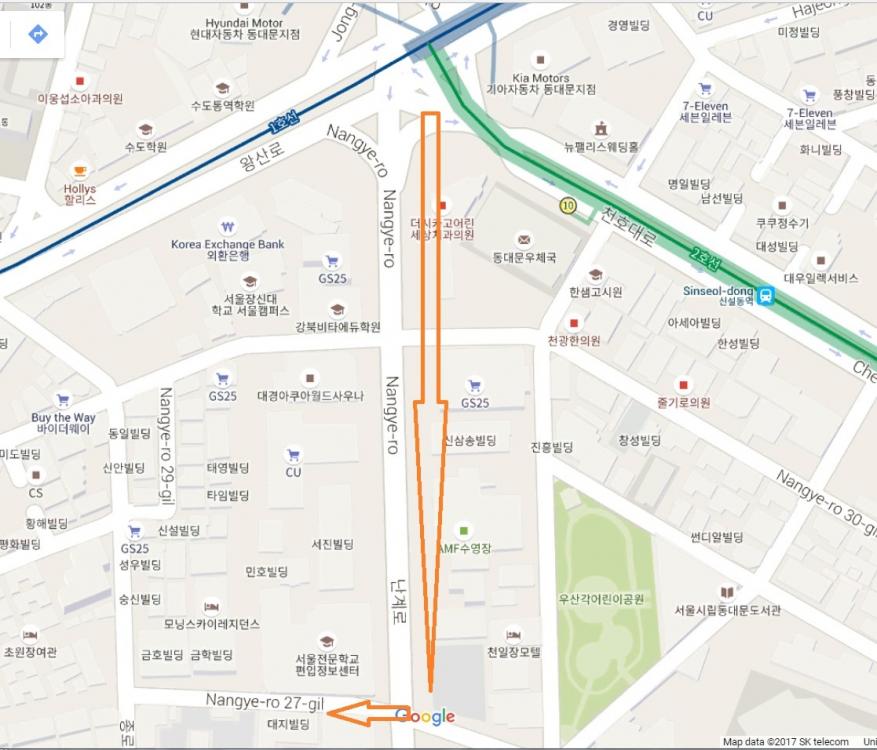
Just got back from a trip to Korea. On a day outing in Seoul, we managed to find the neighborhood in the city where leatherwork supplies can be found. It's located on the Western edge of the city, in the neighborhood of Sinseol-dong. Go east of downtown to the Great East Gate (Dongdaemun), where there is a subway stop by the same name. The subway line (line 1) going East from there stops at Dongmyo, and then the stop you want is Sinseol-dong. You can also take a spur of line 2 (the Green line) which terminates at Sinseol-dong. From Sinseol-dong station you need to go up to street level and east to the large intersection, where Choui-ro (east-west) meets Nangye-ro (running north-south). Look at the map below -- follow Nangye-ro SOUTH from the intersection, on the WEST side of the street until you see the smaller road Nangye-ro 27-gil crossing the main street east to west. (You could also get a taxi-driver to drive you to that intersection; as of September 2017 I estimate the taxi fare from the center of Seoul (Seoul station or the downtown palaces) to get here as 4,000 to 10,000 won depending on traffic.) Now you need to turn right and go to the WEST, following Nangye-ro 27-gil. it's not much of a road, more like a wide alley, but don't be fooled. Look at the Google maps road view below -- this is looking NORTH WEST from the intersection of Nangye-ro and Nangye-ro 27-gil. See that blue street sign in the center of the picture? That's what you are looking for. After maybe 50-100 meters you should find the store fronts that sell the stuff you want. Here is a picture of the first one along the line, looking back towards the intersection you just left. It's the small store to the center right, with the silver car in front of it. This first store you see here is full of rivets, decorative and functional. Some map applications in Korea (for smart phones or computers) can use the phone number to locate the store on a map, and the phone number of this shop is 031-528-1626. The other stores start west of this one. Google Maps streetview won't go down there, however. In my 15 minutes of looking I saw at least 3 stores FULL of rivets, grommets, etc. (HUGE bags of them, as well as small ones). One store had nothing but thread, thread, thread and more thread. Leather, buckles, tools, oh my! One store had paint, more sizes of hole punches than I knew existed, needles, thread, templates, and 3 different kinds of stitching ponies (I bought one for 20,000 won). I didn't go very far down the row, but I believe that skivers (big and small) and hides (including tooling) and elec I saw very few stamping and tooling supplies. Lots of leather and hardware, thread and coloring, for bags, clothing, and the like. (skivers, head knives, needles, strap end templates and punches, stitching chisels, etc.
-
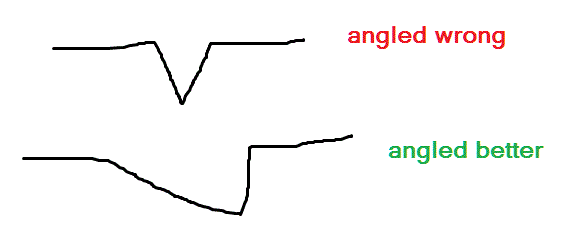
From what I can see in the photos, I think you are not using the beveler correctly yet. Take a look at the crude diagram below-- The top line is a side view of what I think I see on your leather. You have made cuts, but you seem to be using the beveler to just widen the cuts, into a wider Vee-shape. The bottom line is what a beveler is meant to do: push down one side of the line into a smooth slope, making the other side of the line (the "cliff" in the diagram) appear to stand out from the surface. Also, ditto on the different sizes of bevelling tool sizes from the commenters above. Also, you might look into textured tools and see if you like the way those look.
-

Getting started: first handbag
DJole replied to motocouture's topic in Purses, Wallets, Belts and Miscellaneous Pocket Items
Beautiful work! Sure hard to tell that's just a "practice" bag! -
I doubt there is a substance on earth that will get that old leather supple again, unless you can find a time machine! ;-) But if you really want to restore it, you'll need to find an expert who can actually look at and handle the leather, to find out its thickness and what kind of leather it is. It is possible that people who make bellows-blown bagpipes, such as Northumbrian pipes, Irish Uillean pipes, and Scottish smallpipes would have a good idea about cost and time involved. You'll have a much easier time finding those people in the UK than over here in the USA. That would sure be an unusual project. How is the rest of the forge, I wonder?
-
Well, I don't go to Starbucks now, and I have been to Tim Horton's a few times; I shopped at Dominion and Sobey's stores as well; and I got used to using Celsius and Kilometers (not to mention buying gasoline by the liter). I need to work on my apologizing. Sorry about that...
-
I lived three years in Newfoundland (going to university there). Can I be an honorary Canadian? ;-)
-

Hand stitching thread and needle preferences
DJole replied to plinkercases's topic in Sewing Leather
Interesting! I have never used Tiger thread, but now my interest is piqued. The next time I need a thread color, I'll replace it with some Tiger thread to experience it myself. -

First Project
DJole replied to DocDaddy's topic in Purses, Wallets, Belts and Miscellaneous Pocket Items
That's a good starting project -- it got you experience in a few things (hole making, lacing, lacing around corners, dyeing) so you can use what you learned in your next work. What dye (and color) did you use there? and on a humorous aside, never apologize for using "scrap" --- all that word means is small leather bits you haven't found a use for yet! ;-) I've got a fair bit of scrap around, just waiting for the right moment when I need a piece of leather just that size.... -

Hand stitching thread and needle preferences
DJole replied to plinkercases's topic in Sewing Leather
Let me add my 2 pennyworth to the mix here: I find that after sewing for a while, the waxed thread starts to get unwaxed (it rubs off as you pull it through the holes). So I have a cake of just plain beeswax that I run over the thread. Nothing fancy, and I haven't found any reason to do anything else yet. Maybe Zulu's (or other people's recipes for wax stuff) holds up to wear (such as wallet stitches) better than what I do. This seems to be related to thinner threads; thicker threads probably hold more wax in their fibers. -
Seems to me that the only answer to this question is this: if this makes the tooling better for you, then "switch-hitting" is fine. As a right-hander, I have metal tool in left hand, and mallet in the right, and it seems to go fine. Then again, I've played the violin for years, and so perhaps my left hand is used to finesse work.
-

Hand stitching thread and needle preferences
DJole replied to plinkercases's topic in Sewing Leather
Over in my tool box I have a few spools of waxed linen thread in a few different colors, which I purchased from here: http://www.royalwoodltd.com/cat14-17ar.htm They have a good selection of colors, and the waxed linen is good for historical re-enactment stuff, and it wears well. I use 4 ply in the 50 gram size spool, which is a good amount of thread. I often separate the threads so I have two 2-ply strands for lighter stuff. I also have some Tandy black, white, and natural waxed thread, for less "fancy" work. It seems to work fine. I am using no special needles-- just a general use 10 pack from Tandy, and some glover's needles for garment leather. -
Oh, yeah, that breaks at least two copyrights, like you said! But putting that aside, it's a lovely mash-up concept!
-
You should go to Youtube and check out the videos that Ian Atkinson has posted for his small shop, Leodis Leather. He has some great material there, and I think he does what you are looking for (not tooling, but leather bags and wallets and such.) Start with this one: Top 25 recommended leather tools.--> https://www.youtube.com/watch?v=VTfMRaVyCd4
-
Welcome DocDaddy! Do you know how to do a search in this forum? There's an oval "Search" bar with a question mark up at the right hand top of the screen. If you type search terms like "starting out" or "essential tools" then you'll find discussion threads about those topics. The short answer is basically what are you trying to do (tooling? shoe making? saddle making? bags and purses? hand stitching? machine stitching?) and how much money do you want to spend?
-

First ever bag!
DJole replied to motocouture's topic in Purses, Wallets, Belts and Miscellaneous Pocket Items
That is some NICE, careful work. It's beautiful, and I would be very proud to make (and own!) a bag like that turned out. That's like a marathon of hand stitching, and you completed the 26 mile run! -
My wife's family lives across Dayton from you, over in Fairborn. Welcome to the forum!
-

looking for someone to cut 2 inch leather circles -nat veg tan leather
DJole replied to teresamwong's topic in Old/Sold
One resource I know of is Brettun's Village up in Maine. They do custom shape cutting -- email them for rates to see if they match your needs and price range: Website= http://www.brettunsvillage.com/leather/, email = info@brettunsvillage.com


