


DJole
-
Posts
1,091 -
Joined
-
Last visited
Content Type
Profiles
Forums
Events
Blogs
Gallery
Store
Everything posted by DJole
-
 This is a pattern of a typical welted sheath design, borrowed quickly from Google, which uses a strip of leather between the front and the back to protect the stitching from the sharp blade edge: From what you say, that's what you're doing, which is pretty standard procedure. Adds a layer of difficulty to the stitching, but makes the sheath last longer. I can't say that using a straight pricking iron as a chisel is a no-no. It's probably an aesthetic thing in this case. My (limited) understanding is that the angled stitch is less likely to tear through the leather, since it grabs more leather or something. But on a knife sheath, with heavy leather like this, it's probably a matter of how much time you want to spend stitching (or what the patron wants) rather than wear and tear on the stitched line.
 -
Well, it only took you 5 until you got one you liked! imagine what it would have been like without the help of the friendly holster experts here! It looks pretty good, but how did the surface of the leather over the gun portion get banged up like that (scratched, dented and marked)? Some people might find that less than appealing visually, which might cost you a sale if you wanted to sell them. Perhaps some people with experience can help you around that.
-
My heart goes pitter-pat for pattern welded steel (I have a pattern-welded dagger blade blank up in my closet that SOMEDAY I will actually turn into the actual thing. But enough about that, this is a leatherworking forum! Okay.. the sheath...stop looking at that blade... That's a pretty clean job. Nice even stamping, with a pretty nice design. I can't tell if this is a welted sheath or not (2 layers or 3 layers-- top and bottom with a welted strip?) The edges are hard to see at that angle-- did you slick them down? The stitching looks fine -- you seem to be using a straight stitch rather than an angled stitch. Nice job with the contrasting/ alternating thread colors. That's an unusual mounting -- I can't quite get how the sheath part is attached to that round part. I'm curious to know why you decided to do it that way. But that's a nice blade,too!
-
For the inside of the chef's hat, rather than merely cut it away, use a matte backgrounding tool. Typical backgrounding tool:: Creates this effect:
-
Nice work up there, for sure! That dragon armor looks really good -- was that ever entered in an Arts and Sciences competition?
-
Well done! Apparently the judges thought so, too!
-
Hmm...that's a toughie. I looked at Buckle Guy's catalog and this one didn't pop up...but maybe there's a specific name for this buckle which would help. Perhaps you could contact Buckle Guy himself and see if he can help you out:
-
I can tell you that Angelus Light Blue is not very light, straight from the bottle. It's not really a bright blue, or a Navy blue, but like this: To get a nice baby blue, I'm not sure what proportion of dye reducer to blue would work. I use that method to try making a lighter blue on a different project, but it's certainly not baby blue: I have to wonder if it's even possible, since the leather behind the dye is not really white enough to make the pastel baby blue work. Perhaps some experts here have the solution.
-
*whistles in admiration* That is some lovely floor work there. The only flooring I have ever done is install tongue-and-groove flooring in my living room, and that of course is nothing like this! Those bog-oak pens are gorgeous. I love beautiful wood, and beautiful woodwork as well. I can well understand why you'd want a beautiful case for them. Good materials and craftsmanship are a delight to the touch and the eye.
-
Recent archaeological find: 5,500 year old shoe found in Armenia
DJole replied to DJole's topic in Leather History
Fredk, thanks for the additional digging (pun intended) to pull out the scholarly information for those who would like to know that! So UCC is the place to look for the details, then. Thanks again! -
Read the article for further information, and see the photos. I'd like to know more about the type of leather, the stitches used, was it welted, and so on-- Of course, that kind of specialist knowledge isn't covered! http://www.ancient-origins.net/artifacts-other-artifacts/everlasting-shoe-what-does-5500-year-old-shoe-found-cave-tell-us-about-021382
-
You may also want to look into lining the inside of the armor, with either a softer leather or with cloth, after all that patient work fredk recommended above. If the costume warrants it, you could add another layer of cloth between your expensive materials and the leather (like a surcoat or a padded jacket, like those worn under metal armor.)
-
By "a short time" surely you mean a year or two, judging by all those tools in the background and your sure hand with the sharp tools! ;-) But welcome to the forum! There is so much information here from all kinds of friendly folks who have a passion for leather. Those handmade pens -- they are also your work?
-
That's the holy grail of stitching, right there.
-
First major project
DJole replied to Leatherhips's topic in Purses, Wallets, Belts and Miscellaneous Pocket Items
That's a stellar job for the first project! Makes me want to throw mine away! (heh!) Where do you think there are issues with it? (Not that I doubt you, but because what you see could be valuable for me to know.) -
A leather mirror frame? Now that's not something I would have thought of. How is that protected from the damp, warm steam of the room when the shower is on?
-
That's a nice video-- your voice is clear, and your brief demonstrations of the tools is good too. I must say that when I first started doing leather, I had even fewer tools than that! I had an Xacto knife, a diamond awl, and a modeling spoon!
-
looking for celtic,gothic,fantasy,skulls patterns
DJole replied to Hornbag73's topic in Patterns and Templates
Find some Dover Design Books via Amazon.com. Perhaps some of the line drawings will work for you. -
I made a scabbard!
DJole replied to ravenwing110's topic in Gun Holsters, Rifle Slings and Knife Sheathes
Here's the rapier hanger that I did a few years back. The color is difficult to see in this picture; it's a nice Oxblood. I like that color.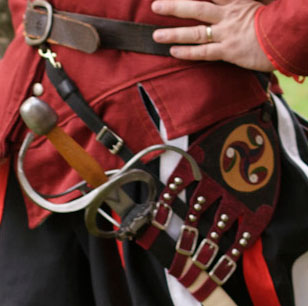
-
Zitro -- Find the section of this forum which is devoted exclusively to finishes, and ask your question there, about which finishing product will work best for a wallet. Of course, you need to decide some things first -- do you want a shiny finish, a matte finish, or something else? Depending on what you want, some experts can help you decide what will best preserve your hard work. I do not consider myself experienced enough in finishes to give you good advice, but I look forward to seeing your first steps into leatherwork!
-
I made a scabbard!
DJole replied to ravenwing110's topic in Gun Holsters, Rifle Slings and Knife Sheathes
Congrats on finishing your project! That's half the battle right there, putting hand to leather to learn how it all works. What do you think happened in the middle of your stitching? (I don't have an answer; I'm just curious to know what you think.) -
I've never actually done this, but thinking about the task brings a couple solutions to my mind: You might use glove needles, which are sharp and diamond pointed. But they tend to be rather dainty, so they may not be what you want. It depends on your leather thickness and type: thick tooling leather isn't what these needles are for. They are for soft, thin leather. Or perhaps sailmaker's needles will be ideal for this, since they are designed to sew canvas sails. Google the term, and you can see what they look like and where to buy some.
-
You might try these guys up in Maine: http://www.brettunsvillage.com/leather/leatherpanels.htm
-
Horween Tumbled Essex Bag
DJole replied to 9tpi's topic in Purses, Wallets, Belts and Miscellaneous Pocket Items
Oh, my....that's some mighty craftsmanship there! Well done, indeed! -
Lots of excellent newbie vids: check out Ian Atkinson's Leodis Leather vids on YouTube, and Nigel Armitage's vids too. Armitage is the hand stitching guru! That ridgeline "branding" could be done a few different ways. First thing, though, is not to steal that design! Create your own, using the gorgeous silhouette of the Tetons instead. When you say "branding," you really mean "branding" as in burning, or just tooling? You could tool it in -- that's a pretty simple design that wouldn't require a whole lot of tools. I can imagine using just a backgrounder tool to make the line in a kind of "reverse" tooling. Or using a beveler to create a three dimensional line. If you wanted to include some sort of words like in the example... well, that would be tough to get right. A beginner might use up a lot of leather trying to get them to come out right. Or, you could (if your finances permit) create a custom stamp with that designt. Lots of places will create a custom stamp for you, based on certain computer file types. It's even possible to do it this way as a hot stamp (see Ian Atkinson's video here <https://www.youtube.com/watch?v=azyCKOpdSo0> for a quick overview) That custom stamp might be too expensive for a one-off project, but if you anticipate doing it over and over again, like a maker's stamp, it'll save you a lot of headache.