DJole
-
Posts
1,091 -
Joined
-
Last visited
Content Type
Profiles
Forums
Events
Blogs
Gallery
Store
Everything posted by DJole
-

Sheath For My Custom Karambit
DJole replied to Chief Filipino's topic in Gun Holsters, Rifle Slings and Knife Sheathes
I like seeing the Filipino-style designs. And that's some pretty good tooling there, even for a ham-handed amateur as you call yourself! -
With a background in dressmaking and millinery, you already have a handle on patterns and 3 dimensional thinking. Welcome to the forum, and remember that most of us started like you did, so don't be afraid to show off your projects or ask for help when needed!
-
A typical veg-tan tooling belly is a strip about 5 feet by 6 inches (give or take, of course). Not all of it will be usable (holes, too stretchy, etc.) but if it's just to practice tooling on, or for small projects, then it will be fine. I recently found some thick veg-tan tooling bellies at Tandy for 10 dollars apiece, on sale. Four bellies came home with me, and I still have more than half the leather left to play with. Just in case you aren't familiar with the terms that describe hides (belly, shoulder, etc.), the diagram below will help: Tandy often has bags of scrap for sale (mixed veg tan and chrome tan), and Brettun's village up in Maine also sells scrap leather by the pound (but not tooling leather, I think --see this link for that part of their website).
-
If you are making this arm guard out of thick enough leather, perhaps you don't need metal eyelets or grommets at all, but just holes will work. If you are worried about cords pulling through the holes in the leather, maybe what I did here will work for you: This is a leather coat I wear over my fencing doublet. You can see from the folds that it is not a heavy leather. The leather was from a remnant of an upholstery hide, so it's like a thick cloth. But notice the oval pieces at the front seam. Those are reinforcement pieces for the leather ties, made from a thicker tooling leather. I have one oval piece on each of the overlap, with two holes in each, and the thongs come through that leather, so the ties pull on the thick leather rather than the thinner hide. If you were to do something similar for your bracers, the leather is only one one side (the outer side), so there would be nothing sticking out on flesh side to irritate the person's arm, like what might happen with a grommet. A grommet may get hot in the sun, or corroded over time by sweat, rain, etc. and need to be replaced. These leather "grommets" can also be replaced-- cut the stitches out and sew a new one on. I must admit that setting a series of grommets or eyelets will be much faster than all the stitching involved here!
-
First, what bevelling tool (or tools) are you using? If you can give us a make and number (like, say, B60 Craftool Beveler Stamp) that would help us figure out if it's the right tool for the job or something else.
-
Searching For Minimalist Wallet Pattern
DJole replied to RetiredTom's topic in Patterns and Templates
Through serendipitous web links, I found Bellroy's site. Bellroy is a leather company based down in Australia, and they have a great variety of leather goods for sale. Among them is a slim wallet. The web page <https://bellroy.com/slim-your-wallet-new> contains an animated photo of the wallet pattern, cut out in pieces, and how it is assembled. I found myself watching the repeating video over and over for about 10 minutes, noting different details. -
You'd probably like my wallet, Gabriel-- Here's the pix: <http://djole.altervista.org/djole/Publications/Leather/Wallet/wallet.htm> My other leather stuff is at the link next to my name down at the bottom of this posting.
-
Yes, deeper cut lines will add dimension -- but you have to plan the leather thickness accordingly. I've found that a modeling spoon can help round things out, if the leather is properly cased. Take a look at what this fellow is doing with his modeling tools, with a sort of repousse: http://blog.leathercraftlibrary.com/?s=Modeler I've only done a bit of that kind of thing myself, so I'm not much of an expert on that. Also, Gabriel-- I'm a non-Western tooler myself. I'd love to see the kinds of things you're doing, since we might have similar interests.
-
Those are great! I like that French skiver. The curlicues from the fork handle just make it more French.
-
Kept this one simple
DJole replied to Boriqua's topic in Gun Holsters, Rifle Slings and Knife Sheathes
A nice understated holster and belt. Nice work to get the extra 20 bucks in there! -
You're using a textured pear shader, right? Is that a deliberate choice or because you don't have a smooth pear shader? All that texture seems to muddy the shapes.
-
That's a lovely story and a great looking wallet with heart and soul. I can only hope that some of my stuff can last that long and be treasured like that!
-
Saddle Stitching - Looks Good on the Backside
DJole replied to superpacker's topic in Sewing Leather
The first thing that comes to my mind is the "casting" of the thread. One needle goes through a hole, and then the other thread goes OVER or UNDER the first thread before the second needle is pushed through the hole. Depending on the direction of the slanted hole, going over or under should make that slanted stitch work. Maybe that's the problem? -
The first time I ever touched leather tools was 7th grade shop class, back in the late 1970s. I still have the luggage tag I made from that shop class. No, I have no pictures of it. Joined the SCA while in high school (a local college chapter) and saw leather work, but didn't do any of my own. There was no leather shop closer than 6 hours, and I had no money anyway. Time passes-- through the 80s and 90s, I started doing some leather stuff, for various costume party and such, picking up a few (very few) basic leather tools. A Tandy shop was only 5 minutes away, the first time I'd ever actually seen a leather store, to handle hides and tools on my own. Not much time or money to invest, and only some interest-- I made a knife sheath, a belt and some bracers. I didn't know anybody else who did leather work, and there was no Internet yet. That's really what I would call the first time. Final year of my MA program I decided to make a book bag, decorated with medieval motifs (and with an Anglo Saxon inscription). I realized that I kind of liked doing this, and I wasn't too bad (for not really knowing what I was doing.) More years pass -- I got married, more grad school in Eastern Canada. I kept my tools and a few pieces of leather, but didn't do a whole lot with it-- time constraints, expense, and so on. Moved here to Western Washington, and started making stuff for friends. Much of what I do isn't really standard stuff (belts, holsters, sheaths, etc.) I realized more tools were needed, and I started collecting hides (much like quilters collect fabric). Having a Tandy store across town was very convenient. Having Internet access is even better! So it's been a gradual climb, and I've gotten gradually better. I won Grand Prize in the Western Washington State Fair a few years back (with this leather box), much to my humble surprise. That's a nice confidence builder, I must say!
-
You should take a look at Leodis Leather's YouTube videos (done by Ian Atkinson up in the North of the UK). He discusses this very topic and points out that special dedicated leather tools are not always needed. Here is one of his videos(The Tools You need for Leather Work): https://www.youtube.com/watch?v=X1pAMZQpYFA Here is another (Top 25 Recommended Leather Tools): https://www.youtube.com/watch?v=VTfMRaVyCd4
-
You could get it engraved on a big metal ring and then mount it onto the maul. Just watch out for Smeagol trying to make off with his precious, though...
-
It's funny what gets people interested in leatherwork. For some, it's playing with cool machines and tools! Welcome aboard, and happy sewing!
-
That is very nice! Lovely floral work, and a spectacular dye job! I would like to know how you did the dye work. I think that I can guess the steps, but I am not certain.
-
If you live in California, you may be able to locally source some non-water-based dyes if you are close to Santa Fe Springs. The Angelus compay is based there. Address: Angelus Direct 12060 Florence Ave. Santa Fe Springs CA 90670 U.S.A. Website: https://angelusdirect.com/collections/angelus-dye-1
-
Very nice work! I see that 2 of them use metal rings for the lacing and one only uses holes through the leather. Which do you think is the more comfortable and secure system?
-
Maybe this fellow is still around in Tuscany? From an older thread (2016): italiantanner 7 posts Location:Italy Posted February 3, 2016 Hello! I'm writing from Tuscany, Italy. I'm the owner of an old tannery, La Ruota SRL, founded in 1952. We produce bovine leathers, full grain and full vegetable tanned. Double Shoulders, Double Butts, Backs, Bellies, Calfskins, Splits, etc. We can ship Worldwide. Quality 100% Guarantee Visit our e-shop at www.leather-eshop.com. Thank you!!!!! Simone. post-69765-0-05040600-1454510569_thumb.j
-
I like the inverted carving style. You have a nice touch for it! Welcome to the forum!
-
Are you using a strap cutter of some sort, or just trying with a straight edge and a knife?
-
If you only want Campbell's, there was this thread back a few years ago which came up only with a supplier in France < this bookbinder supplier might have what you want: <http://www.talasonline.com/Irish-Linen-Thread> Try here maybe "WAXED POLYESTER-LINEN; Irish polyester-linen from Henry Campbell. Waxed in the USA." --> <http://www.thethreadexchange.com/miva/merchant.mvc?Screen=CTGY&Category_Code=WAX165> Will Crawford linen thread (made in Belfast, Ireland) do for you? If so, it's 4 cord waxed linen, available here <http://www.basketmakerscatalog.com/waxed/wlinen.htm> and here <http://www.royalwoodltd.com/cat14-17ar.htm>. I have used it in some of my projects.
-
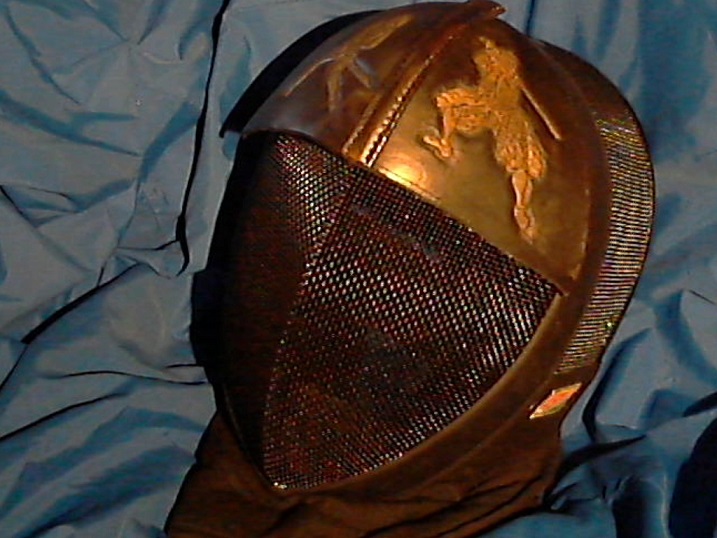
Ok, got both panels tooled, dyed, and assembled. Here's the result, just sitting on the proper place of a mask: