DJole
-
Posts
1,091 -
Joined
-
Last visited
Content Type
Profiles
Forums
Events
Blogs
Gallery
Store
Everything posted by DJole
-

Scouts wallet for customer.
DJole replied to HamiltonLeather's topic in Purses, Wallets, Belts and Miscellaneous Pocket Items
I wonder if the recipient of the wallet is a holder of the Leatherworking merit badge? (I don't have one myself; I didn't get into leatherwork until long after Scout age.) As a fellow Eagle Scout, congrats to the new Eagle. As a fellow leatherworker, nice job-- that's a clean design. I concur with the interesting use of the overstitch wheel on the pocket lines. -
Such a helpful community -- you got some great instruction there, and it looks really nice!
-
That's nice work for your first piece. Nice design and layout of elements, and good stitching for a beginner (certainly better than mine was!) Does it work well as a quiver? I can't see the barrel stitching in your photos, but if it's anything like my first cylindrical projects, I can see why you're not showing it.
-
Korea has some *awesome* leatherworkers. That's a nice piece, and she's got a lovely design.
-
I like the playfulness of the big paisley patterns -- that's a nice design! Also, congrats on scoring a bag design that you were searching for. I can't comment on the Resolene though; I don't have the expertise.
-
37B17868-647B-40F5-ABAC-1A0BE4FEF595.jpeg
DJole commented on Cmleather's gallery image in Gallery- Our Leatherwork
 Oh, that's lovely work! The painting and modeling are top notch! I'm pleased to see yellow thread in there, too, as a complementary accent. (I've got some yellow thread, but I haven't used it anywhere yet.)
 -
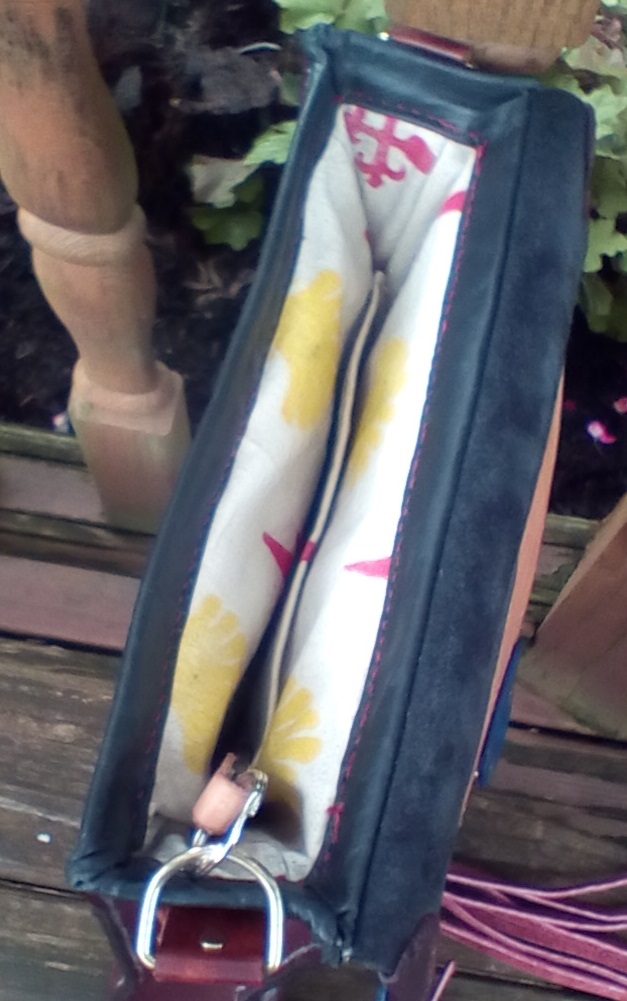
I found that lining method to be a real headache. Making the inside cloth lining fit exactly inside the leather bag (all four seams, and the height) was a real pain. You may be up to the challenge, but I don't think I'll do things this way again.
-

From the album: DJole -- Completed Work
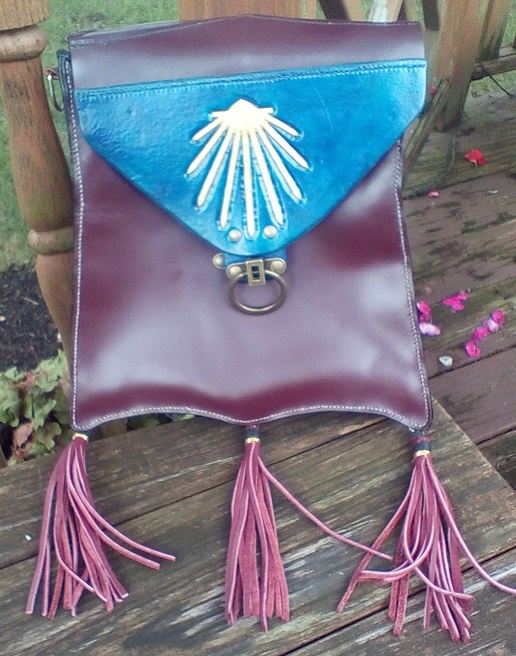
in commemoration of one person's completion of the Camino de Santiago -- over 1500 km of walking. -
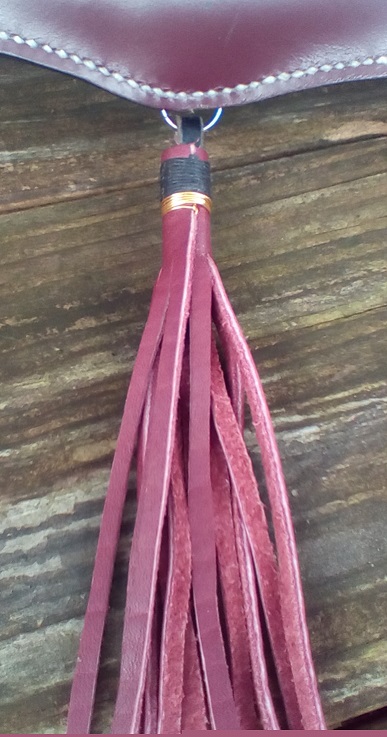
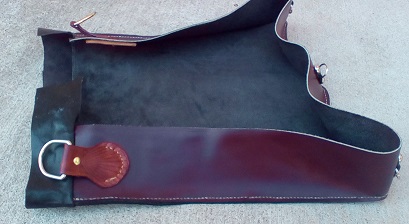
A relative of mine, a couple years back, walked the medieval pilgrimage route, the Camino de Santiago, from Le Puy, France to Santiago de Compostella, Spain (2 1/2 months of nearly daily hiking, all on foot, about 1500 km). So this summer, I made her a commemorative bag, similar to the one the medieval pilgrims used, as pictured in art like this: And here's my version: I used some red-brown chrome tanned leather (picked up at a Tandy clearance sale) for the bag, and some thick tooling leather for the flap. The tooled design is a scallop shell, the symbol of St. James. The golden shell and blue background are used as trail markers across the Camino. That's Angelus light blue and gold acrylic paint on the front flap. 3 coats of SuperShene on the flap, too. The edges are coated with Fiebeing's Edge Kote in black. The closer hardware is from Ohio Travel Bag. They have a LOT of cool hardware! The tassels are handmade (wrapped with black thread and gold wire)-- see close-up here: I am very pleased with my stitching -- I used a 3 mm Japan Goods stitching chisel. I used Natural waxed linen thread for the bag and Blue waxed linen at the top of the blue flap. Other stitching used Red waxed linen. Both the Red and Blue thread are from Royalwood, Ltd. in Ohio (see their website here:<https://www.royalwoodltd.com/>) There is a cloth liner inside, using hand-printed fabric which features the shell motif and the St. James cross: Even the strap hangers keep the shell motif (using Fiebing Mahogany to get that red-brown color): I learned a LOT from making this bag. The full story of the bag (with work-in-progress pictures) is located at my website, here: <http://djole.altervista.org/djole/Publications/Leather/Camino Bag/CaminoBag.htm> The strap is not done yet -- I didn't have enough time to finish it before giving to the new owner. I'll get the measurements and make that later on.

-
Perhaps what this person did will work for you: <https://www.tumblr.com/search/attaching armor> You may also try lacing the armor onto whatever you wear beneath it. In other words, there will be small holes (like grommets on your shoes) in the armor, or a small tab attached to the armor, and laces attached to the clothing. The lacing goes through the small holes and fastens the armor on. Looking at the armor you illustrated, I can see where this would work. (this was actually how some armor pieces were fastened on, with what are named "points.")
-
Welcome to the forum! You might also find additional answers to your questions in Ian Atkinson's video links, done from a UK perspective (he lives and works in Leeds): <http://ianatkinson.net/leather/videos.htm> He features topics like the following: Beginners’ Videos Top 25 Recommended Leatherwork Tools (45 mins) The Tools You Need for Leatherwork (15 mins) The Hardware You Need for Leatherwork (30 mins) Information About Dyeing Leather (45 mins) Choosing the right type, weight and quality of leather for your projects (35 mins) Hand Stitching Leather (1 hour 35 mins) And I see you live in Cardiff -- I spent a couple days in Cardiff on my way to a summer Welsh course in Lampeter, back in 1988.
-
You're welcome. It worked well for me, since I used it to make these things: * http://djole.altervista.org/djole/Publications/Leather/Samurai Wallet/SamuraiWallet.htm * http://djole.altervista.org/djole/Publications/Leather/GL wallet/GLWallet.htm and this work in progress: *http://djole.altervista.org/djole/Publications/Leather/Camino Bag/CaminoBag.htm
-
Here is one way to get straight stitch holes through 2 thin layers, which I have been using on a couple of wallets and a larger bag with visible stitches. The leather I have used for these projects is 2 mm thick (veg tan for the wallets, chrome tan for the bag). I'm using a 3 mm chisel with my projects. 1) Use wing dividers to scribe the stitching line on the outside (visible side) of one piece, and use stitching chisel to make the holes down that line. (I'll call this the "top" piece. ) 2) using the same wing divider measurement, scribe the stitching line on the INSIDE of the second piece (the flesh side of the "bottom" piece). (I also did a very light line on the outside/grain side of the leather so I could check the accuracy later on.) 3) Put the 2 pieces of leather together (flesh side to flesh side), so that the stitching lines overlap. Hold them together tightly, and check the alignment of the edges and the lines. Then use the stitching chisel to MARK the first few holes on the bottom piece by just pushing the chisel through the existing holes on the top piece, without using the mallet. Don't go all the way through the leather. 4) Remove the top piece. Now, you have the first set of holes correctly indexed on the bottom leather stitching line, on the flesh side of the leather. 5) Go slowly -- keep the chisel VERTICAL over the line, and before striking with the mallet, make sure that all the chisel prongs are lined up ON the line, and not drifting off to one side or the other. (this is where I realize that something with more teeth than my 6 prong chisel would be useful, but I make do with what I have!) 6)Since the chisel enables you to make consistently spaced holes, you can now use the chisel to complete the line, trusting that the holes in the top piece will line up with the bottom piece. Every few strokes, check your line by lifting up the leather, and then looking to make sure that your holes are following the line on what will be the visible side of the leather. This should help keep your stitch lines the same distance from the edge, making the burnishing/edging process easier. As ImMikeToo points out, for a thicker leather this might not work. For stitching those thicker leathers using an awl, you should definitely look at Neil Armitage's videos: <https://www.youtube.com/channel/UC8urn9l3pybW5LztUa6zbOA>; He does an extensive review of pricking irons and their use, as well.
-
Welcome to the forum! As you spend time here, prepare to be amazed at how much you can learn and improve you leatherworking skills.
-
Mary Rose flask
DJole replied to Brushpopper's topic in Purses, Wallets, Belts and Miscellaneous Pocket Items
Lovely work! I was wondering how you had shaped it, so I am glad you included the wooden molds for it. -
Greetings from Omaha, somewhere in middle America...
DJole replied to FlatwaterLeatherGuy's topic in Member Gallery
Welcome to the forum! -
Watch Ian Atkinson's video "Leather Turning and Bindings" for a review of various ways to edge, including folding and creasing. Video is here on YouTube: https://www.youtube.com/watch?v=jOiuBcl2fek
-
Do you have any kind of camera right now? If so, is it a DSLR or a smartphone/tablet camera?
-
Your most severe critic, the horse, seemed to think it was okay. I've never worn a breast collar so I wouldn't know what a good one was. Oh..wait...you're asking about the tooling? Well, that's fine too. If Patty doesn't mind....
-
Your dog is too smart! Give her a merit badge!
-
For security, you can't go wrong with the bowline. It doesn't come untied by itself or slip. It can also be untied easily, if you need to. Scouts and climbers know and use this knot for those reasons. The hangman's knot has a cool name, but I don't know if you can depend on it in this case.
-
New wallet! Need opinions
DJole replied to paulamoose's topic in Purses, Wallets, Belts and Miscellaneous Pocket Items
The whole piece is a great design in which all the elements work together. That is some very nice work with that "scale"-look stamp-- getting geometrics to work is a pain, but you did it very well here. Maybe you shouldn't hide the work by using a colored antique dye/stain at all, but a highlighter, instead, which will darken the leather slightly but help the tooling to "pop." The stamped elements already have a nice dark contrast, and I'm not sure that darkening them would be an improvement. This looks like a job for the scrap leather test! -
What kind of project is it? Is it thick veg-tan (like a sheath) or softer leather (like a purse)?
-
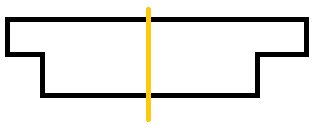
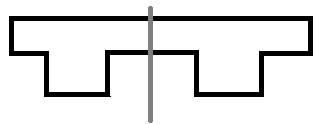
An interesting question. It could be one long row, with a single stitch down the middle which makes the pocket, like this example: (the colored line is the middle stitch.) or it could be this way: My thinking is the second way, to reduce the leather thickness like you say. I am curious to see what the actual experts think about this. I'd spend some time with some templates and possibly some scrap leather, making a mock-up.
-
Maybe these past threads will help you find the answer you need. I don't know enough to risk answering you myself!