DJole
-
Posts
1,091 -
Joined
-
Last visited
Content Type
Profiles
Forums
Events
Blogs
Gallery
Store
Everything posted by DJole
-

Looking for friction? tongueless? slider? buckle
DJole replied to blackmad's topic in Hardware and Accessories
Have you emailed them with the same request, and that picture? Perhaps the thing you want isn't in the online catalog. -
1) Yeah, I think most of us struggle with this, and not every hide works the same way. This is a case (no pun intended) of having somebody right there at your shoulder to supervise would be ideal. Otherwise it's a case of trial and careful observation. 2) That's the reason right there that many of us don't do basket weave. () Trying to figure out what you're doing wrong on your own is frustrating. 3) Are you referring to stamps (which make pictures like a star, or an eagle, or so on), or tooling stamps (bevellers, pear shaders, etc. )? 4) Muscle training -- it takes time to develop the even strokes. And perhaps you are hitting too hard, which affects this. Having the leather properly cased actually reduces the amount of work it takes to make a crisp impression. And for the other hand, it takes a while to develop the 'touch' to walk the tool to create a repeated smooth impression, rather than thinking of it as a series of discrete, overlapping stamps. Loose grip on the mallet, and using the fingers as a pivot, rather thinking of driving nails. 5) Many suggestions up above to weight the leather down as you tool it. Others use rubber cement to fasten the leather to a piece of cardstock or cardboard (this helps reduce stretch, which has caught me out a couple times). Having a softer touch on the mallet also assists with keeping the leather in one place.
-
Is it possible to make a embossing wheel using tinkercad
DJole replied to chrisash's topic in 3D Printers and Lasers
Could this over at Shapeways be a solution for you? <https://design.shapeways.com/> Apparently it seems possible in that program, as discussed in this forum post: <https://www.shapeways.com/forum/t/blender-wrapping-a-shape-around-a-cylinder.2285/> -
Is it possible to make a embossing wheel using tinkercad
DJole replied to chrisash's topic in 3D Printers and Lasers
Ah, I see. Well, too bad the easy answer is not an answer at all! Back to the drawing board... -
Is it possible to make a embossing wheel using tinkercad
DJole replied to chrisash's topic in 3D Printers and Lasers
Perhaps this video holds the secret you want? -
Hey, that's a very nice looking dragon! That tooling is sharp. (And the quilt in the background caught my eye, too... you have a quilter in the family? Quilters and leatherworkers have many similarities.)
-
Nicely done! And with better edges, too! Are you part of a re-enactment group which cares about historical accuracy?
-
Interesting old YouTube Video - Saddlers in Ireland
DJole replied to jcuk's topic in Saddle & Tack Maker Gallery
Not a saddler, but I still found the entire process fascinating to watch. Some beautiful work produced on those benches. I wonder if the saddlery is still around? -
You should be able to get some medical help for that...
-
What a clever contraption you have there!
-
If you can attach some photographs of the leather piece that has the problem, that will help us. The problem could be a number of things, but looking a picture will help us discover the most likely solution.
-
ELWATS 2018, Arnhem Netherlands (Pic heavy)
DJole replied to immiketoo's topic in Leatherwork Conversation
But I bet the weather down in Rhodes is drier and warmer. It looked like a great time was had by all and sundry. All those people dragged their tooling slabs to the convention? That's dedication for you. -
New Clock face for an old clock
DJole replied to corkscrew's topic in Furniture: Inlays and Upholstery
I see that Nemo found the diver... Nice execution of design, for a truly unique clock! -
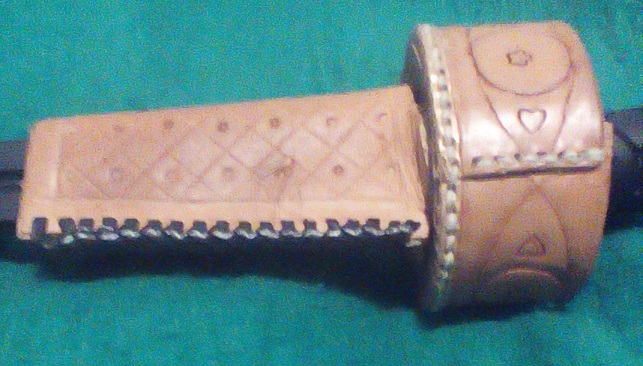
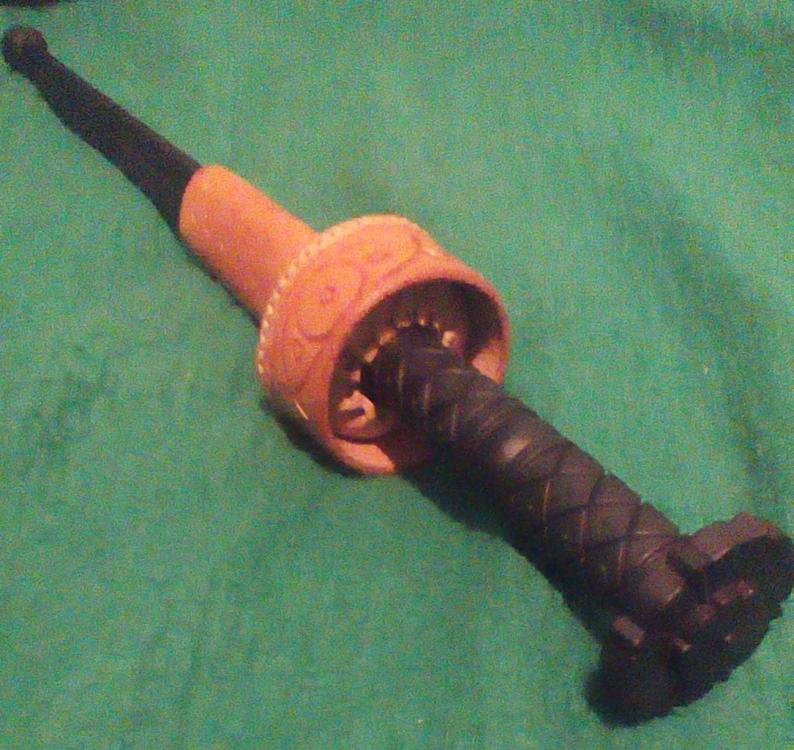
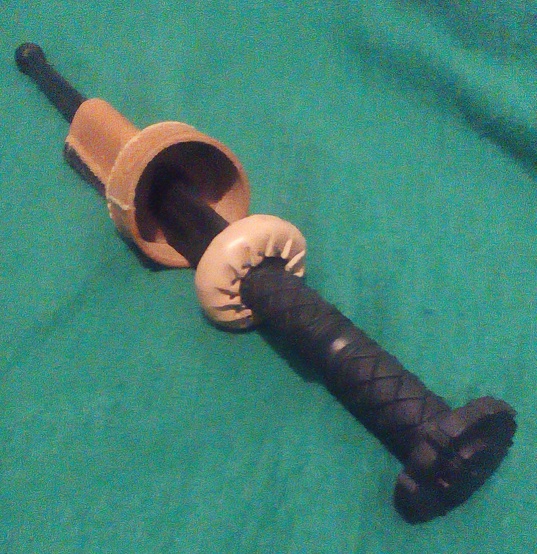
I recently was gifted a rondel dagger simulator (Cold Steel model) in my longsword class. This particular dagger design has a pretty, floral/star design on the rondels, which actually are rather jagged and pointy (as you will see below). Those rondels can scratch and scrape a bare arm. I read that some people modify these by taking them to a belt sander and grinding off those tips, but I decided to do it differently. I wrapped the lower rondel (the one most likely to scrape a person's arm) with a leather "boot", kind of like a steering wheel wrap. Then, I thought that I should make a sheath for it, so that I could actually carry it and even use it during longsword practice (as a secondary, backup weapon). But this dagger is triangular in cross section, and those rondels don't lie flat, so what kind of sheath would work? Also, the balance point (where the knife will hang blade-down correctly) is actually on the rondel itself, so any working sheath will have to go past that. But the rondel is round... so...what to do? My brain said, "It's got to go into a little cup, kind of like an inverted ice cream cone (the cake kind, not the conical sugar cone kind.)" A bit of research later on confirmed that this "cup" method is actually shown in medieval art, which made me pleased. And of course I have to break out my tools, to make it look nice: I decided to lace up the triangular portion (since it will likely see some wear), and I actually used my filigree punches for decoration here. The color is a British Tan antique paste, from Tandy, which I have had for...hmm...many years now! I am pleased with the barrel stitching (the round bottom of the cup)-- I have nearly got it figured out! The triangular part (to the left) is not yet riveted to the cup (on the right) in this photo. Here is another shot of the dagger, resting in the cup: And now for a shot of the "boot" around the rondel: The boot also creates a nice friction fit against the sides of the cup. The last thing to do will be to create the hanging loops -- I'm thinking of some way to do a dual system, so I can hang it vertically or horizontally.
-
If you find out, you will let us know, right? ;-) I'm curious to know what this thing is called, too.
-
Try asking the folks at Ohio Travel Bag if they can identify this for you. They have a LOT of specialty hardware. Link here: <https://ohiotravelbag.com/contact.aspx> Perhaps the Buckle Guy can locate this piece. Link here: <https://www.buckleguy.com/contact-us/>
-
At first I was wondering if the title of this post referred to you, but now I see that it's a burly machine!
-
Cherry blossoms wallet and key fob
DJole replied to datdraku's topic in Purses, Wallets, Belts and Miscellaneous Pocket Items
Very nice -- It's a beautiful piece of work aside from the tooled design, and the understated accent of the blossoms really adds to the beauty. -
No apologies for your English is needed here. We're looking at the leather, not your grammar or vocabulary! ;-) and you have some nice stuff -- you use the geometric stamps like a master!
-
I have nightmares (figuratively speaking, of course!) about trying to line up designs like that camo stamp around a circle. It's quite the job to get them lined up and evenly spaced. That's a nice job with the meander tool, and an excellent solution for terminating each end.
-
Wallet interior I am proud of
DJole replied to datdraku's topic in Purses, Wallets, Belts and Miscellaneous Pocket Items
I see now -- I couldn't see that those were gussets, and now I understand. It's an interesting way to do a change pocket. -
Wallet interior I am proud of
DJole replied to datdraku's topic in Purses, Wallets, Belts and Miscellaneous Pocket Items
That is very well done. It's so smooth, and balanced, with nice color harmony. Marvellous stitching, too! I can't figure out how the little pouch is stitched onto the liner-- can you explain the pattern? -
Shot shell bag for sporting clays
DJole replied to corkscrew's topic in Gun Holsters, Rifle Slings and Knife Sheathes
That's a nice looking squirrel and branch. Good modeling and excellent coloring! The texturing on the backgrounds is a nice touch, too. And I suppose it even works for its intended purpose, so it's all a win! -
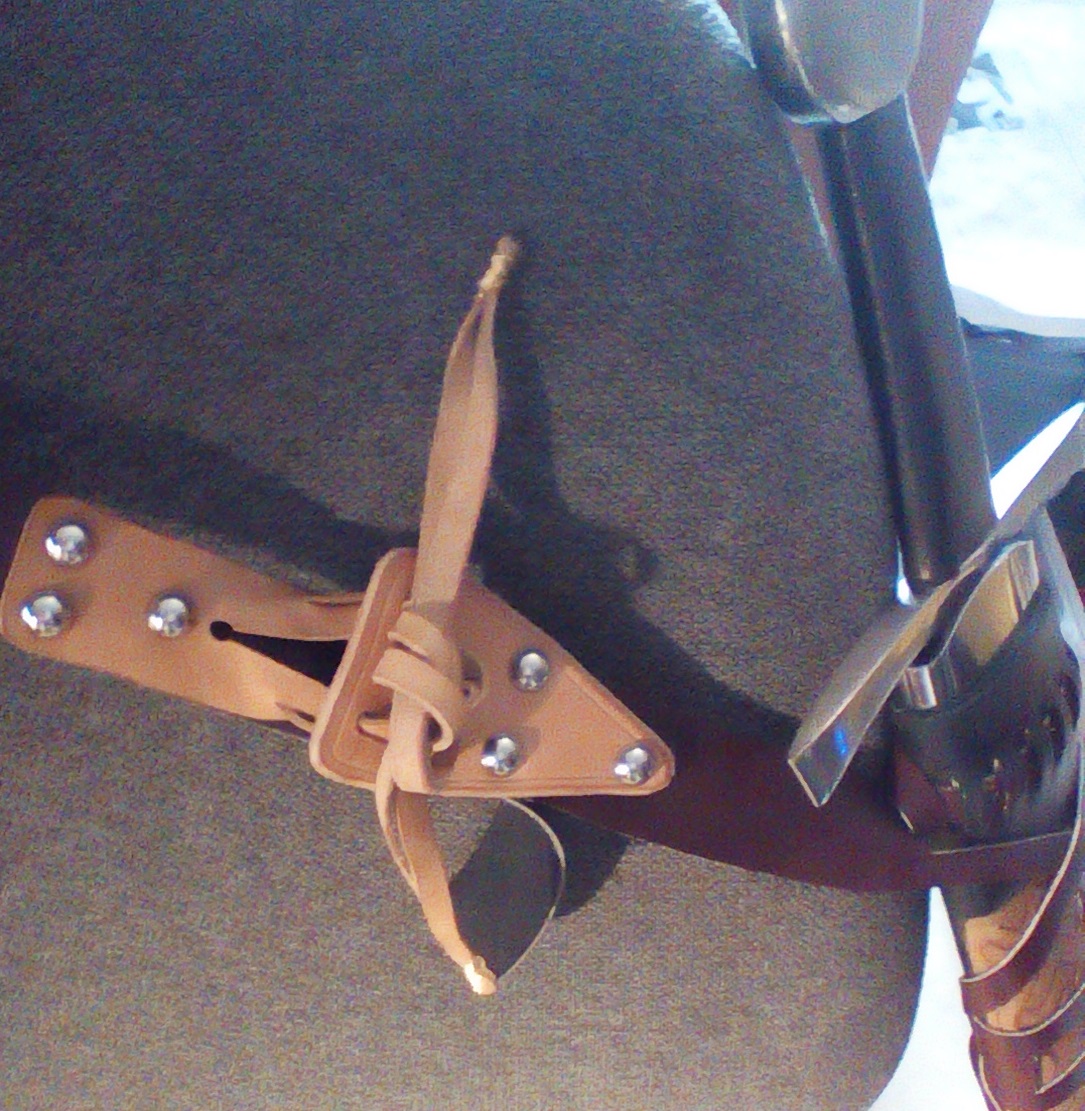
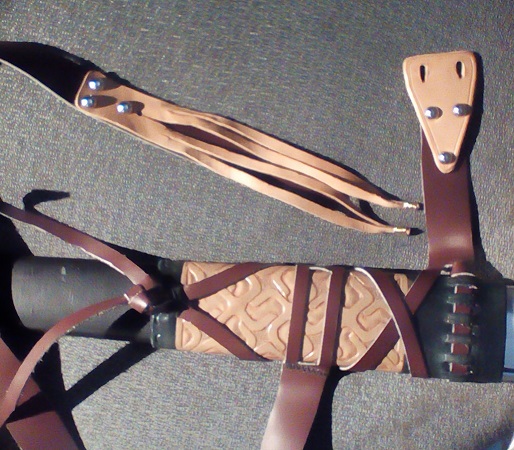
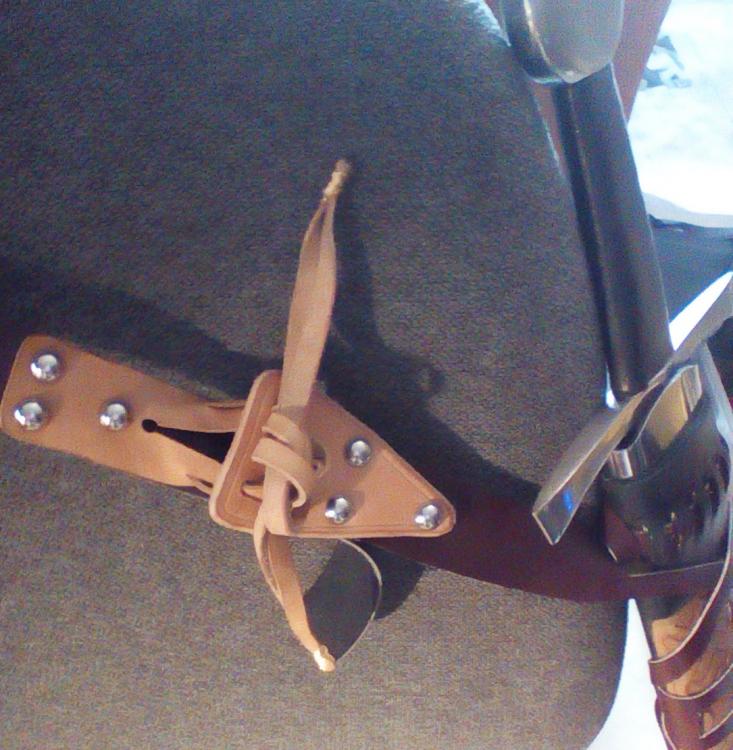
Completed it today. Here are all the straps, sewn and mounted: I have the ties installed -- it kind of looks like a squid here. I modified the design somewhat --instead of just splitting the strap in two, I put on a piece of veg-tan and split that instead. And instead of two, I decided that using four strips made for a stronger bond, and a better looking knot. So I wrapped the ends together with wire, not only to lock them together but as a bit of decoration. I made a flat knot where the scabbard straps cross (bottom left) which looks nice and neat. And here's what it looks like all tied up, hanging from a chair back. I am satisfied with it...I got to practice more leather skills and end up with something I've wanted for a long time.
-
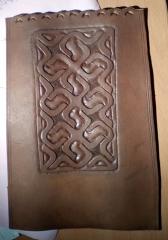 This is the pattern for the panel of the scabbard hanger. It's not knotwork, but actually referred to as a "key" panel. It's based on a pattern taken from Bain's famous Celtic Knotwork book, from a section of key panels. The original is found somewhere in a church in Wales. It's not Celtic or Viking, but just plain medieval.