


DJole
-
Posts
1,091 -
Joined
-
Last visited
Content Type
Profiles
Forums
Events
Blogs
Gallery
Everything posted by DJole
-
For longer blades, like swords, a back sheath is pretty much Hollywood -- you can only draw the sword the length of your arm, which is shorter than the lengths of most swords. (For a quick, fun illustration of this problem, look at this video: Shadiversity -- Drawing a Sword from the Back) But for a shorter blade, like a machete, it may just be possible to draw it from a back sheath. Use cardboard and mock it up before devoting leather to the project. I don't think you could cross your face and draw it -- that would be a lot less draw length. Drawing it up over the right shoulder (if right handed) would be the way. Or make a down-draw sheath, as illustrated above.
-

Tested Cricut Maker new debossing tool (photos attached)
DJole replied to AmyK's topic in Leatherwork Conversation
An interesting experiment! Thanks for sharing your results. If the pen is permanent, then it has a lot of potential. -
circular holes or holes cut out - is there a difference?
DJole replied to NeilMott's topic in Sewing Leather
My understanding is that the angled slits allow more stitches per inch, but also give the thread more "meat" to grab, meaning the stitches are less likely to tear out through the leather. For a small size project, like a watch band, this may be important. The angled slits also mean the holes are smaller in size, so you don't need bigger thread to 'fill' the hole. So the stitches per inch and the thread size are the two variables, rather than having to account for the hole size, also. Round holes are different -- to punch them out removes a bit more leather, and they can't be placed as close together as the angled slits or else you get a postage-stamp perforation effect. (I see that many commercial kits use round holes -- I don't know if it's because it's easier for a machine to do that when cutting out the pieces of the kit, or because it's easier hand stitching for the beginner who is the market for the kits.) I vaguely remember reading somewhere that the diamond shaped awl (which is paralleled in shape by pricking irons and stitching chisels) pushes the leather fibers apart, whereas the round punch cuts through them. (I suspect that in reality they all cut through at least some number of fibers, but the round hole would cut more) Imagine a piece of woven cloth, where you push a needle between the fibers, leaving them intact, or cutting a tiny round hole, breaking some of the threads, thereby weakening the structure. I can't verify that this is actually what happens in leather, though, so I am merely sharing this as a possibility. If you are using the diamond shaped holes, or the traditional angled slits from an awl / pricking iron / stitching chisel, it is possible to get a "straight" stitch. You basically have to know how to correctly do the angled stitch, and then not do those things. It's not BAD technique, if that's the look you want! The angled stitch has historical precedent -- it's a marker of hand-sewn saddle stitching, the way it was done for many years. Machines can't do that -- they do a straight lock stitch. In the end, it really is up to you and how you want your stitches to look. -
circular holes or holes cut out - is there a difference?
DJole replied to NeilMott's topic in Sewing Leather
Ditto what Wizard of Tragacanth said: round holes are not going to give you the small, tight stitches you want for watch straps. Diamond-shaped holes won't give you what you want, either. You need the flat, angled teeth of traditional stitching irons/chisels. -
Welcome to the forum-- there are many friendly and skilled people here, with years of experience in just about every type of leather work. If you search this forum for "stitching pony," "stitching horse" or even "stitching clam," you will get a good variety to look at. Some people with excellent wood-working skills have done some gorgeous work. You say that you are unsure of what tools you will need, but that's fine! That just means you won't go out and drop hundreds, or even thousands of dollars on tools which you don't ever use. There are quite a few resources that can help you discover what you need to start with. Check out Ian Atkinson's video page (https://ianatkinson.net/leather/videos.htm) where he has some good tutorials and some discussion over what tools you might need to start with. Of course, that depends on if you are interested in doing tooling and decorative work or not.
-
Looking for Options for Thin Leather
DJole replied to NewfoundlandLaw's topic in Leather Sewing Machines
I can't answer your machine questions, but I do have a Newfoundland question. I spent 3 years in St. John's, going to Memorial U. Are you out 'round the bay in an outport somewhere? -
I have no advice -- I don't own a machine that will sew leather. Maybe someday... For that, your best bet is to locate the section of this forum that deals with leather sewing machines and seek expert advice there!
-
The biggest problem is figuring out what you want to do, so that the tools you get help you with that kind of leatherwork. You can actually do quite a lot with a handful of tools -- I began with an Xacto knife, a modeling spoon, needles and waxed thread, an awl, a mallet, one stitching chisel and some hole punches, plus a rubber pounding/cutting mat. That's really not a whole of money to start with! Over time, I have collected various tools AS I NEEDED THEM for a project, rather than just going out and purchasing a bunch of tools. There are a few tools that I purchased which I rarely use at all -- the stitching groover, for example. I find wing dividers much more versatile.
-
Welcome to the forum! Your question is a very common one. First, it would be helpful to know where you are at, so that we can direct you to resources in your area. Start with a video such as this: Top 25 Recommended Leatherwork Tools--> <https://www.youtube.com/watch?v=VTfMRaVyCd4&feature=youtu.be>
-
Welcome to the forum! You'll find that there are quite a few of your own countrymen who post here, so you'll find information that is relevant to UK members, in addition to the vast range of helpful, experienced folks who can help you with leatherwork.
-
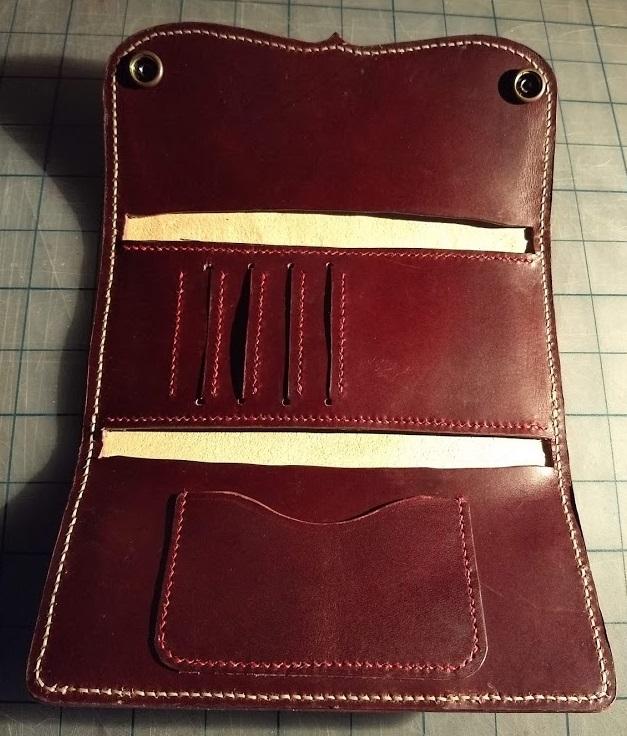
I just recently used double-sided tape for the first time on a project. I found it at a local craft store, about 1/8 inch in width. I used it to help create interior slash-style wallet card pockets. For light leather, it's nice and quick, and straight, to hold the pieces together. I did not use it for outside edge seams (those were glued, clamped, and then let dry.) For heavier leather, I don't think it'll work so well -- a good glue would be much more secure.
-
Hello, Rebeldevil, and welcome to the forum! 1) What are these "things" that these work buddies want? If you mean wallets, holsters, sheaths, etc., that's an awfully tight schedule, especially if you've only just begun learning the process. If they just want keyfobs, or coasters, that may be possible. But if you want to do good work, it'll likely take more than 2 months to get the hang of it. 2) Hobby Lobby acrylic paints should be just fine. I don't think that there is a special "leather-only" acrylic. You just have to know that acrylic paint sits on top of the leather, and is thus exposed to wear and scratches. So you'll certainly want to cover it with a finish, like you are planning to do. 3) Eco-flo glue is basically PVA (poly-vinyl-acetate). It's okay, but I find that other adhesives hold better and faster (like Barge brand cement, for example.) 4) Among your list of finishes, you might get some Fiebing's Resolene finish, too. You should take time to find and watch reviews like this--<https://www.youtube.com/watch?v=zyTg_hfpNUM> This video is Ian Atkinson's review of various leather finishes, featured on his YouTube channel. Ian has a LOT of other good information (about tools and techniques) on his YouTube channel that you will likely find very useful as you start out. 5) As far as additional tools go -- do you have sharpening stones for your edged tools, and a strop? Having these things and learning to used them will really help out!
-
Skull and Roses wallet
DJole replied to AndyL1's topic in Purses, Wallets, Belts and Miscellaneous Pocket Items
That liner you found is perfect for this! The rest of it's pretty good too. The "primitive", limited modelling on the roses works really well. -
Celtic wolf for a valet
DJole replied to arashikage's topic in Purses, Wallets, Belts and Miscellaneous Pocket Items
I actually hardly ever use the flat blade in my swivel knife! I find that for me, the angle blade works for me and the designs I do. I do have a flat blade-- I should mount it and practice with it, I suspect! I know which tiny backgrounding tool you mean! I got a bigger one for the reason you listed, and to speed up the process of a big background area. That's way of tools, isn't it? Add another one, and another, and another, as you suddenly realize you need them. Of course, I find that I only use 5 or 6 tools for 90% of what I do. A couple ones (like the basketweave) I haven't used in years. You should also get Leather Crafting by Tony Laier -- it explains the basics of how to use the beveller, backgrounder and other tools. Pretty clear instructions and good illustrations. It's a free download, too. (It's basically an updated version of a Stohlman manual from the 60s.) -
Celtic wolf for a valet
DJole replied to arashikage's topic in Purses, Wallets, Belts and Miscellaneous Pocket Items
I suspect that nearly every beginning leather-worker bites off more than he/she can chew with the first few projects! It's just human nature, I suspect. The stitching is good for a first time project, and the tooling is pretty good for first time, too! You just need some practice time. Which large Tandy blade are you referring to? Are you using the flat one, pictured attached to the knife itself, or one of the angled blades? Getting the leather casing right does help a lot-- it takes some time and experience to figure that out. Too wet, and the leather is mush, and won't hold any design. Too dry, and it won't take any design, and cutting is difficult. It will also take some time to get the feel for making smooth curved lines -- as others on the forum point out, repetition is key here. The common advice goes like this: doing 10 small projects (drink coaster or luggage tag size, for example) helps you develop proper technique and tool use. They are also quick, and don't waste a lot of expensive leather. Your bevelling lines look like you've figured out how to "walk" the tool, which is a big struggle for many beginners. But your bevel seems to be too steep, like a V shape instead of like this: See how the one side of the bevel (away from the cut line) fades out? That's what the tool is meant to do, adding dimension rather than just deepening the cut line. Like you, I noticed that some of my designs required a smaller bevel tool than the basic kit has. I also, over time, added a larger figure bevel and a textured bevel. Not all at once, but for specific projects. A modeling spoon is pretty useful, too, as you note. Your backgrounding should also fade out at the edges, like the beveled lines. The tool should be rotated so that no discrete tool makes (the pointed oval shape) can be seen. A lot of places are fine here, but the upper left has the tool marks visible. You might find Stohlman's book-- Leathercraft Tools: how to use them-- useful to understand what the tools are meant to do.-Is it still a free PDF download? -
You could make a card holder, like this:http://djole.altervista.org/djole/Publications/Leather/HelenaCardCase/HCardCase.htm I used thin pigskin for the pockets, and it's as thin as, or thinner, than the leather you have up there. It's a good project for practicing leatherworking skills, too.
-
For punching and stamping, yes -- the weighted deadblow hammer is good. One hit and done. If I did a lot more stamping and punching than I actually do, the deadblow hammer out in the garage would join my mallets in the leather tool box. For tooling, where the aim is lighter, repeated taps, the mallets work well.
-
You strike something with that, the thing KNOWS it's been struck! I just use the yellow poly mallets (one smaller than the other) from Tandy. I haven't had any reason to switch yet.
-
Find a place that cuts and installs stone countertops and offer to take away a scrap piece of granite, like I did. Cost was zero.
-
Mini Hand Bag
DJole replied to thefanninator's topic in Purses, Wallets, Belts and Miscellaneous Pocket Items
Nice! Beautiful craftsmanship. Working in miniature is difficult! -
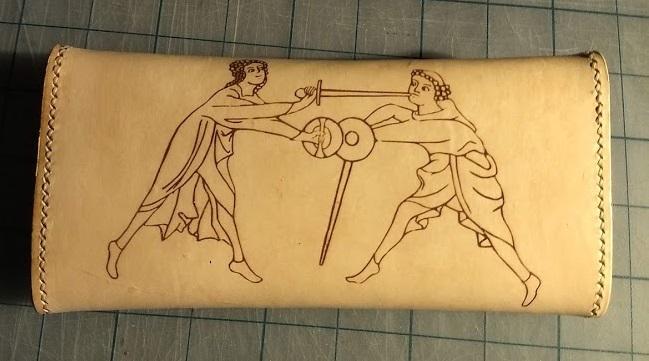
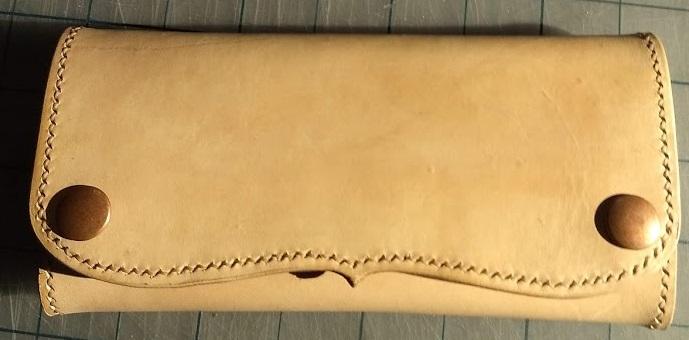
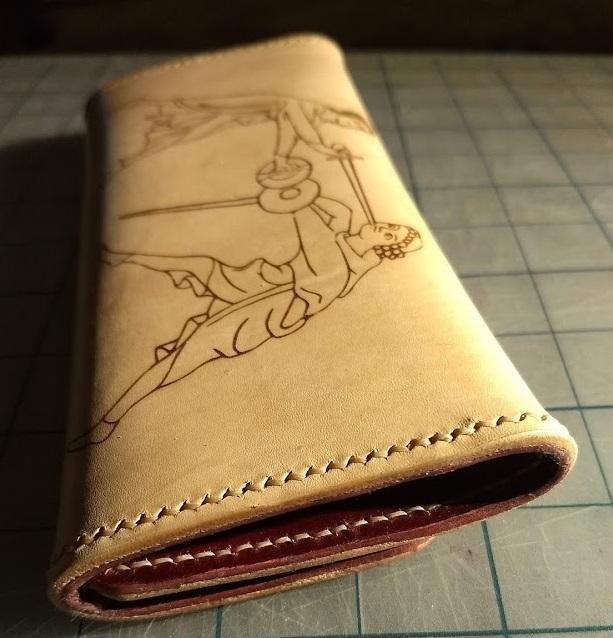
New "Walpurgis" long wallet
DJole replied to DJole's topic in Purses, Wallets, Belts and Miscellaneous Pocket Items
Not a laser printer (which is used to print documents) but a laser engraver. I had it done at a local shop which engraves trophies (wood, metal, plastic, etc.) using a laser. They charged 13 dollars, which seemed quite reasonable to me. -
Got this just about finished tonight. It just a needs a bit of cleanup on some edges and a nice coat of Resolene. I have more info about the process, featuring internal shots and pre-assembly pictures, on my website: <http://djole.altervista.org/djole/Publications/Leather/Walpurgis Wallet/WalpurgisWallet.htm>
-
Are you talking about antiquing techniques? That seems to be what you describe above.
-
That's certainly a different pattern! I personally don't care for the big rivets -- if I were doing this pattern and keeping the rivets instead of sewing them, I'd use smaller ones. But's that's just an aesthetic choice.
-
Fiebeing's White dye ends up like this (which was a deliberate design choice): http://djole.altervista.org/djole/Publications/Leather/Samurai Wallet/SamuraiWallet.htm