


DJole
-
Posts
1,091 -
Joined
-
Last visited
Content Type
Profiles
Forums
Events
Blogs
Gallery
Store
Everything posted by DJole
-
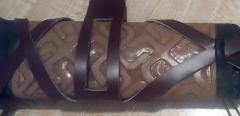
 Wider shot showing sword scabbard hanger in location on sword, with belt strap "buckle".
 -
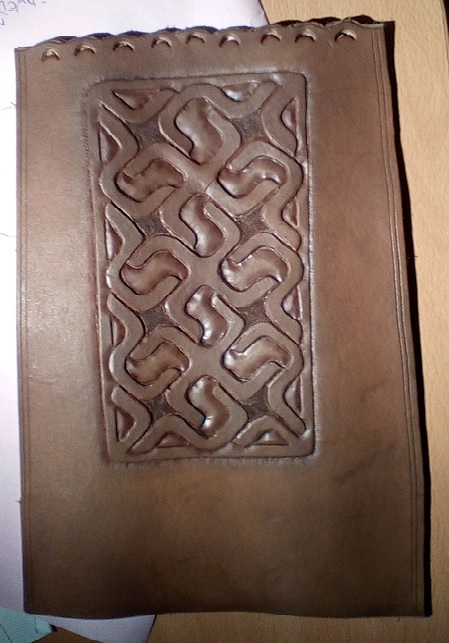
 Front detail of the key-work panel, with strap placement.
 -
I have always wanted a laced sword scabbard, but the amount of work (and wood working experience) required to create a scabbard is daunting. I have a sword, but it already has a scabbard, so what to do? Finally, I got a brainstorm -- I'll just make a sleeve which goes AROUND the existing scabbard, and that'll do the trick! So here's the original tooled design, a key-work panel on the sleeve, with Fiebing HiLighter (modified slightly from the original design, taken from a church in Wales): Geometrics are a pain...but to get it right, go SLOWLY with the swivel knife, and use a straight edge wherever possible. Here's a mock-up of what it will look like, when all done: All that intricate lacing...it's painstaking work -- you can't really cut the slits until you have the belt strips ready to mock it up. The triangular piece to the bottom of the picture is a type of "buckle." The other strap (top center) will end in two strips, which will tie through the holes in the "buckle." It's period -- some medieval art features scabbards done that way. I also decided to cut a 'window' in the wide middle strap to hide less of the nice tooling. Here's the back -- I'm using a baseball stitch to butt-stitch the pieces together, using flat lacing. I'd forgotten how tedious lacing can be; you really have to pay attention to avoid twisting the lace, or getting the pattern wrong (only had to undo two stitches so far!) Here you can see the interlaced straps, linked through each other. I didn't realize it, but the baseball stitching doesn't close the edges as closely as other stitches, so I think the hanger might be a bit loose on the scabbard itself. However, I can glue a 'shim' of thin leather inside the hanger sleeve, and that should snug it right down.


-
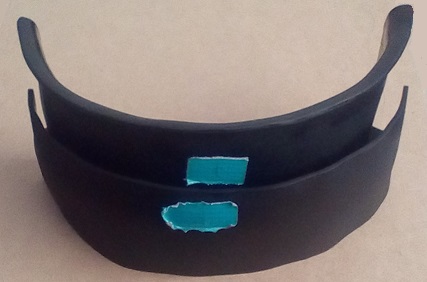
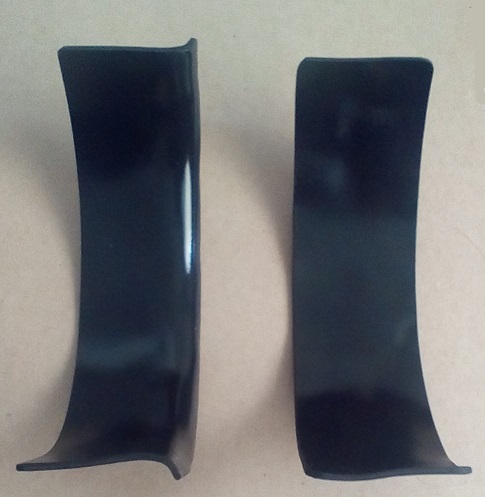
Those are some hefty leather elbows! Do they have three pieces of Kydex on them? I think I am going to do something similar these elbows I made, but putting the Kydex inside: 1) The leather alone isn't stiff enough to protect the 3 important bone points. 2) Once could, of course use cuir boulli, but then the nice carving would be lost, and the natural finish on the leather would be lost too. 3) So I'm going to install Kydex inside them. I don't think I can do it with one solid piece -- Kydex doesn't dish like metal, and I suspect that I would end up with wrinkles. But I'm thinking one piece with relief cut to form the curves, or two pieces, mirroring the leather pieces sewed together here.
-

First handbag
DJole replied to Marietje's topic in Purses, Wallets, Belts and Miscellaneous Pocket Items
Nice work-- look at all that careful, contrasting stitching! A lovely warm golden brown color, too. -
That's some lovely work! I like the curves in the border design, and that asymmetric closing strap looks great!
-
Library Display
DJole replied to Stewart's topic in Purses, Wallets, Belts and Miscellaneous Pocket Items
That's really nice--- for both you and your community! What you display here is the kind of thing that should make a lot of people say, "Hey, I should be able to do that!" -
That's a nice looking gorget piece there. As a person who wears a gorget (I got stabbed in the throat just last week -- hurray for throat armor!), I like the protection of this one more than your previous one. I envy your use of the machine to stitch all this together! Also, for the elbows to really work, they probably need to be dished if they're going to protect all three points of the elbow. That dishing is what I'm working with on a gorget project of my own: . I'm doing articulating lames -- this is the front. Using the heat gun, and my fingers, I bent the lip of the top lame over. Just like dishing metal, I had to go back and re-work the C-curve of the lame. I still need to go back and fine-tune some flatter spots. But I found the articulation would be better if I could also dish the Kydex: It's a subtle dish, but the lames curve into each other. It sure takes a long time, though! This is where a form would be useful. I know that Kydex can be dished into a deeper bowl shape, but I don't think I want to try doing it by hand!
-
Angelus leather paint is acrylic, so it should act as a resist to any dye you apply over it. The dye should not affect the paint color --but you should test this, of course, using a scrap piece of the same leather as your project. If the results are not what you wanted, then you should do the dye first. For the project below, I didn't use paint--I used the colored dyes first (that white is actually Fiebeing's notorious white dye, which actually worked well for the weathered, old-fashioned look of this project.) The eyebrows and mouth were done with a fine point black Sharpie marker. Then I carefully applied Fiebing's Resolene over the dyed areas (white, red, black and other), let it dry, then used antique black for the rest of the wallet. The antique wiped clean from the resist-covered dyed areas. <http://djole.altervista.org/djole/Publications/Leather/Samurai Wallet/SamuraiWallet.htm> I used white acrylic paint in another project: <http://djole.altervista.org/djole/Publications/Leather/Pouch/CometPouch-1.htm>. But I didn't use antiquing. I think the antique dye should be first, then the paint (since that will cover any dyed areas), then the finish (Resolene or whatever).
-
Try safety pins, perhaps? They should lock the elastic in place.
-
Assuming that you have already made stitching holes in the leather, you should be able to stretch the elastic then push pins (like for fabric sewing) through both the hole and the elastic to hold it in place. I did this while stitching a cloth liner inside a bag, and I had to find a way to keep it taut while stitching.
-
I am no expert on the chemistry of dyes and dye mixing, so I don't know why your dye is splotching. I look forward to an expert chiming in to explain the problem. In the meantime, perhaps you can try another dye manufacturer. I find that Angelus works just as well as Fiebing's dyes. Maybe Angelus has the dye color that would match what you want-- there is a dark Navy Blue dye available: Dharma Trading has a lot of colors available: <https://www.dharmatrading.com/dyes/angelus-leather-dyes.html> Or factory direct: <https://angelusdirect.com/collections/angelus-dye-1> I use a small paint brush frequently when dying leather. I haven't thinned the dyes out (although I do have a bottle of Angelus Solvent/ dye reducer for this purpose). 2 important things: (1) wipe excess dye off the brush! Don't load the brush with a lot of dye, because once you touch the brush to the leather, suddenly a flood of dye will rush into the leather pores! (2) work from the center of the area to the edge, to avoid dye going past the edge lines. it's not really painting, but more like carefully daubing. As far as intricate dye application, small areas of dye shouldn't appear uneven. Big areas of dye have that problem.
-
You should get in contact with Ian Atkinson, who lives up in Leeds. He's got a website here: <http://ianatkinson.net/leather/> His website also has a lot of video instruction about a lot of different topics-- tools, techniques, and materials.
-
Dont get carried away with collecting sewing machines
DJole replied to chrisash's topic in Leather Sewing Machines
I think this guy won the contest! Did he have a purpose for such a collection, or is it just compulsion? -
Radio bucket
DJole replied to Horsewhishper's topic in Purses, Wallets, Belts and Miscellaneous Pocket Items
You are certainly right about box stitching being tough to learn, especially the 45 degree miter jointed pieces. It looks like you decided to not use miter joints, and instead used flaps? The stitching looks pretty good, and the red thread looks great here. Looks like a hefty piece that will hold up to abuse in the field! An interesting array of straps on there -- what's the third one for, the one that hooks to the belt behind the back? -
Spartan short sword sheath.
DJole replied to immiketoo's topic in Gun Holsters, Rifle Slings and Knife Sheathes
Ah, for some reason I thought it was UNDER the sheath! Woops... -
Spartan short sword sheath.
DJole replied to immiketoo's topic in Gun Holsters, Rifle Slings and Knife Sheathes
Nice use of period design motifs, and excellent handwork. As the leaf-shaped blade is wider at the 'waist' than at the hilt, the scabbard sides can't all be sewn up (or else the blade wouldn't go in/come out). Is there a slit on the "top" edge of the scabbard? And finally, Is the scabbard based on a surviving historical piece? -
Those are great! A very unusual subject matter, and they look great! That's some champignon leatherwork! (heh!)
-
Well, it depends on what you are doing. If you are doing long straight lines, or gentle curves, a wide beveler will work. Some are *really wide*. But if you are doing sharp curves, or intricate lines close to each other, a small thin beveler is what you want. And then there are textured bevelers, in different widths. Then there are undercut bevelers, to make a deeper bevel. Then, for very specific patterns, you can get curved bevelers, and even triangle bevelers! I don't have any of these. Just starting out, you need to take the time to learn the basics of how to create a smooth beveled line, how to walk the tool and angle it correctly. Of course, those things only work if you case the leather properly, and if you are using a good quality tooling leather! See the graphic below for a quick overview: So, it makes sense to start out with a "vanilla" beveler which you will likely use most of the time, of medium width, like the one labeled as craftool B-200 shown above (which may not be the current number). The one I started with is a Craftool B203, purchased over 25 years ago. Later on, once I figured that I needed them, then I added the very thin B935, then later on the textured B936. Just this last year, at a sale I picked up the undercut bevelers B892 and B60). But note the key point: I didn't buy those other ones until I decided I needed them for a project.
-
Is that part of your range land in the one picture? No wonder you guys get torn up riding through the brush! You need arm chaps, too!
-
Hey, that's about 15-20 minutes away from me. It looks more antiquey than usable, though.
-
I bet that's what he did. I've some armor bits where I punched the holes in the leather first, then marked the holes in the Kydex, and drilled the holes through the Kydex.
-
I have some waxed colored linen thread purchased from Royalwood in Ohio. They are actually a basketry and beading supply store, but they offer various colors and plies (i.e. how many strands) of waxed linen. I've been satisfied with their thread, and the selection is quite good. Website: https://www.royalwoodltd.com/cat14-17ar.htm I haven't used Tiger thread yet. I should get some to experiment with on projects.
-
That's basically what I started with, years ago -- one Xacto blade, a modeling spoon, an awl, and needles. I didn't have bevellers or a pear shader (which is what your pear-shaped criss-cross thing is). The whole point here is that you enjoyed it, and you're excited to keep going! On to the next project!
-
Burnishing & Slicking
DJole replied to wrz0170's topic in Dyes, Antiques, Stains, Glues, Waxes, Finishes and Conditioners.
Yes, that's the basics behind getting slick edges or a slick back. You can look for videos online to get step by step directions behind the process. Searching for this topic on the forum will bring up other posters' takes on this topic (such as using only water to burnish). Have fun reading! ;-)