Uwe
-
Posts
2,221 -
Joined
-
Last visited
Content Type
Profiles
Forums
Events
Blogs
Gallery
Store
Everything posted by Uwe
-
The foot lift mechanism on your Lucy is similar to my Rex 11-155R. I made a short video showing how I equalize foot lift on my machine. Hopefully yours works in a similar way.
-
Your edit time window may have expired on the original post, but you can always add information in a reply like you just did.
-
One of the few machines I'm aware of that is designed to cover the range of what you want to do, and does it well, is the new Juki LS-2347H ( Juki-LS-2342 flyer.pdf ) Official specs for the "H" version covers thread sizes 69-266. I got a demo of this machine at the trade show in Atlanta last May and it is a seriously impressive machine, with a price tag to match. At an estimated $7-8K it may seem expensive, but it's really cheaper than the original Juki TSC-441 was back in the '80s if you account for inflation. Size wise and application range wise this machine fits neatly between the Juki LS-1341 (Cobra Class 26) and the Juki TSC-441 (Cobra Class 4), with enough overlap on both ends to make it worthy of consideration. You can buy cheaper vintage or clone machines, but then you'll be paying for the difference in stress, aggravation, blood pressure medication, and eventually additional machines. Here's a demo video of the machine to give a sense of scale.
-
Congratulations on your new arrival! Looks like a very nice, capable machine in good condition and in a beautiful table top. Lots of Seiko goodness in that vintage period of Consew machines. It'll be worth every penny if it does what you need it to do.
-
You have to state a price per Marketplace rules.
-
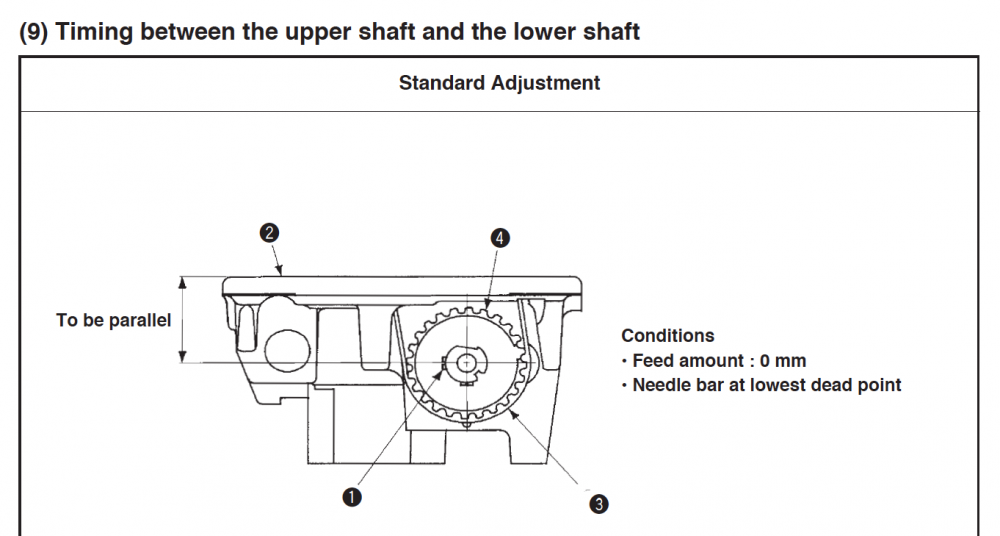
1. If you still have the thread guide rod, use it. Otherwise it will feel neglected. 2. The Juki TSC-441 engineers manual (Juki 441 Engineers Manual.pdf) uses stitch length set to"0" when checking hook-to-needle timing, so that's the "official" way to do it.
-
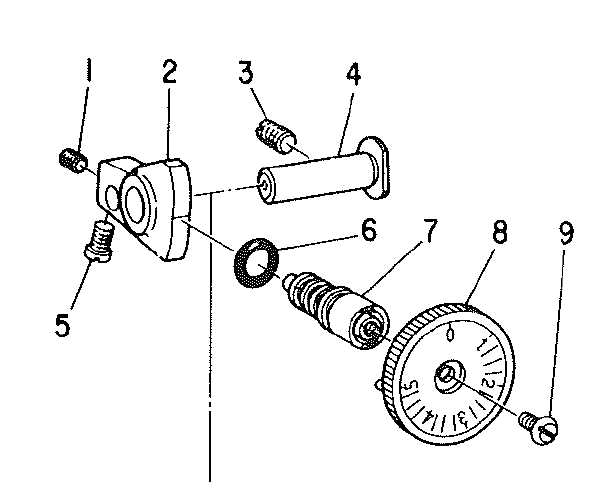
Screw that stitch length adjustment knob in the center of the hand wheel in as far as it will go and see if it produces a noticeable feed dog movement. If not, you may be missing some parts. I just got done fixing the same stitch length mechanism on a different machine where a few parts were missing on the excenter disk. Let's hope your stitch length mechanism is complete because fixing mine was a real pain.
-
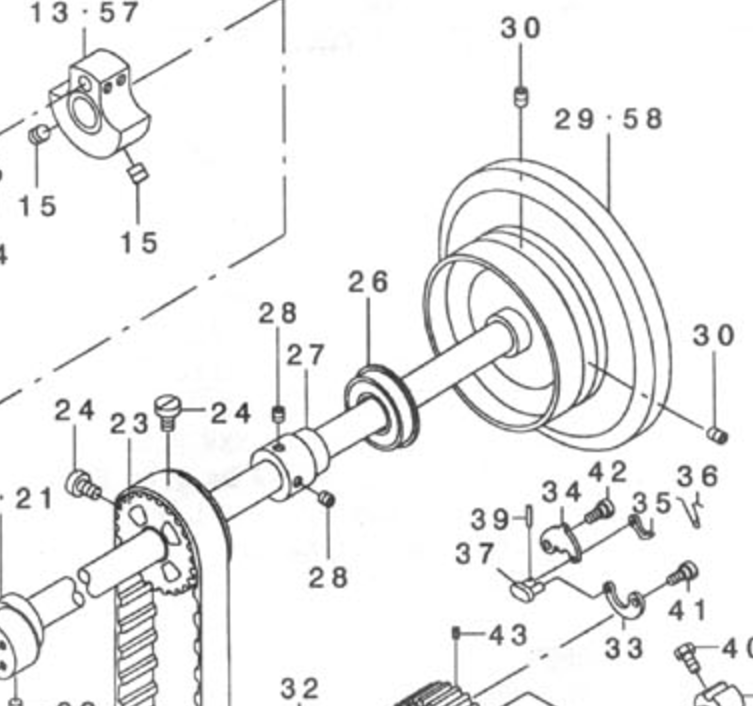
Taking the old timing belt off is easy, just cut it . Getting the new belt back on is not so easy and usually involves removing the hand wheel (easy) and the main shaft rear bushing and bearing (may be tricky, Parts 26 and 27): When putting things back together, you have to make sure the upper and lowed drive shaft are synchronized properly: Here's a video that shows the concept of timing belt replacement on a Singer 111 (a very different machine, but the concept is the same): https://www.youtube.com/watch?v=TIxQViDgL1c You probably should also start a new topic for things like this with a proper "How to replace a timing belt on a Juki 1508" title to keep topics focused and easier to find and navigate in the future.
-
The motor spinning the wrong way is the more likely cause of the reverse feeding problem. There's no point in investigating potential other issues unless we are certain the machine's mechanism is rotating in the correct direction. I'd recommend taking the drive belt off the hand wheel until you hand turn perfect stitches on the machines. It's no use running the machine under power if something is wrong. Tilt the machine head back a few inches to slacken the drive belt and take the belt off the hand wheel. Don't put the belt back on until you can hand-turn perfect stitches. Move the top of handwheel towards you - the hand wheel needs to spin counter-clockwise when you look at it from the right side (that's the only way that machine will ever make a stitch.) Try that and report back.
-
Some electric motors actually have a hard time to start spinning from a standstill. They need movement to work properly. Once the motor spins, everything is okay, but starting the motor is often a problem. Without getting too technical, these hard-to-start electric motors usually have some means of momentarily "faking" movement to trick them into spinning. These motors also happily spin in either direction. The startup helper device also helps the motor spin in the right direction (most of the time). Ancient clutch motors can be trouble and some are downright dangerous electrical or fire hazards. I've picked up old machines where the clutch motors had frayed wiring, or dried, brittle rubber coating and all manner of potential electrical hazards and problems. Unless you're super attached to that particular motor for sentimental reasons, it may be wise to replace it with a new clutch motor, or with a modern servo motor (the cost is about the same). If you've spent a lifetime working on domestic machines, it's unlikely that you will love the clutch motor experience, even if the motor spins in the right direction. Even a cheap servo motor ($135) will give you modern electrical safety and "domestic" speed control so you can safely enjoy your heirloom sewing machine.
-
This seems to be the week for bobbin case springs. I had to go hunt down one of those bobbin case springs for horizontal axis hooks. I found two samples with different style bobbin case springs in my parts stash, but neither of these are Singer 31-20 bobbin cases. Below's a picture of the two I found. The springs are designed to put some friction on the bobbin rotation so it doesn't spin too freely and unwind itself. These springs are rarely present in vintage machines in my experience. The style on the left falls right out, the one on the right has little tabs that hold it in place inside the bobbin case. Alas, the Singer 31-20 may not even use one of these bobbin case springs. At least they're not called out separately in the Singer 31-20 parts manual (31-15 and 31-20 Parts list.pdf )


-

Juki LH-527 walking foot two needles split needle bar restoration?
Uwe replied to patria's topic in Leather Sewing Machines
Split needle bar issues aside, the Juki LH-527 was designed as a Bottom+Needle feed machine. You're not missing walking foot parts, they were never there to begin with. Here's a portion of the title page of the Juki LH-527 Engineer's manual that shows the variations in feed specs.
-
It turns out I had a Rex 11-155R in storage and I brought it home to make a short video showing on how the reverse lever and stitch length dial mechanism work together on this machine. Hopefully it'll illuminate the subject matter to figure out what might be causing your machine to misbehave.
-
That circled part connects the reverse lever shaft to the spring that gives the reverse the springy feel and keeps it pegged at the top unless you press down on the lever. Can you please post the PDF file (or a link if available online) of the parts manual where your parts diagram with the red circle came from? I still don't know which original your REX is based on.
-
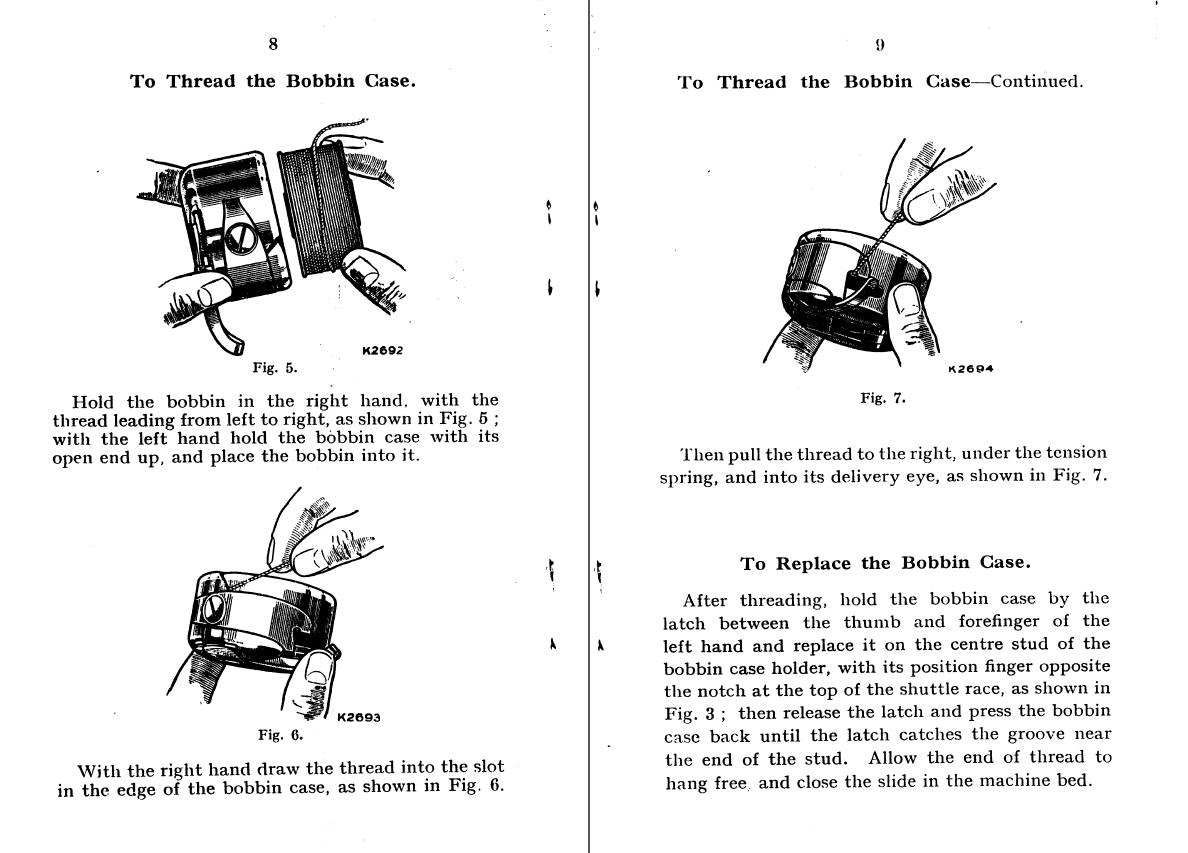
Make sure you're winding the bobbin nice and evenly. It seems like a simple thing, but I've seen bobbins that were a total mess straight from the winder. Is the thread still under the bobbin tension spring after the problems start? It may pop out from under the spring for some reason. The thread itself also may affect things. Some thread is super stiff and acts like a spring itself - some may unwind from any spool or bobbin unless held in place by something. Also make sure you have the basics right for threading the bobbin in the bobbin case. There's a few variations of the manual floating around. I like this Singer 31-20 manual - it shows diagrams with HUGE bobbins:

-
This composite from the Juki DU-141NH parts diagram may be closer to what your machine looks like. I've arranged the parts so that the pin points directly at the part it's supposed to be touching.
-
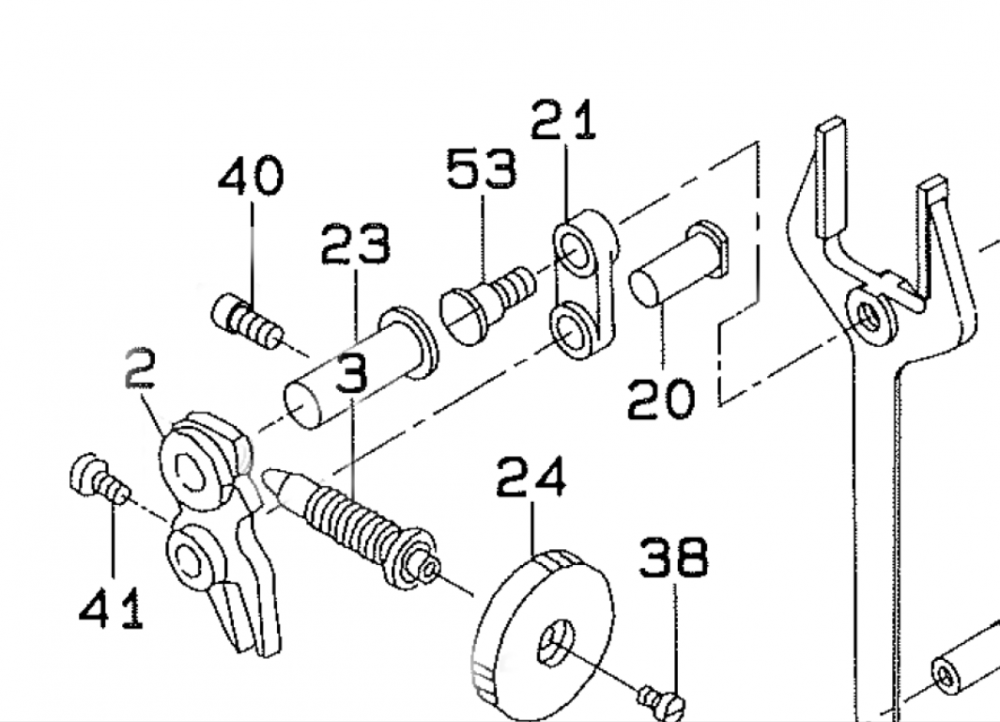
Does your reverse lever still work? If that stitch length adjustment shaft with the round tip doesn't touch anything, that's likely a problem. Those pins normally provide a stop for the reverse lever movement, both top and bottom. Normally when you adjust the stitch length, the reverse lever also moves up and down a little. The problem may well be with the part that normally touches that pin. Your reverse lever is likely pegged at the top for maximum stitch length. If the reverse lever still works, then your stitch length pins isn't providing a stop for the reverse lever. Maybe a set screw came loose. Below's a picture that shows how many machines are designed. The part in question is #2 - that's the part that is supposed to be resting against the pin as it is rotated by the reverse lever. The parts diagram below is from a Juki DLU-490, which may not even be close to your machine. Do you know which Nakajima or Juki model your Rex is a copy of? A proper parts diagram will be valuable in determining what's supposed to be where.
-
If you're not fond of googling things, call one of the banner vendors and get the full service treatment for a little extra. For self-service, try this approach: The Consew 227R-2 Manual specs the hook assembly as part number 13086. Typing "13086 hook" into the Ebay search window comes up with this nice OEM Seiko hook for $22.49 (Consew machines were built by Seiko back then):

-
I'm striking out on Pfaff 438 user manuals as well. Usually it's other way around, that user manual is available but service manual is not. Perhaps the user manual for the successor model Pfaff 938 ( Pfaff 938 User Manual.pdf ) is useful. It doesn't look like the threading or that confounding looking zig-zag dial have changed much from the Pfaff 438 model.
-
Yes, they're essentially the same machine head with very subtle differences. Both are Juki TSC-441 clones. TechSew 5100 is a third option, by the way. The Cobra 4 already has mounting holes on the back for a swing-down edge guide, in case that matters to you. Table, motor, and bundled accessory packages will vary between the options, as will pricing, shipping, and customer service to some degree.
-
Juki/Ferdco "Bobbin Case Spring"
Uwe replied to JerseyFirefighter's topic in Leather Sewing Machines
As I was taking pictures for the Adler 205 hook timing topic, I noticed my spare hook actually had one of these elusive springs inside. I took a picture to document the occasion. I never knew what I was missing in all those hooks, I suppose. I ordered two dozen of those springs from my supplier. That should last me a while and make my bobbins jump for joy in the various machines that use the same spring.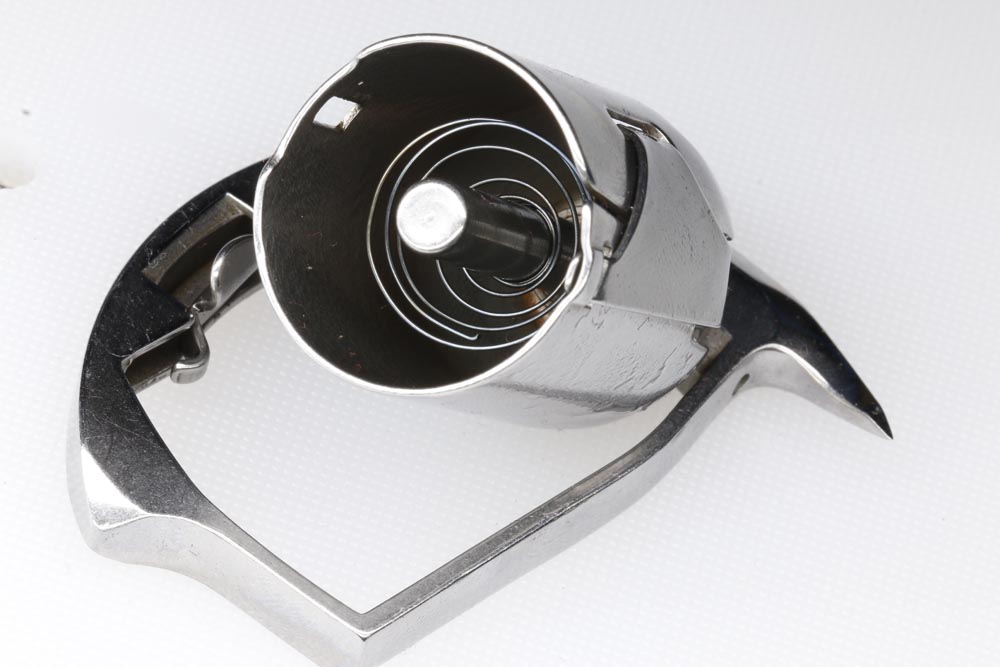
-
205-370 refusing to take 794 system needles?
Uwe replied to HENDREFORGAN's topic in Leather Sewing Machines
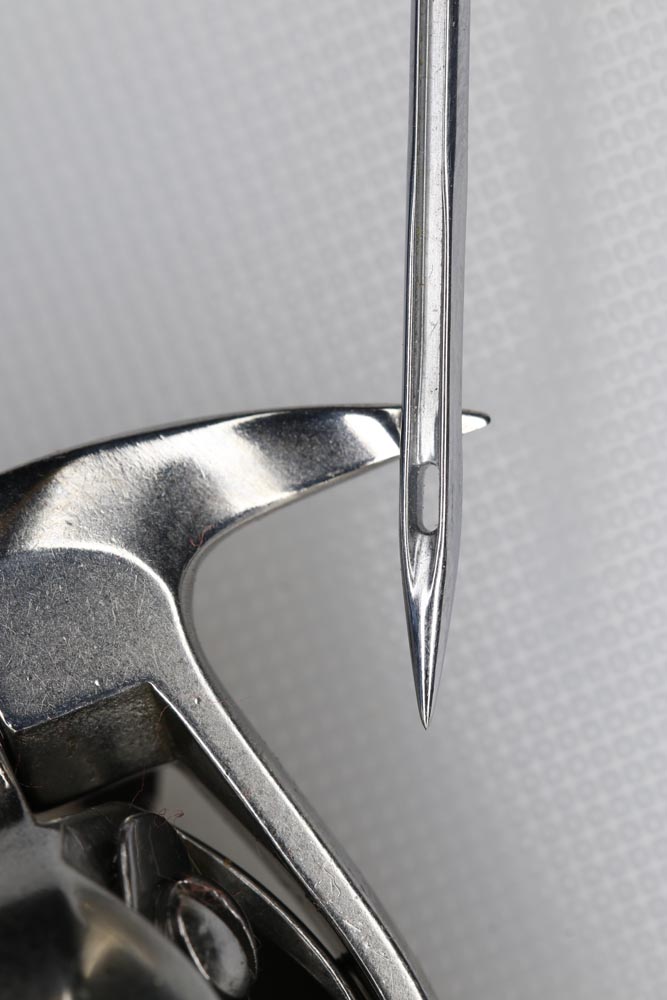
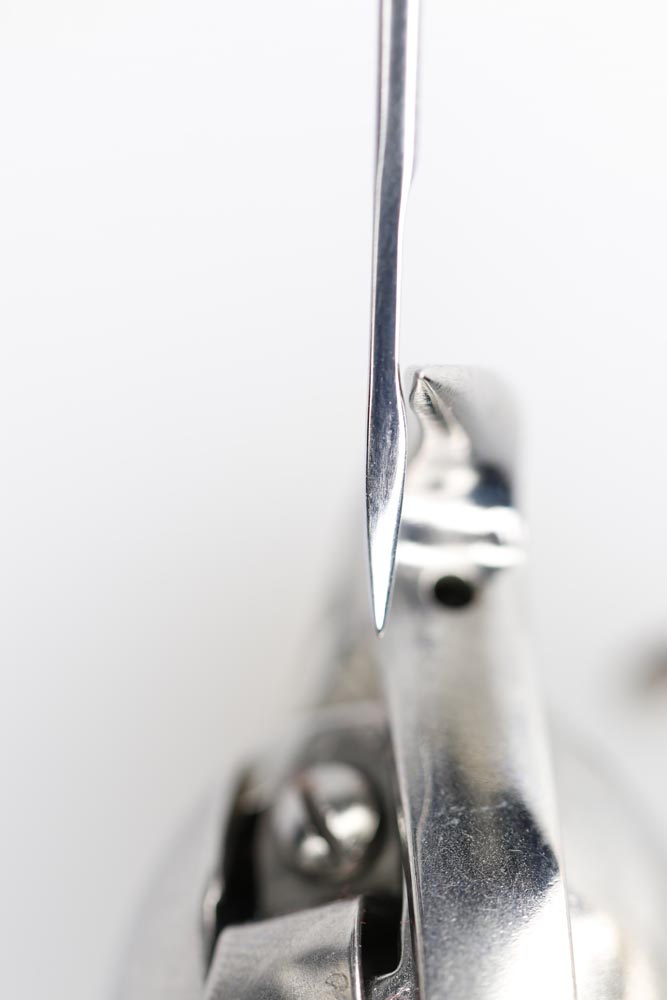
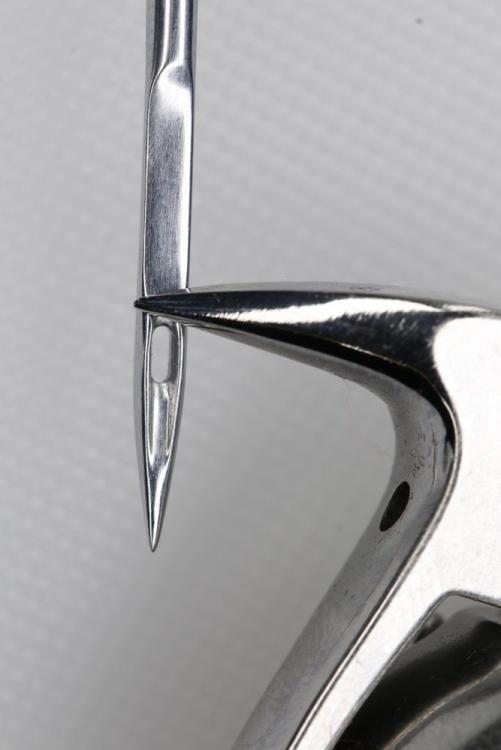
As diyer mentioned above, the Durkopp Adler 205 service manual ( DA-205-370-Service-Manual.pdf) describes, among other things, how to set the needle bar height. Below are two screenshots for quick reference. From that paragraph above, I find actually hard to visualize what they mean. The German version is cryptic, and the translation didn't improve it. Here are a few pictures that show how your needle and tip of the hook should to be aligned for proper needle bar height according to the service manual. When the tip of the hook peeks a tiny bit past the needle, the bottom of the hook and the top of the eye of the needle should line up. I re-edited a video I made some time ago that shows how this looks in on the machine in slow motion. It also shows how the eye of the needle, when the needle is at its lowest point, does not dip below the outer diameter of the hook driver. That's what they mean in that awkwardly worded "Note" in the instructions above. In the video the needle is actually a tad lower than what the specs call for, but the machine sure was making beautiful, reliable stitches. So there's a little bit of wiggle room.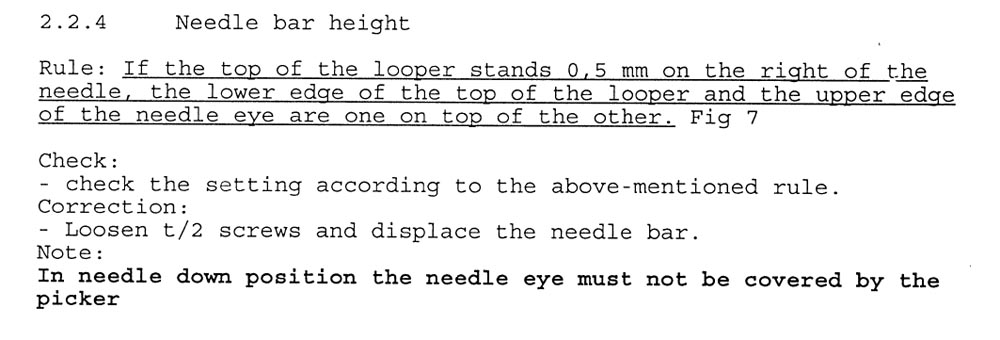


-
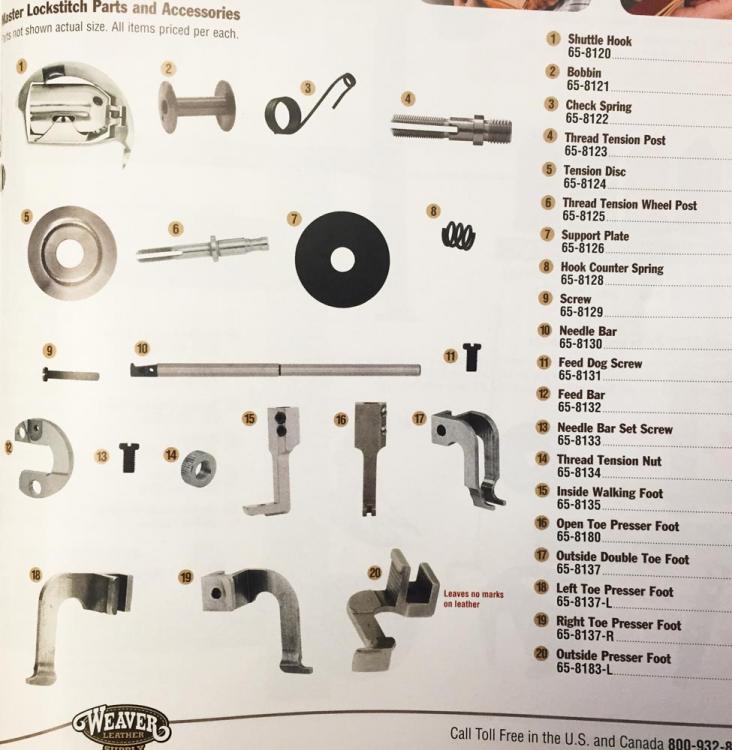
Juki/Ferdco "Bobbin Case Spring"
Uwe replied to JerseyFirefighter's topic in Leather Sewing Machines
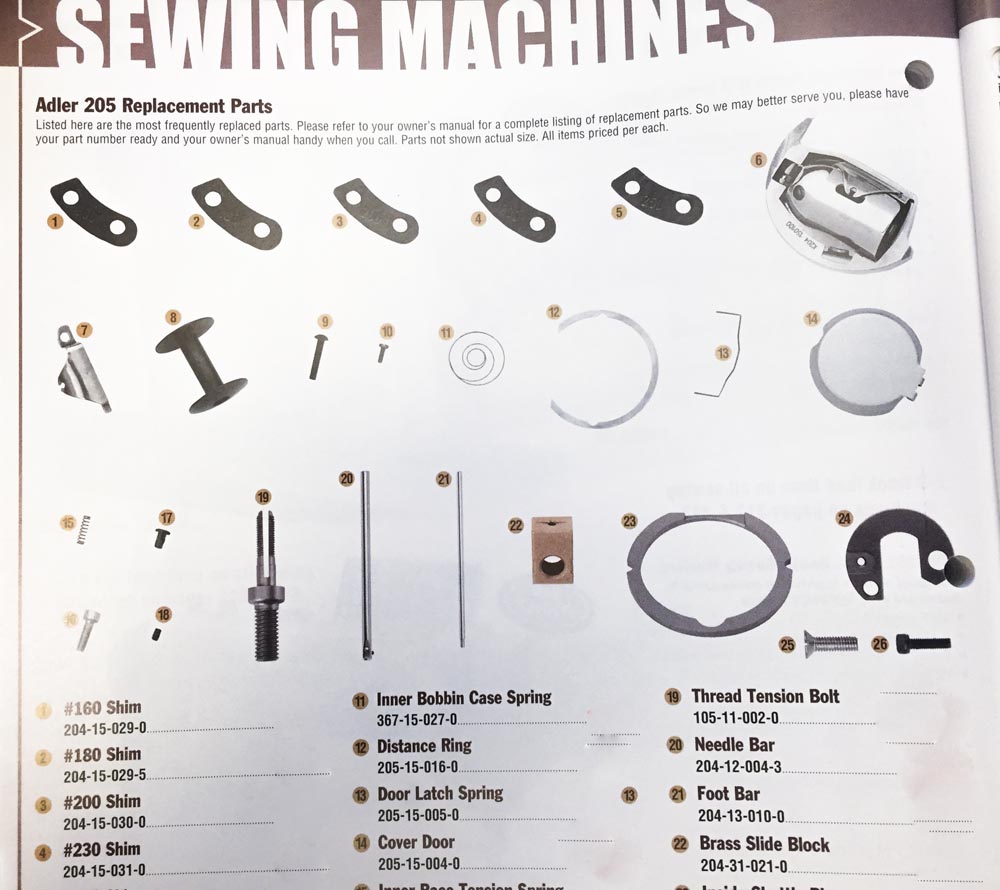
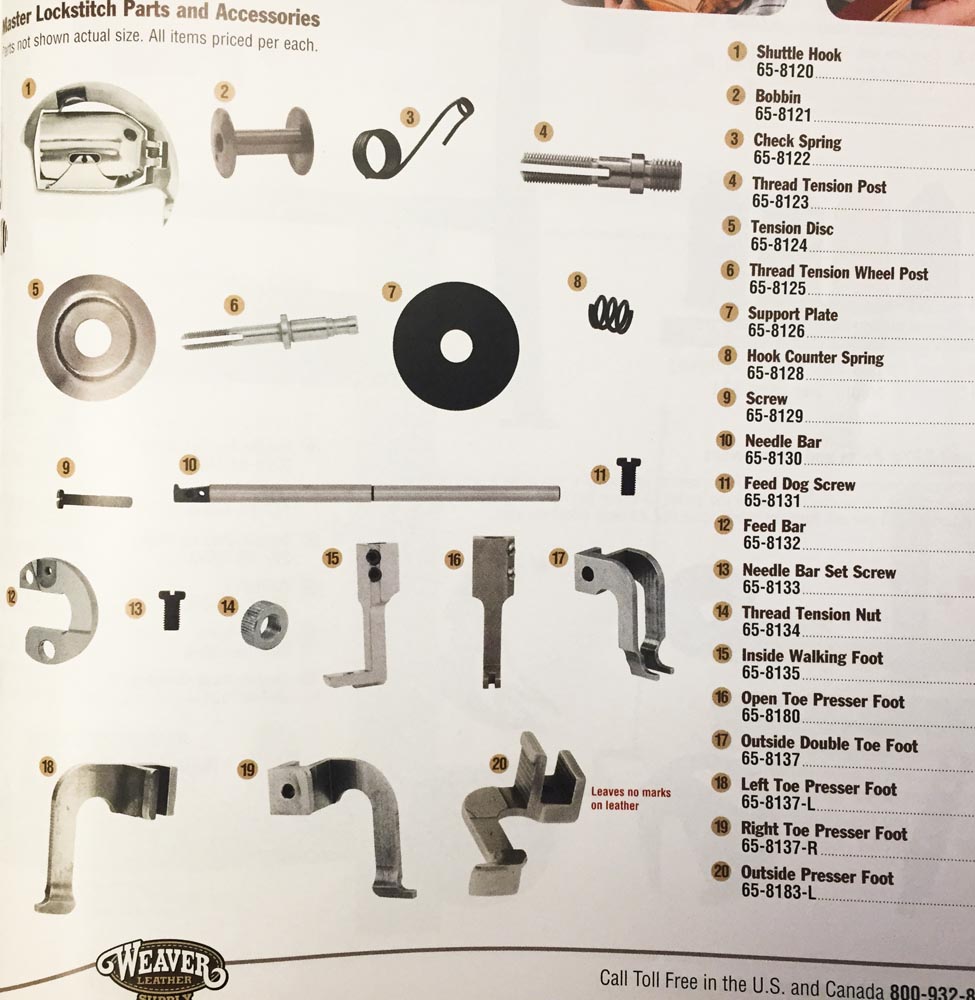
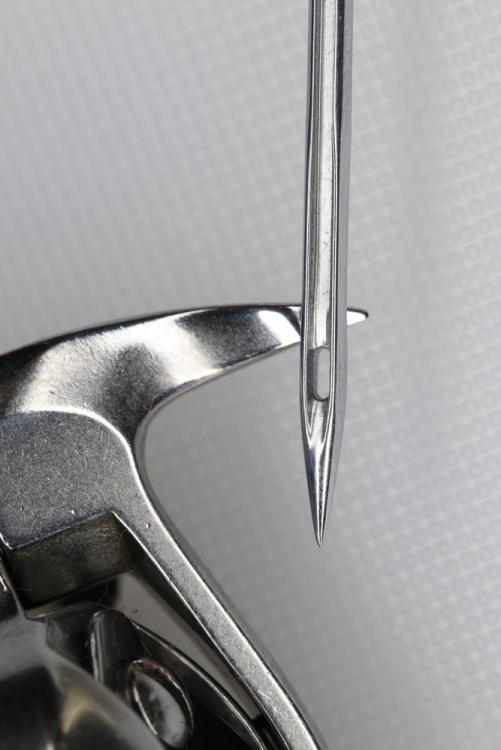
Upon further review (a.k.a. fact checking my own statements) it turns out that Adler 205 hooks have the inner bobbin case springs, but the Juki TSC-441 class hooks do not. Here are two pages from my 2016 Weaver catalog. The Adler 205 spare parts page does list the "Inner Bobbin Case Spring" (Item 11, part number 367-15-027-0: The Ferdco Pro 2000 switched from using actual Juki TSC-441 machines to made-in-Taiwan clones in 1995. It's possible that Ferco added an inner bobbin case spring as part of their enhancements. If you feel you really need that spring, you can order the Adler 205 version from Weaver - it should work just fine in the Juki 441 hook. The spare parts page for Weaver's Juki TSC-441 clone does not list a bobbin spring: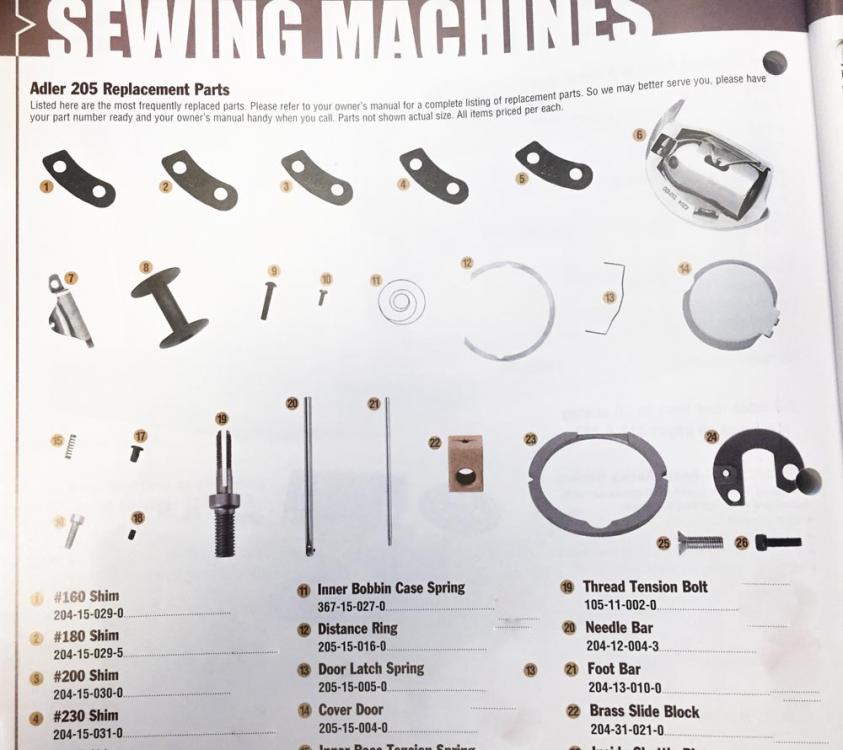
-
Juki/Ferdco "Bobbin Case Spring"
Uwe replied to JerseyFirefighter's topic in Leather Sewing Machines
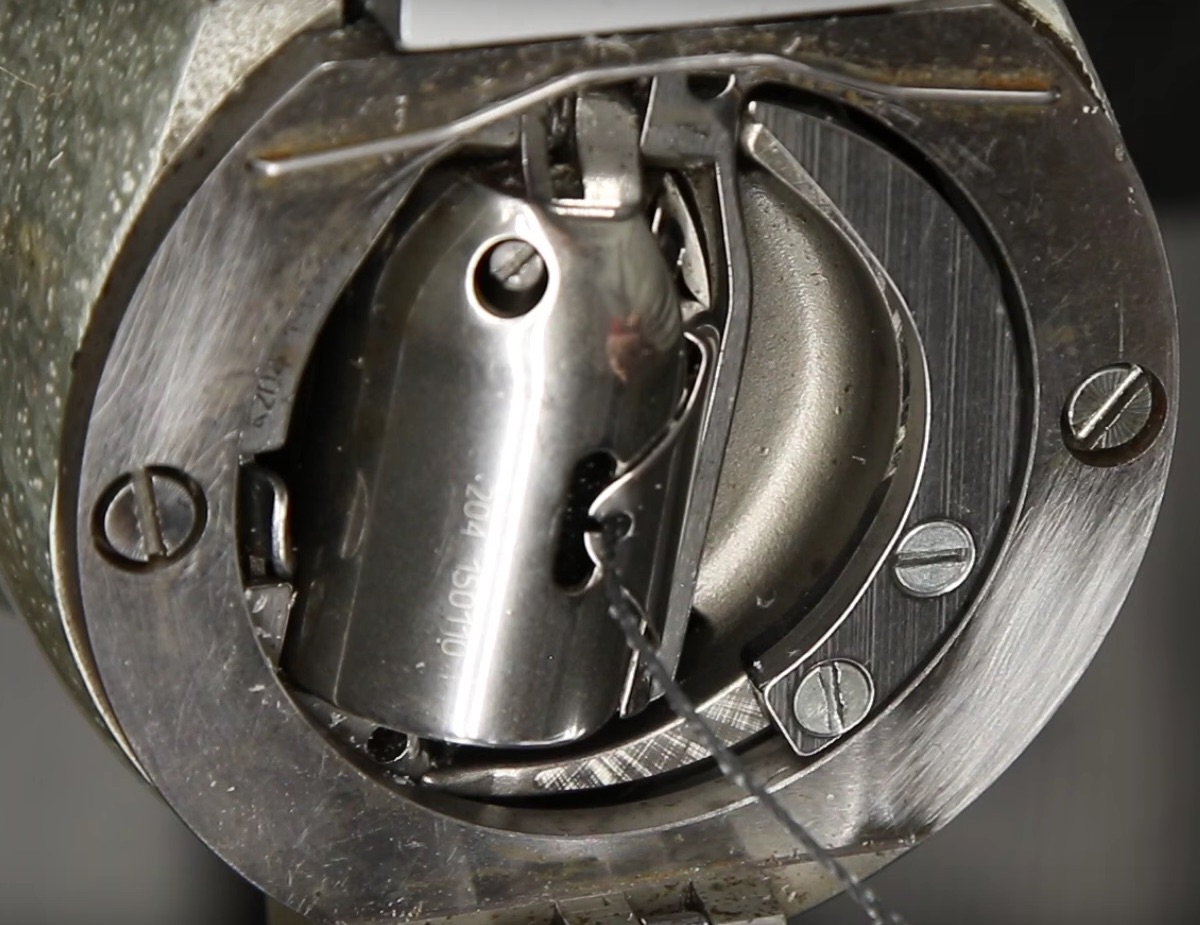
We also need to consider the distinct possibility that the 441 style shuttle hooks simply do not have bobbin case springs, by design. If you pop out the bobbin case in the position shown below (on my Adler 205), gravity is your spring and the bobbin will simply fall out. I've looked at a fair number of shuttle hooks, and I can't remember seeing a single one that had a bobbin spring inside. Some vertical axis flatbed bobbin cases definitely have these kinds of springs, but those are usually called out in the parts diagrams. Even then, not all hook variations within a class use the springs (Example: JUKI LU-SERIES HOOK PARTS.pdf).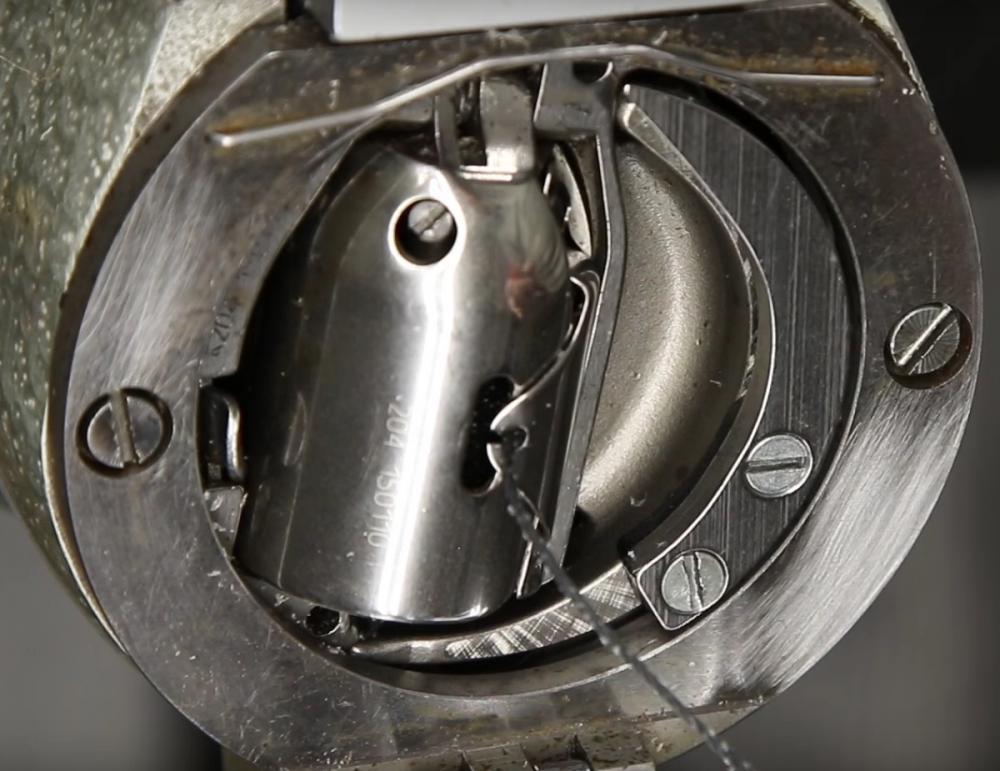
-
What needle size do I need for my Singer 31-15
Uwe replied to Natcamp's topic in Leather Sewing Machines
Post some close-up pictures of your machine and some stitch samples when you get a chance. Achievements like that need to be documented!