Uwe
-
Posts
2,221 -
Joined
-
Last visited
Content Type
Profiles
Forums
Events
Blogs
Gallery
Store
Everything posted by Uwe
-
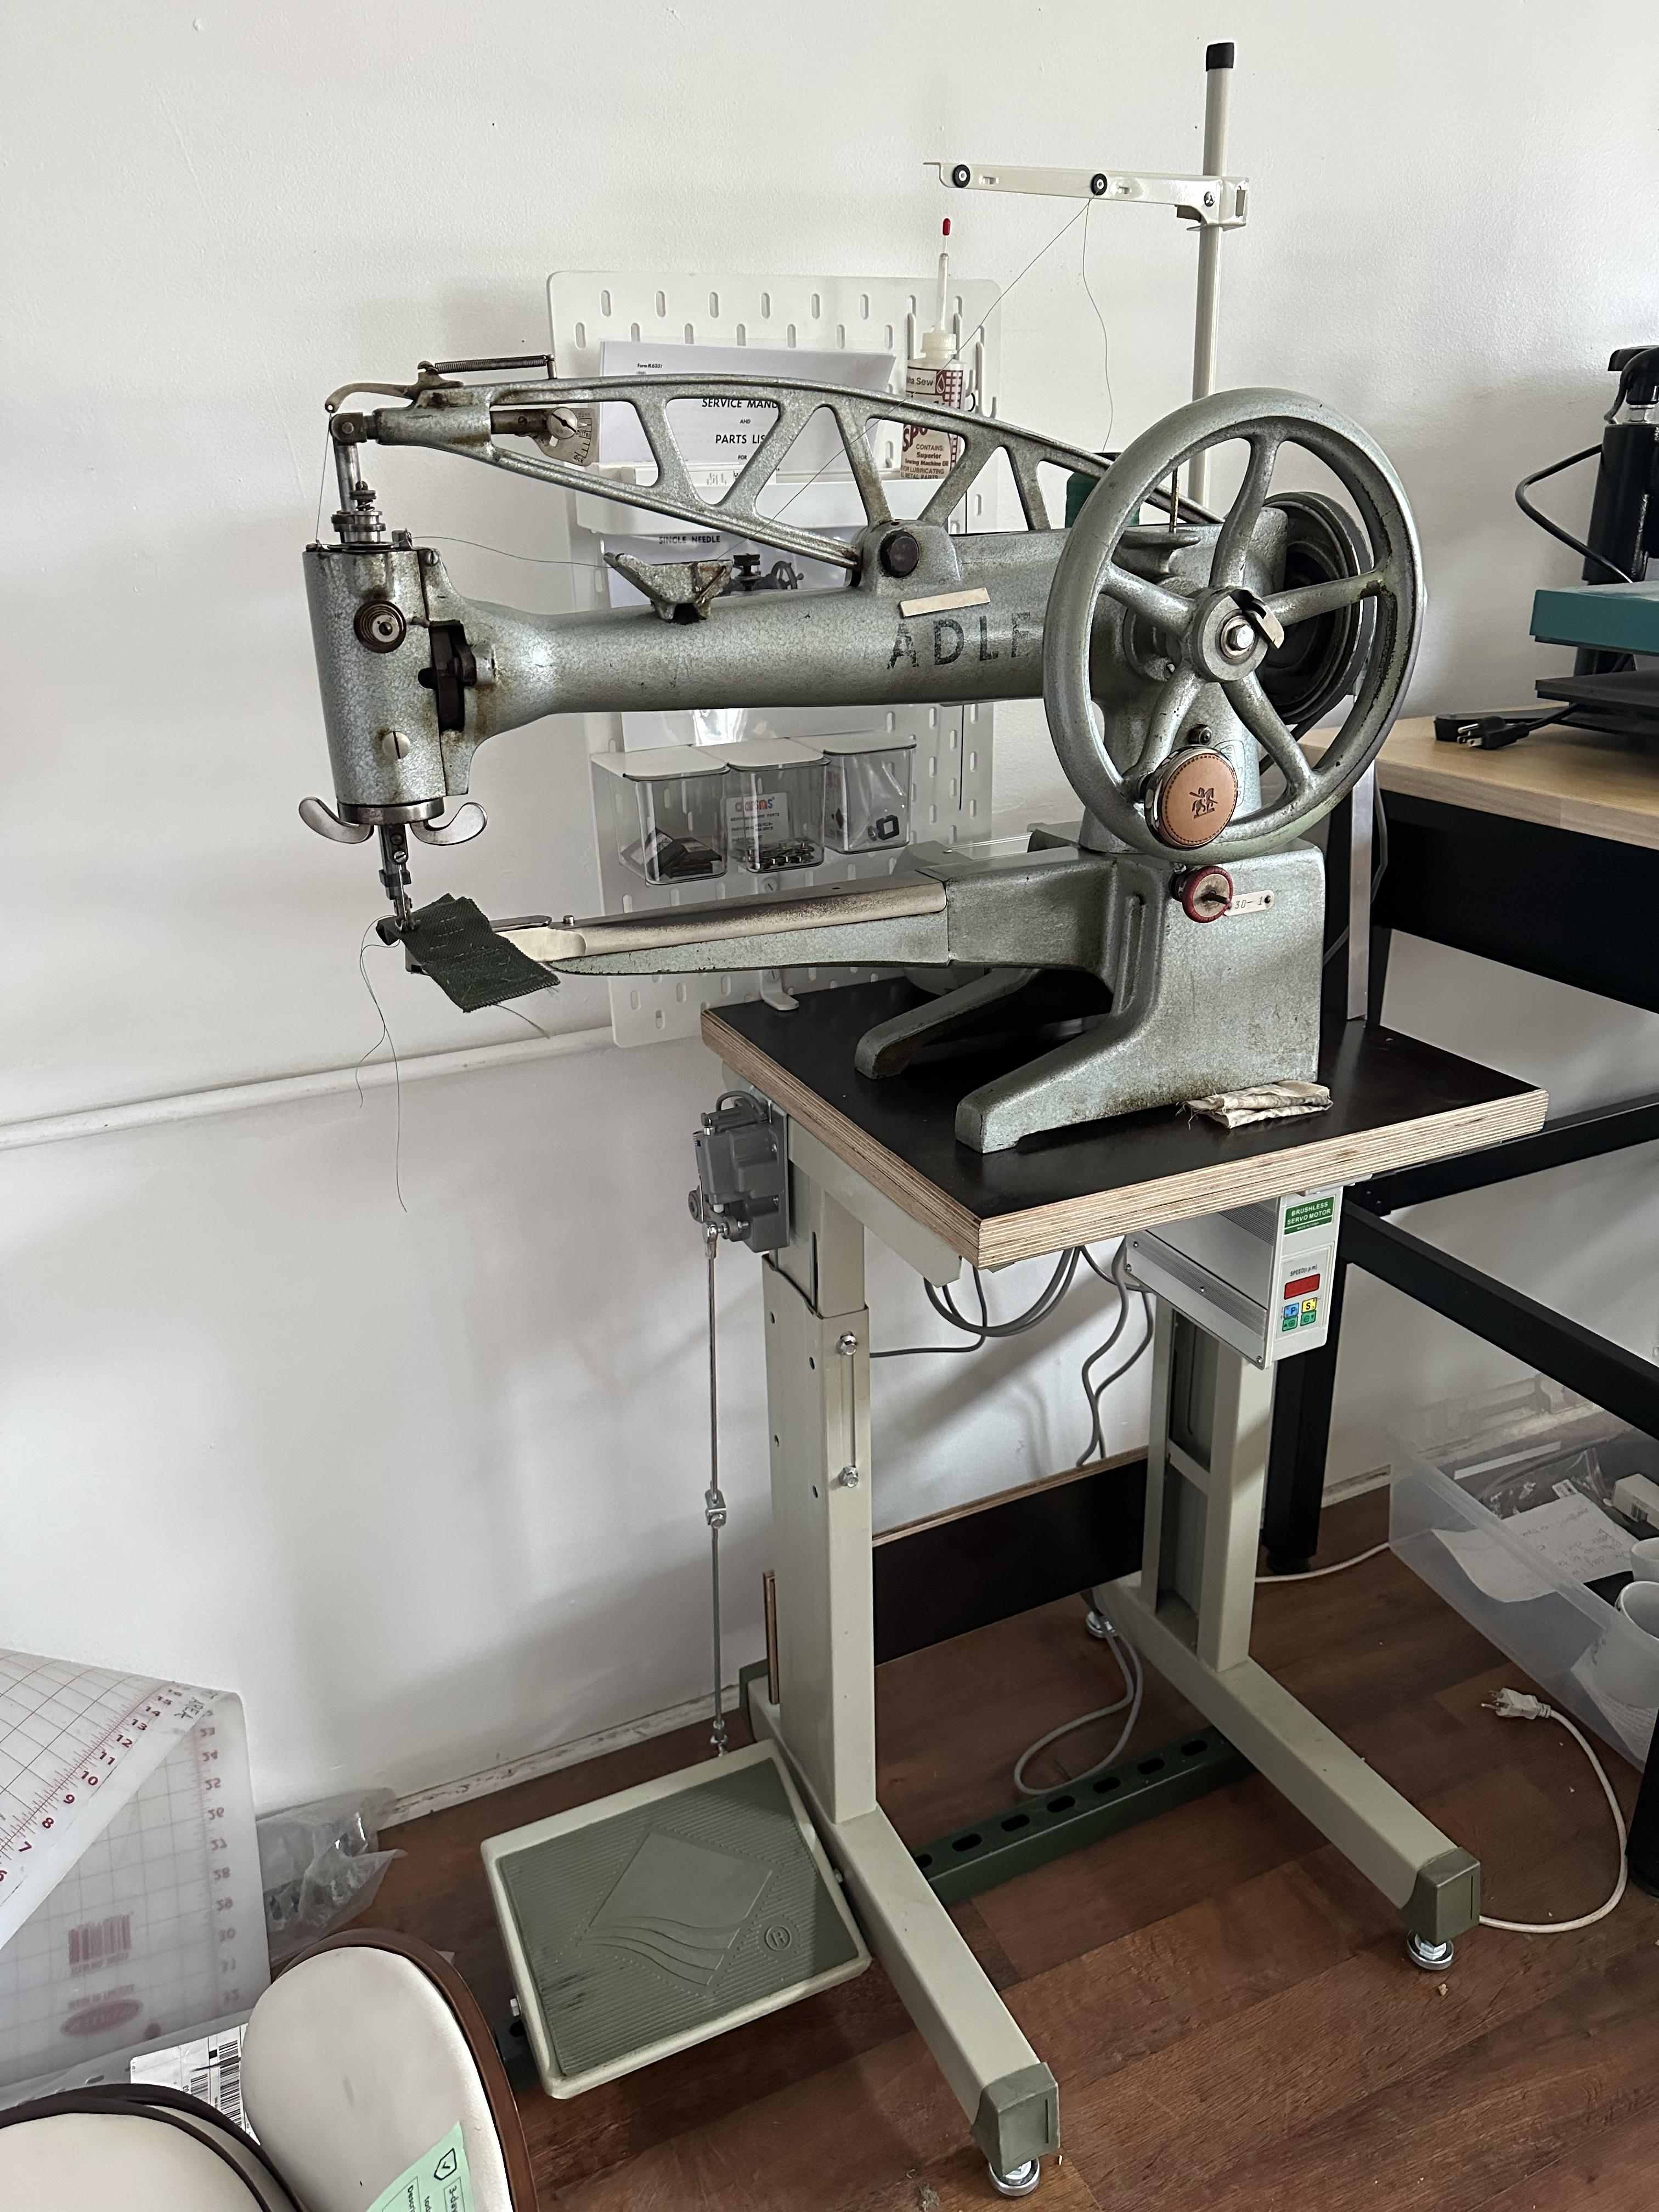
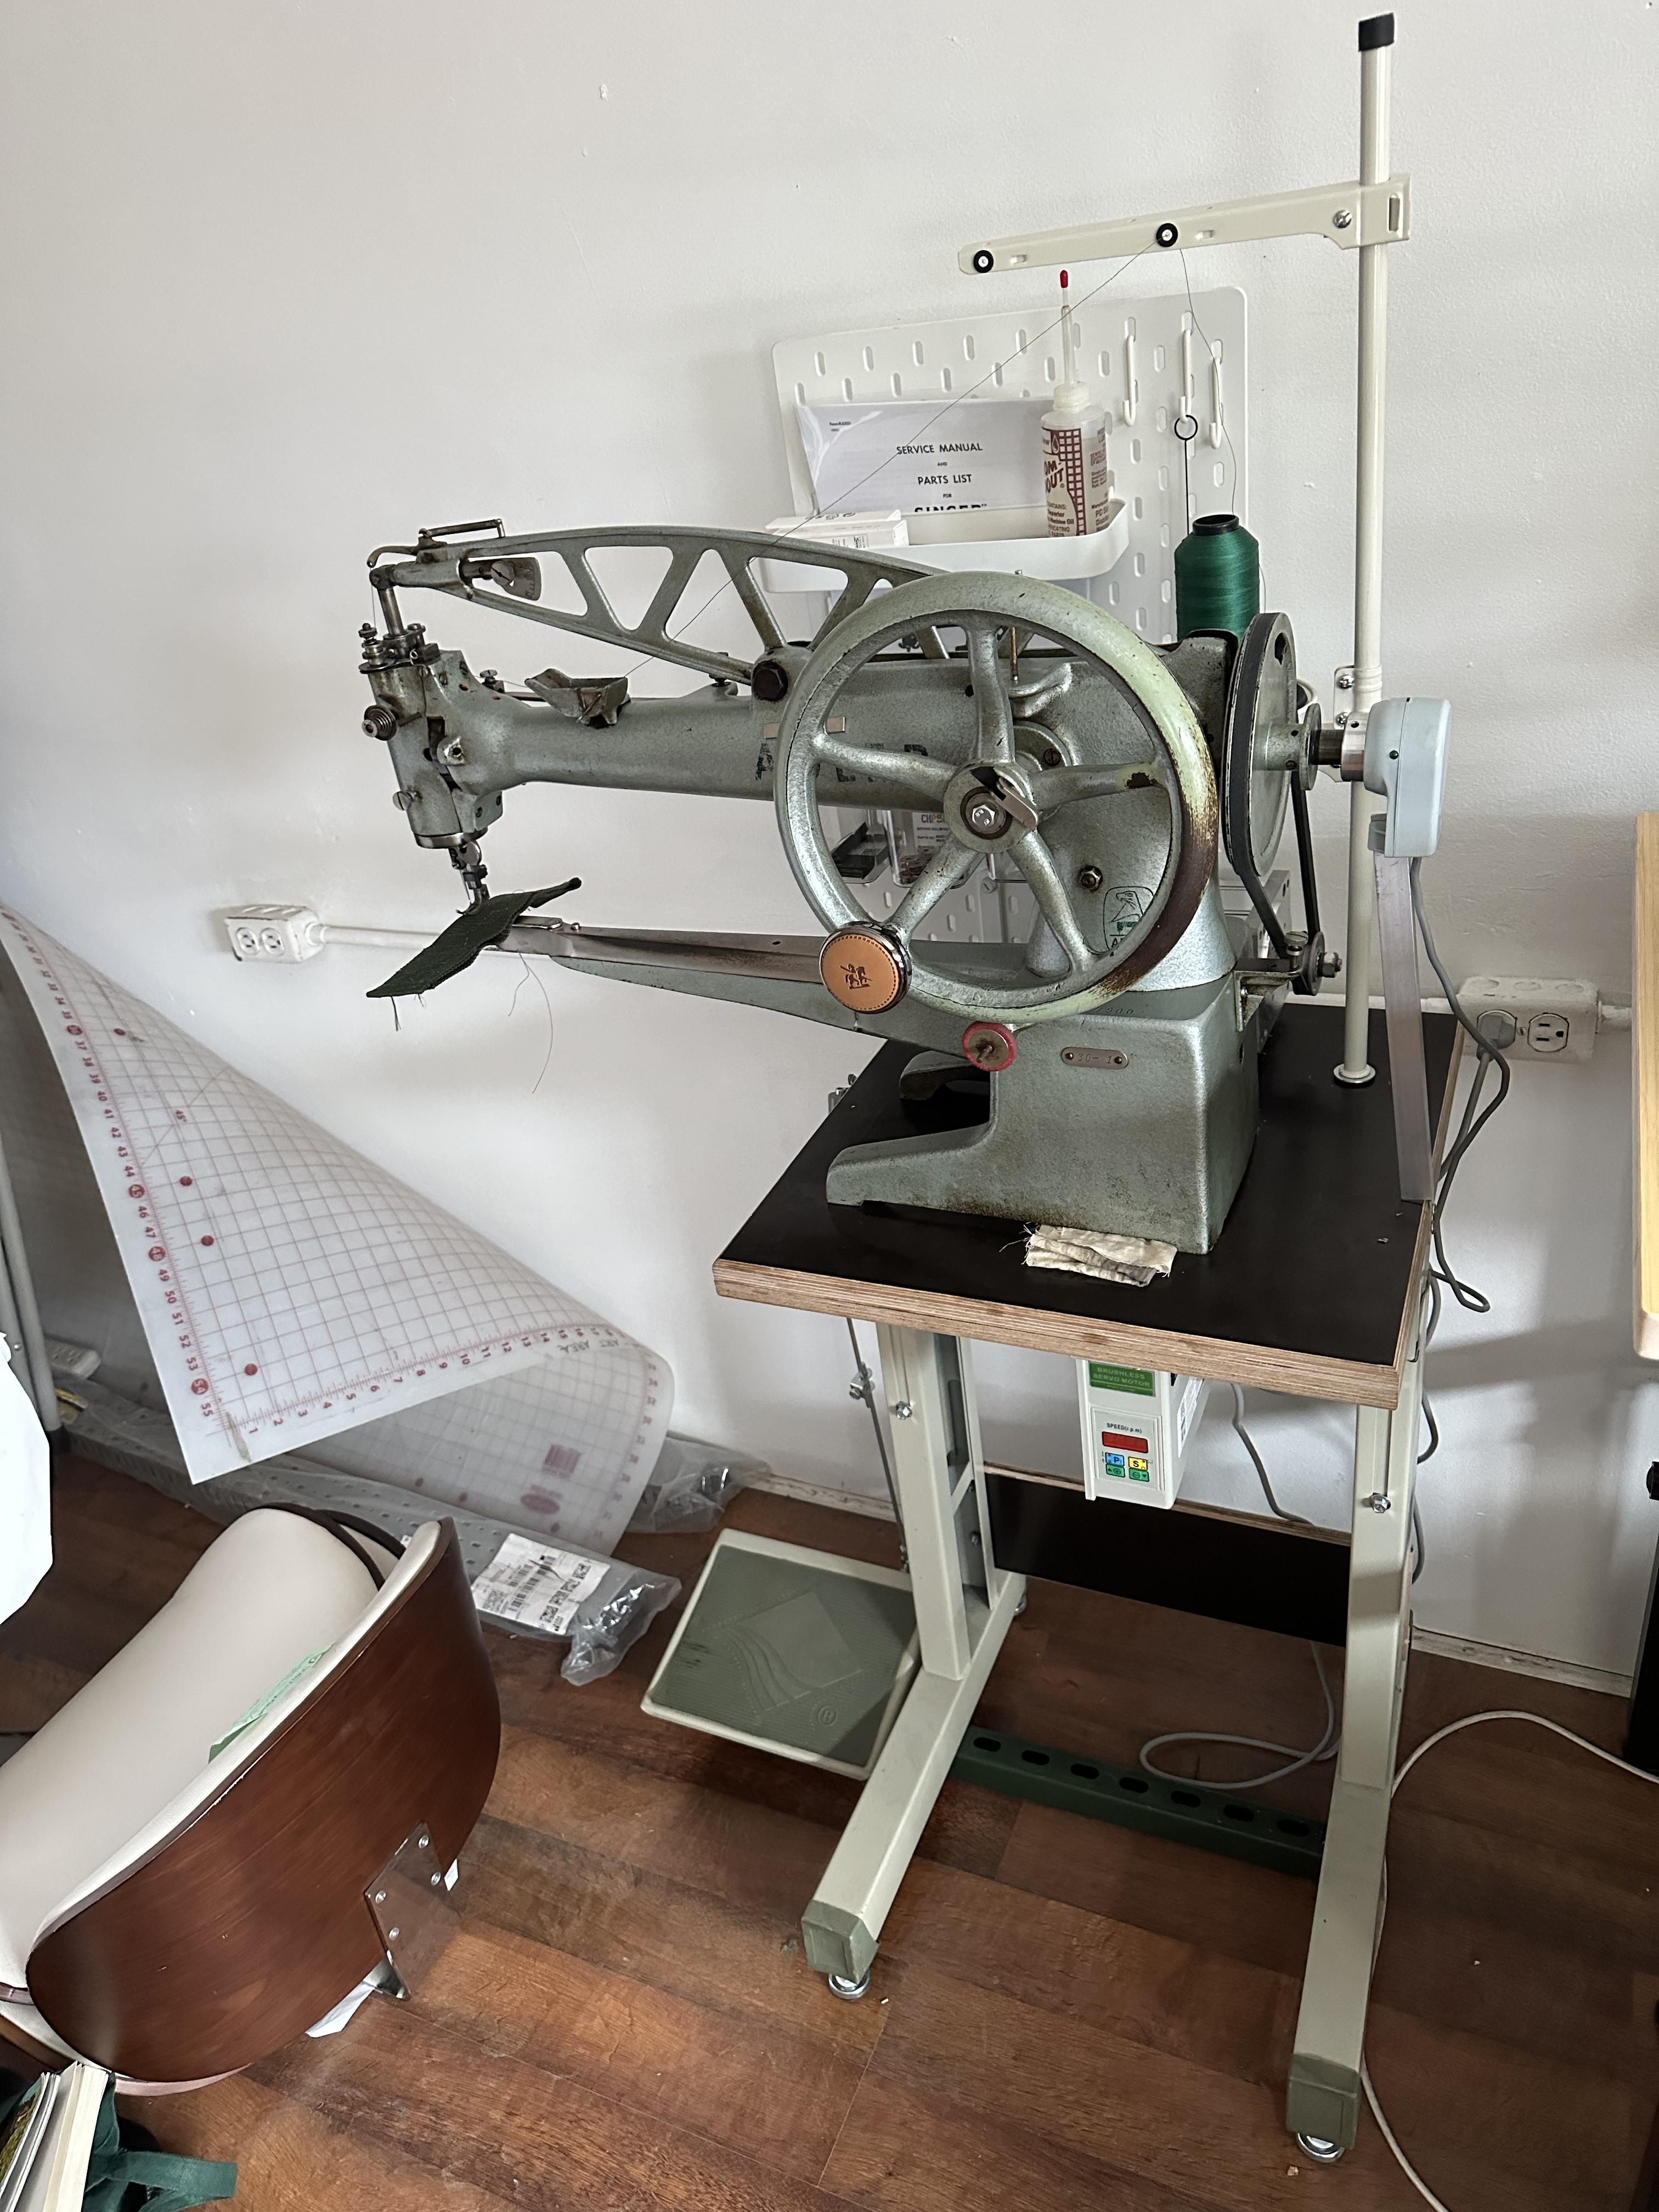
I made a table-top setup once for an Adler 69, with a pedal on the floor connected by just the wire. I also just installed an Adler 30-1 at my maker space with a table-top mounted 1,500W servo motor, needle positioning, and standard pedal configuration. Maybe it helps you figure out your configuration.


-
On the Adler 269 the feed movement is generated from eccentrics on the top shaft. There is no synchronization required between top and bottom shaft and you will not find instructions for that in the service manual. Moving the timing belt just changes hook timing. If you then re-time the hook, you’ll be exactly where you were before moving the timing belt. But very subtle changes in hook timing may have a noticeable effect. So you likely just timed the hook slightly differently, improving it. It’s also possible, but unlikely, that your hook is not original to the machine. An aftermarket or seemingly compatible hook may “fit” the machine, but may have slightly different geometries (e.g. the distance between the tip of the hook and the base of the hook that pulls the thread around the hook assembly.) I had a machine (Juki 563 clone) that exhibited the same snapping-around-the-hook problem. I thought that I had fixed it by moving the timing belt (and then re-timing the hook,) but later I realized that it was just the slightly different timing of the hook that finally made it run smoothly. (On that particular machine, moving the timing belt actually does change the feed timing, so I later reversed the timing belt move.) Just for illustration here are the before and after videos of that machine from 2016. I hesitate to post this because the subtitles refer to the timing belt move as the apparent fix, which is incorrect. The before video showing the thread snapping problem (which can also be described as a take-up-lever-pulls-up-too-early problem): After advancing hook timing (and when I still thought this was fixed because of the timing belt move):
-

Can anyone help me with a running a 3-phase Juki at home?
Uwe replied to williaty's topic in Leather Sewing Machines
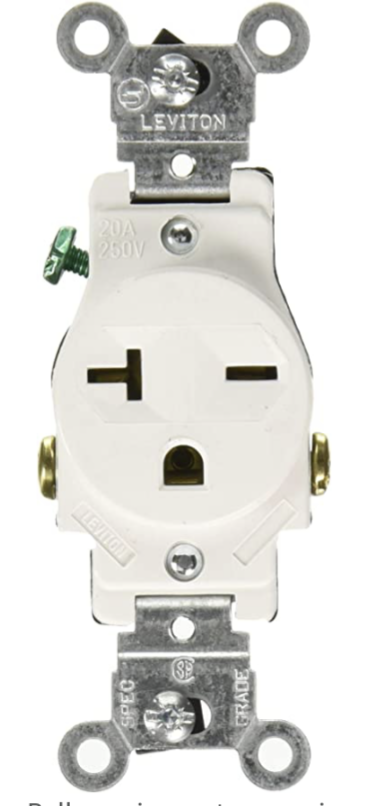
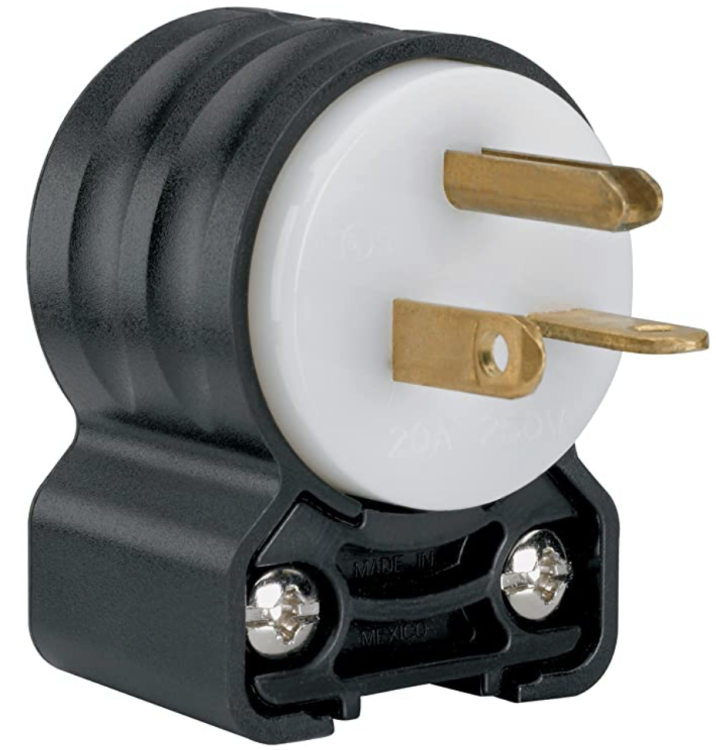
There should be a sticker on the motor or controller box that specifies what the power requirements are. It’s very likely that it’s a 240V 3-phase setup. You’ll need a 240V outlet in your garage in order to use a rotary 3-phase converter. There is no viable path that takes you from a standard 120V outlet to 240V 3-Phase power. The 3-phase plugs and receptacles I use for sewing machines are NEMA L15-20 which look like this. This is the receptacle on the 3-Phase converter and the plug on the sewing machine. For the single phase 240V receptacles on the wall I use NEMA 6-20P plugs and NEMA6-20R receptacles. This is the 240V outlet in the wall and the plug on the 3-phase converter.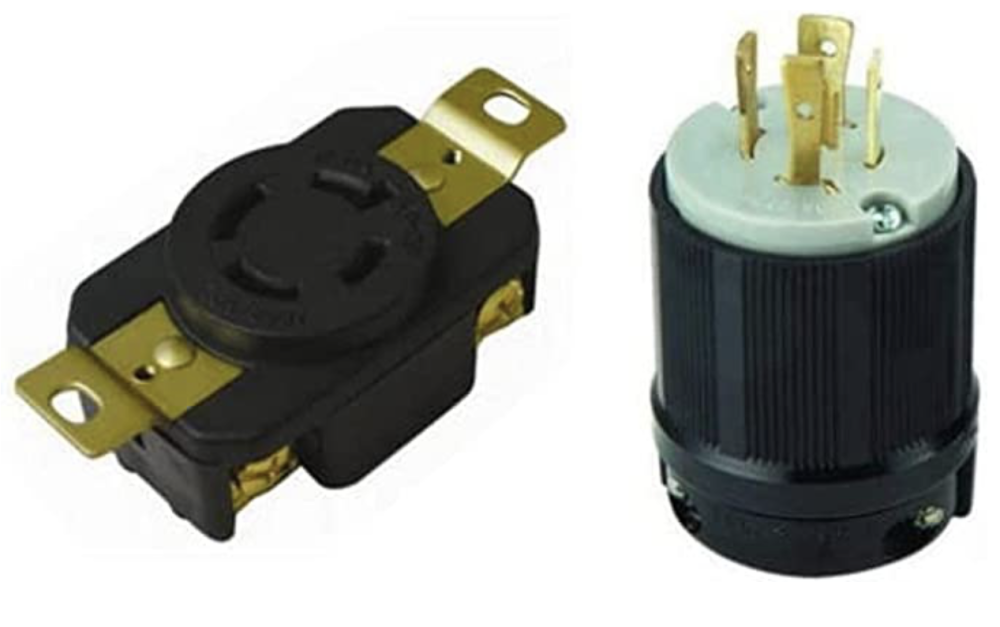

-
There is no separate adjustment for the take-up lever because the linkage to the main shaft is fixed and permanent. The movement of the take-up lever is fixed in relation to the movement of the needle bar, as is the case with most machines of this general class of machines. There is no mention of it in the service manual because there is nothing to adjust. Can you please post some close-up pictures of precisely where the hook is when the needle is at the very bottom (BDC), and when the hook tip is directly next to the needle. You’ll have to remove the feed dog for this. You will likely have to adjust the needle bar height when you advance the hook timing, to make sure the tip of the hook is in the sweet spot of the needle scarf when it needs to pick of the loop. .
-
It would be super useful to actually see the position of your take-up lever in your video. I know it’s tricky and I didn’t exactly do it in my video either. It looks to me like you need to advance hook timing. In general, the thread needs to be at the farthest point on its travel around the hook precisely when the take-up lever is at its lowest point. The take-up lever is the master here, the hook timing is the adjustable element. Below is a video of the stitch cycle on my Juki LS-341, which is a very similar design. The 1:34 mark my the video is when the thread take-up lever needs to be at it’s lowest position (although I failed to point that out in the video.) This is the still frame at that 1:34 mark:: When the thread take-up lever is at its top-most position, the hook tip should be at the Noon position. The needle itself has no easy-to-reference position when the thread take up lever is at the very top or bottom. The hook timing can be advanced and retarded over a surprisingly wide range and it will still pick up the loop and make a stitch. However, the precise hook timing where everything comes together in buttery smoothness has a much smaller range.

-
Singer 29k171 "Another journey to the unknown"
Uwe replied to jimi's topic in Leather Sewing Machines
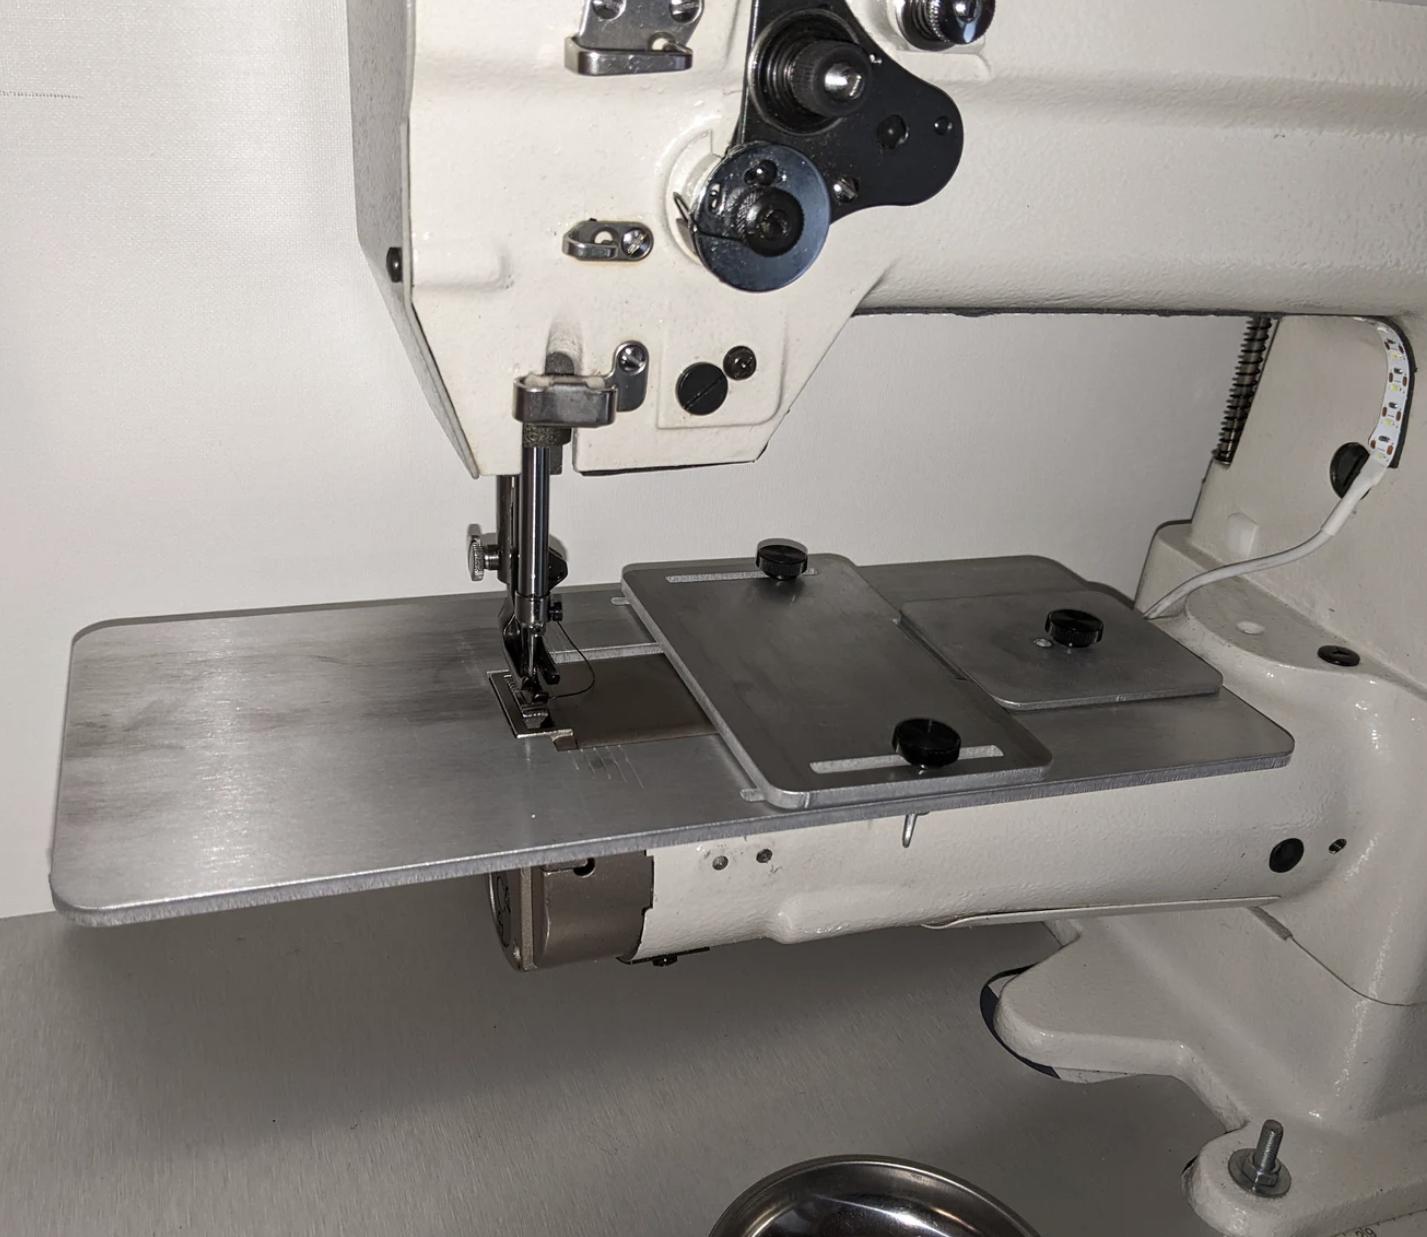
That is a gorgeous looking flatbed attachment! -
Here’s my two cents worth: 1: You need need find out why there is play in the feed dog. Something must be loose, worn, or incorrectly adjusted. It may just be the screw that holds the feed dog itself. 2: The bouncing lever may be due to the feed mechanism touching something it shouldn’t. When certain mechanical linkage movements are restricted by hitting something solid, the mechanism either stops hard (ok-ish), or it keeps moving a wee bit and bends (bad), or moves a lot and breaks (bad), or it keeps moving and something else in the linkage moves out of the way to compensate (ok). That lever moving may be the mechanism compensating for lack of movement elsewhere. Feed mechanisms vary greatly between machine designs. I believe the 69 design generates horizontal feed motion from an eccentric on the main shaft. If the feed mechanism touches something even just lightly, it will still greatly increase pressure and wear on the linkage and that may lead to worn/loose linkages that may cause play in feed dog movement.
-
Sneak peek: Acrylic flatbed attachment for Juki LS-341 class machines
Uwe replied to Uwe's topic in Leather Sewing Machines
@nlopezdearenosa Take a look at this alternative for sale on Etsy: https://www.etsy.com/listing/1222743460/mini-topstitching-table I’ve not used it myself, but it has good reviews and looks like a very nice flatbed attachment.
-
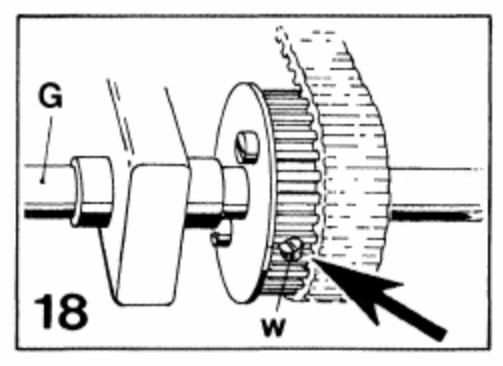
The Durkopp Adler 269 Service Manual describes how to reset and adjust the safety clutch in section 2.6 I recommend reading that whole manual. I don’t have the machine in front of me, so I’m just going by the manual. To test the function of the clutch, you can hold the shaft (G) with a pair of pliers (with grippy leather between the claws to not scratch the shaft). This simulates the hook being bound up for some reason. Now turn the head wheel. The clutch should pop and disengage the drive shaft from the drive belt. If you keep holding the shaft and keep turning turning the wheel, the safety clutch should re-engage after a full turn. Depending on the torque setting, it may take a bit of force to make the clutch pop. The 2 screws (w) under the drive belt allow adjustment of the amount of torque required to pop the safety clutch. Full details in the manual linked above.
-
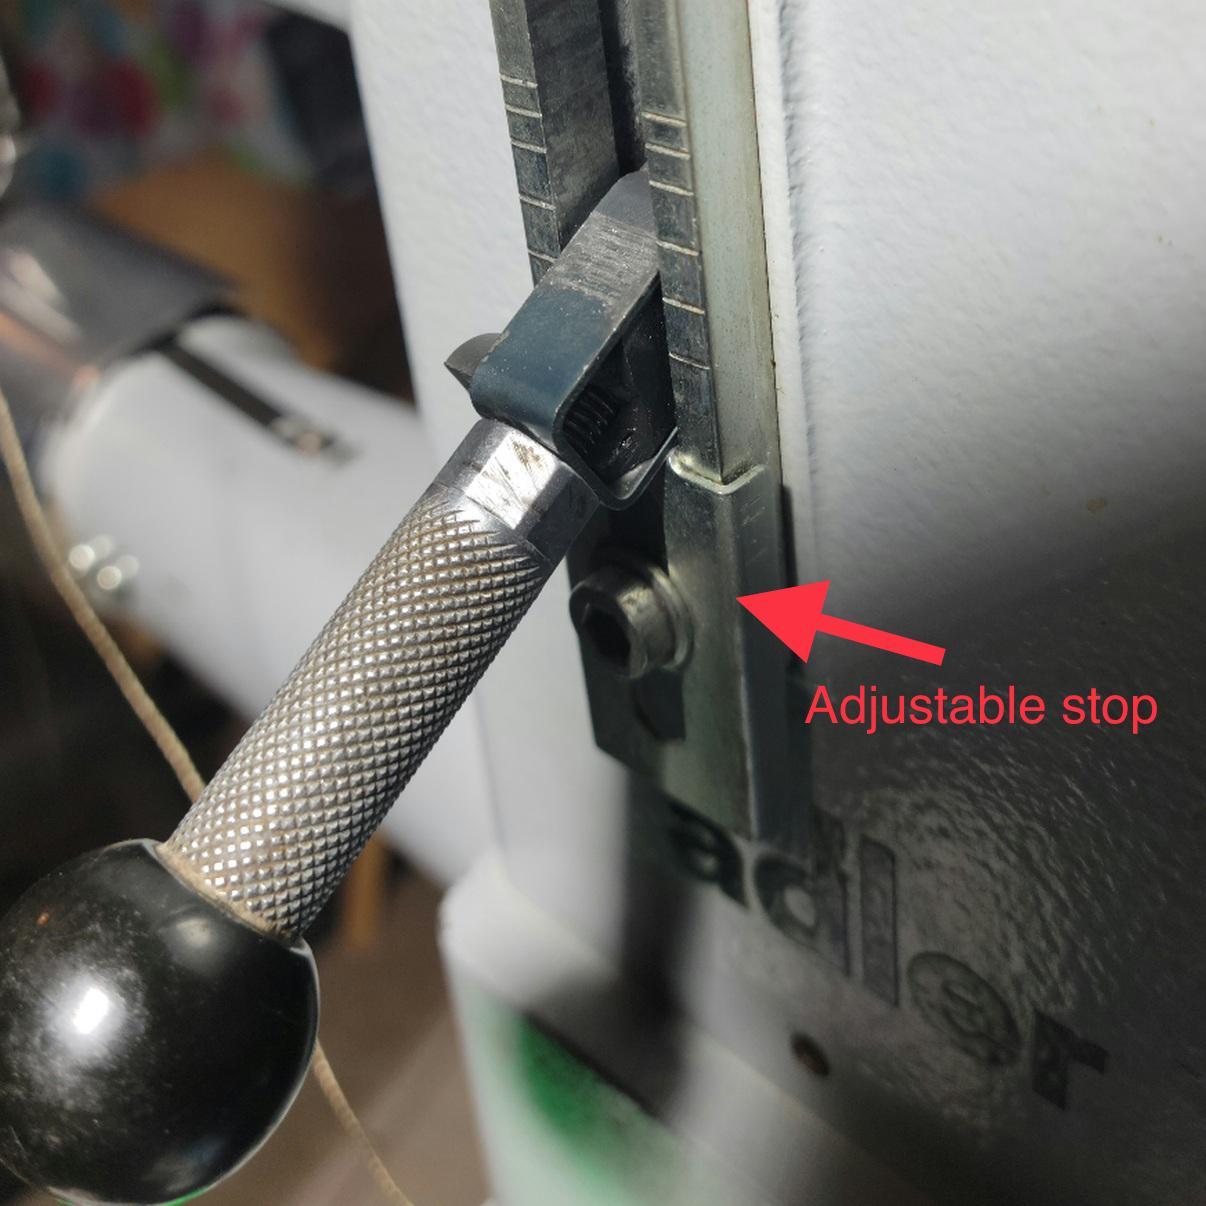
By the way, Adler uses adjustable end stops to allow you to dial in perfectly matching forward and reverse stitch length - for one specific stitch length you choose. This feature is designed for manufacturing settings where you use the same stitch length for long periods of time. Place the stitch length lever in the forward position for the desired stitch length. Loosen the end stop screw and move the end stop to touch the lever. Lock this end stop position by tightening the screw again. Then move the lever to match the reverse stitch length - turn the handwheel by hand until the tip of the needle is very close to the previous stitch hole. Fine-tune the lever position until the needle perfectly aligns with the previous stitch hole. Move the corresponding end stop to touch the lever in this position and lock it in. Now you can merrily flip the lever all the way up and down to either end stop and get perfectly matching forward and reverse stitches for this particular stitch length. Repeat every time you change stitch length. It takes less than a minute with a little practice. Also, make sure these end stops are adjusted all the way out to achieve maximum stitch length.

-
Wow, beautiful! Having the machinery, motivation, and know-how to make custom parts like that is priceless.
-
If the thread snaps off that “horn” or gib, then the hook is likely too late in letting go of the thread loop. The snapping may indicate that more thread is getting pulled through the tension assembly at the wrong time, which makes for bad or inconsistent knots.To fix this, you generally have to advance the hook timing a little bit (which then lets go of the loop a little bit earlier as well.) One function of that horn/gib is to maintain control of the loop as the hook tip comes around the second time. Depending on sewing speed and thread thickness, that loop may get flung around pretty well after the horn/gib lets go of it. Keeping control of the thread loop a little bit longer as the knot gets pulled tight can prevent the hook tip (which follows very close behind that horn/gib) from accidentally catching the same loop again, which would cause a bind or break the thread.
-
You’ll need the KB205 adapter to install any of these swing-down guides on an Adler 205. That Amazon listing has a the zipper guide attachment, which may not be as useful as the normal straight edge guide, depending and what you’re sewing. The links to Kwok Hing’s website: KG-767A Edge guide: https://www.khsew.com/index.php?route=product/product&product_id=321&search=767a KB205 adapter: https://www.khsew.com/index.php?route=product/search&search=Kb205 Kwok Hing may have multiple locations. My orders always shipped from Hong Kong, which is also what they list on their contacts page. Here’s an installation video I made long ago:
-
The Adler 269 Service Manual describes how to adjust the feed motion eccentric on page 6. This is where you can adjust forward/reverse feed balance. On this machine, when the needle is at the lowest position (NOT the hook timing position) the needle is not supposed to move when you flip the reverse lever up/down. If the needle moves, then your feed eccentric is not properly centered. The relevant page in English is here: https://www.manualslib.com/manual/461721/Duerkopp-Adler-269.html?page=6#manual You will also need to adjust vertical feed timing after you change horizontal feed timing.
-
That presser foot set and flat-top throat plate look beautifully made. Did you make them yourself?
-
The purpose of left stand sewing machines
Uwe replied to Constabulary's topic in Leather Sewing Machines
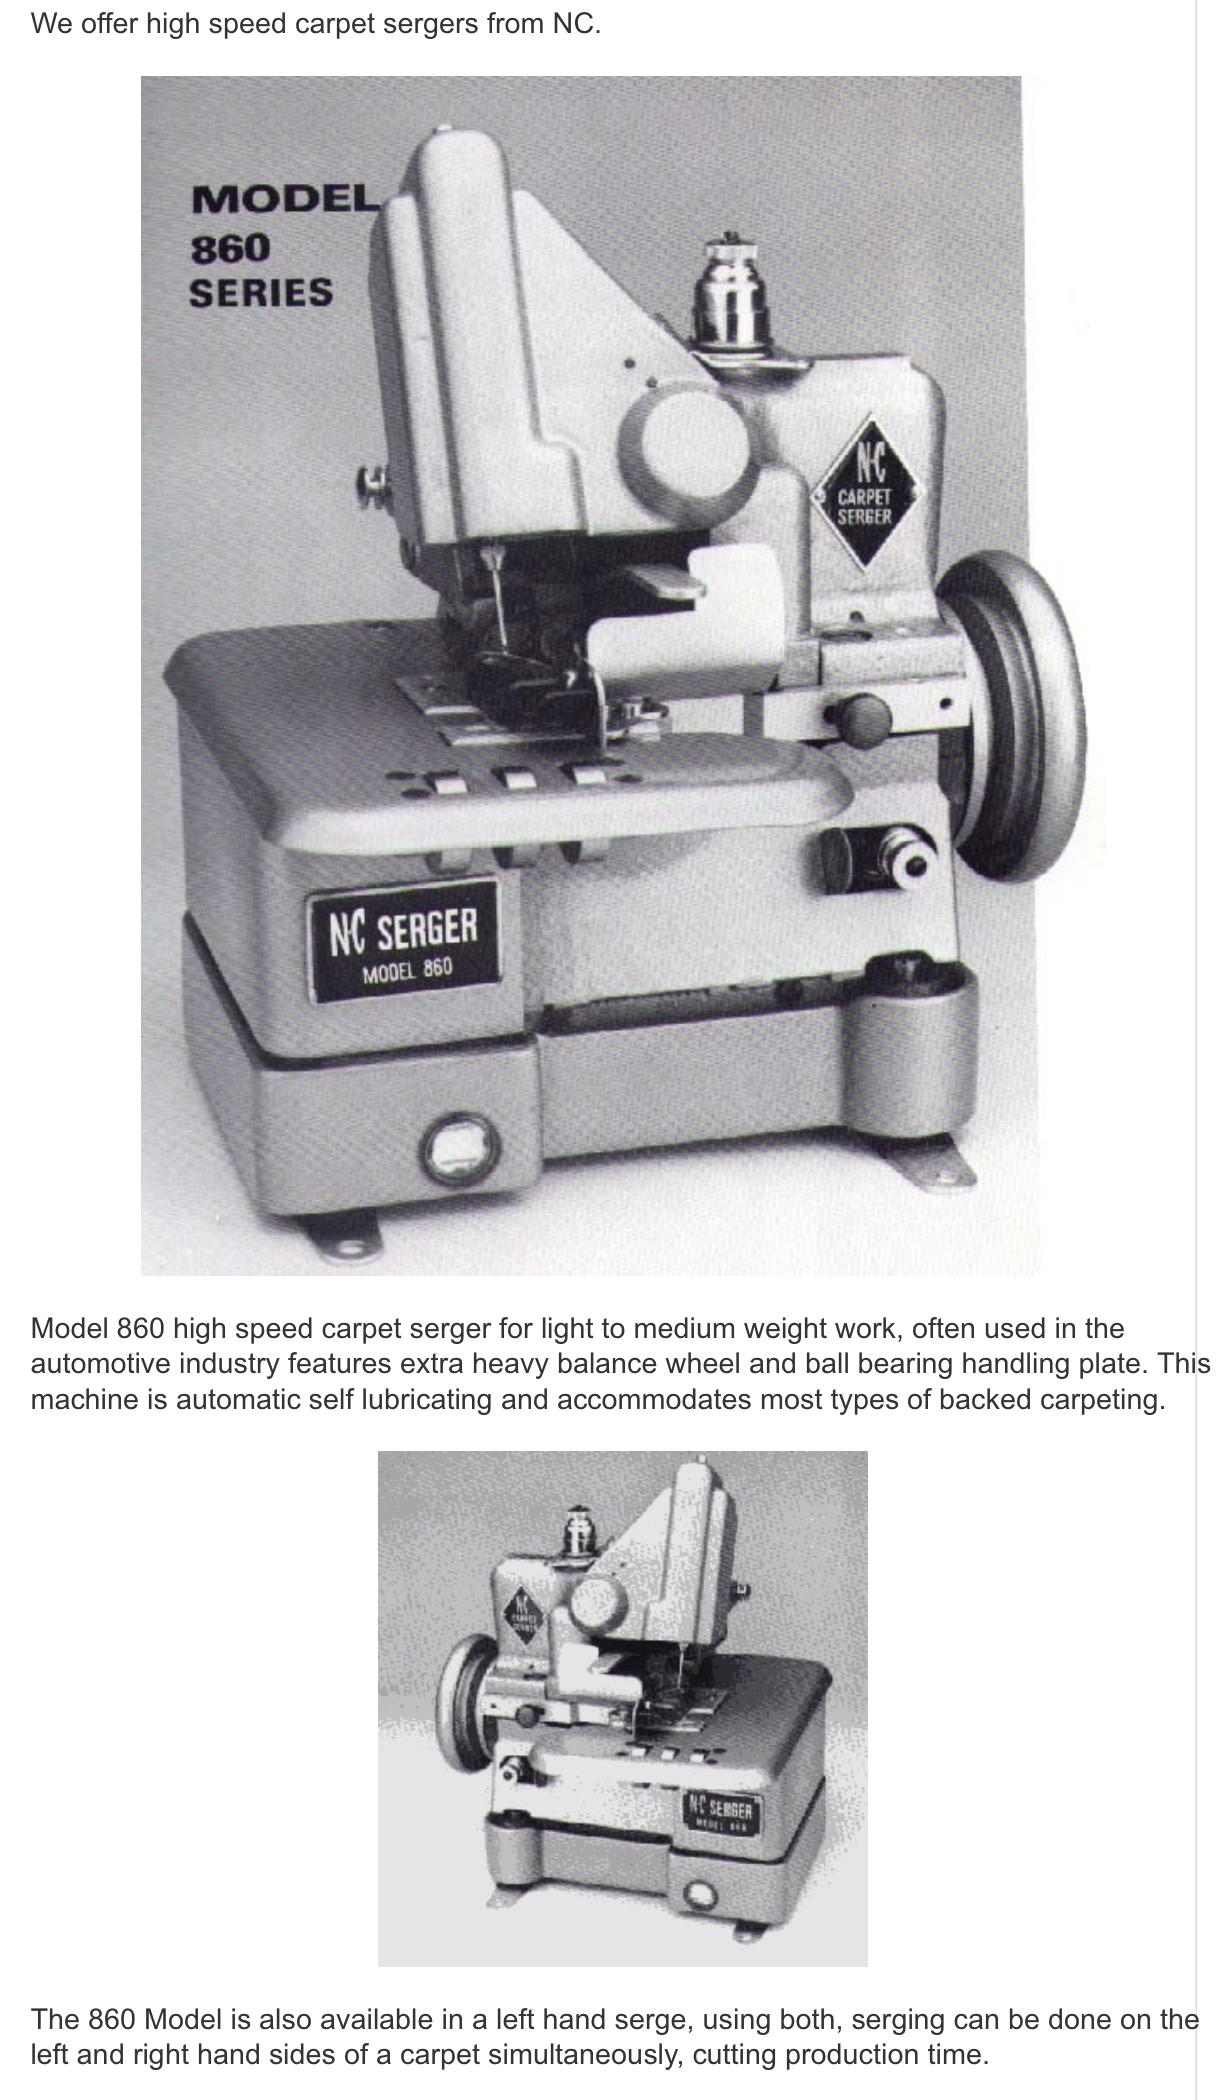
One real world example I know of came from an attendant in a training class in Germany. His company made industrial floor cleaning mops. They used two opposing carpet sewing machines to sew both sides of the mop material at the same time. Something similar to this carpet serging pair: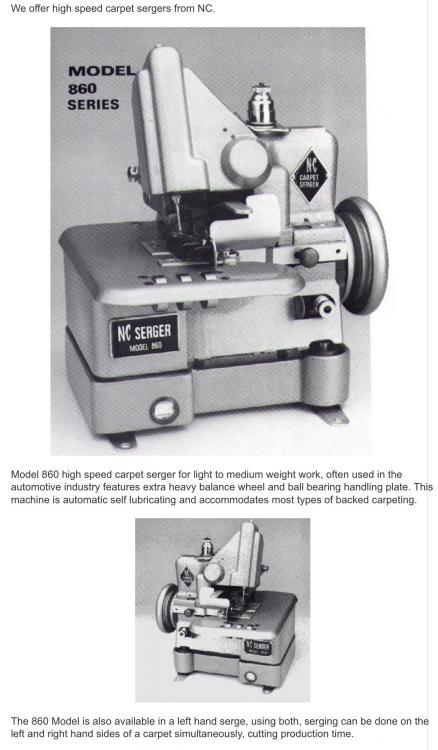
-
Flatbed Table Attachment for Techsew 2750
Uwe replied to MtlBiker's topic in Leather Sewing Machines
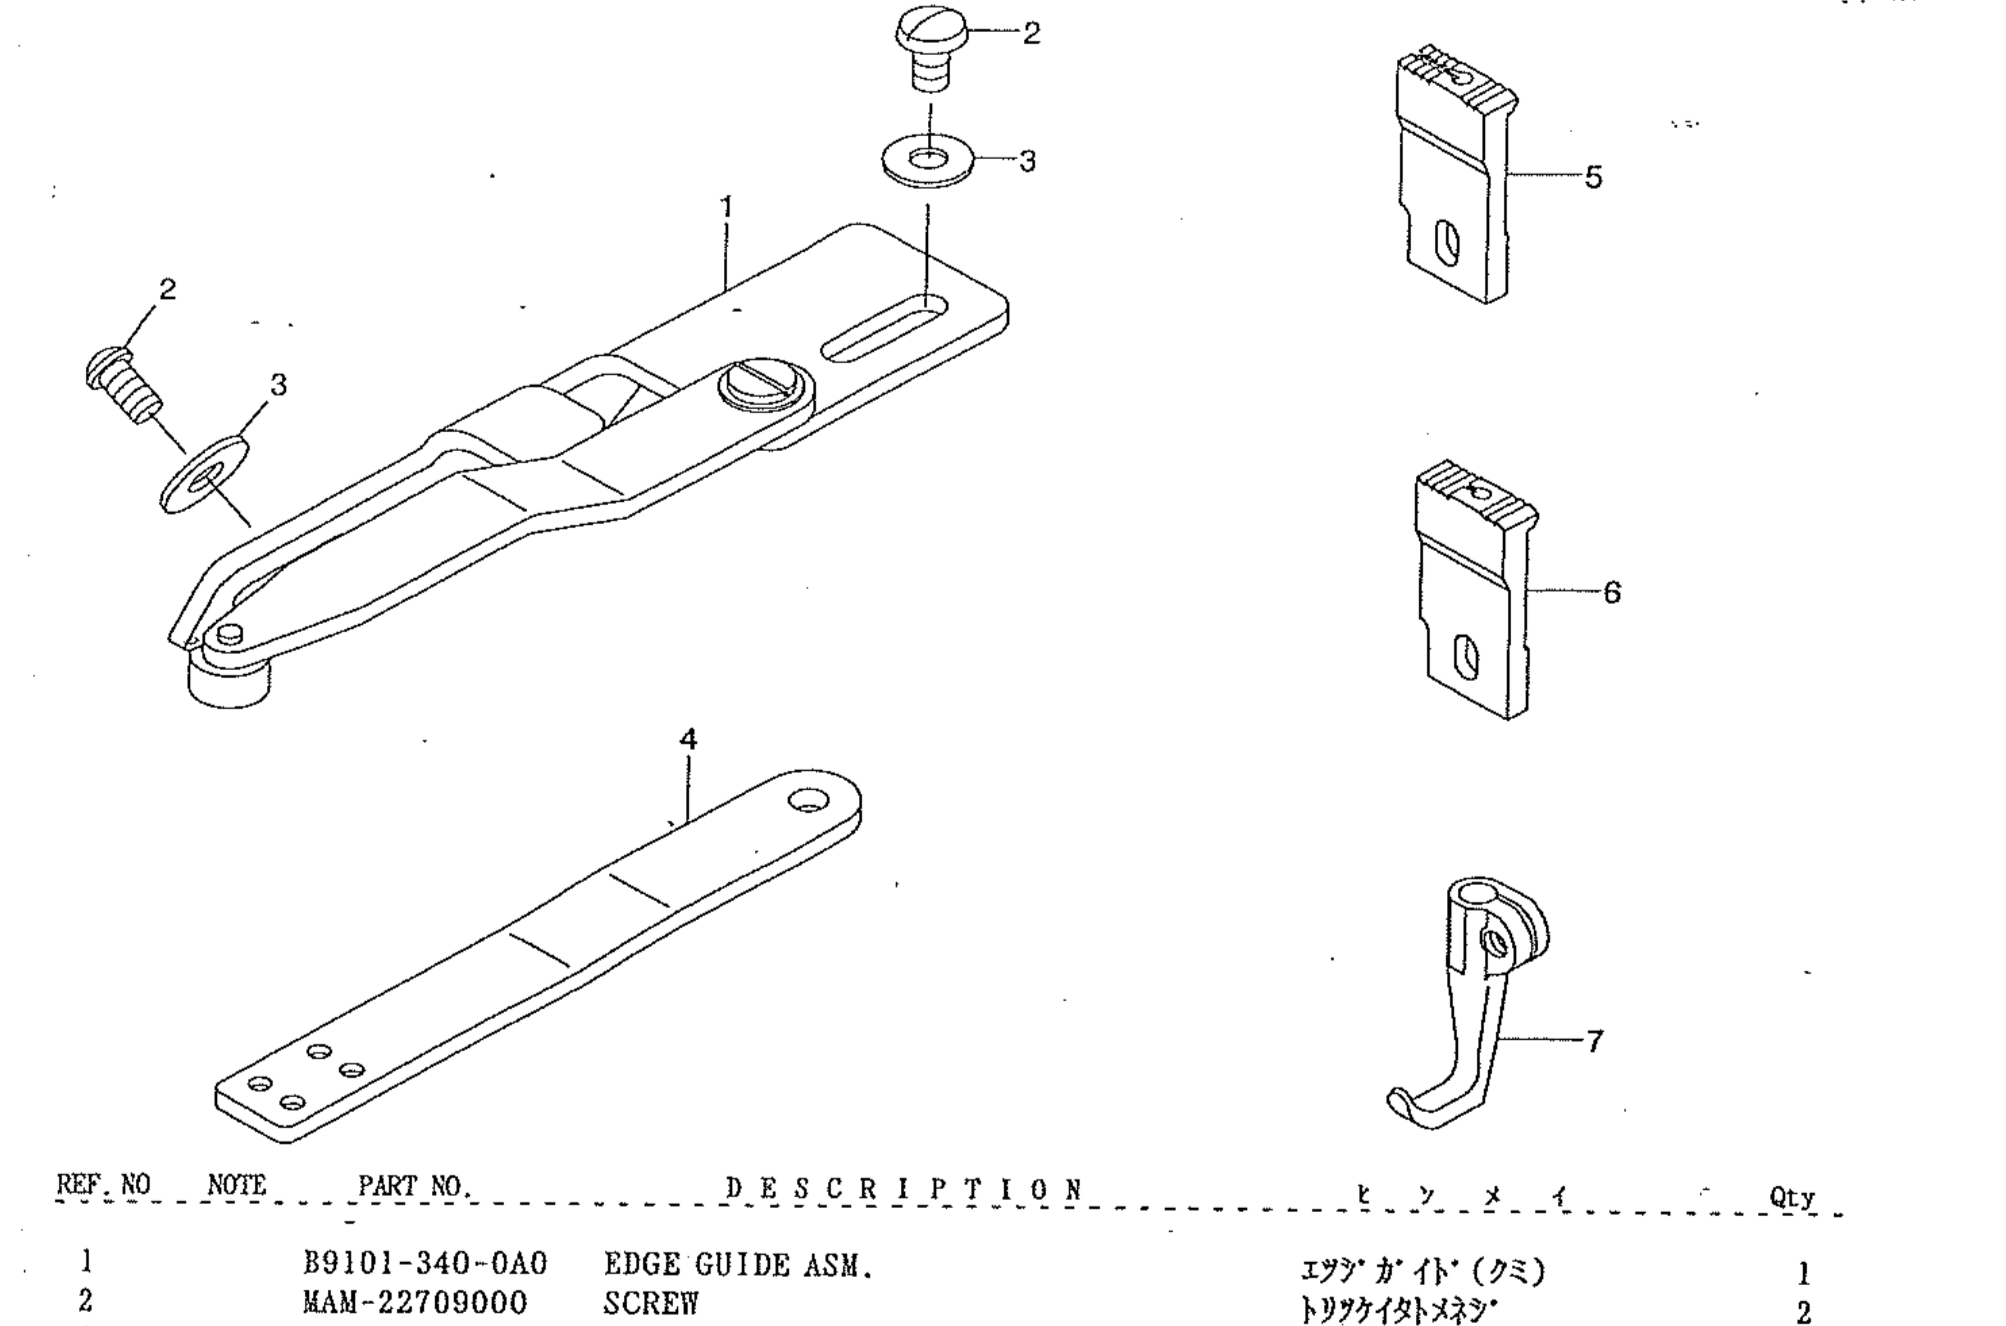
Can somebody please post a link to the web page where these aluminum attachments are sold? @MtlBiker is correct, that screw on top of the arm is close to an M5, but not quite. It has essentially the same thread pitch as an M5, but it is a tiny bit wider than a metric M5. The TechSew 2750 is a copy of the Juki LS-341 but the parts list does not show that screw. The next generation Juki LS-1341 retains the same screw and has it listed in the parts diagram with the edge guide. The screw is a special, non-metric screw (Juki part number MAM-22709000.) Them OEM screw is very likely a 13/64”x32 (which translates to metric 5.15 mm wide with 0.794 mm thread pitch, normal M5 is 5mm wide with a thread pitch of 0.8mm) The screws were hard to get last year and cost about $1.93 each at MJ Foley.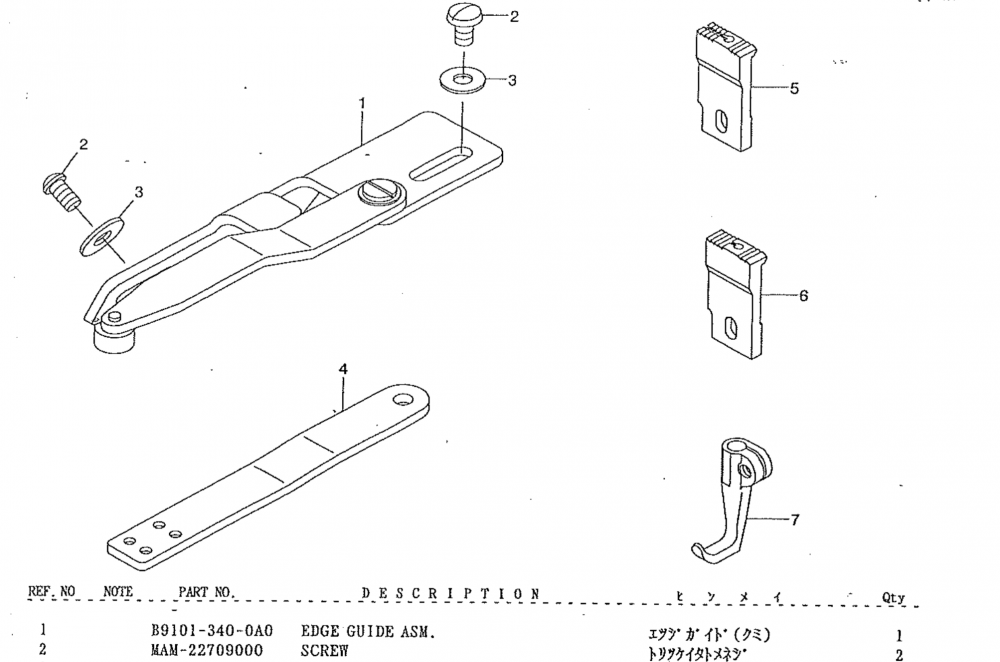
-
If you’re talking about the swing-down edge guide, you can search Google or Ebay for “KG867A” and you’ll find dozens of buying options.
-
The guide is a KG867A made by Kwok Hing. You can buy it (and the KB09 bracket) directly from the manufacturer at http://khsew.com , or from various resellers, including Ebay.
-
The KB-09 adapter is the one to use on Singer 111W class machines. This topic has some details and pictures:
-
This may have to do with a design issue of those hooks. If you stop the machine at precisely the wrong moment, the thread may fall down and go under the hook. Six years ago we had a topic explaining the problem and potential fixes here:
-
Apparently there used to be conversion kits for sale to add reverse, but I’m not sure that they are still available. Perhaps @CowboyBob can provide an update.
-
@nycnycdesign Please post some pictures of your machine with closeups of the needle area. I think we have terminology issues. The throat plate doesn’t move, the feed dog does. The Adler 69-373 allows for various configurations of throat plate and feed dog, it’s hard to guess what you have. A picture or two should clarify the issue. The Durkopp Adler 69-373 parts list (69373_parts_list.pdf) shows the various gauge sets (throat plate/feed dog/feet) that are/were available for that model. (That KH267Q gauge set you show above is for flatbed machines, it will NOT fit your 69.)
-
Can anyone help me with a running a 3-phase Juki at home?
Uwe replied to williaty's topic in Leather Sewing Machines
I’m running my Adler 467 full function machine on a rotary phase converter and it works beautifully. The rotary phase converters are bulky and heavy but they let you run the machine the way it was designed to be used. Since you have two machines requiring 3-phase power, it might be the best way for you to go. American Rotary Is a good option for rotary phase converters. -
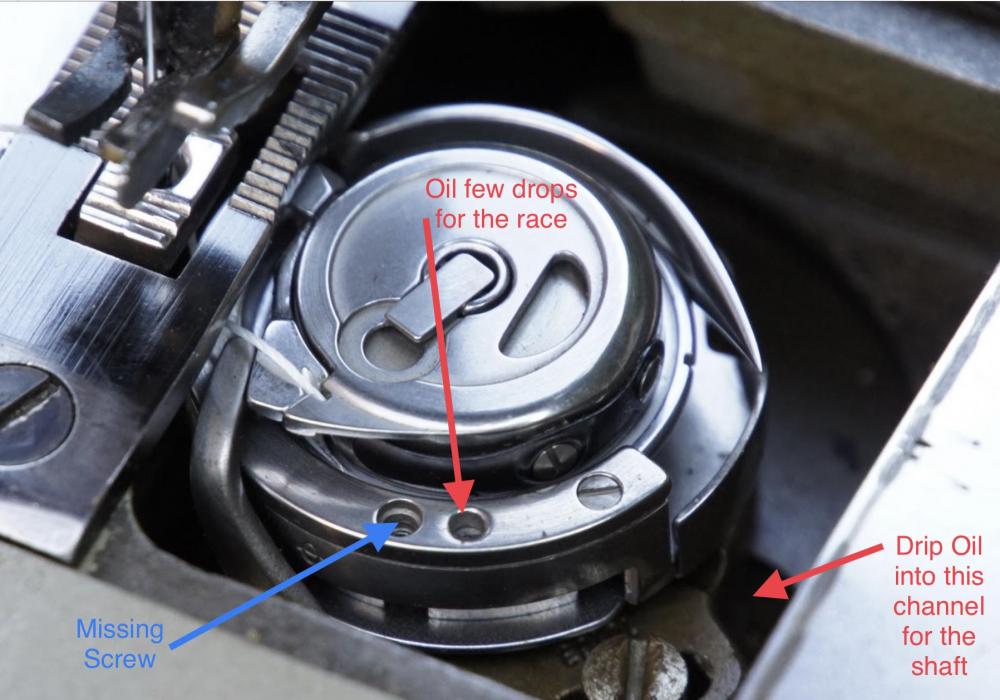
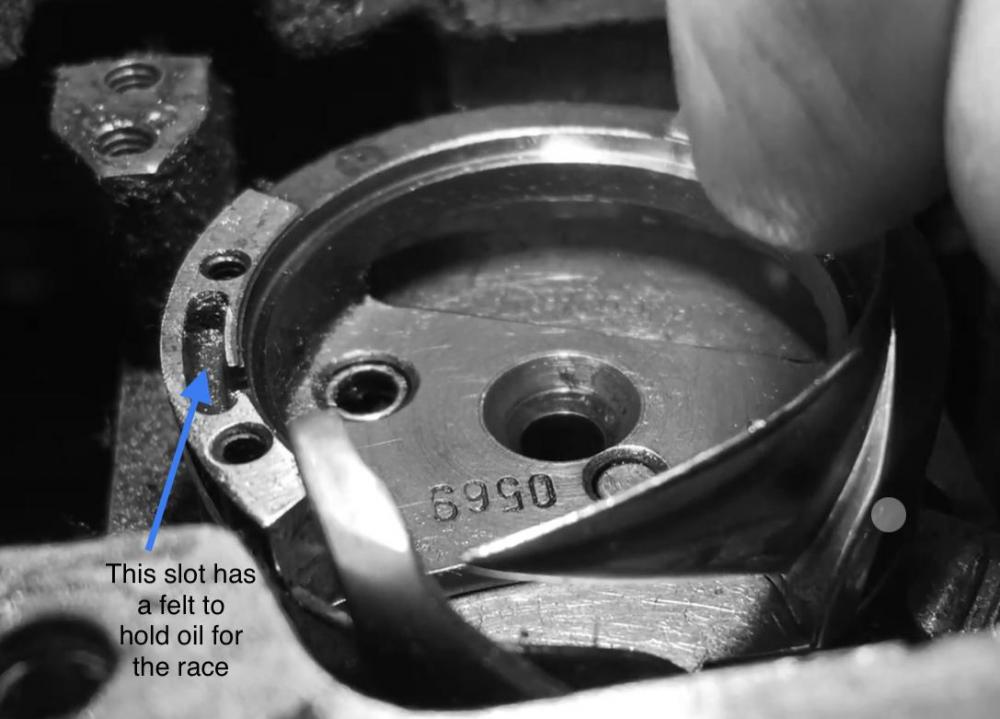
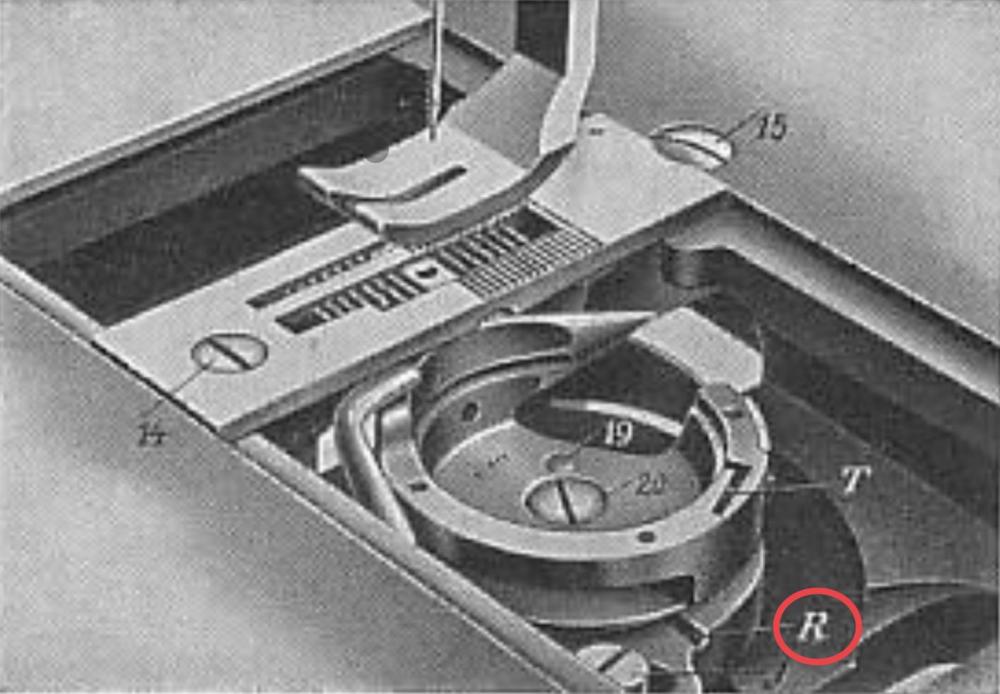
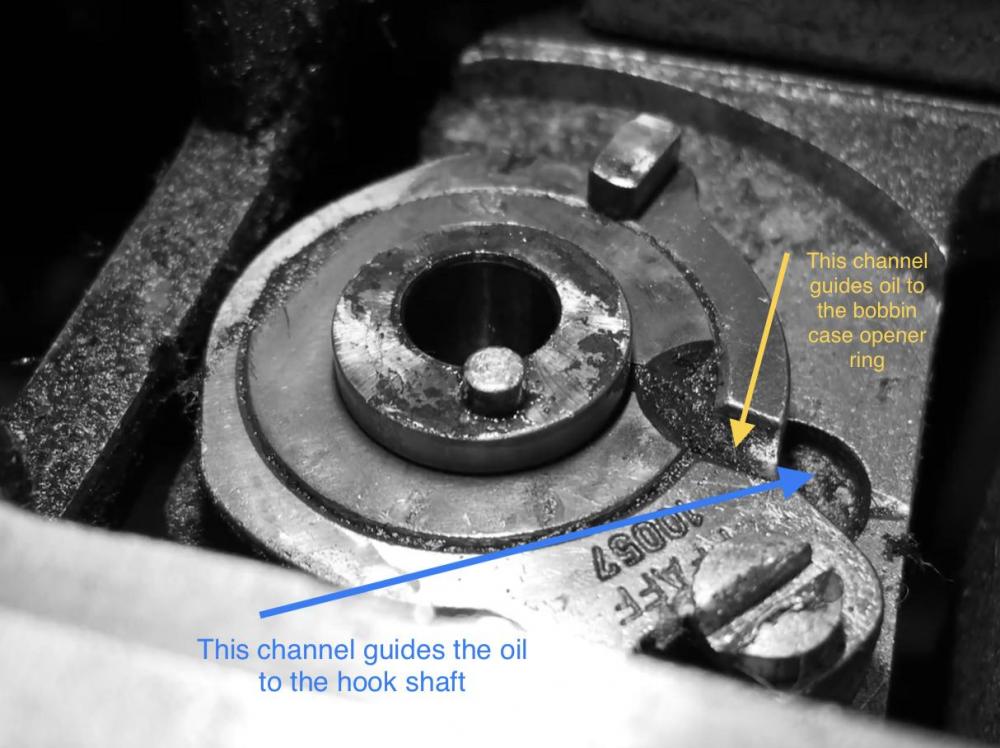
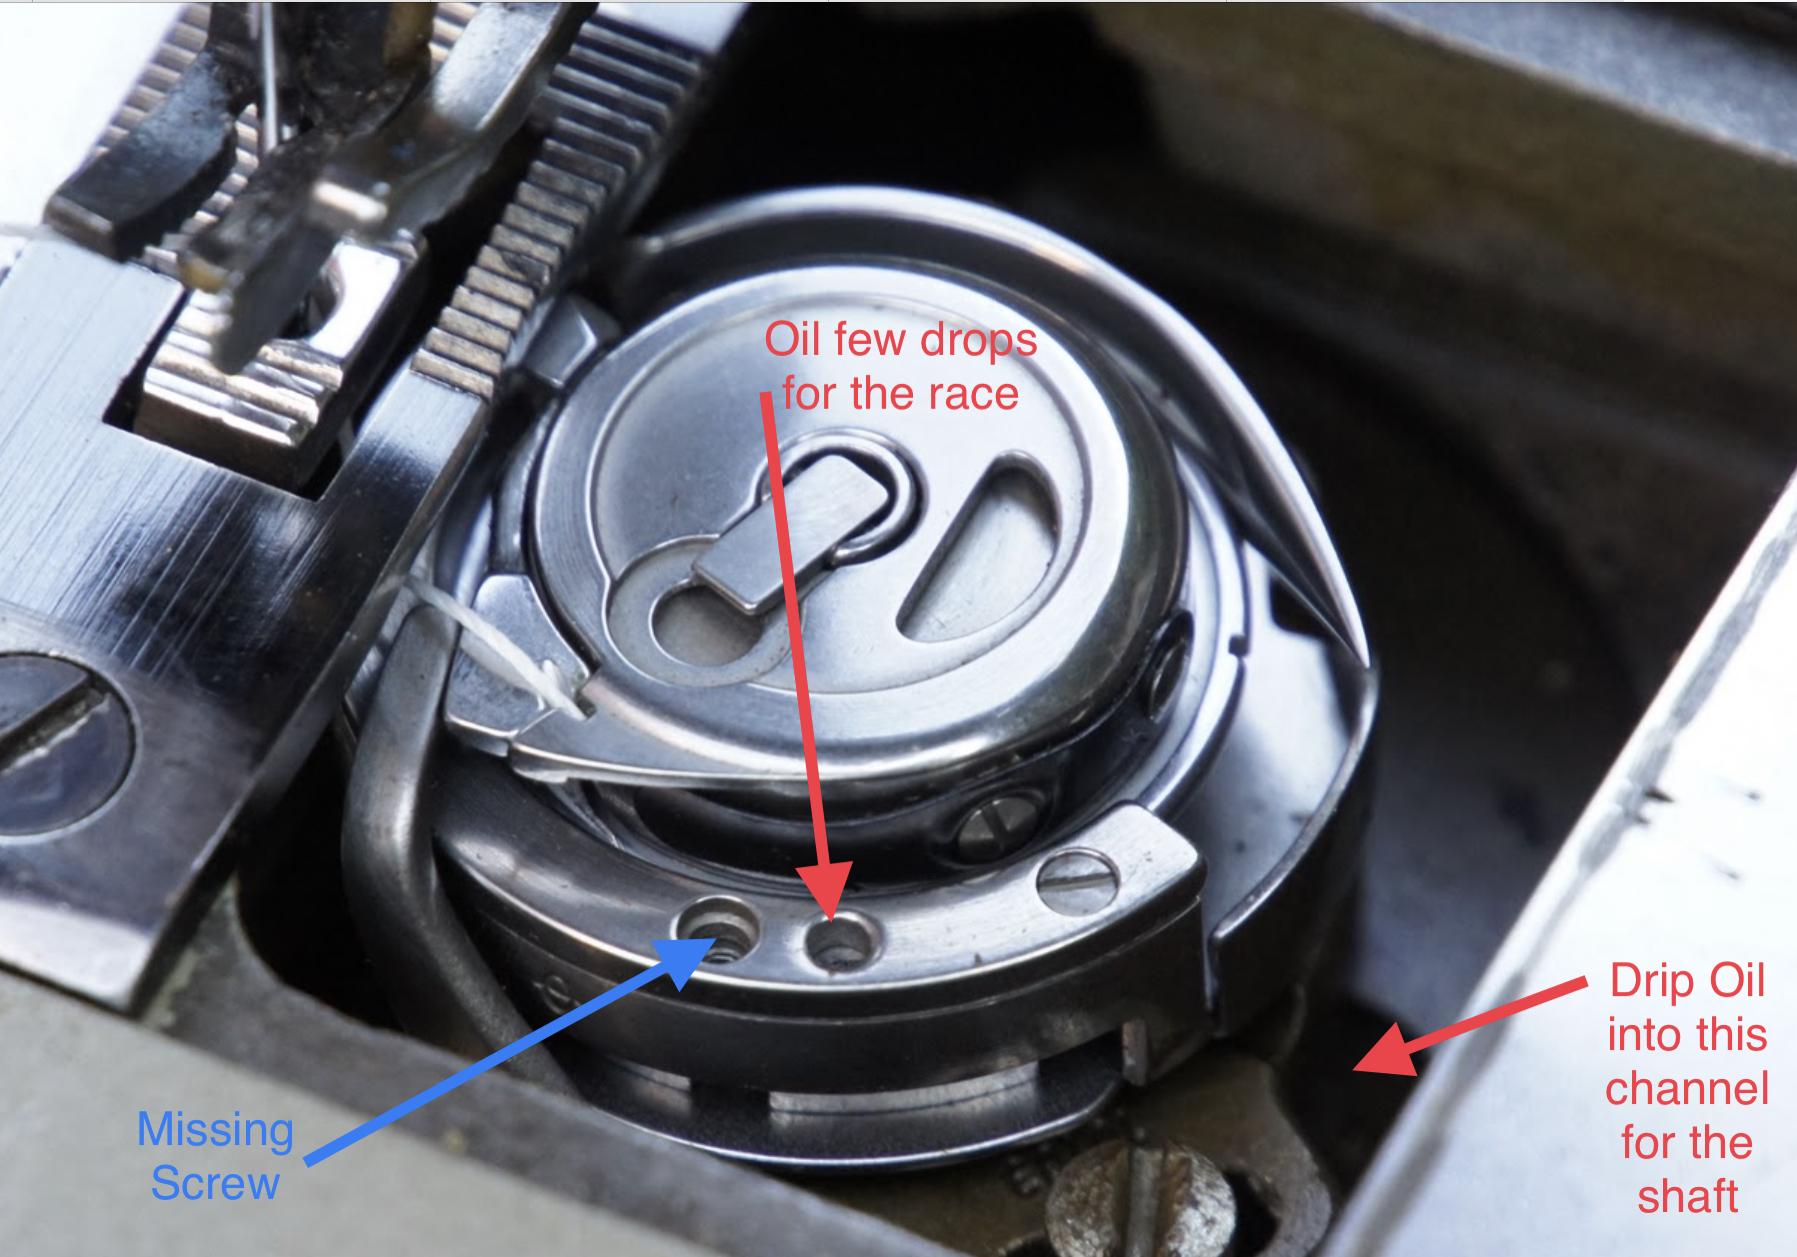
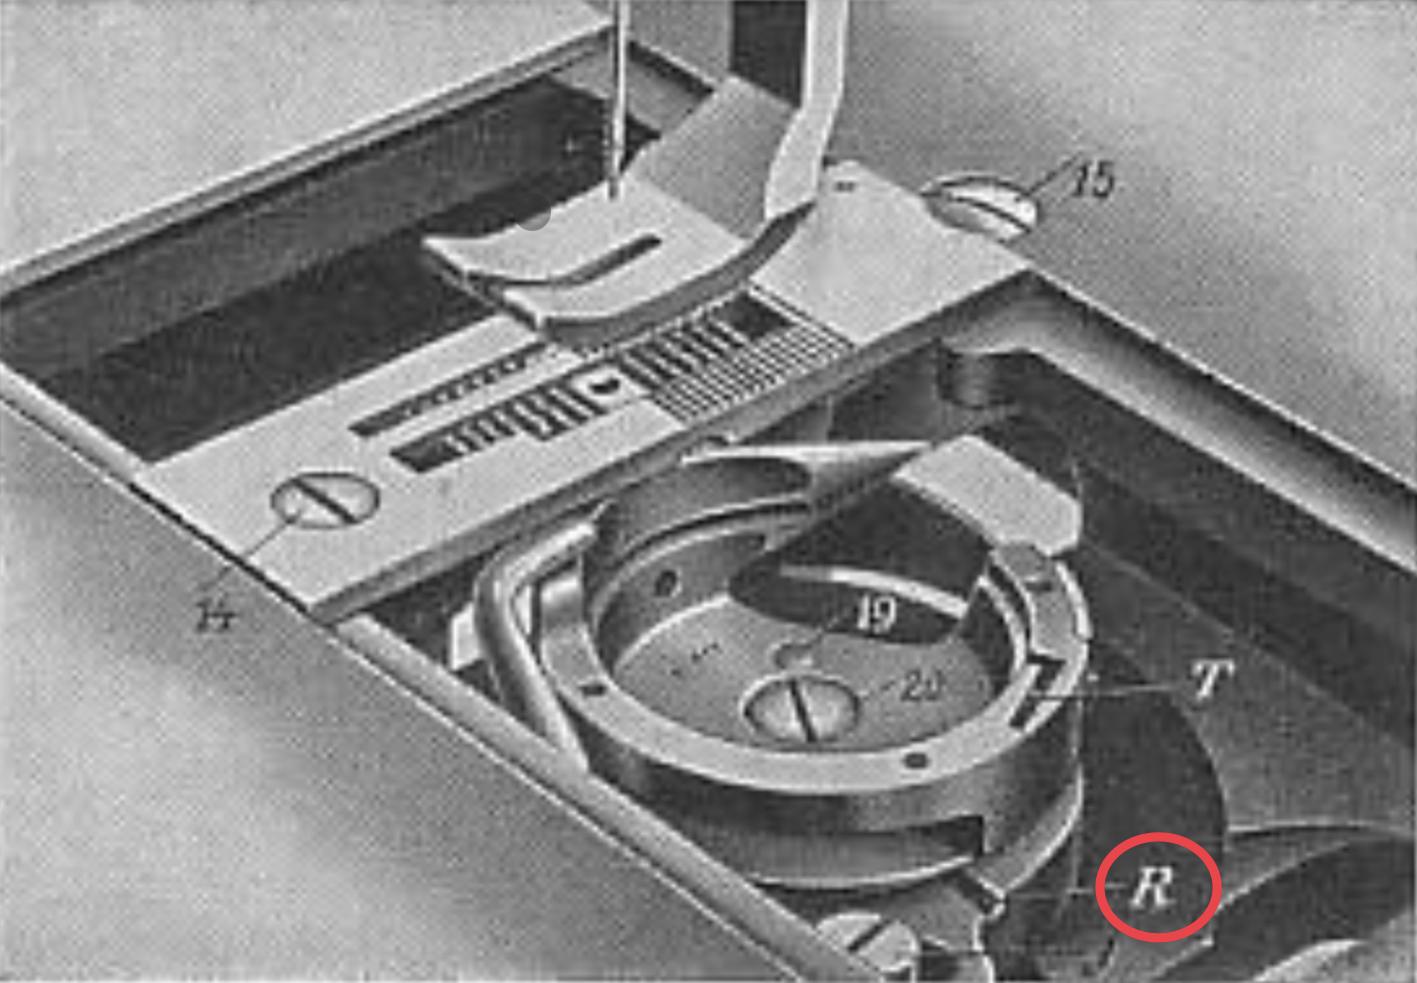
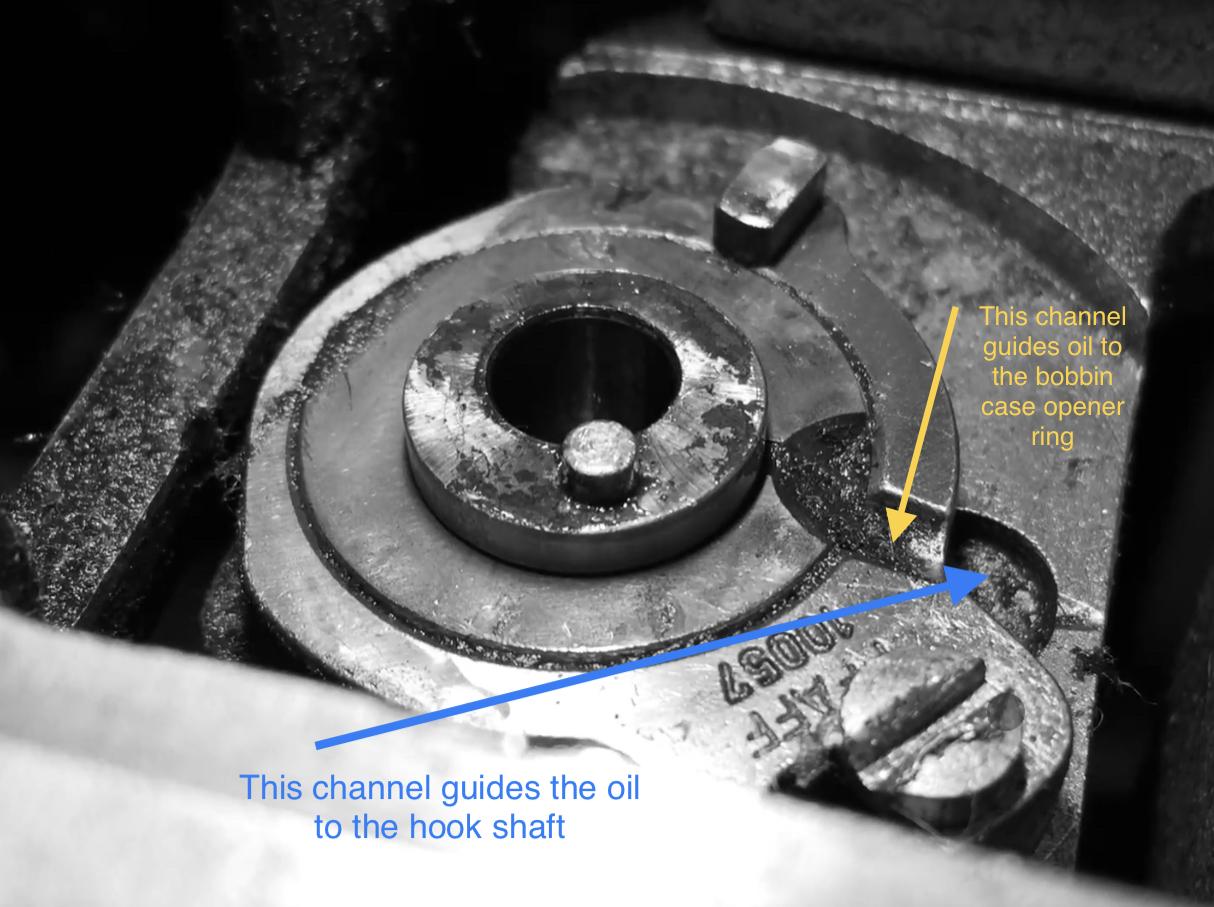
There is an “R” in that photo, it points to a channel in the part that adjusts the bobbin case opener. Here’s a picture I found online. I added arrows and text. This hook looks a little different form the manual. Here’s a photo of the slot under the oil hole that supplies the race. It normally has a little piece of felt that holds a few drops of oil. Here’s a photo from a Pfaff 145 to show what that channel looks like after removing the hook. Two channels gourde oil the either the hook shaft of the bobbin case opener ring.