fredk
-
Posts
5,997 -
Joined
Content Type
Profiles
Forums
Events
Blogs
Gallery
Store
Everything posted by fredk
-
Motorcycles & girlfriends = tick Motorcycles & wives = XX
-
or poppers to us uns The type with a spring in the female part - I have lots of snaps/poppers but I very rarely use them because they are just too tight. They are so tight I have to use a small screwdriver as a lever between the male & female parts to get them to open up. Sometimes I have to use a pin-nail hammer to force the screwdriver between the male and female parts. I have snaps/poppers from a number of different sources. Some are worse than others but they are all too tight I recently used a few on an old fabric jacket. I re-enforced where they were fitted, but upon trying to open a couple they ripped out of the jacket rather than opening! yes, I checked before hand that they'd open but they didn't, I foolishly thought the snaps would loosen up with some use. One snap/popper even ripped out thru the leather on a project rather than opening As we say here 'its dooin ma heed in' (translated; it is very extremely vexing and its annoying me ) I've tried filing the raised ring towards the top of the male part. That helped a wee bit. Maybe I didn't do enough. But filing that ring cuts through the plating on nickle plated ones, but not too bad on the solid brass ones. Is this the only way I can make them looser? I only have about 100 snaps/poppers to work on PS. grease, vaseline, any lube, does not work
-
 Try adding some NFO into your dye. Not too much, just a wee taste of
 -
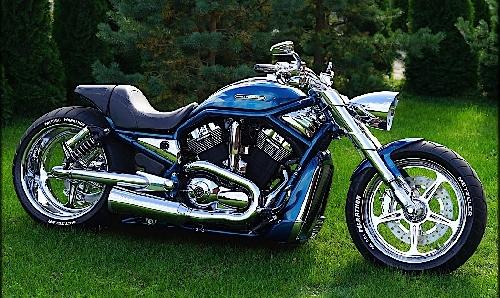
A required accessory for this; A H-D Outlaw If I could, I'd have one of dem!
-
I wonder if these rubber pencil grips would work
-
Nicely done A nice bit of repair & improvement
-
Two good answers To answer one of your questions I use a roller lint remover to remove specks off suede. It definitely does not smooth leather. In fact it does the reverse, it pulls up the nap
-
The ban is specific to Northern Ireland. Illegal to 'import' any knife or blade via post/mail/courier, and only allowed on personal 'imports' with a very good reason for doing so. Very often if I try to buy any blade from GB and have it sent the good companies will flag up 'cannot deliver to your address/location' I buy some blades in GB and arrange collection for when I'm over in GB. I once picked up some sports fencing 'blades' and the forms and questions was ridyicullis for what are just thin straight steel bars with no edges and no points, but the packing said 'blade' on it
-
I still cannot buy via post/mail, not even from Amazon
-
Can't buy via mail and they're out of stock anyways
-
btw, I did check out that place you linked to; they don't have the correct blades
-
I suggest a return, but for a replacement. You may have got a Friday afternoon bogey
-
This may seem strange to you lot; but I can't buy blades by post/mail. Its illegal to do so. I have to buy locally
-
I think I might buy one and try it. They are cheap enough. One problem I foresee is replacement blades; I can't seem to find any like the one fitted Although it looks nasty the way the point of the blade is right up to the grip hole the blade actually sits in a recess
-
Easy easy, very lighty taps. The smaller your mallet the lighter it is and thus lighter taps. I mean really light taps, just use the weight of the mallet to drop down, no extra force required. I use the rubber side of this type of mallet, its pretty useless for anything else; I use the plastic head, the yellow part, for tapping down glued edges, when required Some times I use a lightweight tack hammer, it weighs less than 3 ounces; Again, just very light taps, mainly just the weight of the head dropping on the threads, no extra force. Hold either mallet or hammer in a grip using just your thumb & forefinger and let the hammer pivot there, let the head drop, your almost open palm will stop the tail end. I guess I'm used to holding this way and the motion as that's how I held the grip on my sports swords during sports fencing.
-
Has anyone tried one of these carpet cutters for cutting leather ? Its meant for carpets and floor lino so it should cut thru leather like the proverbial hot knife Obviously not for detail cutting but for roughing out maybe. It looks to be a giant version of the safety cutters used by scrap-bookers for cutting paper or the ones you use for cutting wrapping paper at Christmas time It appears to use a 2-hole box cutter type blade. In use, the material is lifted off the working surface along which the cutter is run. So cutting above the surface will save your cutting mat or table top. In fact you could cut the material anywhere, anytime without having to have a cutting mat down
-
Made these arm guards for a raffle
fredk replied to dhaverstick's topic in Archery Quivers and Bow Cases
Very nice. You put a lot of work into those. I hope they do raise some good $$ for your club -
Agree. OT now; I'm making up some basic kits for the ladies & 1 man in my 'Knit & Natter' group to make up coin purses like the one in the earlier picture. I'll be pre-punching most of the holes, but to my standard. Thus, assembly should be speedy @SUP One other thing to do which helps the leather close up and grip the thread is to go over the stitching tapping it down with light-weight mallet or hammer. A small plastic and/or rubber headed hammer is good. Just lightly tap down the sewing line. Leave no marks on the leather. You'll notice a difference
-
Not necessarily, the size of the hole must match the size of the thread and the size of the thread must match the size of the hole. On this thread the tools we are discussing cut a slit in the leather, they do not remove any leather, but still if the slit is too big for the thread some of the slit will still be seen.Ideally the thread should fill or just over fill the hole. The leather will grip the thread and close over it. Other tools which make holes for sewing remove leather and if the thread is too small the hole will always be seen. Even when the the thread is the same size as the hole the hole will be seen. The thread needs to be oversize to fill the hole as the leather will not close up to grip the thread unless it is forced to do so On these wee coin purses I use a punch to make the sewing holes. It removes leather, about 0.8mm diam hole. I used 1mm waxed cord to sew. The thread is too big for the hole and needs tugged through. It hides the hole pretty well On this Tandy kit the pre-punched holes are too big for the thread or lace and the sewing holes still show and also give an uneven 'jagged' looking sewing line(photo picture taken from an Amazon listing)

-
Nice variety I think you're getting the hang of making these Carry on
-
An addendum to the main discussion; Tandy has. or had, in their library two books, 'Leather and Wood' Volumes 1 and 2. Vol 1 is by our hero Al Stohlman and Vol 2 is by Jerry Jennings & John Drake ( Ha ha, it takes two to compete with the Master! ) Many of the projects in the books are rather dated and old fashioned now but I thought youse might be interested in them and maybe get some inspiration Leather and Wood Vol. I.pdf Leather and Wood Vol. II.pdf
-
Good idea But are they steady enough? I would use pipe joints to put lengths of pipes running between all the legs, to make them all dependent on each other to stay steady
-
On June 1st I placed an order with buyleatheronline UPS delivered my order at 15.00 12th June. I had to buy much more than what I wanted as the minimum order value from the UK is £135. My eventual order totalled £244. I was warned there would be customs duties etc on the order when it reached me. However, there were no extra charges Overall. I'm please with the quality of the hides and pieces of shearling I received. Even the Grade 3 or Grade B quality is very good I'll definitely be heading to them for my next top up of leather
-
btw, highly recommended for use with the chisels is one of these; they are easily made so don't be tempted by the ones costing £20! I made mine out of an off-cut of acrylic perspex which I had laying around (I'm always on the scrounge for bits of stuff like this, )
-
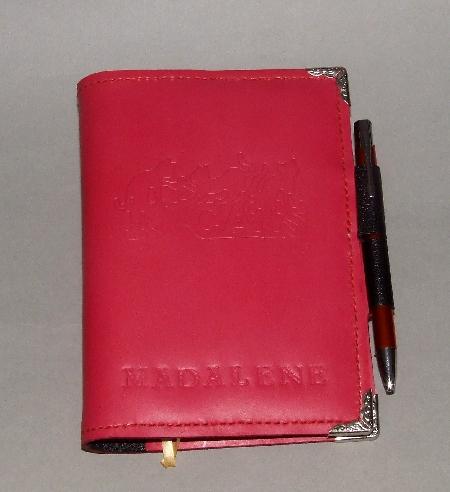
I have these in 3mm and 4mm. Cheap ones, Cost me about £6 or £8 for a set of 4. Never bent yet. Sharpening and polishing them helps them cut. The 3mm set matches quite closely but not 100% the tooth spacing on my pliers type. These are useful for where the pliers cant reach. Also, even with these chisels or the pliers a good sharp diamond awl is required as the holes may be 1. not perfectly through, 2. too small, 3. have closed up a bit When I recently did this book cover I used my pliers type to punch the sewing holes almost all the way around, but they could not reach over the pen holding loop, that's where the chisels were used. As I sewed around the perimeter I had to use the awl a few times to open up the holes