


fredk
-
Posts
5,974 -
Joined
Content Type
Profiles
Forums
Events
Blogs
Gallery
Store
Everything posted by fredk
-
Thats what I mean by thick
-
Not worth any more than £10, and that's just so you can pull it apart and use the bits as patterns for constructing a new one. Not even RE-constructing 'cos it sounds like there isn't anything TO RE-build ALL the leather would need replacing, almost all the wood needs replacing, the metal parts are missing so they need fabricating. Its not even a 'Triggers Broom' Best place for this bellows is in a non-working historical display in a museum somewhere
-

Another Give away Holster to a Veteran
fredk replied to Bert03241's topic in Gun Holsters, Rifle Slings and Knife Sheathes
Nice, simple looking. He will like it You'e a kind hearted crafter to do this for him -
I think its real enough but very old and very dried out
-
@Tequila - two questions; 1. what weight/thickness of leather would you use? 2. what width of rounded bead would you use? I want to try and match your requirements to see if miine works
-
Simples. If I have the time I'll make a nylon one over the weekend and see how it works
-
Yes, but I reckon it would need to be quite thick to with-stand either a thump from a mallet or pressure from a press
-
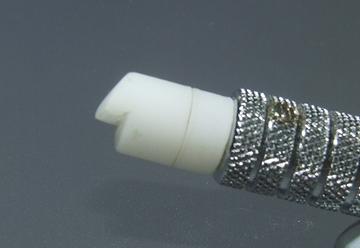
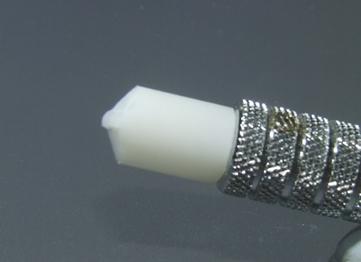
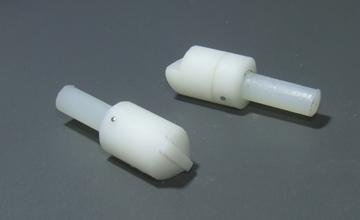
What do you mean by a 'bead' ? I think I and maybe you have two different ideas of what a 'bead' edge looks like You can make a push beveller for a swivel knife. If you cut the end right you can have a rounded top 'bead' These are simple bevellers I made out of nylon rod for my swivel knife; The materials cost me less than $10 and I have lots left to make more. They took only a short time to make I might go and make a 'beader' now !
-
I only, or did only, shoot traditional Long Bow. My prefered wood for arrow shafts is Port Orford Cedar or Ash. Ash is now hard to get in the UK because a disease has wiped out the ash trees. Also; I have a long draw so standard 32 inch shafts are too short for me. I used to get shafts made by a specialist who made mine 35 inch long in P.O. Cedar, made them for my bow strength and made the shafts with the traditional belly and not dead straight. I think that can only be done by hand or by specialist machines. afair I used to pay about £24 for 6 for the shafts. I added in buffalo horn in the nock and of course whipped on goose feathers. I never had to buy many during a year as they rarely broke, got damaged or lost, but knicked ? (stolen), er occasionally
-
Interesting, thanks, But the cost of machinery and getting good proper wood outweighs the minimal cost I pay for proper weighted shafts
-
Quick - get more dye, pour over the rest of the floor and clean up in the same way - you're redecorating and starting with the floor!
-
To me that look likes 'tide' marks caused by uneven drying out of uneven applications of wet products. After some time it may reduce but it will never go away
-
two points 1. stainless steel was invented in 1913. My paternal grandfather was a sheet metal fabricator and specialised in use of stainless steel in the 1920s & 30s. He made a canopy for the Biograph Theater in Chicago and whilst fitting it up he witnessed the sudden demise of a certain gangster 2. Samuel Colt perfected the assembly line for mass production of goods, in his case for fire-arms. Assembly line manufacturing was done on a small scale by clock makers in New England prior and by gun makers in London & Birmingham, England from 1790s or so. Henry Ford was a late comer There has always been and will be great differences in qualities of steel and thus tools made of. Price is no guarantee, nor is place of origin of either steel or tool
-
If its similar to another forum I'm on I think all three of those are dependent on how many postings you've accumulated You've got less than 1000 so you're ranked as 'Member', as you make more postings you go up in rank But, not all your numbered postings count towards your rank. All postings are recorded as a total but postings made in certain areas, eg 'Chat' or 'Buy & Sell' aren't counted towards your rank
-
How about this Embroidered Jacket?
fredk replied to ElliotKennedy's topic in Clothing, Jackets, Vests and Chaps
An embroidered CLOTH jacket So? -
Joining two pieces of leather for a long gusset
fredk replied to Lloydc's topic in How Do I Do That?
I would skive the ends of both pieces, back about 2 inches or so, overlap, glue and use a simple running stitch in two places, both near, but not to close to the ends of the over lap -
4th or 5th refresh try on 'unread', top right of the 6 I get to see, and now bottom right on the top of this thread
-
Samco-Strong Ltd. ceased trading in 2016 but was a dormant company since 2002 so it might be hard to get parts for it if required
-
Is he a relation of 'Speedy'?
-
Clever. Nice simple pattern design Those type of switch plates have fallen out of fashion & demand here
-
It does sound a bit like your leather is too dry and hard. Does it feel and act like cardboard? A good sharp knife should slice through the leather easily; not like a 'hot knife thru butter' but easily with a little bit of effort. A scratch awl should almost cut the surface Mix some, very little, NFO with hot water and a few dribbles of washing up liquid soap. Then apply some of that in big swathes across the leather using a sponge. Not too much, too much NFO is bad. Allow that to soak though for 24 hours, see how the leather feels after that. If it still feels stiff and hard apply again, allow it to work for 24 hours and repeat until the leather is almost pliable, Stop then and allow the leather to rest and the NFO to work for a few more days Assessing the temper of leather does come with experience. I once got stiff as a board leather from Tandy. I managed to get a discount as it was like a sheet of masonite/hardboard but I knew I could oil it and rejuvenate it. Firm temper is often a measure of how the leather was tanned. I have belly leather that is as floppy as cloth and some which is as stiff as thick cardboard, neither is too dry
-
Most excellent artistry
-
Thank you for a. all the answers and b. taking the time to answer my Qs
-
Mine are made of nylon as well. I have no real power tools to make things. I bought a rod of nylon and a rod of delrin* (afair). The delrin is sized to fit into the hole on the swivel knife. A hole in a piece of the nylon rod takes the delrin. A small hole was drilled across and through the two rods and a small brass escutcheon nail was pressed in to lock the two together. Then the working end was drawn on for the shape of the bevel I wanted with a marker and was cut to shape with a very sharp craft knife. Its impossible to sand nylon smooth so it has to be cut smooth with a knife I suppose someone with a lathe type thingy could turn the beveller from one piece of nylon, but not having one I had to make it in two pieces * only got the delrin as that was the only material I could find I could get for the bit to go into the swivel knife And this reminds me; I want to make another with a different profile Here you can see the two part construction with the end of the brass nail showing

-
A few questions; Is the part with the notches leather or wood? What size are the holes for the shafts? On your original metal & plastic one the bit with notches is fixed, can it be made adjustable? that is, for different arrow lengths What are the lengths - over all? from the interior of the bucket to the notched part? On your leather version; is the piece between the bucket and the notched part stiff? eg a covered bar or something? or flexible? I ask, because I think I may try to make a couple of these, one for #1 favourite dottir and one for #3 favourite son, for them to try out I'm supposed to be making a standard bag case quiver for #1 favourite dottir; I must get on with that!