


fredk
-
Posts
5,974 -
Joined
Content Type
Profiles
Forums
Events
Blogs
Gallery
Store
Everything posted by fredk
-
 The links change when the website at the link dies or changes. When you come across them report it to a moderator* who will, when he/she gets the time, will edit out the bad link * to report it just use the 'Report post' in the upper right corner of the posted message and tell them is a bad link in the wee message box
 -
Whilst you lot are waiting for your books to come back I have my copy of PI handy. I'll have a look
-
I've re-read the OP's post. NOwhere does he say he wants to copy the procedure on how the edges were made. He simply asked HOW they might have been done, but some of you are attacking him for wanting and planning to copy another's work. Lets stick to ideas of how that edge effect might have been done. There is no harm in a discussion based on that
-
I suspect that nail carving is taking ordinary woodwork nails and filing them into fancy profiles for doing the tooling I seem to remember that a few other leather workers/crafters on here have done just that
-
Turnshoes with rubber soles?
fredk replied to MedievalMisha's topic in Shoes, Boots, Sandals and Moccassins
This is one of mine. At the lower front is a mans size, top is a womans size and bottom right is a child/toddler size. It seems these were as popular as a teapot throughout Ireland. Here they can often be picked up for the taking away although fancy interior decorating shops are selling them for as much as £150 With one of these you/I can move a shoe around for the best job, eg the mans size is good for the main sole, but the child size is good to get into the heel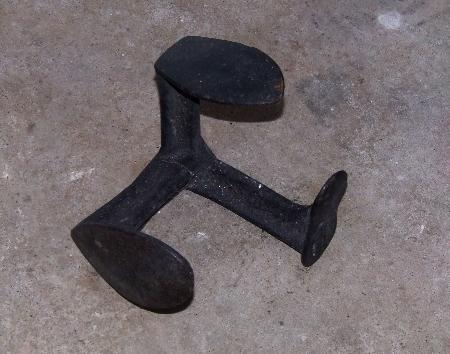
-
When I sew, I pull the left needle & thread back towards me and the right needle & thread away from me. The next hole is sewn with the right needle & thread going in first, pulled back and the left needle & thread goes through and is pulled away from me and it becomes the right needle for the next hole, ad infinitum. It still happens very occasionally, if I'm not careful or paying attention, I do pierce the thread
-
Turnshoes with rubber soles?
fredk replied to MedievalMisha's topic in Shoes, Boots, Sandals and Moccassins
Plenty of good contact adhesive, rough up the contact areas on both the rubber sole and the leather. Consider using a rubber sole much smaller than needed. I used to use a small woman's size rubber sole just on the main area of a man's shoe. Just where his foot was in contact with the ground. I have a couple of cast iron tri-lasts. The shoe with the sole glued on was bulked out and clamped to that for at least 24 hours. Sometimes it took more than one attempt to get the sole to stick down completely -
Colt .38 4" barrel
fredk replied to Bawarrior's topic in Gun Holsters, Rifle Slings and Knife Sheathes
Nice tooling on the holster. I agree, its a nice effect with those leaves coming right out of the main back leather -
Adding a safety Strap
fredk replied to Bert03241's topic in Gun Holsters, Rifle Slings and Knife Sheathes
Look for KAM snaps. You can get them very cheaply, like under $5 for 100. Available in different sizes. I use the tops to go over the bases of metal snaps. I did a wee test on them a wee while ago. I'll look for that ** The tops dont just snap into place you need to glue them on/into the metal snap, but they stay in place well enough eg. KAM snaps. This size will cover the base of a 15mm dia metal snap; https://www.ebay.co.uk/itm/332638472744?var=541754601669 ** Found it; -
I once made a sort of apron for a chap. He wanted it like a tabard with a full length back. I used upholstery grade chrome tan which was a mid-brown colour. The leather was about 1.2mm thick. I had a very large piece of leather and just cut a head hole just off centre, only for to try it out for size and shape. The chap thought that was going to be it and liked it! so I added straps and buckles just about waist level and that was it. No pockets, no trimming. That was what he wanted. * He was a farrier and used it in his work, he wanted the back piece to protect his bare back from the open fire, both heat and sparks *other workers will maybe want pockets for tools
-
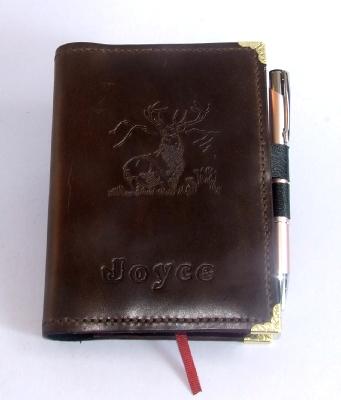
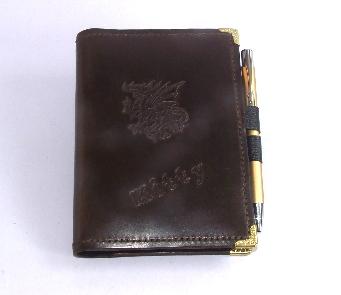
My casing for stamping 3D designs is just a slight wetting of the leather with a wet sponge. I usually do a number of items in one session. By the time I've wet the last item the first is ready to stamp These book covers were of pre-dyed veg and cased my way
-
What diameter of leather are you talking of? I'm thinking that a ferrule crimper for hydraulic hoses might be adaptable
-
Adding a safety Strap
fredk replied to Bert03241's topic in Gun Holsters, Rifle Slings and Knife Sheathes
Not exactly the same; I was once tasked with putting a retention strap on an already made up knife sheath. I couldn't take it apart to do it. I used double sided tape to hold the strap to the back side of the sheath. I put a thin wood block inside and punched sewing holes. I only needed about 4 each side of the length of the strap. I prefer not to make holes go across a strap. I cut down then curved a saddler needle into a semi-circle (I still have that one and use it) and sewed it. Extremely fiddly and annoying. After that was done I took the strap across the knife guard to almost the other side of the sheath on the front where I cut it to length and punched holes to take a Sam Brown button. The SB was a screw fitting. When it was fitted I glued a small piece of very thin leather over the screw head inside the sheath. For that I needed very long needle-nose pliers to get down into the sheath. = Job done HTH -
Yes, the same steps. I don't tool but stamp 3D designs. I use a press for this. I just do it as if it wasn't coloured, ie, regular pressure and depth. Just be careful that the leather is veg tan and not chrome tan
-
I've used these creams. They are nothing but glorified shoe polish. They will not cover up stains, they'll just colour them. but they still be very eveident. I now use the creams as edge paint or low-lighting designs
-
The four British Army regiments of Dragoons still keep to their traditional roll of mounted infantry and scouts. Now they use Jackals and Coyote semi-armoured wheeled vehicles
-
woweee! all that deserves at least two Some really fabulous tooling I wish it was me, or at least that I was able to do any tooling even 1/10 as good
-
Get a heavy bristle pasting or white-wash brush. From a $-shop or hardware store. They are cheap and have enough bristles for a lifetime. I've pulled them apart for using the bristles as 'thatching' on model houses. The bristles are stiff enough to stay straight but flexible enough to bend when pushed a suggestion; hold the end of the bristle near the side of a candle flame. it will melt a wee bit and roll back slightly giving a more blunt end
-
I've been reading up on early guns; Its hard to believe that these pistols, with barrels up to around 14 inches, were 'pocket pistols' Your belt holster would have been really appreciated back then
-
The town called Asbestos in Canada recently changed its name; https://www.bbc.co.uk/news/world-us-canada-54608836 One of my uncles got asbestosis through his work in the Belfast shipyard
-
dang, boye, that is nice. Very clever way to get around the flintlock
-
That is real artistry
-
Thanks for your replies. I don't dismiss any ideas. The thread is about 1.5mm / 1/16 inch thick. Just enough for a heavy sewing job. And its pre-waxed. I use 2mm multi-strand stainless steel wire in handbag straps for anti-thief security (I've only done few though) That s/s wire is a real bugger to cut when you want to
-
How about a simple pouch bag for carrying pistols? Not every one might want a holster but a padded pouch to take their gun to a club range. In WW2 US military personel used to be issued with a pouch to carry their Colt Auto in, and friends I used to have used pouches to carry their Olympic pistols to their club range for practice evenings A small case for the cleaning equipment. Again, those friends, used various biscuit tins for that. A nice leather be-spoke case would be ideal
-
good one. I've not heard that one before