-
Posts
5,247 -
Joined
-
Last visited
Content Type
Profiles
Forums
Events
Blogs
Gallery
Store
Everything posted by Dwight
-
That's good lookin stuff there. May God bless, Dwight
-
Good job on both . . . May God bless, Dwight
-
Not quite sure I would spend that much time on a gun case . . . but by golly . . . it is a beautiful case you made. I'd also like to see some targets that thing shoots . . . and the ranges you shoot at. It looks awesome. May God bless, Dwight
-
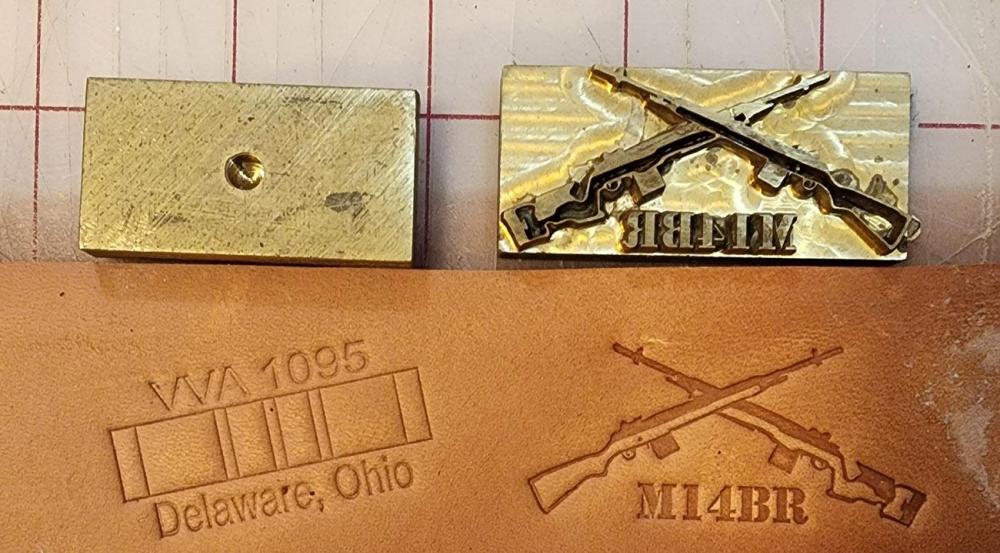
Hey, Doc . . . I don't particularly love doing business with China . . . but I (like you) needed a couple custom stamps. I went on Ebay . . . found a place in China (there are a bunch that advertise on Ebay) . . . it came in the mail about 2 weeks later . . . made out of brass . . . and the detail was superb. Don't know if this one is the one I used (it was several years ago) but here is one . . . and this is just a little more inflated price than I paid. https://www.ebay.com/itm/141593199313?hash=item20f79cc2d1:g:jecAAOSwEeFVIaxR&amdata=enc%3AAQAHAAAA4GNBdGmF8BYW1Hi47oM4B1Z1jHAuNREe493EWyuwH%2Fm757V37BoOgOTTm43TDGMsGKfpHVeL17d0JIyR9vNzAyZokPXdvQf4t2Od577T%2BhA3mfm%2BHsPSj9kdlEgzYSkddeIZENFMTgRbnZ5pVmO1usmjmPhK52H9EtsmFtNIFISSupzf0hVAlPdli3x%2Bjk95z5Mi92Ui7h0MHSzklcEfXhZsu6k8OAGFwt9kHDdnjU%2B6CFs1SIVNed5KW1uk2b%2B3yPESfBclhK27jPJO7G1u6vjCJrDSR%2BrV24ZakMUdMZqI|tkp%3ABk9SR6ytjqvrYA You will need to give them a picture . . . drawing . . . something to go by . . . the picture is the ones I got . . . there is a hole in the back . . . came with a little metal rod to screw in the back . . . I guess to use to pound on . . . I use these with a little 1/2 ton arbor press I got from Harbor Freight . . . and use them to make key fobs. Have fun . . . May God bless, Dwight
- 5 replies
-
- custom stamp
- leather stamp maker
-
(and 3 more)
Tagged with:
-

Hatchet sheath—any helpful advice
Dwight replied to Jaxx1024's topic in Gun Holsters, Rifle Slings and Knife Sheathes
THE advice for making a sheath . . . absolutely NEVER put even one rivet in the sheath that is anywhere near the blade edge. WHY? . . . Because you . . . just like all the rest of us . . . will one day pick it up . . . swing it at a piece of wood . . . halfway thru the swing we will remember that the sheath is still on it . . . and when contact is made . . . the blade will be ruined wherever those rivets were. In the place of the rivets . . . put a welt . . . and sew the welt. If you don't sew . . . thong the thing . . . use a drill press . . . 1/8 inch holes . . . leather lacing . . . tie a knot in it before the first hole . . . tie another knot in it at the last hole. It won't be as pretty as the riveted one . . . but it will protect your hatchet / axe far, far longer and greater. May God bless, Dwight -
Those both look really good . . . especially the color . . . you should be proud of yourself on those. I did one several years ago . . . a .22 Ruger semi auto . . . bottom welt had to be 3/4 of an inch thick. My Boss sewing machine didn't like sewing stuff that thick . . . but it DID punch the holes . . . and I finished the sewing with a needle . . . 346 thread . . . and a BIG pair of pliers. Hopefully you didn't have that kind of hassle . . . May God bless, Dwight
-

Vertical bifold wallet
Dwight replied to Chux's topic in Purses, Wallets, Belts and Miscellaneous Pocket Items
I'm not as good as I would like to be at wallets . . . so I bought one almost exactly like that. But yours is seriously better looking. Good job. May God bless, Dwight -

Custom Basketweave Belt
Dwight replied to dfrensdorff's topic in Purses, Wallets, Belts and Miscellaneous Pocket Items
Good looking belt . . . and I must say. you certainly have a ton more patience than I. My "grumpy . . . aggravated . . . exhausted" meter would have been pegging half way thru the belt. May God bless, Dwight -
I don't . . . I simply back stitch 3, 4, or 5 holes . . . depending on how tight they seem . . . cut em off flush on the backside . . . lightly touch with a lighter . . . done. Never had one unravel yet. May God bless, Dwight
-

Little sheath for my marlin spike knife
Dwight replied to Gezzer's topic in Gun Holsters, Rifle Slings and Knife Sheathes
One thing I learned from boy scouts almost 70 years ago . . . and since . . . there is no such thing as a malformed square knot. They might be UGLY square knots. . . but they always work. They come apart just like the pretty ones do. Granny knot??? That's another animal . . . I'll mess with it for a moment or two . . . then my Kershaw comes out . . . and it is forever undone . . . no funeral . . . just undone. But there are any number of knots out there . . . some are good ones . . . some need the Kershaw treatment. But both of the knots on both sheaths are good looking ones. I have to do stamps on things like that . . . my tooling is something to seriously be desired for better. May God bless, Dwight -

Little sheath for my marlin spike knife
Dwight replied to Gezzer's topic in Gun Holsters, Rifle Slings and Knife Sheathes
Really a good looking sheath for a good looking knife as well. I never wet form a sheath like that if I did any tooling on it. Tooling and wet forming are like wife and girlfriend . . . best only to have one . . . try getting both and wellll............. May God bless, Dwight -
In two quick words . . . you don't. Put it on with a cheap 1 inch bristle brush . . . hair side only . . . and put just enough on to see you have covered it all or 95% of it. You know you did because it begins to look wet. Hang the item up to allow it to spread out and become uniform in the product . . . takes 24 hours. Do it that way and you will like the result . . . heating it up will get too much on the project . . . and while it will not always ruin the project . . . it can do it very easily. May God bless, Dwight
-
I'd certainly rather sell the guy the wrong set of spark plugs for his diesel rig . . . than tick off the fellow who I'm handing a fully loaded .38 special to . . . in his new holster . . . he don't like. May God bless, Dwight PS: So far neither has happened in my 20 years of sales. My worst case was I was late on a tax payment of less than 10 bucks and some lily livered jughead down at the tax office (sales tax) threatened to sue me $1000 a day until it was paid.
-

Side pull, where to cut the leather from?
Dwight replied to Scootch's topic in Saddle and Tack Accessory Items
Maybe someone else knows . . . but honestly Scootch . . . I have no idea what a side pull is. Might be something to do with a saddle . . . maybe a rifle scabbard . . . a ladie's purse . . . or a camera case. I wouldn't know . . . and couldn't guess what you might use. May God bless, Dwight -
For my white leather projects . . . I buy white leather off Ebay . . . Has worked very well so far. May God bless, Dwight
-

looking for GOOD men's acrylic wallet templates
Dwight replied to DaveP's topic in Patterns and Templates
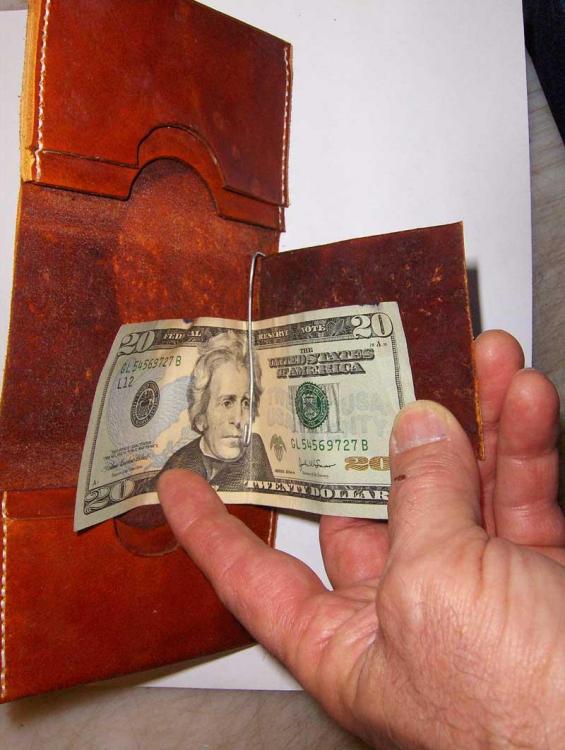
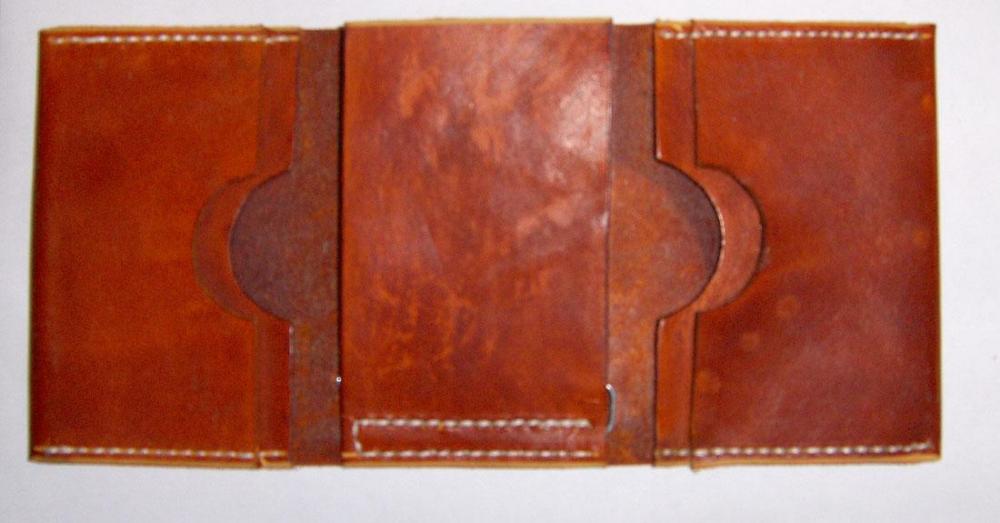
Several years ago . . . standing in Tandy's . . . a fellow came in and asked the manager to make him a billfold. Manager pointed him over to me. His daughter had bought him a tri-fold a number of years ago . . . and it was simply worn out. He wanted a new one. I told him I'd try . . . but needed his billfold for a pattern. He got a bag from the store . . . dumped his bilffold comtents into it . . . gave me the old one . . . I copied it . . . and he was elated. These pictures are of the trial run I did . . . but they show the results . . . and you can copy that. He put several cards in each slot . . . and had a money clip in the middle. May God bless, Dwight -

Leather sewing machine for the knifemaker
Dwight replied to EmilHandmadeKnives's topic in Leather Sewing Machines
I noticed you did not have the Tippmann Boss in your lineup there. It would be a very good first machine for you. It's not only a good machine . . . the manufacturer is really great . . . we've had a 20 + year relationship . . . been nothing but good. It was may first machine . . . making holsters, belts, knife sheaths, even billfolds and other "things". For knife sheaths . . . I wouldn't even think of going any other way . . . it is tough to do belts . . . especially longer ones . . . It is in your price range brand new . . . although I don't have any idea what the shipping would be. May God bless, Dwight -

No hands sewing on a Cowboy Cb4500 (ALMOST)
Dwight replied to RockyAussie's topic in Leather Sewing Machines
Betcha cannot guess who helped me load my Cowboy onto my trailer there in Toledo . . . May God bless, Dwight -

No hands sewing on a Cowboy Cb4500 (ALMOST)
Dwight replied to RockyAussie's topic in Leather Sewing Machines
Who is the Bob who has these things ?? Thanks, may God bless, Dwight -

No hands sewing on a Cowboy Cb4500 (ALMOST)
Dwight replied to RockyAussie's topic in Leather Sewing Machines
OK . . . now where do you get that whatchamacallit . . . ??? Looks like a handy tool. May God bless, Dwight -
Just had to ask . . . is your name because you like stitching stuff by hand . . . or you got the stitched hand . . . having the hand too close?? Sitting here looking at my left thumb . . . got it too close to a fairly sharp Kershaw the other day. Barely missed the stitched hand moniker. Any deeper and it would have been a sewing job. May God bless, Dwight
-
First rule, second rule, and third rule are sharp knife, sharp knife, and sharp knife. I use mostly a drywall utility type knife . . . and when I put a new blade in it . . . first thing I do is strop it. Factory razor blades are fairly dull. Learn to hold your cutting tool 100% straight up . . . NEVER lean it over to one side or the other. You will be tempted to do so in a curve . . . especially a tight one . . . DON"T do it. Also start out by making shallow cuts . . . knowing that the first cut will be your production cut . . . and the others can follow it fairly easily if you take your time. Last thing . . . don't try to cut your leather for belts, purses, holsters, knife sheaths, and things like that for a "final" cut that is pretty . . . fancy . . . etc. That is why you have a disc sander over in the corner. Your "nicky" cuts you made need to be sanded . . . they will look better . . . edge better . . . and finish better. Until it becomes second nature . . . practice these three things with all your scrap leather. It won't take long until you will be cutting like a pro. May God bless, Dwight
-
At the risk of sounding overbearing here . . . may I make a suggestion? See if there is an adult's computer class in your local area . . . trade schools . . . churches . . . high schools . . . some "senior" organizations. They will do more for you in two weeks about learning to use a computer . . . than talking on here will do in a year. They can actually "show" you how to do it . . . comment on your technique . . . and give you pointers that we cannot see. I was bumbling and fumbling all over the place before I took a 8 or 10 week "adult" course some 20 years ago . . . the best effort I ever made on computer work . . . and my company paid for it. It was like 2 or 3 nights a week . . . and was an absolute ball . . . to say nothing of the learning I did. As far as pictures go . . . the easiest is to stay away from those places where you store your pictures on their servers and so forth. . . . also about half if not more of them charge you to handle your pictures . . . this does it under YOUR control . . . at zero cost to you. You need to do only three things 1. Store all your pictures on your personal computer . . . make files for them : family . . . leather work . . . shopping . . . cooking . . . etc. so it is easy for you to find the one you want. 2. Download Adobe Photoshop 2.0 . . . you don't need any more advanced than that . . . it'll fix your pictures super for yourself or for posting here. You can usually find it for a free download. 3. Go down to the choose files . . . icon at the bottom of this page . . . pick the picture you want . . . like I just did (took 20 seconds) . . . and when you close out the entry . . . the picture will post. May God bless, Dwight
-
I virtually never do an 8 / 4 belt . . . they are always like 6/6 or 6/5 or 5/5 . . . trying to keep them pretty close to the same thickness. Lately I've been using a hide I got from Weavers some time back . . . it's a heavy 7/8 . . . and I've got my splitter set for about 110 thousandths . . . which gives me a .220 belt . . . right at the size I really like to make em. Never had one do what you are talking about . . . and I've got some steel lined belts out there . . . doing their work. May God bless, Dwight


