Dwight
-
Posts
5,250 -
Joined
-
Last visited
Content Type
Profiles
Forums
Events
Blogs
Gallery
Store
Everything posted by Dwight
-
That is pretty much the look I want. Mind sharing the brand name and the "where I got it"? The Roman Centurion belt I need for a costume is $200 from India and really doesn't have the images I want. This opens the door to a really good looking belt. Thanks, Jeff, . . . may God bless, Dwight
-
I've got a special project I need to do, . . . make several 2 1/2 inch square pieces of carved leather look like brass. The pieces will have ancient Roman symbols, . . . nothing really intricate. It doesn't have to pass a tight inspection, . . . just have a brass appearance from out at about 5 feet or more. Anybody got a real good suggestion? Thanks, may God bless, Dwight
-

I did it again! Wrong side out!
Dwight replied to alpha2's topic in Gun Holsters, Rifle Slings and Knife Sheathes
I have a box for "bad cuts" and they go in there when I make a "wrong" cut. Some day, . . . I'll use them, . . . or when I'm worm food, . . . my son will wonder why I cut out all those pieces ahead of time and didn't use them. May God bless, Dwight -
Right hand or Left hand
Dwight replied to seabee's topic in Gun Holsters, Rifle Slings and Knife Sheathes
You are a credit to the leather industry, . . . thank you. I do basically the same, . . . keeps my customers happy, . . . makes for a good reputation, which cannot be bought, . . . only earned. May God bless, Dwight (not a seabee, . . . shipboard EM2) -
Question on holster Parts
Dwight replied to Byrd1965's topic in Gun Holsters, Rifle Slings and Knife Sheathes
When you go out to get your glue, . . . make two stops. First one is at a lumber store or hardware store, . . . buy a pint of Weldwood contact cement. https://www.lowes.com/pd/DAP-Weldwood-Off-White-Interior-Exterior-Contact-Cement-Construction-Adhesive-Actual-Net-Contents-32-fl-oz/3819177 Second stop is at Harbor Freight, . . . you want a package of acid brushes, . . . https://www.harborfreight.com/36-pc-12-in-horsehair-bristle-acid-shop-brushes-61880.html Put a light coat of the contact cement on each piece, . . . fully coat the points where they come together, . . . take a hair dryer or heat gun and lightly go over it (need a well ventilated area to do this) to dry out the contact cement. When it is dry to the touch of your fingers, . . . carefully put the two pieces together, . . . and apply pressure. I like to use a wall paper seam roller. Finish off the edge with a sander of some sort. I have two of these, . . . they work great. https://www.harborfreight.com/1-in-x-30-in-belt-sander-61728.html I usually groove the edge for my stitch line. https://www.tandyleather.com/en/product/craftool-adjustable-groover Then finish off by rounding the edge. https://www.tandyleather.com/en/product/craftool-pro-classic-fine-edger Oh, . . . and welcome to the wonderful, . . . enjoyable, . . . sometimes expensive, . . . and addictive, . . . world of leather working. May God bless, Dwight -
First try at a full flap holster
Dwight replied to Jake907's topic in Gun Holsters, Rifle Slings and Knife Sheathes
That's a good lookin, practical holster. That a top break .22 inside it? May God bless, Dwight -
Tooled Gun Rig
Dwight replied to internetcowboy's topic in Gun Holsters, Rifle Slings and Knife Sheathes
Welcome from another Buckeye, . . . May God bless, Dwight -
LH holster - JLS pattern
Dwight replied to JKHelms's topic in Gun Holsters, Rifle Slings and Knife Sheathes
Good job my friend, . . . Funny though, . . . every time I make a holster for a Shield, . . . I always say to myself, . . . "Sure used an awful lot of leather for such a scrawny little gun", . . . and I've got one. May God bless, Dwight -
I won't put staples or rivets in any knife sheath I make. All you have to do is be stupid one time, . . . try to stick the knife in the end of a post while still in the sheath, . . . and you just ruined the knife blade. An old boy scout leader (long since gone) taught me that back around 1958 , . . . never forgot it. Same goes for ax sheaths. The rivets / staples actually do nothing for the sheath if the sheath is made properly. I realize the "real" ones had them, . . . but that doesn't mean I have to do it. May God bless, Dwight
-
1911 Thumbreak Question
Dwight replied to larry1096's topic in Gun Holsters, Rifle Slings and Knife Sheathes
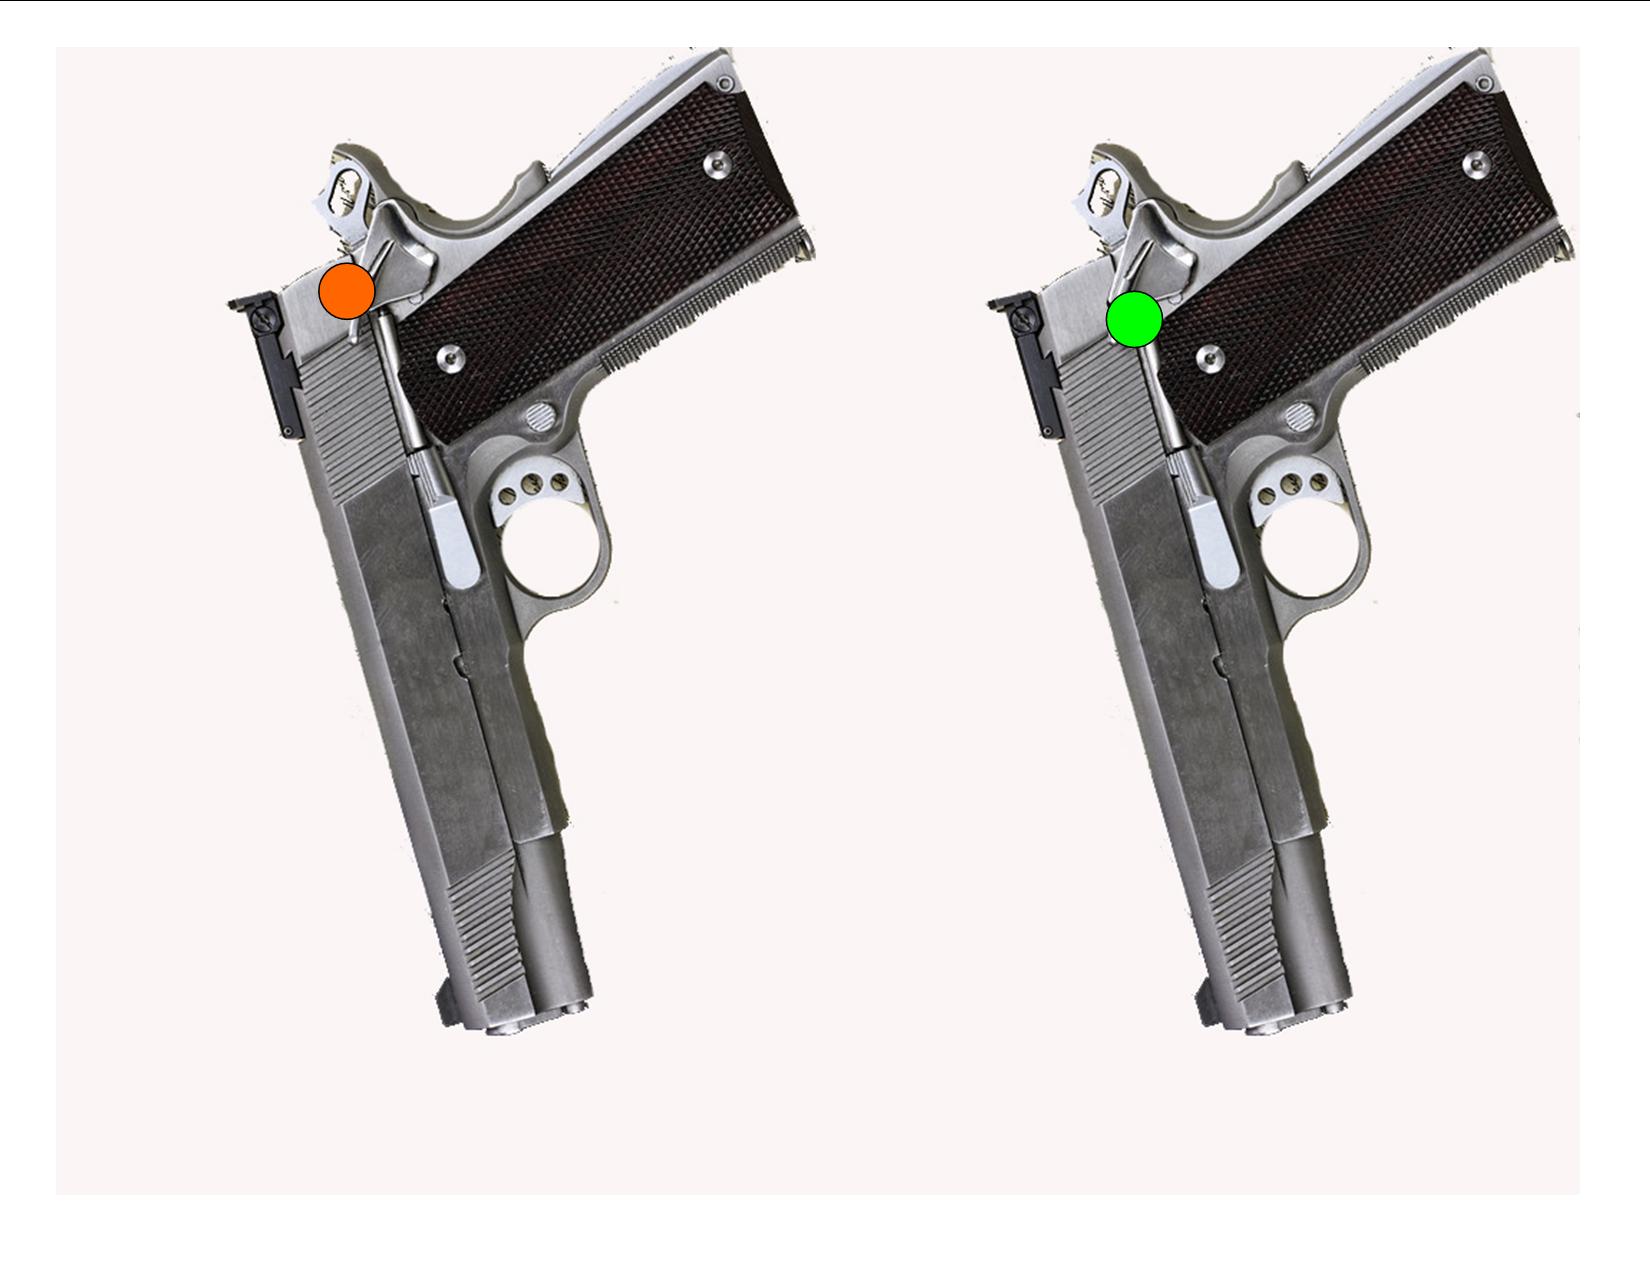
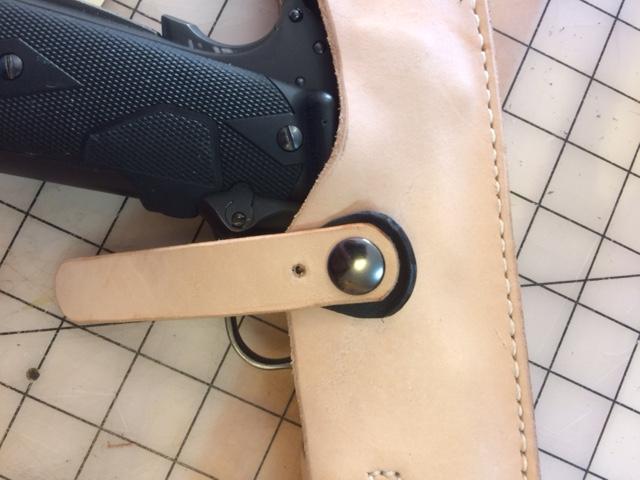
I always like a puzzle, . . . and this one had me puzzled. But when I saw Josh's holster, . . . the light came on. I could not figure why I was not having any trouble with my safety, . . . but other's were. I did not "design it", . . . it is one of those things that falls in place, . . . sometimes by good fortune more than by critical engineering. My snap is placed a little more forward on the weapon and a little lower. What happens there, . . . when the thumb is attempting to put the snap together, . . . it is actually pushing up on the bottom side of the safety, . . . attempting to push the safety further "on". In Josh's, . . . I'm thinking that a hard push on making the snap come together, . . . just might dislodge the safety. Not sure that is the case, . . . but it seemed reasonable. I did a little picture of what I think "might be" happening, . . . if the snap is put at the red position, . . . it might cause a problem, . . . but it should not in the green position. What do you think? May God bless, Dwight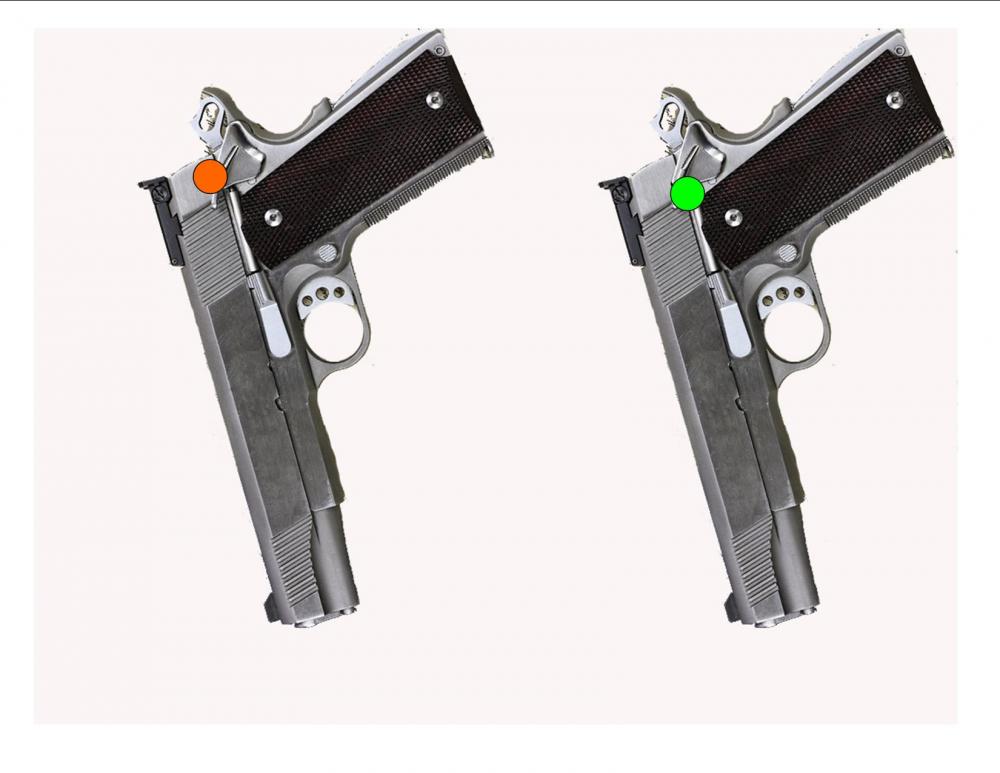
-
1911 Thumbreak Question
Dwight replied to larry1096's topic in Gun Holsters, Rifle Slings and Knife Sheathes
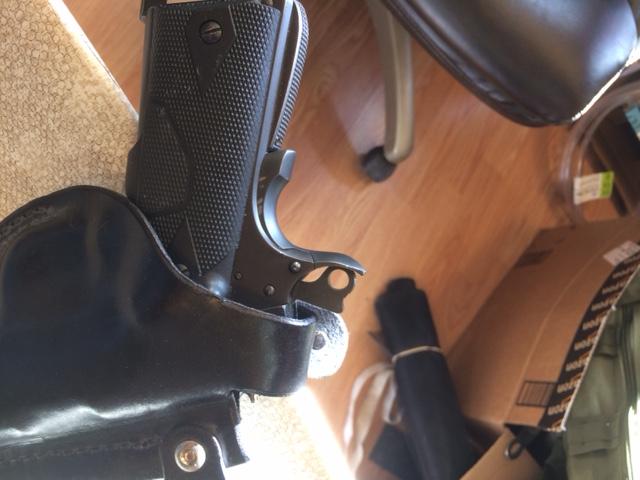
I no longer make horizontal shoulder holsters, . . . but the pictures show how I did the thumb snap on them. This was one I did just messing around, . . . but it suffices to show how I did it. For vertical shoulder holsters, . . . I make a strap with two snaps, one on each end, . . . so it can be snapped across the trigger guard. The piece of Kydex on the end of it gives either the forefinger on the shooting hand the ability to unsnap it rather quickly, . . . or if it is on the other side of the holster, . . . the thumb, . . . or the fingertips of the off hand can undo the strap. All of these retention means work well for me without the problem you seemed to have. May God bless, Dwight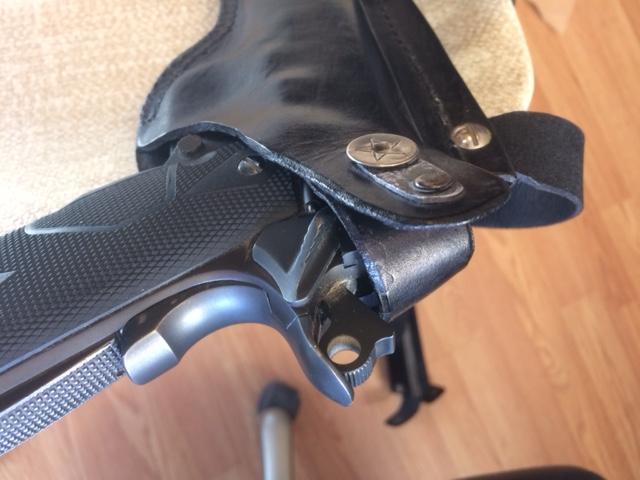

-
It doesn't do that. I mix virgin beeswax from my own hive, . . . and an equal weight of neetsfoot oil (NOT neetsfoot oil compound, . . . there is a difference), . . . put em in a jar in a crock pot, . . . it all melts together making a somewhat greasy and slippery paste, . . . I pour it out into cupcake papers in a muffin pan. Rub it on the project, . . . and don't be especially sparing, . . . run a heat gun over it to melt it into the pores, . . . get a rag and when it cools a bit, . . . begin to buff. Use your strong hand, . . . just because you gotta put some "work" into buffing it out real even. It makes a beautiful finish in my opinion, . . . and I have never had any bad experience with it at all, . . . ever. It is THE old fashioned recipe used by the frontiersmen of days past. There were others, . . . but this was one of the most common, . . . so I am told. May God bless, Dwight
-
Ka Bar Knife Sheath
Dwight replied to Forester's topic in Gun Holsters, Rifle Slings and Knife Sheathes
robs456, . . . just one of those "things" we as people prefer. Unless the customer nixes the idea, . . . all of my sheaths have the retaining strap at the bottom, . . . and the snap flap points forward. That way as you reach for the knife, . . . the palm touches and starts to wrap around the hilt, . . . while the index finger unsnaps the retaining strap. Learned to do it that way some 50 years or so ago, . . . never found a compelling reason to do it otherwise, . . . except a paying customer wants it "his way", . . . then it is his knife, his sheath, and his problem. May God bless, Dwight -
Ka Bar Knife Sheath
Dwight replied to Forester's topic in Gun Holsters, Rifle Slings and Knife Sheathes
Quick, . . . tell me what state that is, . . . wanna make sure I paint them out of my travels. May God bless, Dwight -
Ka Bar Knife Sheath
Dwight replied to Forester's topic in Gun Holsters, Rifle Slings and Knife Sheathes
I've always liked K-bar knives, . . . they are a stand-out piece of equipment. Your sheath adds to that stand-out, . . . great job. May God bless, Dwight -
Josh, . . . beautiful job. Now, . . . can you bottle up some of that patience you obviously have an abundance of, . . . I could use a bottle if not a box. You do work worthy of the word "heirloom". May God bless, Dwight
-
No, . . . I've got a Skippy Crunchy peanut butter jar that has a line on it at about 2 inches from the bottom, . . . another at 3 and another at 4. When I get down to the 2 inch line, . . . I add water to the 3 inch, . . . the Resolene to the 4 inch, . . . shake, . . . and I'm ready to go. Put the lid on tight after every use. Have to change the bottles out every year or so, . . . they get cruddy and nasty up around the top. But it ain't no big deal, . . . cause I like my peanut butter. I have one bottle made up for black, . . . another made up for browns. Sometimes, the black will tend to pick up some of the dye as you brush it on, and I do a lot of black holsters here. Keeping two bottles also makes sure I've always got some, . . . especially if it is a black project. What is not mixed stays in the bottle up on the shelf. May God bless, Dwight
-
I don't want to sound mean spirited, . . . but quite frankly I've been using Resolene for well over 10 years now, . . . NEVER have I had a serious "brush stroke" or "streak" problem. I use cheap bristle brushes bought at Harbor Freight . . . rinse it out after each use, . . . usually it lasts a month or so and then the bristles start falling out so I pitch it and get a new one, . . . they're about 50 cents each. I use 1/2 resolene and 1/2 water mixture, . . . brush it on fairly thick to start, . . . brush quickly to get a "lather" of bubbles all over the area I'm working, . . . then very lightly brush left / right / up / down / oblique left / oblique right, etc., . . . until there are no more bubbles. It is a satin finish, . . . if I want more shine, . . . add another coat. THIS has always worked for me, . . .i have the compressor and air brush, . . . just too much aggravation and trouble to use it when I can get great results with a brush. Especially with it being 8 degrees outside, . . . and I'm just not uncorking a spray gun inside without a spray booth, . . . which I don't presently have. Practice it a bit on some scrap, . . . May God bless, Dwight
-
If you wear chaps for any length of time in a saddle, . . . you DO NOT want any big piece of anything up there becoming another belt around you . . . it's a comfort thing. AND, . . . you don't want it to be very strong either, . . . just in case something happens where you get thrown just enough forward to get it to loop around the saddle horn, . . . your horse just may go crazy with the un-recognized shift in weight and tugging and pulling. It would have a tendency to ruin your whole day, . . . unless of course, . . . you really do want to get some saddle bronc riding experience........ Chaps I make use only a replaceable 1/2 or 5/8 strap and buckle. Don't recall who it was that explained it to me, . . . was probably on here. May God bless, Dwight
-
My First Holster
Dwight replied to pmieras2000's topic in Gun Holsters, Rifle Slings and Knife Sheathes
Looks good from here, . . . she'll cherish that I am sure. May God bless, Dwight -
Sling/Cuff combo
Dwight replied to glockanator's topic in Gun Holsters, Rifle Slings and Knife Sheathes
Search out there, . . . Marlin made a bunch of .357 lever actions back in the 80's and 90's or so. My brother has a .357, . . . I've got the .44 mag. Both are good shooters. I've also got a golden 39A Mountie, . . . it's a .22 lever, . . . simply the best and most accurate .22 I've ever shot in my life. Sold it 30 years ago, . . . but talked the guy who had it into selling it back to me, . . . May God bless, Dwight -
Just about any straps, . . . but especially should holster straps, . . . get the full dip dye treatment, . . . a light oiling, . . . then Resolene. The trick is to get back to the straps before the Resolene dries completely, . . . roll it and stretch it to make it pliable. I roll the straps over a 3/4 inch piece of round stock steel, . . . both ways, . . . hang em up, . . . maybe come back in a half hour and hit em again. Softens em right up, . . . the resolene keeps the dye from bleeding, . . . only way I will make em other than just plain oiled leather. May God bless, Dwight
-
Material for Cartridge Loops in a pouch
Dwight replied to Brahmus's topic in Gun Holsters, Rifle Slings and Knife Sheathes
Actually, John Bianchi suggested using calf skin for the loops in his old VHS tapes on holster making. I never have because I've always had the other available and it worked well. You'll do well with the veggie tan I'm sure. May God bless, Dwight -
GP100 Field Holster
Dwight replied to Josh Ashman's topic in Gun Holsters, Rifle Slings and Knife Sheathes
Kinda makes me want to go get a blued steel GP100 just so I can make a holster for it. Good job, Josh, . . . tastefully done, . . . but yet simple and practical. May God bless, Dwight -
New Shield Holster
Dwight replied to Dwight's topic in Gun Holsters, Rifle Slings and Knife Sheathes
God be with you as well, Howard. PM me a regular email address, . . . I'll send you the patterns for the pieces, . . . it'll make it a tad easier. May God bless, Dwight