-
Posts
7,800 -
Joined
-
Last visited
Content Type
Profiles
Forums
Events
Blogs
Gallery
Store
Everything posted by Wizcrafts
-
Most (but not all) upholstery class walking foot machines (if this is a walking foot machine) use system 135x16 leather point and 135x17 round point needles. Exceptions exist, especially in Pfaff machines. If it has two bars coming down, with feet on both, behind the needle bar, is a some form of walking foot machine. The #140/22 needle is waaaaaay too big for #69 thread. You should buy some #110/18 needles in leather point to sew leather with this thread. The #22 needle is meant to sew #138 thread, which is twice the diameter of your #69. Thread balls or knots underneath can be caused by incorrect top threading, or overly tight bobbin tension, or the thread binding in the bobbin shuttle mechanism as it cycles for a stitch. I'll guess incorrect top threading, with little or no top tension, for now.
-
Just about any modern walking foot machine can sew up to 3/8", or at least 5/16" of leather. The maybes include maybe it'll only sew 3/8" with #69 or 92 thread, or only with the presser foot pressure screwed all the way down. If that Mizti is being sold locally, ask for a demonstration. Bring some strips of leather and see how much can be sewn together before it breaks the needle or skips stitches.
-

Inline Cowboy presser feet on Cowboy CB4500
Wizcrafts replied to Wizcrafts's topic in Leather Sewing Machines
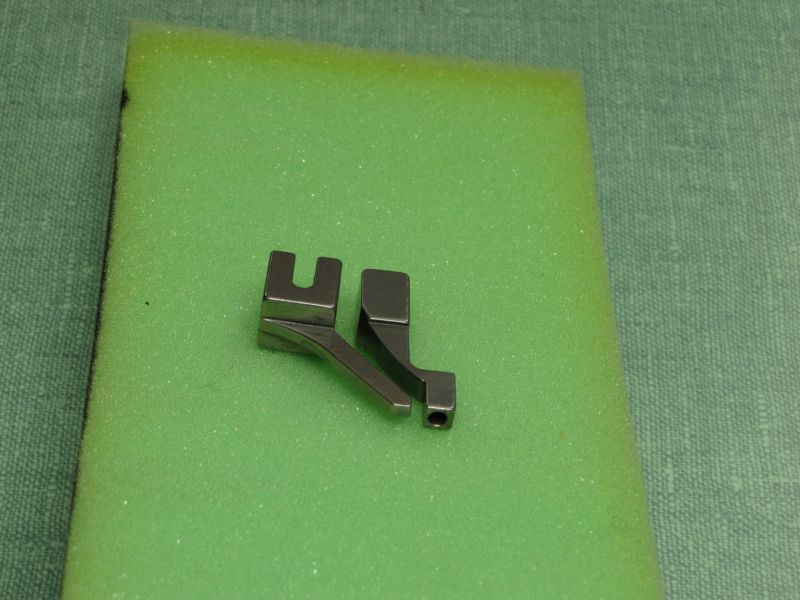
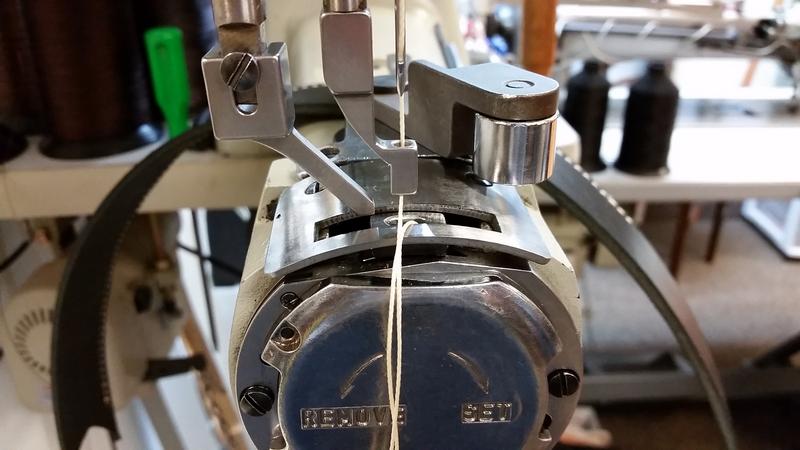
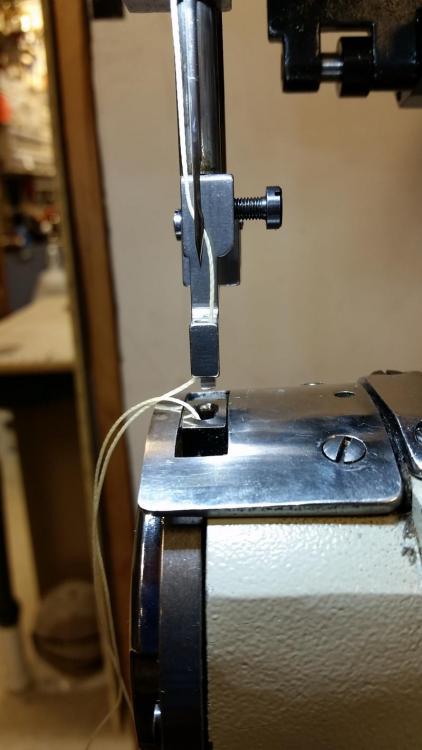
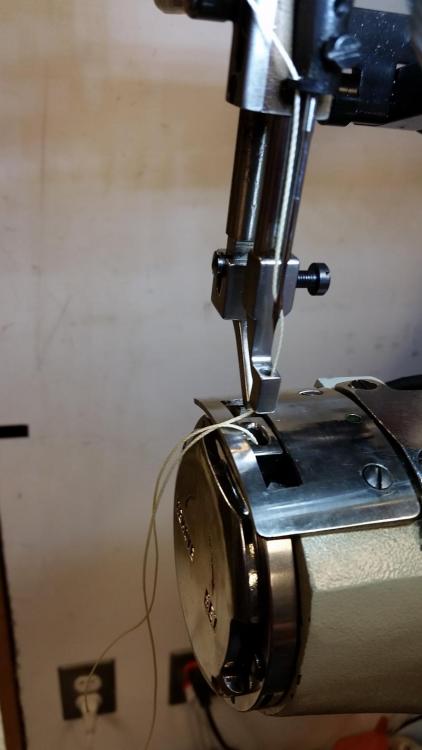
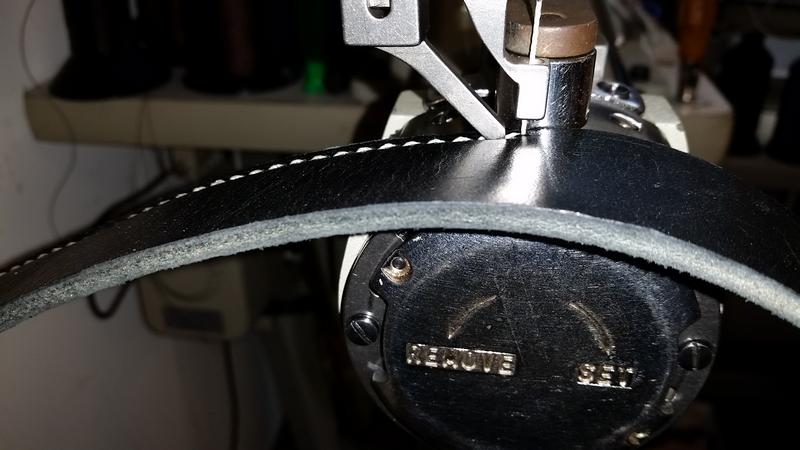
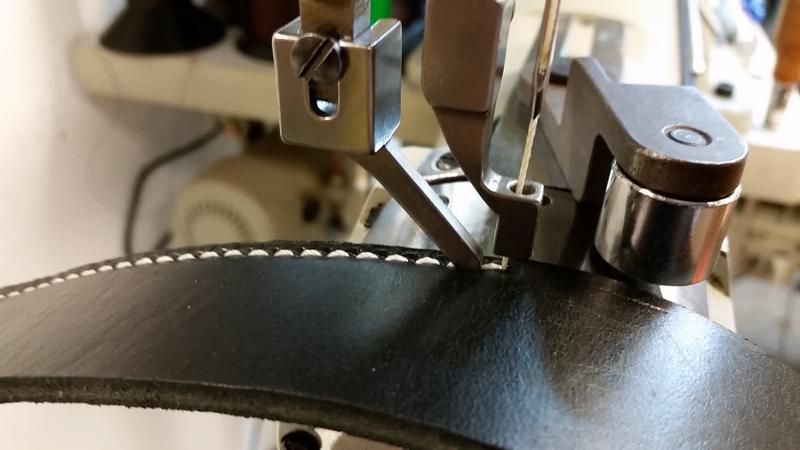
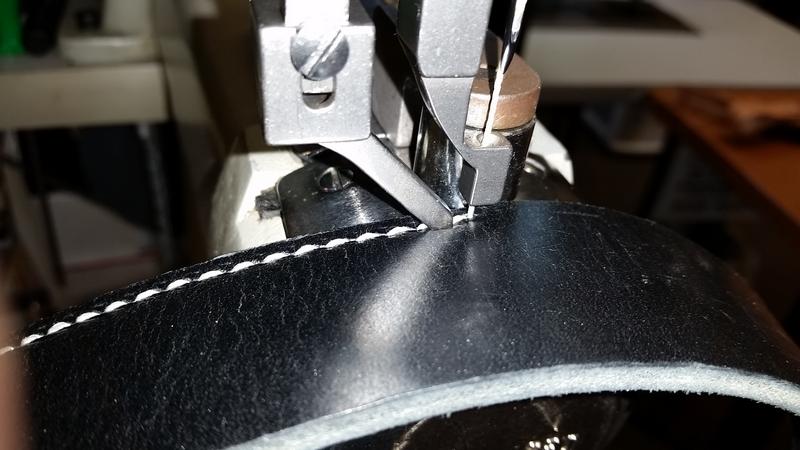
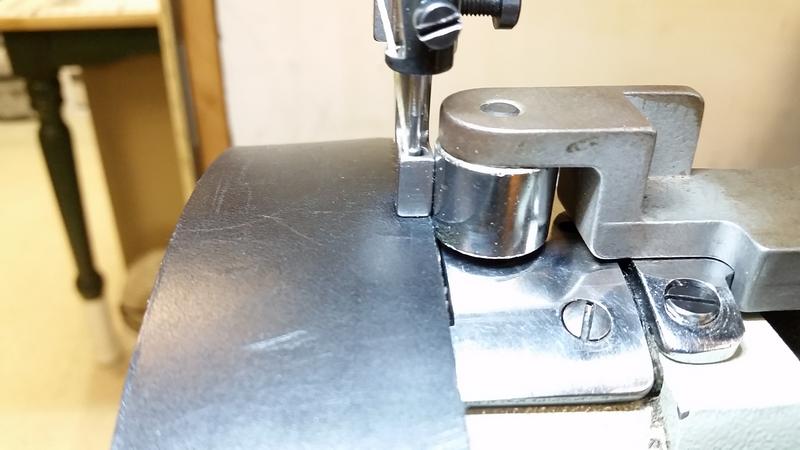
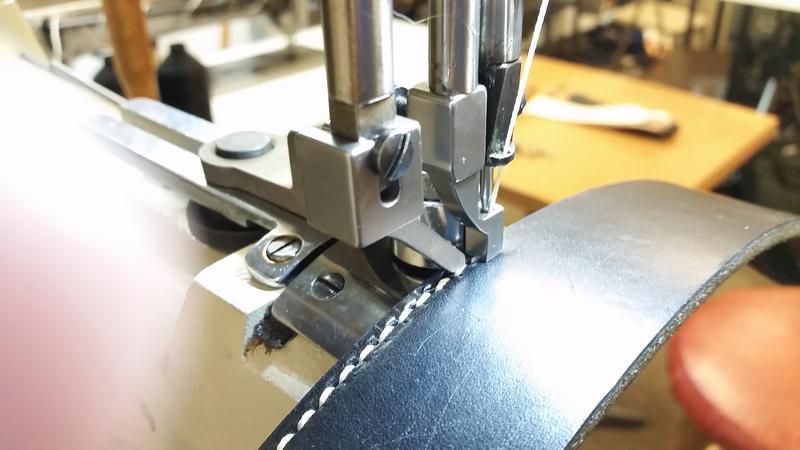
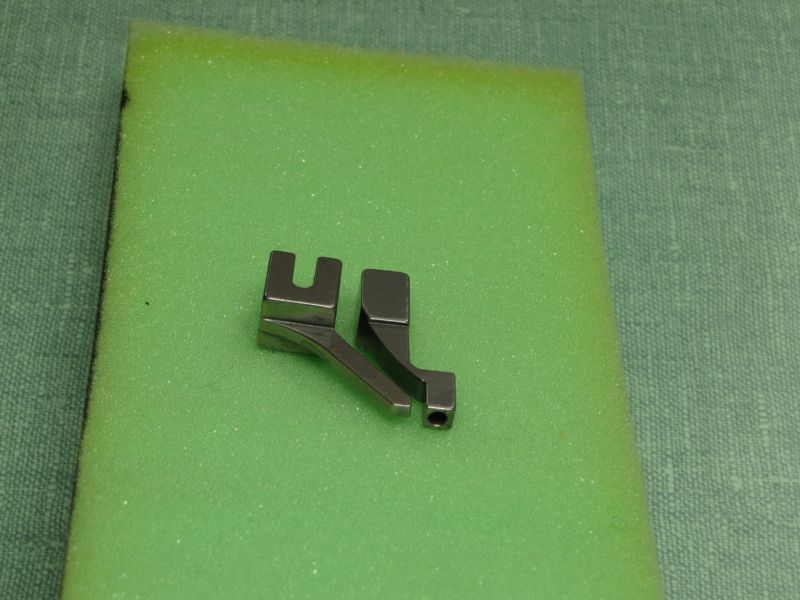
In case it's not obvious, the inline feet are used to sew very close to the right edge and slide past any hardware or raised leather that might be on the left of the needle. The width of the inside foot is the limiting factor. It is just over 1/8 inch wide, so you can sew a narrow strap, collar, lead, watchband or studded belt, without having the hardware deflect the foot and stitch line. The presser foot is inline and follows the vibrating foot. These feet are useful if you need to resew soles of shoes and boots. All you need is about 1/8 inch of leather protruding from the uppers to sew along the edge. Finally, because the inside vibrating foot is so tall, you can't sew as much thickness as with the harness feet. The maximum thickness is determined by the bottom of the needle bar's needle clamp in relation to the top of the inside foot where the needle hole is. It must not hit the top of the inside foot! -
Recently, some topics have come up exploring the available options for inline presser feet on walking foot machines. Some involve altering existing inside and/or outside feet to form an inline pair. But, for owners of a Juki 441 clone, there are commercially available inline feet made by Cowboy Sewing Machines. Since I own a set of these inline feet, I've decided to post some photos I took of them installed on my Cowboy CB4500. I should mention that these feet must be installed as a set and that you need to be aware that they are much shorter than a standard harness foot set. This is especially true for the back presser foot, which looks kind of like a pseudo-pod on an amoeba. But, I digress... Remove the existing inner and outer harness feet, avoiding the tip of the needle. If you want to play it safe, remove the needle first. Next, loosen the stop screw on the inside inline foot and slide it all the way uo to the milled collar on the vibrating foot bar (that's what Singer named the inside foot bar a looooong time ago). When it tops out, line it up with the needle (reinsert the needle) and lock it down tight on the bar. Now insert the rear foot onto the presser bar and set it as low as it will go without falling off, or contacting the back of the inside foot. Then lock it down tight. Because the feet are so short, in order to get the back foot to contact a single layer of 8-10 oz leather, you'll need to open the faceplate and lower the presser bar at least 1/4 to 5/16 of an inch. Don't worry about lowering it all the way to the feed dog. Just lower it enough so it firmly contacts the top of an 8-10 ounce test strip. There are two flat head screws on the steel block that the presser bar feeds through. There is a crankshaft in front of this block that will expose both screws if you rotate the handwheel to the correct position. Loosen the screws and pull down on the rear foot until is is about 1/8 inch above the feed dog, then turn it so it is as straight as possible and lock down the screws. Once the rear foot is in contact with the test strip of leather, you may need to loosen the large Allen bolt on the crankshaft coming out of the rear face of the machine and manually position the inside foot so it makes contact with the top of the leather just as or just after the tip of the needle makes contact. At that point you should lock down that big Allen bolt. This should give you fairly good alternating feed. Reinstall the faceplate and thread the machine. Run some test stitches to balance the tension, foot pressure and edge guide (if wanted) on the right side. I ran my test strip using 12 ounce bridle leather, #277 Cowboy thread and a #25 Schmetz S point needle. My edge guide was almost touching the right side of the inside foot. The photos will tell the rest. I made a video that I have to upload to YouTube later on. I will embed it in a follow-up reply once the video is available. If anybody with a Cowboy, Cobra, Techsew, or a Juki 441 or clone wants a set, contact Bob Kovar, at Toledo Industrial Sewing Machines: 866-362-7397. He told me on July 5, 2017 that he has some ordered and they should be in his shop by the second week in July. I don't know their cost at this time.
-

Help choosing the right sewing machine
Wizcrafts replied to craftsman827's topic in Leather Sewing Machines
Probably. That's where I got mine. -
Call Keystone Sewing, or Toledo Industrial Sewing Machines, or any industrial sewing machine dealer who has been in the trade for at least 20 years. They will find the right needles for your machine.
-
I like your shop Jess! Everything is laid out logically. As a fellow retail shop owner, I wish you the best of success!
- 19 replies
-
- leather workshop
- workshop
-
(and 2 more)
Tagged with:
-
Did you get the exact Pfaff needle system that this machine requires? If not, a too long needle will be bent by the hook, as you noticed. A needle too short won't pick up the bobbin thread. I found that there are 6 different sub-classes of the Pfaff, with different needle systems. Here is a reply I found to someone else who bought a 138 without a needle. SCHMETZneedles says: July 28, 2016 at 10:06 am Need to know the machine class. The SCHMETZ Needle catalog shows six entries for the PFAFF 138 depending upon machine class: PFAFF 138 – ALL CLASSES EXCEPT —— Uses Needle System 265KK, 438KK, DPx438KK 138 – 6-21-915-01 —————— Uses Needle System 130B, DBx130B 138 – FROM 1948 – 1952 ——— Uses Needle System 134R, 135×5, SY1955, DPx5 138 – 275-01 ————————- Uses Needle System 134EK, DP-P5 138 – 277-01 ————————- Uses Needle System 134R, 135×5, SY1955, DPx5 138 – 915-01 ————————- Uses Needle System 130B, DBx130B
-

Help choosing the right sewing machine
Wizcrafts replied to craftsman827's topic in Leather Sewing Machines
The 441 clones all accept a special Cowboy brand presser foot set that is inline. The footprint is about 1/8" or so, depending on how precisely the back foot lines up with the front foot. I use this set to occasionally re-sew boot soles, or to sew next to hardware, like your example. The way the feet are built reduces the thickness that can be sewn somewhat. But, since most of these machines can sew at least 3/4 inch, it doesn't matter that much. Here is a photo of the Cowboy inline foot set. -
Your serial number says that you have a Model 27, which is NOT an industrial sewing machine. The only way to find parts for it is to buy another Model 27 for parts. The best place to find these ancient treadle heads is in antiques malls, Salvation Army stores and Craigslist. I've reconditioned and sold three of them and have one more sitting on a foot stool inside our shop. We use it to sew satin linings that the walking foot machines would eat.
-
I use Foxit PDF reader to view PDF files. But, my browsers all contain a built in reader. So, the only time I open Foxit is when i have downloaded and saved a PDF. I am speaking about personal computers here, not Androids or iDevices.
-
PDF is the preferred file format for manuals. Almost every modern browser has a built in PDF viewer. In contrast, very few non-business computers have Microsoft Word any more. It would require one to download either the free Microsoft Word Viewer, or an alternate office program. You might want to think about uploading a PDF version instead of a proprietary Microsoft format.
-
Tandy Leather has pattern packs for leather vests. I've had mine for several decades. What it didn't show was how to fit and install a satin lining, which is necessary to prevent the flesh side from getting on your shirts. Any seamstress can show you how to add a lining, including one with inside pockets.
-

CB3200 - Tension problem (maybe)
Wizcrafts replied to Pauls Leather's topic in Leather Sewing Machines
I'd like to follow up on my previous post about what to check for excess top tension. In it I mentioned that the default setting for the check spring was very strong and based on tensioning #277 thread and up. I will expand upon that now... Sometimes I use my CB4500 to hem jeans! When I do I use jeans #80 poly-cotton blend thread with a #18 or #19 - 7x3 round point needle. This thread is made with tailoring machines in mind, not huge harness stitchers. To sew with it I make some major adjustments to the top and bottom tensioners, as follows. After winding a bobbin I adjust the bobbin spring for a modicum of tension, but nowhere near as much as I use with bonded nylon thread. Next, I make sure that the top thread only passes straight through one hole in the top post. I back off the upper tension beehive spring I loosen the securing nut behind the bottom shaft set and turn the shaft to loosen the check spring to the minimum tension needed to allow it to bottom out on the downstroke. I run a test stitch and make last minute adjustments to the top tension. If the knots appear on top despite all lowered tensions, I tighten the bobbin spring to bring the knots down. The reduced tensions also lay looser stitches. So I shorten the stitch length to 8 to the inch. Sewing with #138 bonded thread on a 441 machine that is set up for heavy thread requires similar tweaking to balance the knots. The usual suspect is the check spring tension and travel being too much for the light weight thread. -

Easy stitch length adjustment
Wizcrafts replied to T Moore Medicine Hat Saddlery's topic in Leather Sewing Machines
You might inquire in your general area to see if there are any Mennonite or Amish harness shops. If so, ask if any of them have a Union Lockstitch machine. I have owned two of them and they will match holes well. They have true square drive and needle feed (with a jump foot) and the needles don't bend much if you are using a #3 to #4 needle (perfect for 6 cord or #346 thread). It would be worth your time to check out one in working condition. The Campbell Randall lockstitch machines are even more reliable feeders because the awl feeds the leather. -

SIDE WALL SOLE STITCHING MACHINE
Wizcrafts replied to robinindustry's topic in Leather Sewing Machines
You could consider shipping these machines without motors for the US and Canadian markets. We have easy access to all kinds of 110 volt servo motors. -

CB3200 - Tension problem (maybe)
Wizcrafts replied to Pauls Leather's topic in Leather Sewing Machines
Perhaps the top thread has too much tension when at rest. This can be caused by wrapping it around a top post, rather than simply feeding it straight through a hole. Or, the thread check spring might have too much spring tension for your thread. This spring is normally set with a lot of tension because it is usually dealing with larger sizes of thread than 138. It has to keep the top thread under tension as the take-up lever moves up and down. It also has to move all the way down to its bottom stopper bracket as the needle meets the top of the leather. The check spring tension can be decreased by loosening a nut on the reverse side of the head to where the bottom roller mounts. Then turn the split threaded shaft with a screwdriver blade to reduce the spring tension to the point where it just is able to go all the way down to the stopper on its own. Tighten down the nut on the back and see if this helps stop the knots from pulling to the top. If you need to sew with #277 or larger thread, that spring needs to be tightened up again. -

Cylinder bed USSR leather sewing machine
Wizcrafts replied to olariuciprian's topic in Leather Sewing Machines
It resembles a typical light to medium duty walking foot machine, like the Consew 227. It can probably handles medium weight thread (perhaps up to T 90 or T135) and may sew up to approximately 9 or 10mm thickness. I think that it is missing the outer presser foot. It needs two feet that alternate up and down. -
I use a Cowboy CB4500 to sew holsters, ammo pouches, saddles, saddle bags, gun belts, etc. I often sew over 1/2 inch with either #277 or #346 bonded nylon thread.This is far beyond a 227 type machine, or any upholstery class machine.
-

Singer 51W54 Thread size conundrum
Wizcrafts replied to Davidmadd's topic in Leather Sewing Machines
While it uses a similar size bobbin and shuttle, the clearances are far smaller than on your walking foot machine. Everything is tighter in those ancient post machines. I used to own two of them and could only get them to sew reliably with #69/T70 bonded thread, tops. Anything larger got pinched and jammed everything up. I would stick to using a #110 needle, with T70 bonded thread, as the maximum. Make sure that if there is a latch opener that it pulls the bobbin case back far enough to let the top thread pass freely around the positioning tab on the case, under the throat plate. Give more thread slack in the check spring. You may get lucky and fool it into passing #92 thread, but you'll need to find a #19 or #20 needle to sew with it. -

How close to the edge of the arm will it sew?
Wizcrafts replied to Matt S's topic in Leather Sewing Machines
I have holster and stirrup raised plates for my Cowboy CB4500. They let me get very close to the left edge, with the holster plate having the least amount of material on the left side of the slot (about 1/16"). There is still metal underneath the plates on the left, but most projects can be bent out of the way enough to sew them on top. Here is the holster plate for a 441 machine. -
Your machine uses the standard System 135x16 and 17 walking foot machine needles. It should handle up to #138 thread, using a #23 leather point 135x16 needle. If the holes are too wide, move down to a #22 needle. There is a thread and needle chart on the Toledo Industrial Sewing Machines website.
-
I use very thick leather to make some of my belts (13-16 oz). Normally I supply Chicago Screws to secure the folded over ends to the front. But, some customers prefer Ligne 24 snaps so they can swap buckles without using a tool to hold the Chicago Screw cap. Aside from buying longer post buttons (custom order), or a flat blade skiving tool (bad results), has anybody tried gouging a countersunk hole in the flesh side to drop the back of a Ligne 24 socket below the surface with a 9/16" end mill? If so, what results did you get? If somebody makes a custom 9/16" end mill with a (~3/32") centering pin (for a #3 hole), please PM me. My drill press has a 5/8" chuck and can accept a 9/16" steel rod.
-

Cowboy CB4500 vs Cobra Class 4 Comparison
Wizcrafts replied to Wonderboy's topic in Leather Sewing Machines
I have a CB4500 and a buddy has a Cobra Class 4. Both machines have similar specs and use the same needles and bobbins. They are based upon the venerable Juki TSC-441. They are well built and will last for many years under normal harness, belt and holster sewing use. One thing they won't do so well is to sew 1mm of anything. That is just too thin. But, if you were to remove the feed dog, install the narrow slotted flat throat plate, change to a #18 (aka 110) needle, load up with #69 (aka T70) bonded thread, back off the top tension and dink with the bobbin tension, you may be able to actually sew this thin. In actual use, I never try to sew under about 2mm as it is too much work for something that can be done with much less effort on any walking foot, or even a straight stitch machine. Converting a huge heavy duty machine like a 441 into a light duty machine is time consuming and can lead to lots of frustration as you fine tune out skipped stitches and overly tight tensions that can pucker the leather. These machines were built with thread sizes 138 and up in mind. There aren't even any leather point needles readily available under a #23 (aka 160). I don't even bother with #138, as I have another machine that handles it even better..I believe in using thread sizes 207 and up in a Cowboy or Cobra 441 machine, into at least 1/8 inch (3.2mm) of leather, The results are more consistent. -

What Exactly Is An "eps" (Electronic Positioning System)?
Wizcrafts replied to Johanna's topic in Leather Sewing Machines
I use a CB4500 and can tell you with full confidence, that if you get one powered by a Family Sew motor, you will not need an EPS system to position the needle up or down. I can move the needle so slowly I can watch grass grow.


