JLSleather
-
Posts
7,378 -
Joined
Content Type
Profiles
Forums
Events
Blogs
Gallery
Everything posted by JLSleather
-
 Not big on nylon. You can get red sable hair for like a dollar or two more. Great response, and last near forever if they're cared for.
 -
YEAH - that's the ticket, rot cheer boy Next one -- TAKE PICS at stages while ya go, and I'll turn it ina pdf fer ya Just fer easing my obsessions, I would run the front stitch line on up. Keep 'er tight to the contour ya made with the cutout.
-
I "cased" some leather when I first started -- probably just because that's what the old Tandy books said to do. Wasn't long to figure out that isn't necessary - possibly due to changes in tanning processes (?) over 50 years, idunno. I sponge. Most of the moisture added to the back. When it comes through the front, you ready Didn't get to finish your carving in one sitting?@! No worries - decide which part of the design you can FINISH, and finish it - then cover the rest with a piece of tracing film that's laying around anyway, and it will still be fine to tool later, or tomorrow (just don't leave it wet for days).
-
I'm not kidding -- open an idiot contest and I'll WIN. WAIT .. lemme rephrase that! I really DO know something about leather. But it's only because I learn from my mistakes - and I've made a LOT of mistakes. Usually the result of doing too many things at one time. Cut a holster with a pattern. Flip the pattern over to cut the lining. Take a phone call. Back to the bench. WHERE WAS I?@! OH, yeah... flip pattern for liner ... DOH!
-
Wanna take just about a minute, maybe even minute 'n' a half ... Gibson was staining guitars like that at least since the 50's, but every so often there's another leather guy going on about "designing' or "coming up with" it. The 9ve is one I never did get round to. Somebody mentioned one, but never produced MONEY (which is required to get on that list). Don't think I've ever seen one outside a gun show. Perhaps get round to that later, but other business needs some attention currently.
-
The contours would NOT line up if you had it highly detailed. And the 686 and 686+ use the same frame, but I doubt that the 686 frame is the SAME as the Taurus frame (though quite similar). Never fired a Gp100 - just seen 'em . Most of the boys around here are S/W fellas, occasionally somebody with a bit more disposable income likes a Colt, lots of the single six ...
-
Yup. SAME frame, same barrel placement, makes the difference about 8° (same center line diameter). He's not wet molding that closely, using tension screw(s) for retention. Never messed with the +, but the "old" 686 (and of course the blued 586) is purdy.
-
We don't know. What's the size difference between tehe 6-shot and 7-shot cylinders? Enough to matter with a 'bucket' holster? Prolly not ...
-
Those screws probably a "6" punch, if you're at the Tandy. Or .200" (which is about 7/32" for you fractional people). So buckle slot is likely about 3/16" x 3/4", and if you went with 1/4" x 3/4" it wouldn't hurt a thing. Oh, and a piece of steel under the stone will keep the stone from flexing (again). Stone very hard surface, but not really made for unsupported vertical shear.
-
Hey, good deal on WORKING trumps shiny any day
-
Right up my alley -- text/prototype/mistakes are my SPECIATY What model machine? LOTS of folks around her kin help with that!
-
Yessir, that is what I mean. Wet it to open is a good plan, too. What holster was ya makin'? I'll send ya a chunk o leather I think you might like -- we'll chock it up to makin' up fer my half-advice Long as I said that, I should add that in SOME cases, it helps to sew down one side so it hold still while ya mark other end!
-
Oh, yah -- gotta hava little humor in there and that guy what makes 'em wont' care if'n ya pitch 'em
-
I like 'em toward the low end of the cylinder. Or just under it would likely be fine. Never cared for them what got a tensioner screw up at the trigger guard area.
-
I think I've seen that one. In fact, I think we all have Mine try to GET TO THE POINT. No fancy "intro" and "sag-way" and music copyrighted by someone else, and name-dropping people I think you may have heard of. It aint a 'how to" video if'n it don't show ya HOW TO.
-
https://www.youtube.com/watch?v=DIIwpNGXXBo
-
Nope, not here. But from what I'm seeing, looks like she purdy close to the 686.
-
Oh, good - entertaining is nice. I'll be taking that quite a bit further afore long .. like rain days are 'topics' days. (I pretty much forgot about all that, but had a burst of folks signing up to my y-would-ya-do-it-tube!).
-
Veggie splits will be fine for LINING a holster or - depending on the weight - perhaps even to MAKE holsters. OR if you are using exotic leathers, then those should be fine for backing for the exotics. Lots of the boys use them for accent panels / stiffeners on holsters, but could also be sewn to many other projects. They don't have to be "scuffed" to take the glue, and the edges burnish like any other veg tanned.
-
About a JILLION articles, books, videos, all going on (and on) about "resist". Now, I get it -- most of those are aimed at SELLING you something (step one is convince you that you need it). And some are just not well informed, and have become convinced that's necessary, and thus convince you (intentionally or otherwise). I have used a bit of liquid stuff to block out very fine areas when applying dye, but turns out even that isn't necessary. Note in this video at about 3:53 -- the "resist" is in the process of becoming a curved back holster. But what I want you to see is the LEFT HAND GLOVE. Without ANY application at all, the area UNDER the holster is "masked off". You can make this a precision operation with very little prep (in seconds).
-
First Pancake Holster
JLSleather replied to Hildebrand's topic in Gun Holsters, Rifle Slings and Knife Sheathes
Good to hear those patterns are gittin some USE! I saw the table set up you made for that stitcher -- LOVE the layout and the thought you put into the setup. -
HEY .. shark fin! Can you put a bit of curve in the pieces, and still be able to sew on the reinforcement? Takes the wrinkle out (except in the shark).
-
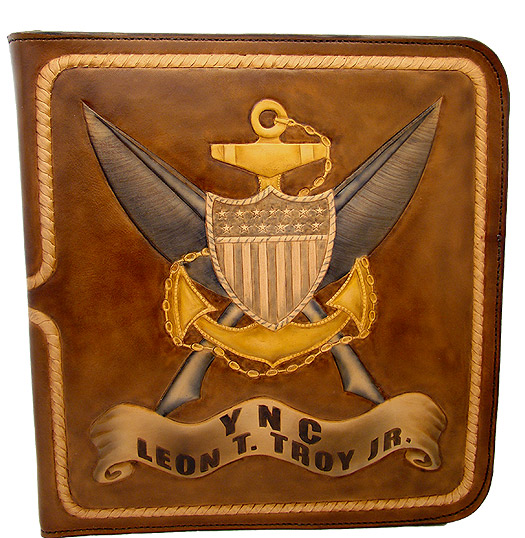
Like these, which I quit doing rather than debate price or timing. I thought the rope border was a nice touch to add in, but the USCG designed the rest of it the "art"! Various "ratings" have been used on the front, and some have 'stuff' on teh back as well. I don't make this for $250. At $250, I feel like yer "stickin' it to me". And those who suggest they can organize to buy 5 or 8 of them, pool their money.. that sounds nice on the surface, but I tend to see that as "stickin' it to me" 5 or 8 times!
-
Both sides the fence. I originally did craftaids, because i wanted to spend what time i had learning the CARVING, not the tracing and spacing. Then I got a copy of "belts galore " and decided to make all of those except the ones that sucked And while some people insist on something "new', I STILL get asked to make some of those belts from that book. Money must be tight all over these days (?). I get folks agree to $250 for a project, then want to add this, and that, and wunna those, and want it to still be $250. I try to be flexible, but unless there's a royalty-free, public domain pic of that somewhere, that may just not happen But I DO make my own designs sometimes, and sometimes share them for whoever wants to use them. Even then, if you 'n' me ''n' 100 other guys are all making that now, how "custom" can it really be ?@!
-
Did I do this one?