Ferg
-
Posts
2,275 -
Joined
-
Last visited
Content Type
Profiles
Forums
Events
Blogs
Gallery
Store
Everything posted by Ferg
-

Finally Done!!
Ferg replied to Sheilajeanne's topic in Purses, Wallets, Belts and Miscellaneous Pocket Items
JANE, I am in the wood shop so will not give you any detailed ideas now. When I get to my computer upstairs...... Ferg -


-
I have made several styles of Leather Cell Phone covers. I made my own dies, yours would be more complicated and needs to be done by someone who does them all the time and with the pertinent machinery. That said: I glue the back/inside and front pieces of leather together a little larger than the die. I have them cut precisely the same. Your main die would cut the perimeter. The die made with a blunted edge for the perimeter with the punch tubes mounted. The blunt edges on the perimeter would keep the die from moving. Just as you have said above. Ferg
-
Die clicker alternative: unplugged/defective t-shirt heat press?
Ferg replied to Piqued's topic in Leather Machinery
Mt heat press is manual 16 x 20 I wouldn't do it to mine. Just not made for that kind of use. I am sure it would work for awhile anyway. Lol -
I checked that out some time ago. I think I found a company in California, don't remember any name. Google is your friend on this one. Bob Kovar at Toledo Industrial Sewing may have something. I put this in Google: Spare Parts for Fortuna Skiving Machines. Several possibilities. Ferg
-
If I remember correctly a new Fortuna can cost from $4000 up, If the machine you are going to look at has been "Factory Used", it probably needs a new bell knife, maybe belts, and grinding wheel. Feeder may need to be changed but you maybe can clean it. The stone feeders seem to gather fine particles and "hide" them. Steel feeder can get fine particles in the grooves and do need cleaning. Hopefully the machine is powered up when you go to look at it. Take some leather scrap with you. Ferg
-
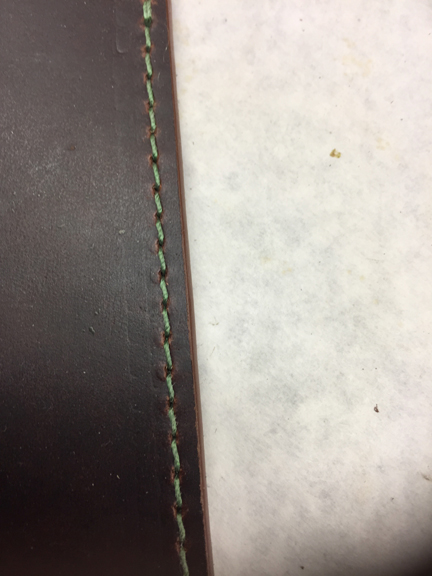
Your "Needle holes" are awfully large. I know the needles are much larger on the 3200 than my Consew Flat Bed. Still seems to me, those holes are huge. If the needle makes too large on the holes the thread cannot make a knot stay within the leather. I think you are on the right track with one more 1/8th of a turn on the bobbin tension. One thing that complicates tension settings, someone mentioned this before I believe, thread from different suppliers will effect your stitching as well as some colors. Black is notorious. Looks like you are using an "LL" needle. Try a straight line stitch needle such as a "P" or "S". This is 138 in 4/5 oz. Bridle with a 4/5 oz. soft Veg Tanned Cowhide on back. I selected this photo because of seemingly large holes with a soft leather as a back and contrasting color thread. If you look very close you can see an occasional knot that isn't quite pulled into the center, or is it? The leather I used has soft spots in it. When the machine goes down the stitch line there are/can be spots that are more thin than others. That can, but not always, cause some of your problems. This was stitched on my 3200. Ferg
-
I think if you want to sew 138 in 4/5 oz. you need a flat bed machine. Ferg
-
I know your frustration. My first machine came from an "Outsider". It had zilch adjustments made for leather. Wiz talked me through many problems plus I love to see how machinery and electronics work so I often take things apart to see what is going on. My wife almost had a coronary when she seen me taking our two head CNC Router apart within weeks of having it delivered. Unmatched size of thread in bobbin and on top is no biggy. Just remember the smallest thread strength is what your stitch will be. Not much difference between 207 and 277. I can sew with 92 thread but I will be the first to admit it can screw up the settings you may have had for even 138 on the 3200. I certainly do not have any direct connection with CowBoy other than owning the 3200. It is an excellent machine. I personally would hate for you to sell yours because of your frustrations. I am going to give you my personal instructions I try to follow every time I have a tension problem and I will bet 50 bucks your problems are mostly Tension settings. #1: I tighten the tension screw on the bobbin to just barely snug with the bobbin removed. Not 40 pounds snug. More like letting that little screw driver turn between your fingers just before you drop it. #2: Now, loosen the screw 1/8th turn, reinstall the bobbin. Adjust the tension discs so they feel as though they are just making the thread have a little tension on it when pulling it through. #3: Rethread the needle and bring the bobbin thread up with top thread. I assume you are holding both threads behind or slightly to the side of foot when you first begin your stitching. #4: Your first thought may be, you really do not want to fiddle with this after your previous endeavors with the machine. I promise you, this will be worth it 90% of the time. #5: Follow the procedure with the bobbin tension spring, 1/8 turn no more than three times. Do not change the upper tension. Sew several inches in the same leather you wish to use for your project each time you change the tension. #6: The knots may not be quite right so change the top tension in very small increments until they are in the center and your stitches are tight. Please let us know what transpires if you decide to do this. Some folks have told me that is too much of a bother. Isn't when you are having as much trouble as you are. I hope this helps. Ferg
-
Operating height for cylinder bed machines
Ferg replied to plinkercases's topic in Leather Sewing Machines
I found a long time ago that my back and legs will not allow me to stand for very long periods at any machine. My first Cylinder arm was set high, as above, I couldn't change it without removing the head from the table so I just left it that way. My CowBoy is table height, my chair is hydraulic. I can adjust it to wherever I wish. Ferg -
If you make earrings for pierced ears you have one immediate problem, The wires need to be safe as in no infections. Visit "Peter Maine's" website. View his jewelry. Drool. Lol Now I realize everyone doesn't have the artistic ability of Peter. Your concern for your daughter and something for her to do with her time is admirable, I have three daughters and would do almost anything for either one. I am thinking this is a very competitive area of leather working you are thinking about. I made a boat load of jewelry when first beginning in leather, 60 plus years ago. Sold very little and still have some in a cabinet to remind me not to do it again. Even Key Fobs would be better. Finishes on personal items are very complicated. So many folks are allergic to their own skin these days let alone ear wires. Ferg
-
BenR, First of all it appears to me that you have very little first hand experience with sewing machines in general. Your #1: The machine has a brake mechanism on it that makes moving with the fly wheel very difficult. You need to press on the left peddle to release the brake, then you can move the fly wheel. #3: You release the foot with the lever provided. It will have some resistance, not enough to hinder movement. After releasing the lever you can move the foot up and down with the right peddle, it doesn't lock. The remainder of your questions suggest that the machine was never prepped at the source or you have been messing with it, not knowing what to do. I am not trying to belittle you. Simply trying to impress on you that these machines are complicated. Fiddling with them does no good. If the seller is offering to give your money back I see that as the best alternative. He should pay the return freight. The Cowboy is an excellent machine. I have a 3200. The problems you are having need to be addressed by a professional. Did you buy this machine from one of the CowBoy Distributors that run ads at the top of the forum page? Why do I feel as though you didn't. Did you oil this machine before beginning to sew? Perhaps WIZ will jump in here. Ferg
-
I have never suggested this to anyone before but..... with leather that thin and if you do not need the functionality of the cylinder arm, you may get better results with a good "domestic" machine. I have a flat bed Consew I use for thin stock. It can be very frustrating some times. Ferg
-
Possibly your needle size. Does your project have different thicknesses of leather in the stitching path? Tension is critical when this is so. Thin leathers, as in single layer, are very difficult to keep the thread knot in the center. Even though smaller thread having less strength, is some times the only alternative. You should reset your tension to what I call "Default". Adjust the tension screw on the bobbin with no thread running through, until it is snug. Don't get carried away, you can mess this up if you make it tight. Now back the tension screw out 1/8th turn, rethread the bobbin. Machine tension should be set midway or as close as you can set it to the middle. Sew a couple inches in the thinnest leather you will have for given project. Knots may or may not be in the middle of the leather thickness. If not, repeat with the bobbin tension until the knot is in the center. Remember that very thin leather isn't sufficient to cover the knot unless you use very small thread with appropriate needle. You may need to adjust the bobbin tension two or three times before you get any improvement. Top tension may need slight adjustment after you have changed the bobbin tension several times. Ferg
-
The tool isn't made quite correctly. Many folks are having trouble setting these. I finally modified the tool. The portion of the tool that slips between the little brass wires inside receptacle side, is slightly too large. It deforms those little spring wires and messes up the stud.. Make sure you use the Cap Stud with the hole in the end for the portion that is the receiver. If the stud sticks through the leather more than about 1mm, it is too long. You will need to shorten it by filing some off or grinding it off. The other stud will usually "mash" inside the piece with the "bump" okay. You may have bought snap sets with a standard length of stud. For thin leather you need the short stud for the receiver. Ferg
-
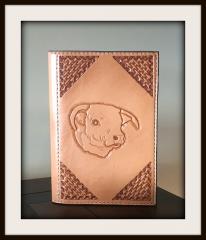 Good job! Reminds me of my Herefords I had in High School for FFA. OH MY! That was almost 70 years ago. Ferg
 -
The cloned machines are for the most part very good machines. I think their main problem is not taking the necessary time to fine tune and FINISH some of the pertinent parts. I have said for years that some things they make must have been cast in a basket of dried leaves. LOL Ferg
-
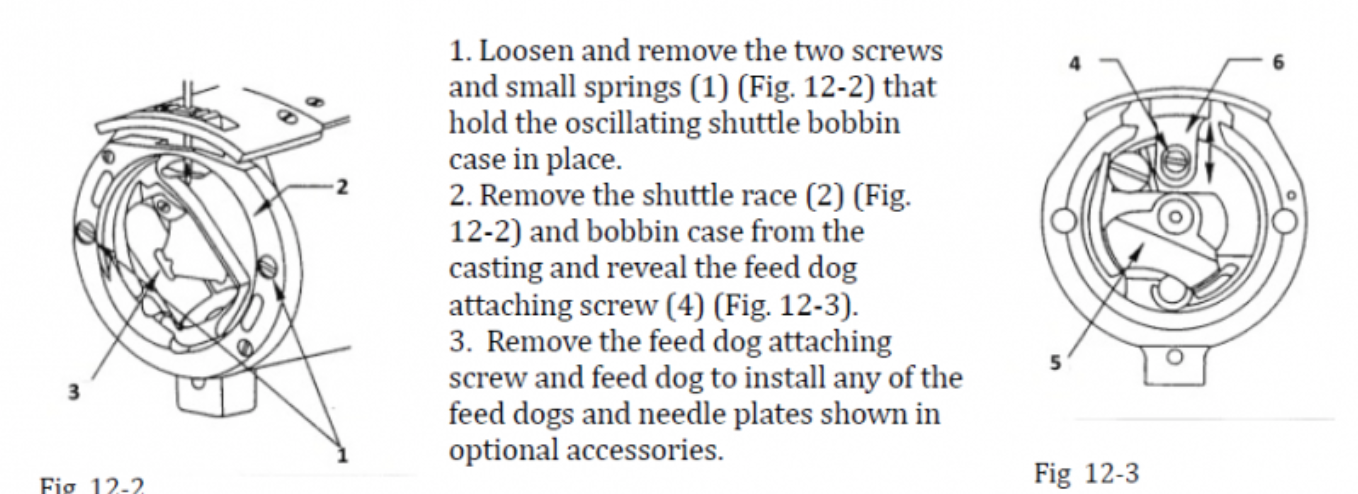
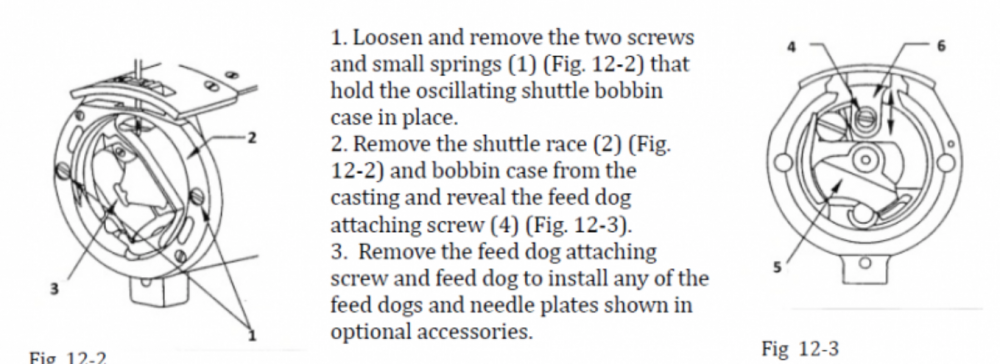
That screw isn't the one I was referencing. When you remove the bobbin you can see the screw that is designated by the number "4" above. If you have the narrow slotted needle plate installed on your machine you will not have this screw or the feed dog shown as number "6". To make any adjustments to this feed dog or the screw it is best to remove the Shuttle Race designated by number "2" in figure 12-2. When you turn the fly wheel as I stated previously, watch the thread just after the hook gets hold of it from the needle. It jumps through a couple places that you can observe. One of those is possibly where your problem is. I don't remember which needle plate you are using. I just watched your video a couple times. It looks as though the thread may be getting frayed as it goes through the little "eye" just above the needle. Could be a burr in that hole. Ferg
-
This is a stretch but...... In Fig 12-3, note the feed dog attaching screw (4). Check that with your finger if you have the shuttle removed. Is there a burr on it? The thread passes over that screw head when the stitch is pulled up. It is a flat head screw and is normally tightened very tight. If you wish to loosen it and retighten, make sure you have a screw driver that correctly fits the slot in the screw. You can ruin the screw if wrong driver used. I hope you held onto the shuttle mechanism when you removed the screws in the outer ring. They are spring loaded and will push the shuttle out of your hand some times. Ferg
-
Remove the cover, I imagine you have already done that, one which covers the bobbin. Make sure the power switch is off on the machine, turn the hand wheel toward you, not away from you, and watch the thread as it loops around the bobbin and case. You should be able to see almost exactly where the "fray" is coming from IF it is in fact happening around the bobbin and or case. Ferg
-
Your needle size is correct. Yes I gave you that info some time back. Works for me. Your foot pressure is about where the rod will pop out, spring is strong. My 3200 measures 1 1/16" from the surface of the arm to top edge of adjusting nut. Yours is doggone near 1 1/4" actually. Rough needle "eye", bad spool of thread, ----- Have you tried changing the thread? Even a different color will make a difference sometimes. Your "Hook" could have a rough spot or slight knick on it. I would check everything the thread is going through from the needle down. You could have a "Burr" inside the foot portion the thread goes through. Easiest way to check for a burr is to take the center foot off so you can see inside of the hole. The foot you have on the machine can be rotated slightly to make sure your needle isn't pressing the thread too tightly against the side of the hole. Ferg
-
You do know of course that a good hand skiving knife can be held in your hand at any angle and you don't have a "Razor Blade" to contend with. Ferg
-
Well, I am no expert on stitching/sewing but I have been doing it a long time. Sorry, there isn't anything wrong with the organ needles, most problems with thread fraying in my experience is WRONG SIZE NEEDLE! A side note: You have the presser foot pressure too tight. You are making a deep impression with the foot into your leather. I understand you are using a scrap to sew in the vid. Your adjustments are way off. Ferg
-
Photos???? Ferg
-
Your art work is great. Reminds me of the 40's. Ferg