Goldshot Ron
-
Posts
402 -
Joined
-
Last visited
Content Type
Profiles
Forums
Events
Blogs
Gallery
Everything posted by Goldshot Ron
-
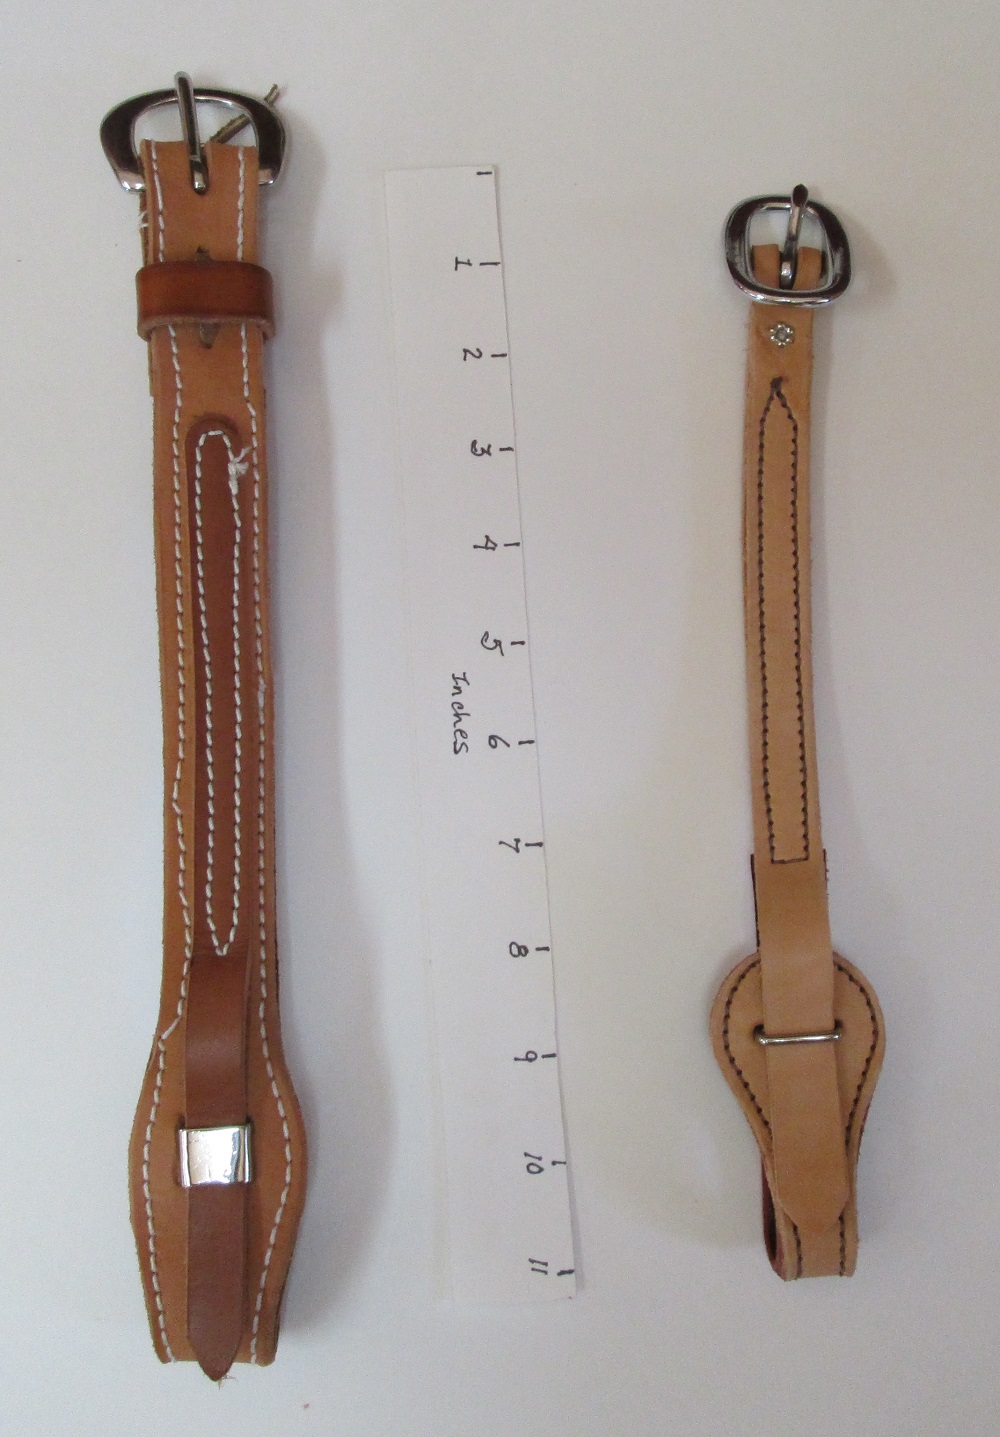
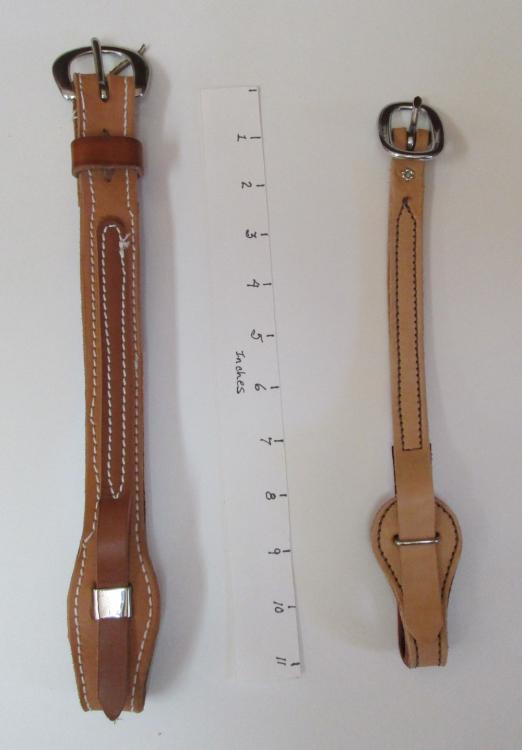
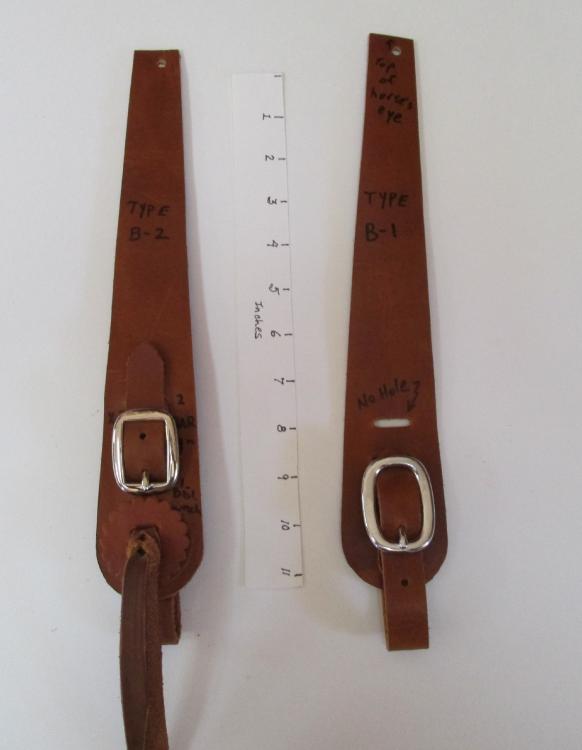
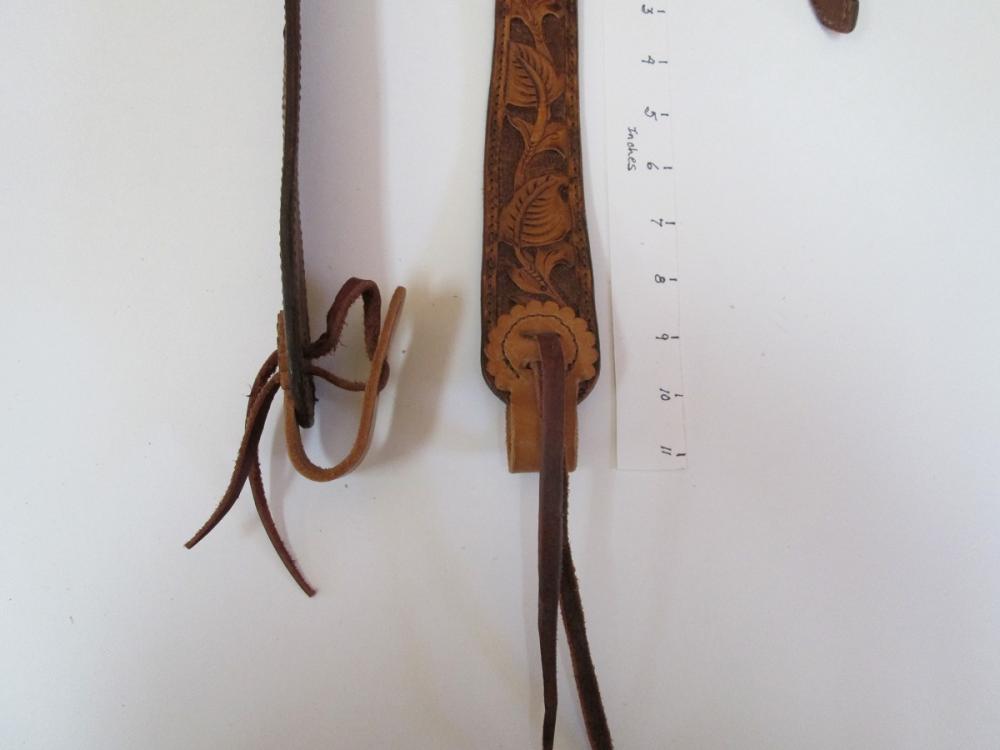
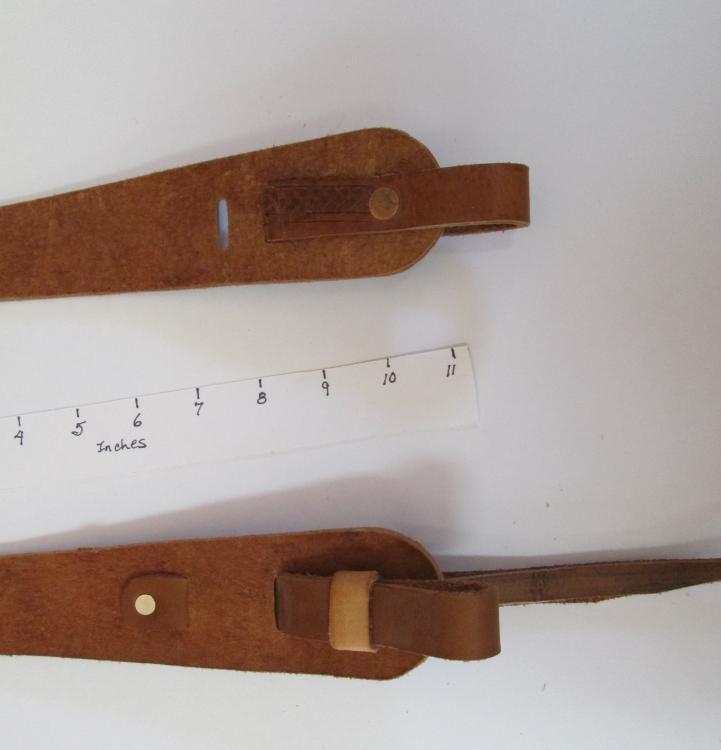
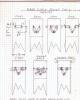
Well Randy, Like you, I kept looking at ways to attach the bit on headstalls. I saw photos in catalogs, but never how to actually make the ends. So, over the years I've worked up prototypes. I've attached some photos. The workmanship of these prototypes was quick and dirty; just to see if the design would work. Please don't critique the work. Photos 1 and 2 show two types of quick change ends. Photo three and four shows buckle ends (two styles). And, photo five shows an attached bit strap and bleed knot. A concho would be installed, but not shown. Ron

-
Billy, I've had saddles come into the shop for repairs with stains on the seat. I've tried a solution of: 1 part ammonia, a skirt of Ivory liquid soap, and 3 parts water; it works well on oily dirt and did a little on the mouse poop, but didn't get everything out. I even tried an oxalic acid solution without real success. In this last case, I ended up dying the seat and oiling it to cover up the stain. It looked okay, but I still knew what the stain was. If you come up with something, let us all know. Ron
-

Laporte Poly-Tuff or the Chicago Stockyard?
Goldshot Ron replied to keplerts's topic in Saddle Supplies, Tools & Trees
Tom, Have you received your tree yet? Ron -
Try taking a Sharpie and mark over the lettering; and, quickly wipe it off. The ink in the permanent marker reactivates the old ink so that you can wipe it off. I've done this on other items, and white boards where someone used the wrong pin. Most of the time it does work.
-
Your post is confusing. There is a design that has the leathers looping up through the seat and back under the seat. Also, there is a design that has the leathers coming out of a slot down on the seat jockeys. If you are trying for an eight button design that has separate front jockeys which is usually the "old fashion" look, then you may want the leathers just looping through the seat. I recommend you not try this method for your first saddle; unless you have an experienced saddle maker helping you. One other item, are you attaching the fenders to the stirrup leathers with the leathers on the front of the fenders? I believe the Stohlman saddle encyclopedia, book one, shows the different methods of attaching fenders. This is a good source to refer to. Ron
-
Laporte Poly-Tuff or the Chicago Stockyard?
Goldshot Ron replied to keplerts's topic in Saddle Supplies, Tools & Trees
Tom, I don't know if both brothers help out in the saddle shop, I was just surprised to have Heath answer the phone when I called. His brother Shawn builds the La Porte trees, and his business cell is (313) 515-0594. And, the shop number is (970)482-6229. Good Luck -
Laporte Poly-Tuff or the Chicago Stockyard?
Goldshot Ron replied to keplerts's topic in Saddle Supplies, Tools & Trees
Tom, The styles of each company is slightly different from each other. Each company is owned by one of two brothers, and they don't compete with each other. If you call Double H Ranch Saddlery in Wyoming you can get your questions answered. I have used one of the LaPort trees and the customer was quite happy. However, I didn't use the cable rigging. Keith Howe is the brother who owns Chicago Stock Yard, and I talked with him recently at the family owned saddle shop in Wyoming. I have worked with him before, and he was very helpful with my questions. I have a customer who wants a lighter weight trail saddle, and I am planning on using his Wade style tree when the customer makes their final decision. Ron -
Try calling International Sheepskin and Leather in Commerce, CA. 323-588-1818. They have a website also. I use their fleece for saddles, but they carry a full line of sheepskin. They wholesale to many of the suppliers that leatherworkers use. They have a no minimum policy. I have always had good customer relations and service from them. Ron
-
Definition or understanding issues
Goldshot Ron replied to Thor's topic in General Saddlery Discussion
Thor, The photos you posted are as you stated single ply off billets. However, you can use a latigo billet just like the on side latigo, so you have two latigos on your saddle; or, you can use a half breed billet. It is shorter than the on side billet, and is attached differently. A two ply off billet is basically two lengths of leather sewn together. The tongue of the cinch is going toward four layers of leather, and two layers of leather are going over your rigging plate (hence, it should be stronger than a single ply). It has been my experience that billets fail not while riding, but when the horse is tied and you turn your back to do something. The horse does something weird, and the saddle is on the ground with the billet torn in half. Ron -
You can use a latigo chinaman to tighten a latigo hornwrap; however, when using a light colored leather (mule hide) for your horn wrap, you need to make a chinaman out of the same material or color. Dye from the burgundy latigo will rub off on the lighter leather. I lost points in a saddle contest because of this. I now have two chinamen in the shop.
-
Ron, You did a fine job on this saddle. Your stitching looks good, especially around the cantle for the Cheyenne roll. Your front jockeys look balanced and in line with the rear jockeys. It's hard to offer any suggestions because you did such a good job, and every one has different ideas when building a saddle. However, there are two areas that I think need some consideration: your horn and horn wrap, and your fenders. The fenders appear to be a little small for the saddle, and if the stirrups were lowered there might be a pinching problem for the rider (but that may be the angle of the photo). The horn cap edge needs to be cleaned up with a larger edger so that the three pieces making up the horn cover blend together better. This may be a burnishing problem that you mentioned. The horn wrap detracts from the saddle. It doesn't look as meticulous as the rest of your work. On a folded fork cover at the gullet, like you have, it is hard to form the wrap tightly around the horn without bending the fold at the gullet. You'll see that many makers attach the end on the wrap to the rope strap screw on the off-side, and finish the end like you did. However, I'd tuck the loose end under the seat so that it doesn't just hang like your wrap does. Kudos for the inlaid padded seat, it looks good. Keep up the excellent work. Ron
-
How Long Should This Strap Be Please
Goldshot Ron replied to JLD's topic in Saddle and Tack Accessory Items
Johanne, I've made three of these collars in the last couple of years. The average adjusted length is about 12 inches. I make mine 1 inch wide with a Conway buckle on one end and a halter buckle on the on-side. I've heard of no manes being rubbed off, but that would be a legitimate concern. Ron -
What Tosch posted was a good answer. But, if you can live with the tree, to repair the problem is to use a tack hammer and a hand anvil (mandrel) and tap the nail so that the pointed end is flattened (problem solved). From time to time this may happen when you put in a metal seat strainer: a nail will be too long for the depth of the bars. This can be caused by driving the nail in at the wrong angle, or using too long of nails for the depth of the bars. To remedy this problem, hopefully just one or two nails, I use my Dremel tool and lightly grind off the pointed end that has come through the rawhide. Avoid grinding or filing the rawhide. If you use stainless steel nails, there will be no spots to rust. Ron
-
Nate, As Josh mentioned, the Al Stohlman book is very helpful and irreplaceable, it is available from Tandy Leather, ebay, or any good leather supply store. You mentioned using your existing saddle as a model or example to follow. This is helpful, but unless you are deconstructing your present saddle, there are a lot of steps that you may miss in constructing your new saddle just by studying your present saddle. The Stohlman books only cover all leather ground seats, and many makers prefer using a metal strainer for their ground seat. You'll need some source of knowledge on how to install a metal strainer. A good video that isn't mentioned very often is Bill Gomer's saddle making video. It is fairly inexpensive, yet he does a good job at directing the first timer at making a wade style saddle. He covers template making, and the basics for designing a well made saddle. You mentioned about wading your way through the process on your own. And, people may comment about this; however, I will give you my opinions on sources of information to avoid for now (because of cost and the format of the material): J.Watt's video, Dale Harwood's video, and most of the books written prior to the 1990s. Watt's and Harwood's videos are good for people who have built a few saddles to hone their skills, but they leave out some information that first timers will need. Techniques and styles have changed since the 50's and 60's, so older books are only good for picking up information for repairs and general interests. Finally the subject of nails/tacks: blue cut tacks are good and cheap for temporary purposes, but I suggest ringshank stainless steel 1 inch nails for final nailing of ground seats and nails that will never need to be removed for repairs. Other nails to buy are smooth/box stainless steel nails ( 1" and 1 1/4"). One Note: Stohlman over used tacks, a good glue is very important and will hold without using a lot of nails and tacks. I hope this answers some of your questions. Good luck, Ron
-
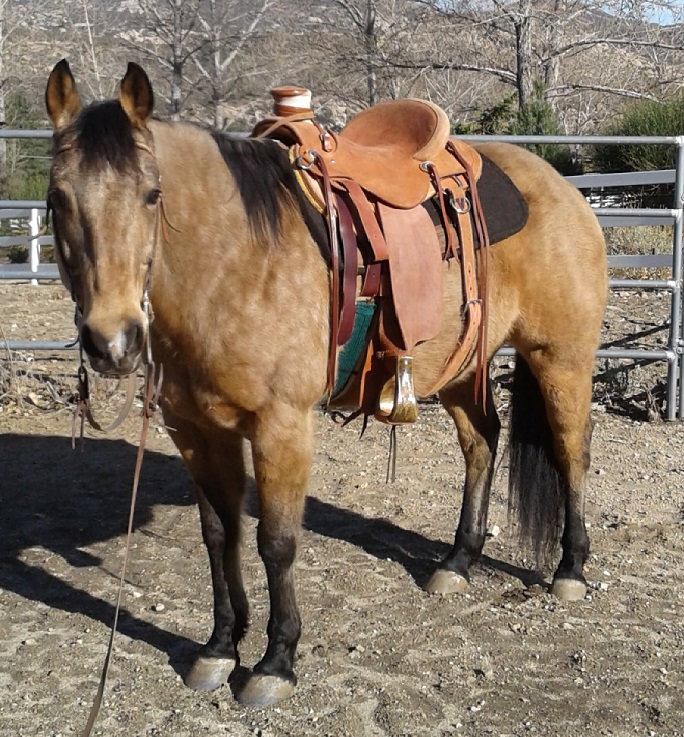
Adam, I think you did a fine job on this saddle, especially for a first attempt. I do have some suggestions and comments. First, the placement of the saddle on the horse appears that it is sitting back a little. Your latigo does not appear to be aligned straight up and down. This out of aligned placement shows also in the seat centerline to the horses centerline where the riders center of gravity is back behind the horse's center of gravity. It may be the photo illusion, but the placement of the girth appears to be placed close to the horse's elbow so you may not be able to set the saddle any more forward. Second, I don't understand the rear girth idea. I've only seen two girths used on pack saddles, then they were attached together and not at the normal girth/flank cinch offset. If you're going to be roping, you have to secure your rear off-billet so it doesn't get caught in your loop. Yours is just hanging there. Two other comments are cosmetic: your horn could be trimmed straighter up and down, and edged rounder, then burnished. And, your border needed the camo (or border stamp) stamped on the bottom like you did on your fork pattern. This adds to better symmetry of your design. Finally, the screw at the fork is too far back towards the seat. It should be placed in the centerline (up and down) of your fork, and about 1 to 1 1/2 inches down from the top edge of the seat jockey. I would have placed it about at the position of the 6th border stamp back from your latigo catcher in your offside photo (photo 5). This avoids pinching the seat leather in and interfering with your stirrups forward swing. Good luck on your next saddle. Ron
-
The last two "first time" saddles that I've seen posted on this site have looked really good. You did a really good job. I do have some questions for you before I jump in with suggestions. It looks like you have inskirt rigging, right or wrong? How did you make your flank cinch? What size seat is on the saddle? Will this saddle be used on the horse in the photo? Ron
-
Making A Headstall - I Want To Give It A Try
Goldshot Ron replied to felis's topic in Saddle and Tack Accessory Items
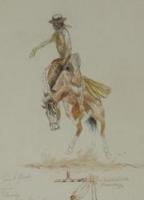
Your first drawing showed a mermaid. A mulefoot could be used for the scales on the tail. If you get into flowers, a mulefoot is used to blend in stems at junctions of the stems. -
Making A Headstall - I Want To Give It A Try
Goldshot Ron replied to felis's topic in Saddle and Tack Accessory Items
Felis, I'm not going to attempt to answer all of your questions, because what I've read in your post is very ambitious for a first attempt. First, pick up a Craftool swivelknife with a 1/4 to 3/8 inch straight blade (of course you'll need a sharpening stone for the blade and a strop). Other tools would be a rawhide mallet, tooling stone, and for the design that you posted the tools you'd need would be a couple of bevelers ( 1/4 inch being the largest for now), a molding spoon, a mules foot, and a small seeder. To cut the leather a Stanley box cutter or even the "break off" blade cutters would be fine. As you progress and learn, the skies the limit. As far as leather, veg tanned shoulder would be fine or a half back, at 8-9 oz. Later, if you buy a splitter, heavier leathers could be used and split down as needed. If you line your headstall pieces, you'll need to sew the leathers together. This is where the glue (rubber cement) comes in handy. Of course, you'll need needles and handstitching thread, and a stitching pony. My suggestion is to start with a simple strap headstall that can be put together with Conway buckles and Chicago screws. This way you learn how to work with leather, and the dimensions needed to fit a horse's head. You'll also find the different suppliers for the materials that you'll need. Good Luck, Ron -
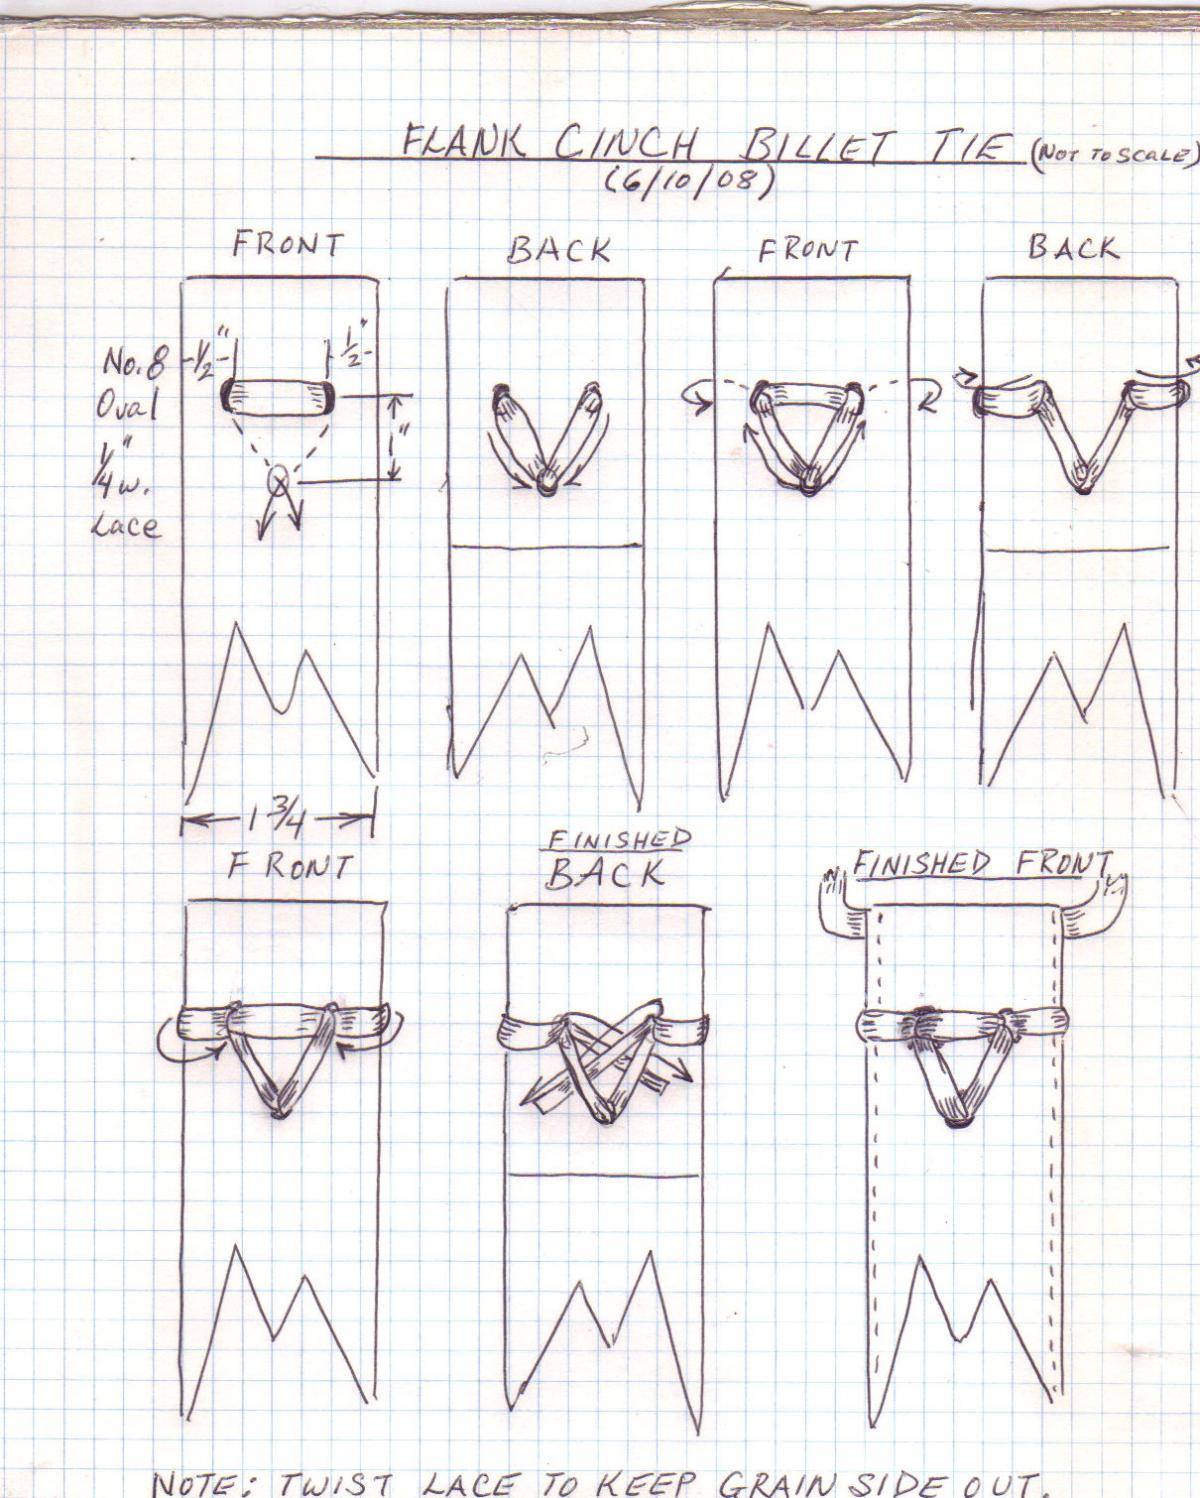
Randy, I came across a diagram of how to tie the flank billet braid. The point can go up or down, that's up to you. Ron
-
Randy, You did a really good job on this saddle. I like the shape of your cantle roll. Your lacing looks good and flat. Now, here's my suggestions: work on your horn cap, you need to edge it where it is rounded off more and not so flat on the edge. From the rear your cantle looks fat, maybe 5 pieces of leather is too much. Your tooling looks good, but a bead along the edge of your tooling would have added to your tooling. Example, the BW on you fenders would look more finished if you used a beader, then the camo, then the BW. The beader that I use is a no. 4 single edge Gomph edger. I've used swivel knife beaders, but they cut the leather and you still have to come back and use an edger to make a nice bead. Little things make a big difference and they're easy. Try lacing your flank cinch billets with a triangular lacing other than the loop type you used. This will fancy up your work and is simple. Again, your cantle came out good, I say this because Cheyenne rolls always give me pain when making them. Also, was this tree made by Sonny Felkins in Utah? If so, how long did it take to arrive? Keep up the good work, Ron
-
"quick Lock Buckle"? - Need Help There Please
Goldshot Ron replied to Aurelie's topic in Saddle and Tack Accessory Items
Tinker, I looked at McMasters site a couple of weeks ago. They do carry box stock, and it just may work. I just haven't had time to pursue this item further. Thanks, Ron -
"quick Lock Buckle"? - Need Help There Please
Goldshot Ron replied to Aurelie's topic in Saddle and Tack Accessory Items
Thor, I've never soldered silver, so I don't know if it would be practicable to try. 25b I'll try McMasters. Weaver's has small square loops, but no small box loop stock. I figured I could cut down a box loop leaving a flange at the bottom and the loop for the buckle piece. We'll see. Thanks guys. Ron -
"quick Lock Buckle"? - Need Help There Please
Goldshot Ron replied to Aurelie's topic in Saddle and Tack Accessory Items
Attached is a photo of the item that I am trying to find. I had an idea of fabricating something out of a long box slide; however, I haven't found any of those small enough (1/2"x1/2"x1"). The only box slides that I found were 1inch square (too big). Thanks for the suggestions. Ron PS the photo is a repair job sitting on the bench. Separate from my search.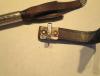
-
"quick Lock Buckle"? - Need Help There Please
Goldshot Ron replied to Aurelie's topic in Saddle and Tack Accessory Items
Geneva, thanks for the reply. I was hoping not to have to spend hours trying to make something that I could buy for the price of a cup of coffee. But, I guess sometimes you have to admit defeat. Thanks, Ron -
"quick Lock Buckle"? - Need Help There Please
Goldshot Ron replied to Aurelie's topic in Saddle and Tack Accessory Items
Well, no one has commented on this topic for a while, but I would also like to know where someone can find the metal loop piece that the attachment strap goes through. I've repaired these headstalls before, and have always managed to make them work. However, I have a customer that wants me to build them a headstall with brass box loops, and brass tips on the 3/8" strap that goes through the loop. I figure I can use a hat band tip, but the box requires a flange on the bottom that is riveted through the bottom strap of the headstall. The loop is flat and wider than a plain wire loop, and can be engraved with a design. Someone out there has had to have to come across a source somewhere. I've checked many web sites (Hansen's, Montana Silver, etc.) but no luck. Ron