

immiketoo
-
Content Count
2,349 -
Joined
-
Last visited
Everything posted by immiketoo
-

Round Knife Sheath Saddlers Journal Article
immiketoo posted a gallery image in Our Leatherwork Galleries
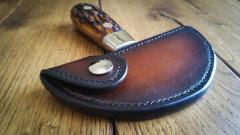 Article and Pattern available in the LCSJ
 -
Round Knife Sheath Saddlers Journal Article
immiketoo posted a gallery image in Our Leatherwork Galleries
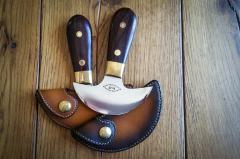 Article and Pattern available in the LCSJ
 -
Round Knife Sheath Saddlers Journal Article
immiketoo posted a gallery image in Our Leatherwork Galleries
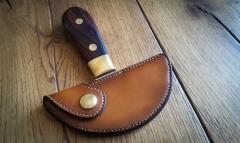 Article and Pattern available in the LCSJ
 -
This is going to sound cheeky, but the simplest answer is, don't put it there. Controlling your dyeing process is essential to clean leather work. A clean dye station without spills or areas that can contaminate your work are key. Wearing latex or nitrile gloves goes a long way to keeping errant finger prints off your work. Adding liners after you dye also helps. If you tape the back side before dyeing, that can help but its no guarantee against sloppy application. Dye edges last and with precision. I know it sounds impossible, but I was where you were a while ago and I hated sloppy backsides. I tried protecting the back in a variety of ways but not putting dye on the back IS the easiest way to avoid dye on the back. I started making sure my process was controlled and repeatable. Now, I make items with color on the front and undeyed lined backs without errant dye marks. This includes the dyed edges. You'll have to develop your own process for this as every work area is different. Tips: Tape or mask the back side. Finish the back with acrylic finish and slick it before dyeing the front. If you miss, you have a second to wipe it off before its permanent. Dye the piece, then add a liner. This covers any oopses as long as you slick the edges without spillage. Don't over saturate daubers. The drip and create dense areas of dye that can spread to unwanted areas including fingers. Consider spraying your color on. It's easier to control. As mentioned, gloves. If you get dye on a glove, replace it before continuing. Clean your dye station with alcohol before any new project and let it dry before starting. Dyestuffs can get EVERYWHERE Hope this helps.
-
Beautiful work.
-
hunting holster belt and ammo case
immiketoo replied to Samalan's topic in Gun Holsters, Rifle Slings and Knife Sheathes
That is fine leatherwork right there! -
http://www.steelstamps.com http://www.greyghostgraphics.com https://www.facebook.com/StampsForLeatherStore/ All of these makers can help you design and make a stamp. Steel stamps are nice because they can make them incredibly small and the material will hold up to use, whereas the delrin stamps can't support the thin lines at small sizes. At least not over time. Grey ghost makes a great delrin stamp, and the cheapest option is stamps for leather. Those require a press of some kind.
-
I love those kind of projects that push you to new levels. They're almost as good as that asshole who says you can't do it. Well done!
-
I prefer carved plugs. I have used putty as well, but its more difficult to get the detail you can get with a carved plug. It's faster though, if that matters. I think a carved plug will hold up better over time if you use your carving for items that will be used. If they are wall hangers, it shouldn't matter. When is up to you. If you have the time and energy, make a carved plug. There is no real reason to use one over the other apart from what I have mentioned above, and thats's just personal preference.
-
Most bikers like their gear to be pretty heavy so 9 )Z veg tanned leather would be a good start for that type of stuff. You can go a little lighter or heavier but 9 is a good start. I like brass YYK zippers for biker wallets, but I almost never get a request for a zipper. Most people want a fold over closure or nothing at all. Interior zippers should be lighter weight, I use plastic most of the time but I have been known to use brass as well. Chains can be found almost anywhere made ready to use. Bay, Etsy and Ohio travel bag all carry them. You can also find chain maille biker chains that are really cool. Other hardware can be sourced from places like aliexpress, the buckle guy and the like.
-
I would suggest you find a pattern specifically for leather clothing if possible. The reason is that you need to account for the thickness of the leather compared to cloth. While deer skin is pretty thin, it still has a lot more bulk than cloth so for example, sleeves that fit in a cloth pattern would likely be too tight with leather. It's the same as measuring a belt. The thicker the leather, the longer the belt needs to be to compensate for the thickness. Hope this puts you on the right path.
-
You are most welcome. I appreciate the thanks, and I hope it helps. Jeff, Happy Thanksgiving, bud.
-
You can use any of the following with equal effect, and in my experience there is zero difference as far as the leather is concerned. Isopropyl alcohol, ethyl alcohol, denatured alcohol or any combination of the above will reduce your dye. Just for fun, here's the pertinent MSDS sheet from Fiebing's that shows they use a combination themselves. You can avoid shipping and go the the pharmacy on the corner and probably get all three kinds. https://www.weaverleathersupply.com/docs/default-source/sds/Fiebings-Leather-Dye-Reducer-50-2049.pdf?sfvrsn=2
-
Glad to be able to help.
-
It’s two apps on my smart phone. Photo overlay and screen record. You can easily compare your art to the photo this way. Actually, you don’t need screen record. I just did that for you so you could see it. Notice how the things that are dead on stay still and those those that are a little off seem to move? Your eyes and nose are perfect.
-
Here is something I do to help if I am struggling with a piece. 351726A3-10F1-4DB8-A284-9F7E271BDA27.MOV
-
I wouldn't call it seriously missed, as he is still recognizable an every well done, just refining the details for 100% accuracy
-
Pardon the crude markup of this picture, but the lines show what I mean more specifically.
-
Andrey, after comparing the original picture to your piece I realized what was bothering me. The top of his head is more pointed in the picture. Yours is more rounded. A subtle difference, but it stands out to my eye. Also, the right side(Viewer's left) cheek crease by the nose has a curve that doesn't exist on the original. But the other side does. Its almost as if you swapped those lines somehow. These are the small details I was talking about the other day.
-
Andrey, the skin texture is excellent. Again, your nose and lips are perfect. Watch out for the eyebrows. It looks like you made indentations for the hairs as opposed to raising them up. Its a lot of work to raise them but its worth the effort. Wow...that I have never seen!
-
Making a briefcase: the handle
immiketoo replied to TxLeather's topic in Satchels, Luggage and Briefcases
I'd say you've got a handle on it! -
Sean Connery has a very distinct accent. Ah well, never mind!
-
That's pretty good Andrey...earsh sare a bitch, eh? Bet you heard that in his voice
-
 It would be perfect, actually. Noting can fall out!
 -
'stiffening' soft leather for cutting..
immiketoo replied to canonitr's topic in Leatherwork Conversation
If you get a thick straight edge, like a meter long aluminum one, you can clamp it down in a few spots before cutting. PITA but works every time for straight cuts.